.png)
Poor audio quality can ruin a perfect video. If you deal with background noise, want to add professional narration, or need to swap out music tracks, then audio replacement in your videos is a crucial step.
With the right tools and techniques, you can easily remove existing audio and add high-quality replacements. Suppose you want to skip the hustle and capture pristine audio from the start. Then try Hollyland LARK MAX 2 wireless microphone system for exceptional sound quality.


Let us now move forward to learn about different tools and applications that can help you.
Best Desktop Tools to Replace Audio in Videos
Desktop applications offer the most comprehensive tools and precise control over your video editing workflow.
We have discussed some of the desktop software that makes it a preferred choice for content creators and editors.
1. Adobe Premiere Pro (Windows/Mac)
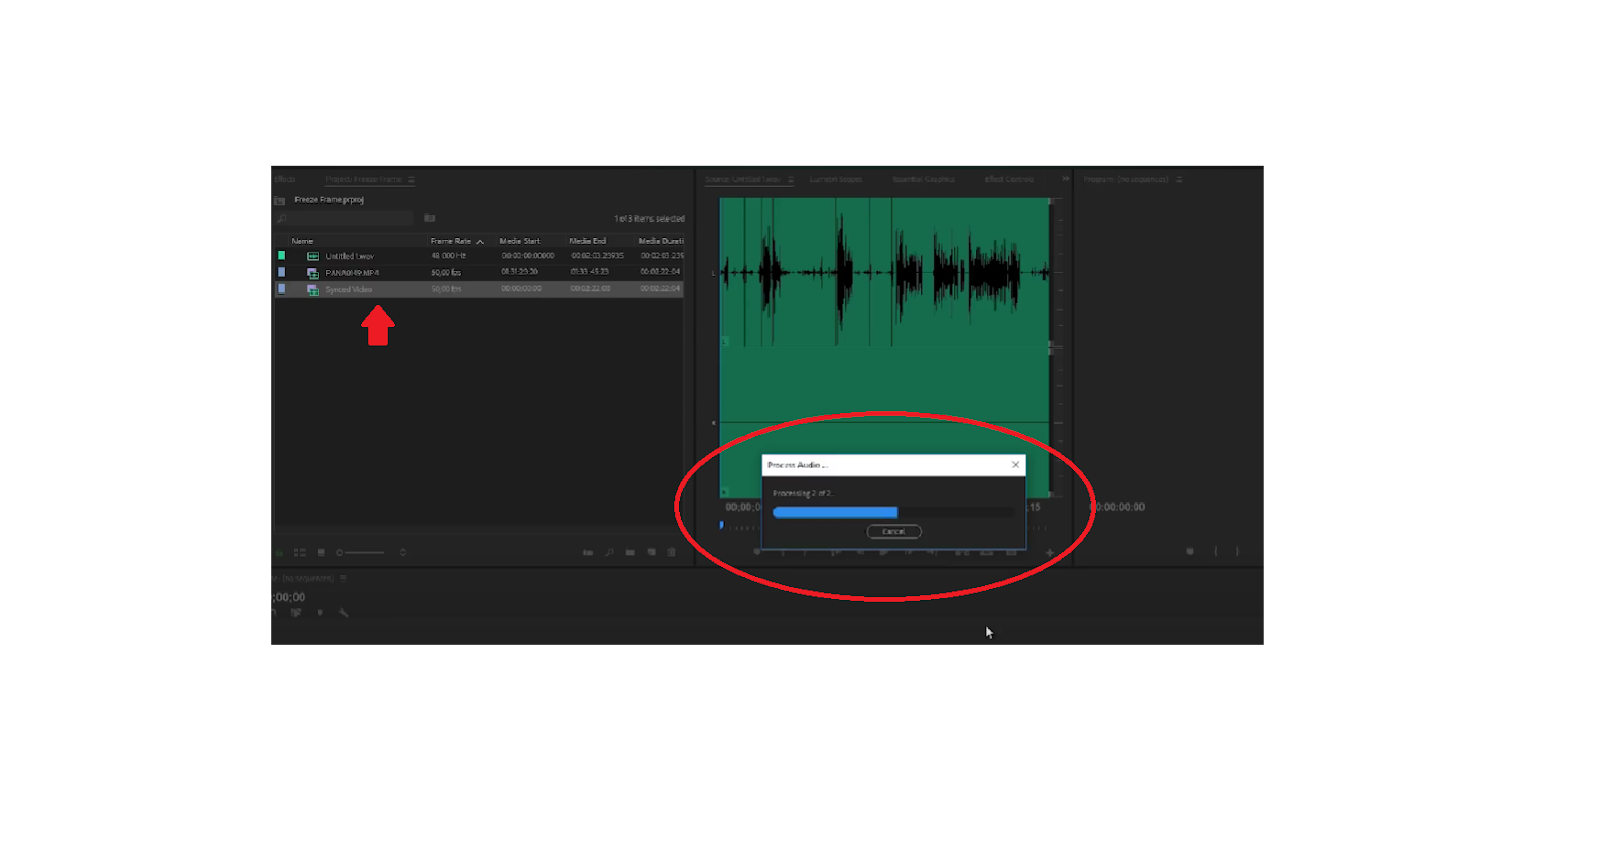
Adobe Premiere Pro offers professional-grade audio replacement capabilities. It has precise control over the timing and quality of the audio.
You can try this step-by-step process to understand how it works:
- First of all, “import” your files. Upload both your video file and replacement audio into the project panel.

- Next, drag your video to the timeline and unlink audio from the video.
- Select the video clip, then press “Ctrl+L” (Windows) or “Cmd+L” (Mac) to unlink audio from video.

- Remove the original Audio. For that, you need to select the audio track and press “Delete”.
- Drag your replacement audio file to the audio track to Add New Audio.

- Now position the new audio to match your video timing. You can use the audio mixer to adjust levels and apply effects.

- And finally, you can process your file and get a new synced video with audio.
- For creators using external microphones like the Hollyland LARK MAX 2, the superior audio quality will help you in the post-production work and place cleaner replacement tracks.
2. iMovie (Mac)
iMovie provides an intuitive interface for audio replacement, which makes it accessible for beginners.
Here is the step-by-step replacement process you can follow:
- Start by launching iMovie on your system and then click on the “Create New” button.

- Next, click on “My Media” → “Import Media” to add your video file to the timeline.

- Then, right-click the video clip and select “Detach Audio” and further delete it.
- Now import new audio by clicking on the “Audio” button at the top.

- Drag your replacement audio file to the timeline.

- Next, add your video file and adjust the time frames with the new audio file.

- Now, to save your file, go to the top-right corner, click on the share icon, and select “File”. And, you are good to go.

Mobile Apps to Replace Audio in Videos on Android & iPhone
Mobile apps offer convenience and portability, which makes them perfect for creators who need to edit on the go or prefer touch-based interfaces for their workflow. We have provided the process for different apps below.
1. CapCut (Android/iOS)
CapCut has become incredibly popular for mobile video editing. It offers many robust audio replacement features.
Let’s take a look at mobile audio replacement through CapCut:
- To start a new project, open CapCut and tap on the “New project” button.

- Choose your video file and click on the “Add” button below.

- Now, you can see your video on the timeline. Under the timeline, click on the “+ Add Audio” button.

- Once you tap, next, you will see four icons at the bottom. Click on “Extracted” one.

- Now, you need to choose the file whose audio you want to extract. You need to click on “Import sound only”.

- Next, you will see the extracted audio below your video timeline. Drag the new audio to match your video timing and play.

- You can also use different voice effects, noise reduction, and volume controls as needed.

- Now, finally, export the video in your preferred quality. Click on the arrow icon in the top-right corner.

2. Replace Add Audio to Video (Android)
This application provides an easy navigation for beginners and remains user-friendly with clear step guidance.
Here is how you can get started:
- Download the Replace Add Audio to Video app from the Play Store.
- And click on “Select” to start with new project.

- Now, import video from your gallery stock.

- Next, select the audio file you want to replace the sound with and click on the “Change” button and “Save” the file.

- The file will start to process.

- Once the process is complete, you can play or share the file.

How to Replace Audio in Videos Using Online Tools
Web-based editors offer instant access and cross-platform compatibility, which makes them ideal for quick edits and collaborative projects without software limitations. Take a look at some of them and try on your end.
1. VEED.io
VEED.io offers browser-based video editing with professional audio replacement capabilities.
Here is the online process you can refer to:
- Visit VEED.io and click “Product” → “Edit” →“Video Editor”.

- Next, tap on the “Get Started” button.

- You will be prompted with the “Upload a File” button. Click on that and upload your video file.

- Next, you can see the video timeline at the bottom. You can adjust the volume levels on the left box.

- Now select the timeline and “right click” → “Audio”→ “Detach Audio” or “Mute Audio”.

- Then, import audio: click the “Audio” section and upload your file. You can also select sounds from the stock library.

- Upload your new audio file and add it to the video. Click on the audio timeline, right-click, and select “Replace Media”.

- Click “Done” in the top right corner and “Export” to download your finished video

2. Online Converter
This tool specializes in different formats like audio, video, and text replacement with simple, straightforward controls.
You can follow the given replacement steps:
- Browse to Free Online File Converter on the web.

- Navigate to the covert “Video to Audio” section. Select both your video and replacement audio files.

- Click “Choose File” and then “Start” to begin processing.

- Finally, you can save the completed file to your device.
3. Clideo
Clideo provides comprehensive audio editing tools through your web browser. Here is your web-based method:
- Browse Clideo on the web and select the “Video Editor” option.

- Now, click on the “Get started” button to begin the project.

- Next, navigate to “Media” and “Click to Upload”. Choose your video file from your device or cloud storage.

- You can see your video in the timeline below.

- Click “Audio” and select your replacement track from the stock library, or click on “Upload” and add your audio file.

- Drop the video sound volume to 0% to complete the replacement.

- Finally, click on “Export” in the top right corner and choose your preferred quality to download your edited video.

Tips for Replacing Audio Based on Your Platform
Here are some pro tips you can follow on a platform basis to choose the best tool and ensure proper execution of your project.
For Windows Users
- Windows Video Editor is free and pre-installed, which makes it ideal for basic replacements.
- Adobe Premiere Pro offers professional features for complex projects.
- Consider audio format compatibility when importing files.
For Mac Users
- iMovie provides excellent built-in capabilities for most replacement needs
- Use keyframes for precise volume control and smooth transitions
- Take advantage of iMovie’s audio enhancement features
For Mobile Users
- CapCut offers desktop-level features on mobile devices
- Ensure adequate storage space for audio files and exported videos
- Use headphones when editing for accurate audio monitoring
For Online Editors
- A stable internet connection is essential for uploading and processing
- Check file size limits before starting your project
- Online tools work well for quick, simple replacements
Conclusion
Replacing audio in videos has become accessible across all platforms, from professional desktop software to mobile apps and online tools. You can use Adobe Premiere Pro for complex projects, CapCut for mobile editing, or online tools for quick fixes.
The key is understanding your workflow and choosing the right tool for your needs. Try them now!
FAQs
1. Can I replace audio without losing video quality?
Yes, when you replace only the audio track, the video remains unchanged. Most modern editors handle this process without re-encoding the video portion. This step helps to preserve the original quality.
2. What’s the best audio format for replacement?
WAV files offer the highest quality for editing, while MP3 provides good quality with smaller file sizes. You can choose based on your quality requirements and storage constraints.
3. How do I sync new audio with existing video?
Try to use visual cues like lip movements, gestures, or on-screen actions to align your replacement audio. Most editors allow frame-by-frame positioning for precise synchronization.