.png)
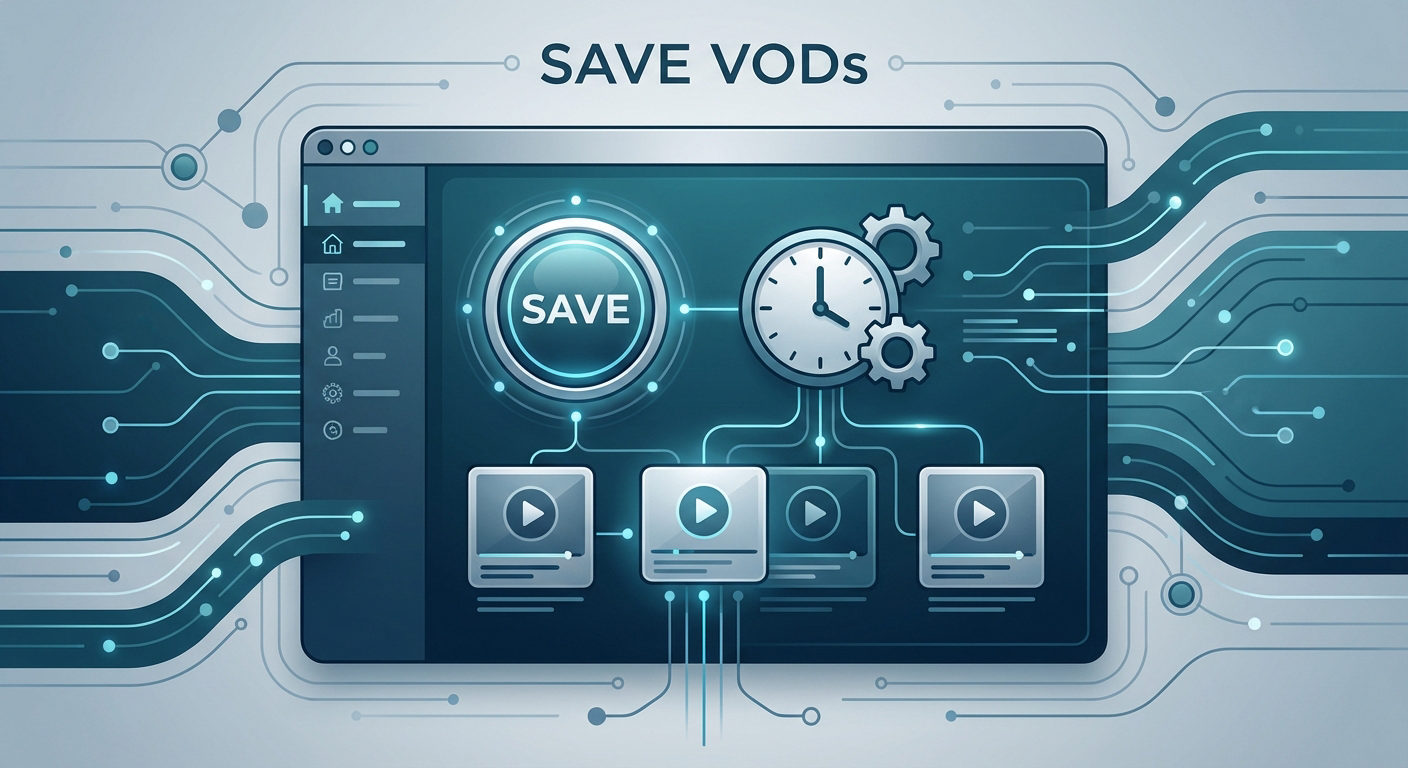
Twitch is the go-to platform for live streaming, which means lots of epic gaming moments, insightful tutorials, and hilarious streams. But how can you save these videos for later?
Twitch has recently introduced a policy limiting creators to only 100 hours of content on the platform. So if you’re one, you have a short window to preserve your extra gameplay. But even if you’re just a viewer who enjoys keeping favorite streams offline or someone reviewing gameplay highlights, downloading Twitch videos can be incredibly helpful.
In this article, let’s walk through 4 different methods to save Twitch videos, useful for both creators and viewers.

Types of Twitch Videos & What Can You Save?
Twitch offers different kinds of video content, each with its own level of accessibility:
- VODs (Videos on Demand): These are full recordings of past streams, automatically saved to a streamer’s profile for a limited time, if the setting is enabled. Creators can download their own VODs directly from Twitch, while viewers need third-party tools.
- Highlights: These are curated segments from past streams, manually created by the streamer. They remain on the channel indefinitely unless deleted. Creators can export highlights, but viewers also require third-party tools.
- Clips: These are short, user-created snippets (up to 60 seconds) from any stream. Anyone can create or view them, and they’re easy to save using clip download tools.
- Livestream replays: These are live streams that automatically turn into VODs once the broadcast ends.
Method 1: Save Twitch VOD, Highlights, and Clips (The Official Method)
Twitch allows you to download your own VODs and highlights from the creator dashboard. But you must first manually enable the option to archive your live streams on the Twitch platform. Without it, Twitch won’t store your broadcasts, meaning nothing to download later.
Let’s first see how to enable it:
Step 1: Open the Creator Dashboard: Log in twitch.tv with your username and password. Click your profile icon in the top-right corner and select Account Settings from the dropdown menu,

Step 2: Open Stream Settings: Go to Channel & Videos section, which will open a left-hand panel. Choose Settings in this panel and then go to the Stream section. This opens the broadcast configuration options.


Step 3: Locate the VOD Settings section: Scroll down the page until you find the section titled VOD Settings.

Step 4: Enable VOD Storage: Toggle on the option labeled Store past broadcasts. Once this is switched on, Twitch will automatically save all your future streams.
Important Note: This setting only applies to future broadcasts. Any past streams that weren’t saved cannot be recovered. So it’s best to activate this as early as possible. Also, keep in mind that Twitch automatically deletes saved VODs after a specific duration:
- 7 days for regular streamers and Affiliates
- 60 days for Partners, Turbo, and Prime users
Now, with Twitch’s 100-hour storage cap, even if you’re under the time limit, older VODs may still be removed to make space for new ones.
Download Twitch VOD (For Creators Only)
Once the setting is enabled, each time you go live, your broadcast will automatically be archived as a VOD. Now, follow these steps to download it:
Step 1: Open Creator Dashboard: Just like you did in previous steps, open the dashboard through your profile icon and then the side panel.
Step 2: Go to Video Producer: Select the Content in the left-hand panel, and then choose Video Producer. It’ll show all your stored video streams.

Step 3: Locate the VOD you want to download: You’ll see a chronological list of your broadcasts. Scroll through and find the video you want to save to your device.
Step 4: Open the Options Menu: Click the three dots (•••) on the right side of the video entry. This will open a small menu of actions. Select Download here, the video will be saved on the machine in MP4 format.

The download can take a few minutes to hours, depending on the length of the stream and your internet speed.
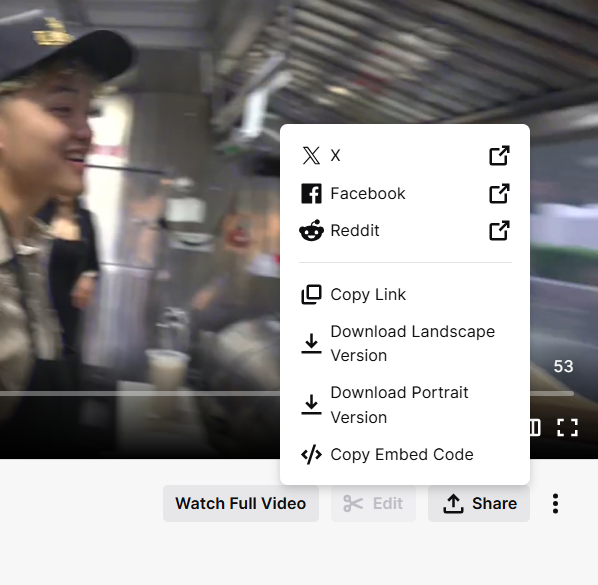
Download Twitch Clips (For Viewers and Creators)
Twitch has a built-in download option for “Clips,” available for both creators and viewers by default. It should work, unless the creator has restricted it specifically. Here’s how to use it:
Step 1: Open a Twitch clip: Play any Twitch clip—-yours or any public channel’s.
Step 2: Click the “Share” button: There will be a “Share” button below the right bottom corner of the video player. Tap on it to open up a menu providing options.

Step 3: Select download orientation: Choose “Download as Landscape” or “Download as Portrait” depending on how you plan to use the video.
Method 2: Download Twitch Videos Using Online Twitch Video Downloaders
You can also use online third-party softwares that directly pull out the video file from a Twitch URL and download it for you. You simply copy and paste the link into their input box, choose your desired video resolution, and save the file onto your device.
Reputable Online Twitch Downloaders Include:
- Untwitch.com
- BitDownloader.io
- Clipr.xyz (Great for Twitch clips)
- 4K Download (Web version)
This approach is suitable for both creators and viewers and supports all varieties of Twitch video content. It’s most highly recommended if you do not wish to install any software, are on a temporary device (such as a school or work computer), or only need to download videos instantly.
Here’s a tutorial on using Untwitch:
Step 1: Open the Twitch video: Go to twitch.tv and locate the VOD, clip, or highlight you want to save. Copy its full URL from your browser’s address bar.

Step 2: Go to Untwitch: In a new tab, open www.untwitch.com. The site has a nice, ad-free, clean interface and supports both VODs and clips.
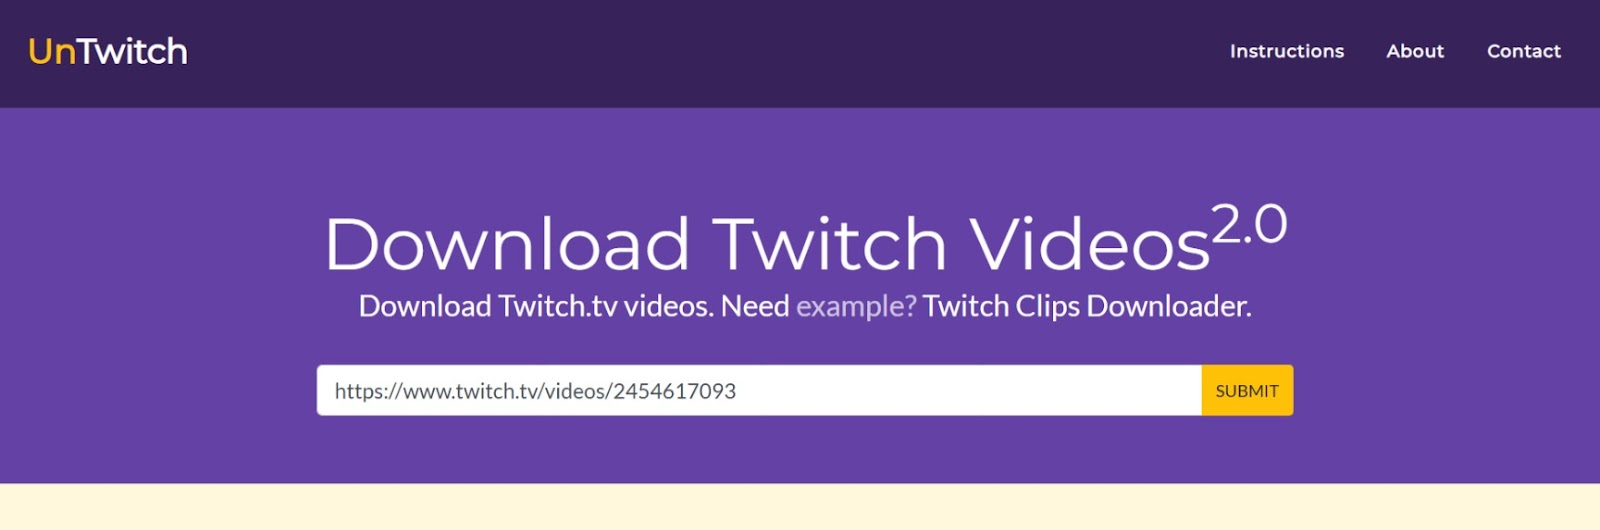
Step 3: Paste the Twitch URL: Click on the input box and paste the link you copied. The tool will begin fetching video details from Twitch’s servers.
Step 4: Select video quality and format: Once the video loads, you’ll be presented with quality options such as 360p, 720p, or 1080p.
Since VODs can go hours long. Untwitch downloads in 1-hour segments. Which is also good if you are interested in specific parts of the stream only.

Step 5: Click the Download button: The video will begin saving to your device.
Important Notes:
Avoid websites with excessive pop-ups or misleading ads, as they might harm or spam your device. Stick to downloaders with good user reviews. Also, note that some sites may impose download limits or apply watermarks for free users—make sure to check their terms before use.
Method 3: Save Twitch Videos Using Browser Extensions
An alternative to using online sites is adding a browser extension. They work within your web browser itself and look for downloadable media on the webpage. Some even place download buttons right on the Twitch site so you don’t have to leave the page, copy and paste URLs, or contend with intrusive pop-ups.
Extensions tend to be more stable for longer videos and provide a safer experience.
Popular and Trusted Extensions Include:
- Video DownloadHelper
- VDT | Video Downloader for Twitch
Here’s how to use Video DownloadHelper:
Step 1: Open your browser’s store: Go to Chrome Web Store or Firefox Add-ons site and install Video DownloadHelper. The extension icon will show up in your browser’s toolbar.

Step 3: Visit the Twitch video you intend to download: Browse over to twitch.tv and stream the Twitch video. It will soon activate the extension, and its icon on your toolbar will become animated or lit up, which means that it has recognized a downloadable video stream.
Step 4: Download the Video: Hit the icon button, and a drop-down list of available videos appears. Select your desired resolution, then hit the corresponding Download button. You can also choose the video format. The download initiates automatically.

Method 4: Save Twitch Videos Using yt-dlp (For Advanced Users)
yt-dlp is a command-line tool to download videos from different platforms, including Twitch. This method, however, only works on VOD and highlights. Still, it’s a great option if you’re comfortable with the command line and want quick access with a choice of download quality, format, and storage location. Here’s how it works:
Step 1: Install yt-dlp: Head to the official GitHub repository of yt-dl.
- For Windows, save the standalone.exe file and put it in a fresh folder (e.g., C:\\\\\\\\yt-dlp).
- On macOS or Linux, install it with “brew install yt-dlp” or with Python using “pip install -U yt-dlp” on the command line.


Step 2: Open a terminal or command prompt: Open Command Prompt on Windows or the Terminal on macOS or Linux, and enter the following command:
- yt-dlp [paste-your-twitch-video-URL-here]
- For example: yt-dlp https://www.twitch.tv/videos/2454617093
And just like that, the program will begin downloading the video.

Step 3: (Optional) Choose a specific format or quality: You may specify the format or resolution through flags. For instance:
- yt-dlp -f best -o “%(title)s.%(ext)s” https://www.twitch.tv/videos/2454617093
This will download the best available quality and title the file from the video title. The file will be stored in the same directory you issued the command in.
Method 5: Save Twitch Videos Using Screen Recording Software
If you’d like to record a Twitch live stream when it’s still live, screen recording is your best bet. It’s also a good option when you’re not sure if the streamer will upload the VOD eventually, and as a last resort in case other techniques don’t work.
Recommended Screen Recording Tools:
- Screencastify (Free, beginner-friendly, and records both screen and audio.)
- Bandicam (Simple and beginner-friendly)
- Camtasia (Great for editing after recording)
To use Screencastify:
Step 1: Download and install: Go to the Chrome Web Store, search for Screencastify, and add the extension to Chrome or whatever browser you’re using.
Sign in with your Google account, then allow the required permissions (screen, mic, etc.).

Step 2: Choose what to record: Visit the Twitch stream you are interested in viewing and click the extension icon in order to record. When requested, select either of the below:
- Browser Tab – to record just the Twitch tab
- Entire Screen – to capture your whole monitor (useful if Twitch is in full-screen mode)
Enable “Tab Audio” to include the Twitch stream sound. Select “Record” to begin recording the screen.

Step 4: Stop and save the recording: When the stream is over (or you’re done), click the Screencastify icon again and hit Stop. Your video will automatically open in a new tab.
Screencastify caps free recordings at 30 minutes per video. To record longer streams, you can upgrade or record in multiple segments. You can rename the recording, cut it if necessary, and download it as an MP4 file.
Essential Tips for Downloading Twitch Videos
- Check the Streamer Permissions: Be aware of the rights of the creators. If a video is paywalled or restricted, downloading it without permission may be a violation of Twitch’s terms of service.
- Balance Quality and File Size: Choose a resolution based on your requirement and screen size—1080p is highly detailed but takes loads more memory than 720p or less.
- Keep Tools Updated: Twitch continuously updates its platform, and that can make third-party tools inoperable, so update your downloader software or browser extension.
- Keep the Files Tidy: Place dates, titles, or streamers’ names on the file to keep them organized and easily accessible.
Conclusion
For Twitch streamers, the simplest method to download Twitch videos is using the built-in downloader on the platform. However, this method only works for VOD and highlights, and also comes with time and storage constraints. For broader access and more stable methods, third-party tools like online downloaders, browser extensions, or screen recording software are the best solution for both viewers and creators.
Respect creators’ rights by utilizing content downloaded for personal use or reselling only as per their policies. And wherever necessary, credit the original streamer.
Frequently Asked Questions
1: Can I download videos from any Twitch channel?
Yes. If the streamer has made a public video available, you can download it in one way or another. Officially, Twitch only provides an explicit download option for Twitch clips to viewers. However, you can simply employ third-party tools for saving VOD and highlights formats.
2: Are there mobile apps for downloading Twitch videos?
The most dependable Twitch video download software is desktop-based. Even though there are some mobile applications with capabilities, they are usually unofficial and unstable. It’s generally better to use your mobile browser with reputable online downloaders.
3: What is the 30-minute rule on Twitch?
Twitch’s “30-minute rule” is its VOD policy. It states that if a streamer ends a session for longer than 30 minutes, Twitch will record their next session as a new VOD. It’s not so much a hard and fast rule as a technical tendency, but it impacts the way continuous streams are recorded.
4: Can I download Twitch clips?
Yes. Click the “share” option presented below the video clip, select “Download as Landscape” or “Download as Portrait” based on your preference, and it will be saved in your device.
5: Can I download deleted Twitch VODs?
No. After being deleted from Twitch, a VOD is removed from their servers and will not be able to be retrieved normally. There are third-party websites who say that they store deleted VODs, but they tend not to be that great and could be in conflict with Twitch’s terms of use.