.png)
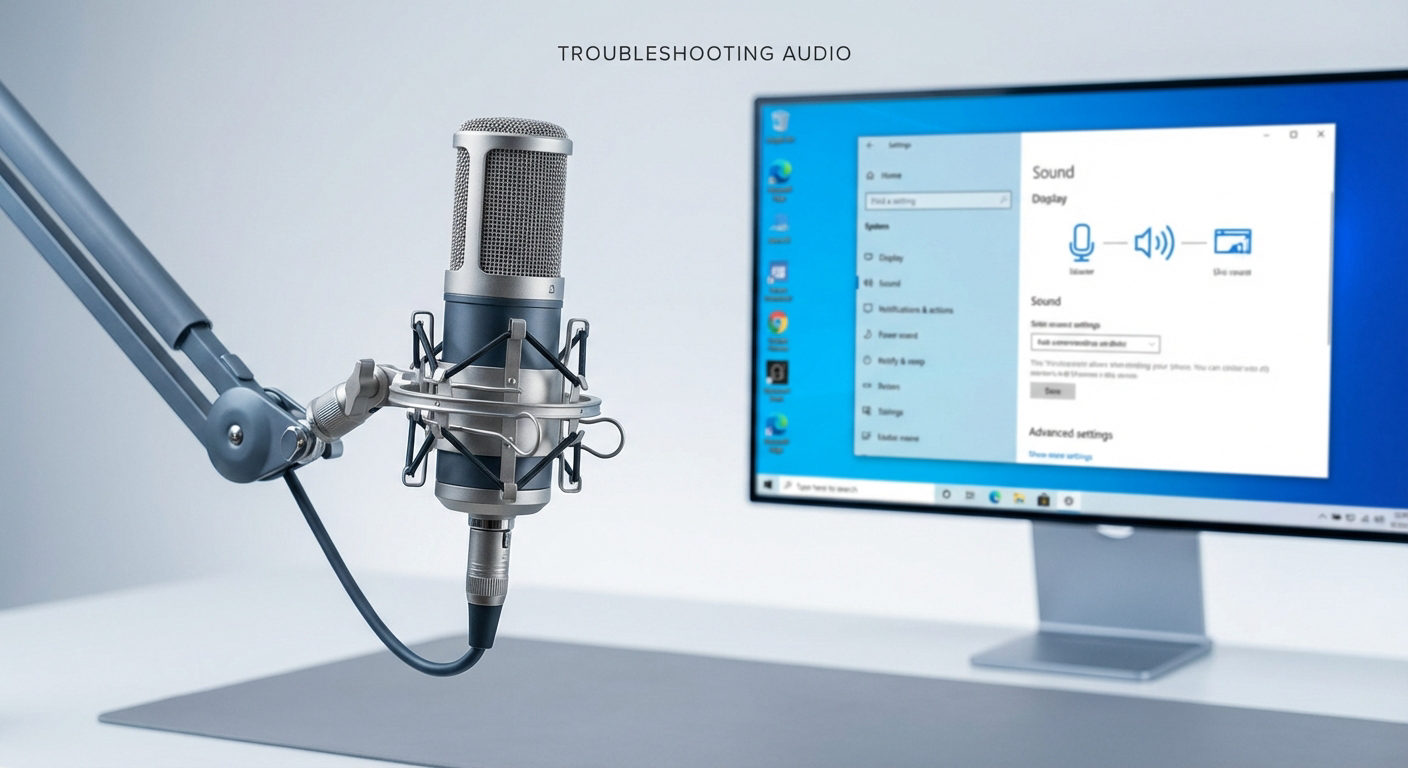
Setting up a microphone is crucial for optimal audio quality and seamless configuration with Windows. From physical connection to software adjustments, having a properly configured mic is essential for professional recordings. Windows 10 offers a diversity of options and solutions when it comes to setting the microphone. So, this step-by-step guide provides a complete understanding of configuring the microphone effectively.
How to set up a Microphone on Windows 10?
Sometimes, Windows cannot configure the microphone, affecting the optimal audio quality and compatibility. It’s essential to check functionality and usability because setting up is more than just plugging the mic. So, here is the step-by-step process to set up the microphone and troubleshoot common issues.
Step 1- Connect your microphone.
- USB Microphones: Ensure the USB microphone is connected to the correct USB port because older mics work on USB 2.0. When connecting for the first time, wait a few seconds, allowing Windows to search for and install the latest drivers. Here are different microphones you can choose, Hollyland Lark M1 is a good choice.
- Analog Microphones: If you are using a microphone with 3.5mm audio, then ensure you are connecting it to the microphone slot. Some mics need an external power supply, so ensure they are adequately powered. The pink color or mic symbol will show its secure connection.
Step 2- Check Microphone Privacy Settings
- Open Privacy Settings
- Click on the “Windows icon” from the taskbar and select settings.
- Then click “Privacy” from the settings window and tap “Microphone” from the left column section.
- Allow apps access to the microphone.
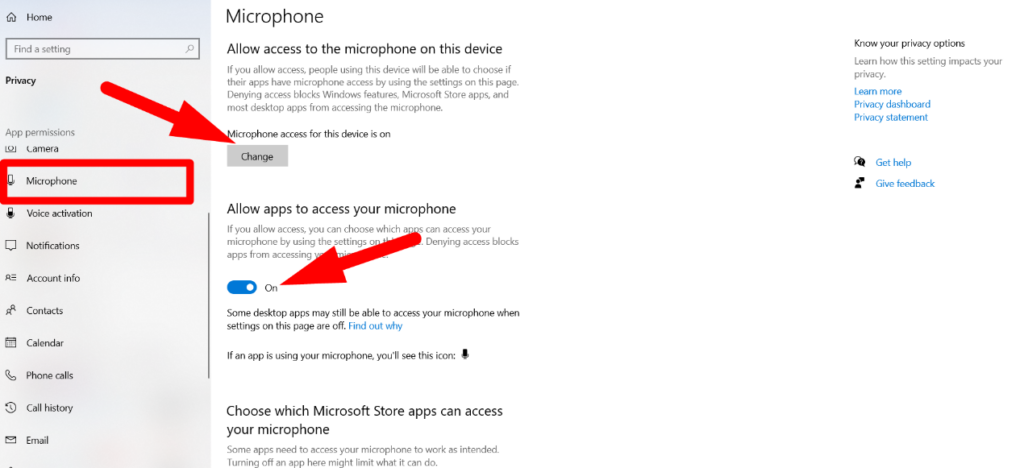
- Under “Allow microphone access on this device,” click “Change” and turn the toggle to allow access.
- Then ensure that “Allow apps to access your microphone” is turned on, and if disabled, no app can use the microphone.
- Scroll to the “Choose which apps can access your microphone” section and ensure you enable access for the app you are trying to use.
By carefully managing permissions and privacy settings, you can have better control over which apps can access the microphone.
Step 3- Set Microphone as the Default Device
- Sound Settings
- Right-click the sound icon from the taskbar’s bottom-left and select “Sounds.”
- Or search for the control panel and click “Manage audio devices” from the sound section.
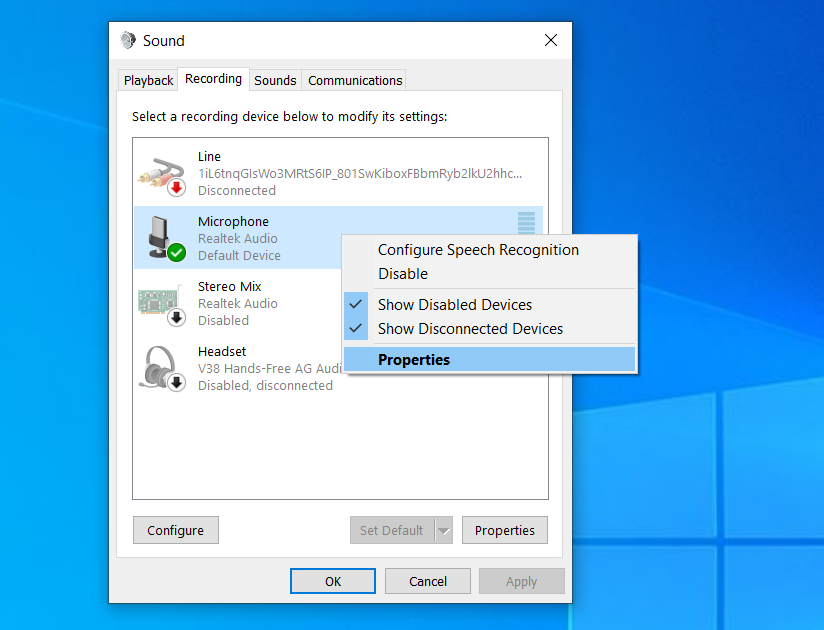
- Check disconnected or disabled devices.
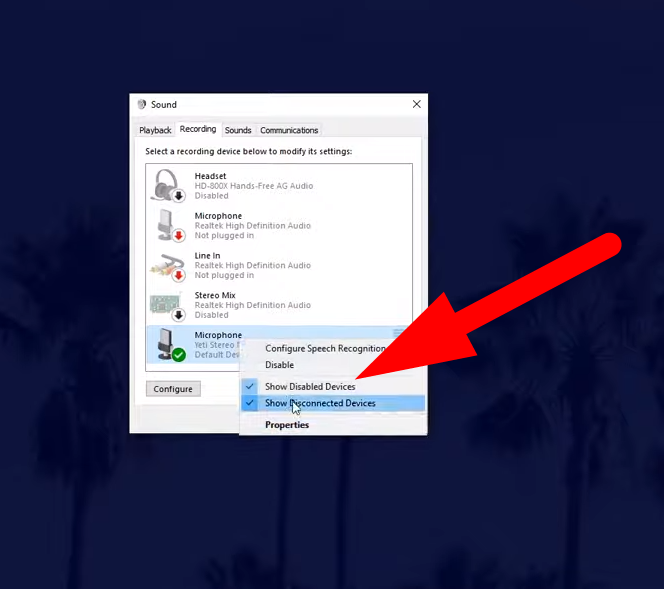
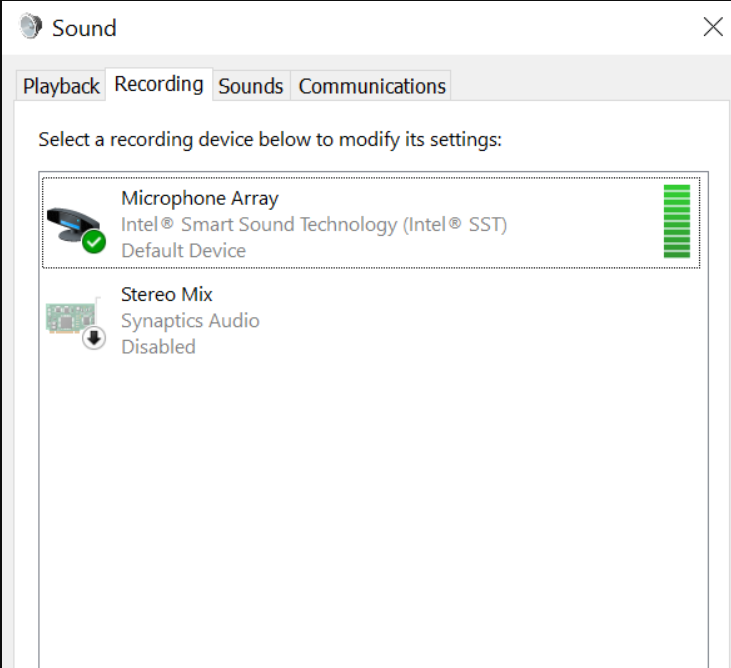
- Go to the “recording tab” and locate your microphone from the list.
- If your microphone is not on the list, right-click and select “Show disconnected” and “Show disabled devices.”
- Set as Default
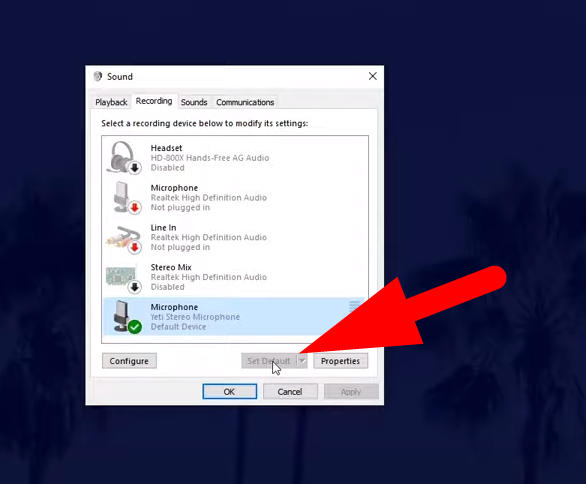
- Then, right-click on your microphone and select “Enable” to enable the mic.
- Select “Set as Default Device” at the bottom and click “OK” to save your settings.
Step 4- Adjust Microphone Levels
- Levels tab
- Double-click on your mic after setting it to “default device” in the recording tab.
- Click on the “Properties” and go to the “Levels” tab from the next window.
- Adjust volume and boost levels.
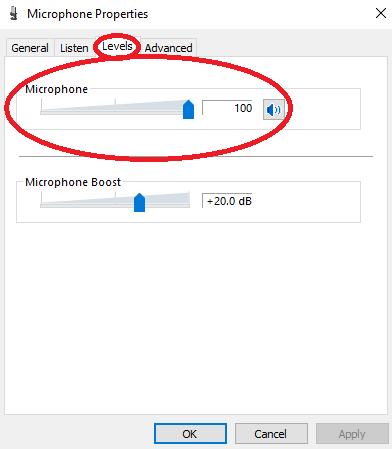
- Change the microphone sensitivity by adjusting the microphone sliders to the desired level.
- Depending on the microphone and connection type, there will be a “Boost” option, and adjusting it ensures your microphone isn’t too quiet.
- Click “OK” to change your settings.
Step 5- Adjust Microphone Settings
- Listen to this device.
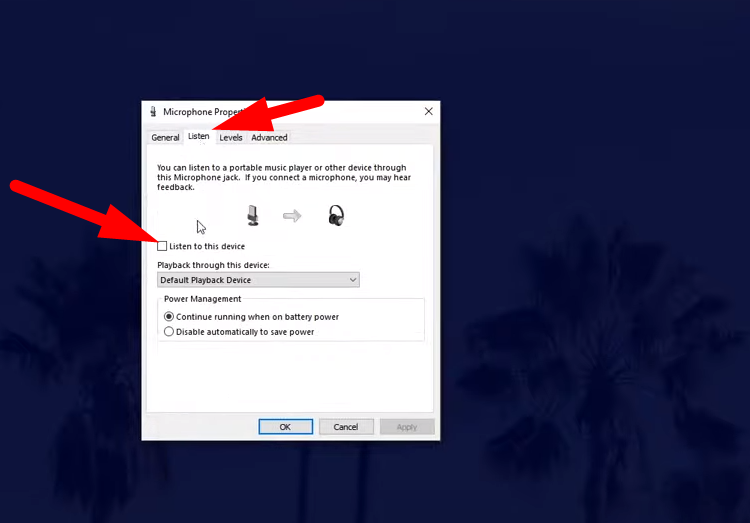
- From the microphone properties window, click on the “Listen” tab and ensure you select the “Listen to this device” section.
- Sample rate
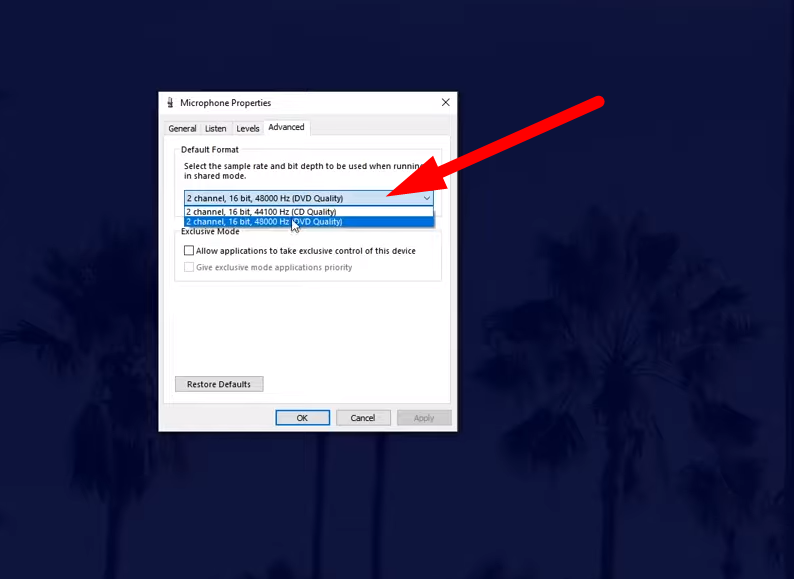
- Then go to the “Advanced” tab and click to change the “sample rate” of the microphone under the “default format” section.
Note: Additional mic settings may be under the “microphone settings window,” depending on the type and connection to set up the microphone. Ensure that these are correctly checked for better functionality.
Step 6- Check your Microphone Drivers
Depending on the type of mic, installing the drivers from the manufacturer’s website might be necessary. Follow the process below:
- Device Manager
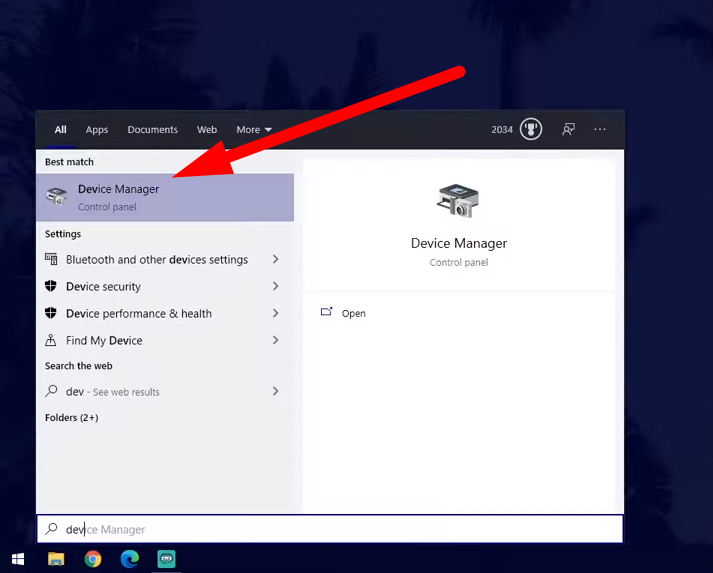
- Right-click the start or Windows icon from the taskbar and click “Device Manager.
- Update Driver
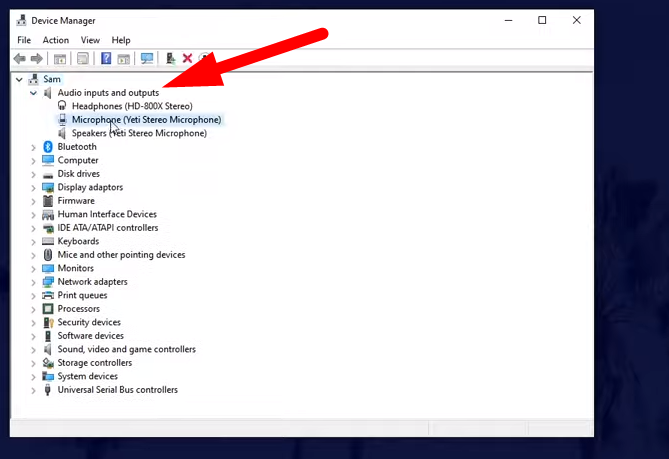
- Under the “Audio Inputs and Outputs” section, click on the “arrow” to expand it.
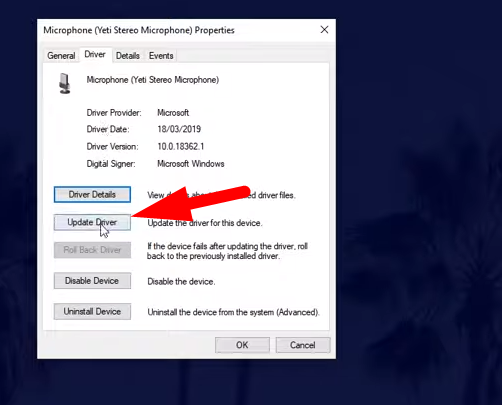
- Double-click on your mic, then go to the “Drivers” tab and click the “Update Driver” option.
- Choose “search drivers automatically,” and Windows will select and install the latest mic drivers.
However, if you have installed the driver from the manufacturer’s website, browse your computer and insert the driver. After the installation, restart your computer to ensure the microphone functions appropriately.
Step 7- Test your Microphone
- Recording tab
- Right-click on the sound icon from the bottom-left of the taskbar and click on “sounds.”
- Go to the “Recording” tab and tap on your microphone.
- Check green bar
- Try speaking into the microphone and look for the movement of the green bar. If the bar moves, the microphone is configured correctly and working fine.
- Audio Playback and recording
- Then, right-click on the microphone and open the “Properties” window. Go to the “Advanced” tab and click “Test” under the “Signal Enhancements” section. Follow the instructions to test your microphone’s “Audio playback and recording.”
Alternatively, use a Windows built-in voice recorder or third-party applications to record a short audio clip. Then, playback the recorded audio to analyze the settings and audio quality.
Step 8- Troubleshoot if Necessary
- Ensure microphone access
If your microphone is not working, check it has a mute button and ensure it’s not muted. Also, ensure the microphone can use particular apps and the mic is the default device.
- Enable Microphone
Even after connecting the microphone, it will stop working effectively because the mic is turned off for this device. So, to enable the mic,
- Right-click on the “Windows icon” from the taskbar and click “Device Manager.” Under the “Audio Inputs and Outputs” section, right-click on your microphone and ensure it’s enabled.
- Run the Troubleshooter
After properly setting up, if the microphone is not working, then use the Windows troubleshooter to resolve the issue.
- Click on the “Windows icon” from the taskbar and select “Settings.”
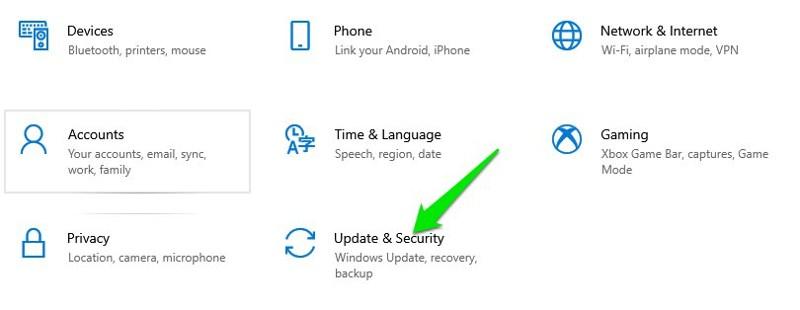
- Choose “Update and Security” from the settings window.
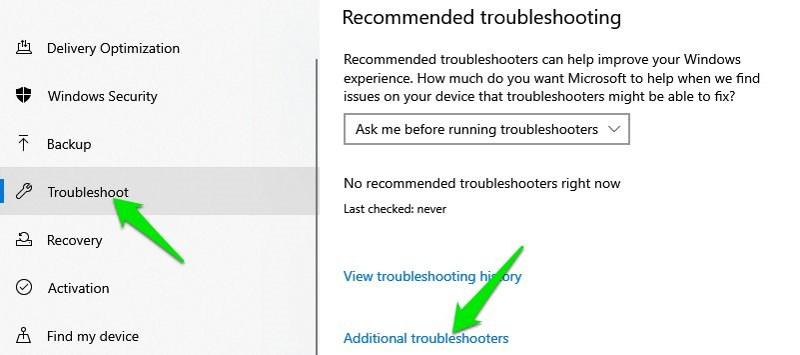
- Select “Troubleshoot” from the left pane and click “Additional troubleshooters.”
- Scroll down and click on the “Recording Audio” under the “Find and fix other problems” section.
- Click on “Run the Troubleshoot” and select the device you want to troubleshoot.
Furthermore, turning off the audio enhancements further improves the audio quality because enhancements can interfere with mic functionality.
Setting Up Hollyland Lark M1
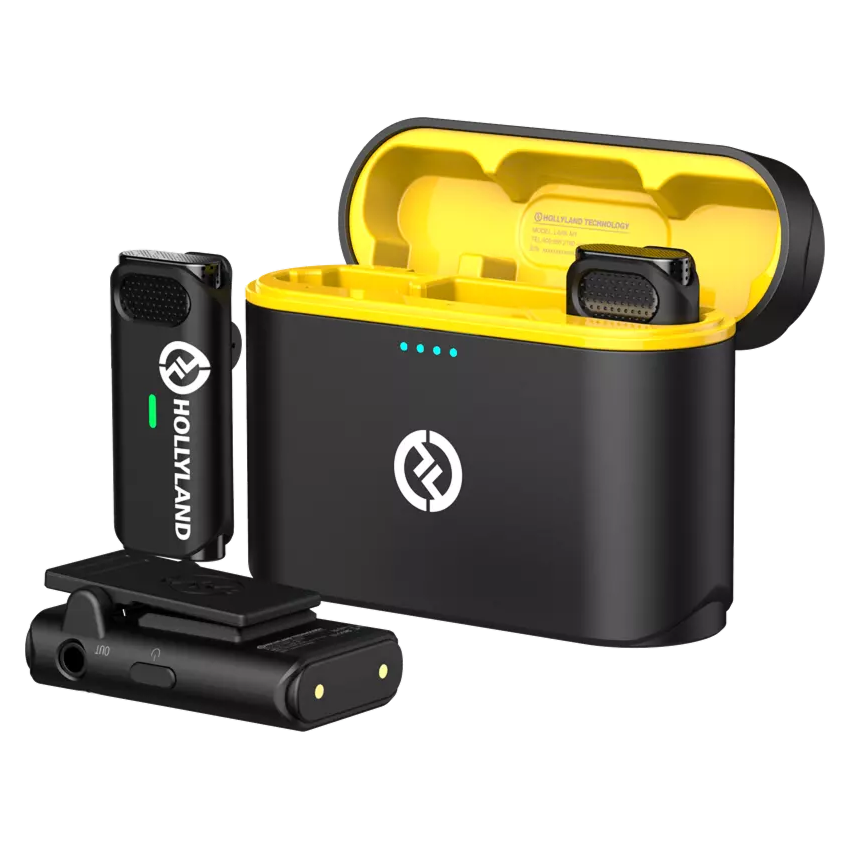
Hollyland LARK M1 - Tiny Wireless Microphone
A lightweight and user-friendly wireless microphone with one-click noise cancellation.
Key Features: Hi-Fi Sound Quality | Tiny & Light Design | Plug and Play
With the plug-and-play design of the Hollyland Lark M1, no driver installation is required, and it connects seamlessly to Windows. Here’s the process to set up the microphone:
- Connect the receiver using a 3.5mm output interface using the TRRS to TRS cable.
- If your computer has no 3.5mm jack, use USB-C to 3.5mm adapters to connect the microphone.
- Once the receiver is connected, go to sound settings from your device and ensure “Hollyland M1” is selected under the “Input” section.
Furthermore, properly charge the receiver and transmitters and ensure they are paired before the setup. Also, set the recording to “stereo mode” and set the appropriate volume level from the receiver.
Setting Up Audio Technica ATR2100
When setting up a USB microphone on Windows, ensure it’s compatible and appropriately connected. If connecting the mic for the first time, a notification “new device found” or “driver successfully installed” will pop up. However, follow the process for seamless setup:
- Click on the “Windows” icon from the taskbar and select “Settings.”
- Tap on the “System” and click on the “sound” from the left column menu.
- Click on the tabs “showing active input devices” and “showing active output devices” and select your connected USB microphone.
Then scroll down to “test your microphone” and try speaking into the mic. The mic connects and works correctly if the blue bar rises and falls.
FAQs
How do I enable microphone access on Windows 10?
- Step 1- Click on the “Windows icon” from the bottom-left of the taskbar and select “Setting.”
- Step 2- Select “Privacy” and “Microphone” from the left menu window.
- Step 3- If “Microphone access for this device” is off, click “Change” and turn the toggle to enable the mic access.
- Step 4- Ensure that “Allow apps access to your microphone” is on for seamless microphone performance.
Why is my microphone not working on Windows 10?
From improper connectivity to software misconfiguration, there are several reasons why the mic stops working. Here are the common causes:
- The microphone is connected properly
- Outdated or corrupted drivers
- Audio input is muted from the computer or the microphone
- The microphone is not enabled
- Compatibility issues
- The mic does not have access to the device
How can I increase my microphone volume on Windows 10?
- Step 1- Right-click on the sounds icon from the taskbar and select “Sound.”
- Step 2- Go to the “Recording” tab and right-click on your microphone.
- Step 3- Select “Properties” and go to the “Levels” tab.
- Step 4- Increase the microphone volume by dragging the slider to the right and also adjust the microphone “Boost” according to your requirements.
How do I set up a Bluetooth microphone on Windows 10?
- Step 1- Turn on your Bluetooth microphone, select the “Bluetooth” icon from the taskbar of your windows, and click “Add a Bluetooth Device.”
- Step 2- Click “Add Bluetooth or Other Device” from the top and select “Bluetooth” as the type of device.
- Step 3- Select the device you want to pair and click “OK” after confirmation.
- Step 4- After pairing, right-click on the “sound icon,” then select “sounds” and go to the “recording” tab.
- Step 5- Right-click on the Bluetooth mic and choose “Set as Default Device.”
- Step 6- Speak into the mic, and the rising green bars indicate it’s working correctly.
Can I use an external microphone with a laptop with a built-in microphone?
Yes, but if two microphones are used at the same frequency, they will interfere with each other and not work effectively. Therefore, when using an external microphone, turn off the internal mic and set the external microphone as the default in the settings.
How do I switch between different microphones on Windows 10?
Windows 10 has no built-in feature or shortcut keys to switch between microphones. However, you can switch manually between different microphones by following the process:
- Right-click the “sound icon” from the taskbar and select “Sounds.”
- Go to the “recording” tab and choose the preferred microphone as the default device.
- Click “OK” to save the settings.
What should I do if my microphone is too quiet or too loud?
If the mic is too quiet:
- Update or reinstall microphone drivers from the manufacturer’s website.
- Increase microphone volume from the mic properties.
- Position the mic close to the sound source.
If the mic is too loud:
- Reduce microphone volume
- Use pop filters or windscreen
- Adjust mic gain
How do I remove background noise from my microphone in Windows 10?
While complete removal of the background noises is not possible, Windows 10 has built-in features to reduce it by the following:
Method 1- Enable Noise Suppression
- Click on the sound icon from the taskbar and open the sound settings.
- Go to the “recording” tab, right-click on the mic, and select microphone “Properties.”
- Click on the “Enhancements” tab to enable the “Noise Cancellation” or “Noise Suppression” feature.
Method 2- Use microphone boost or third-party noise cancellation features
Method 3- Use pop filters, shock mounts, or windscreens
Is it possible to use two microphones at once on Windows 10?
Windows 10 recognizes a single microphone as the default audio input source. However, it’s possible to use two microphones using the following alternative solutions:
- Use an Audio Interface with multiple microphone inputs
- Using VoiceMeeter audio mixers
- Use ASIO drivers (need careful understanding for proper use)
How do I update my microphone drivers on Windows 10?
- Step 1- Right-click on the “Windows icon” from the taskbar and click “Device Manager.”
- Step 2- Then click to expand the “Audio Inputs and Outputs” section.
- Step 3- Right-click on your mic and select “Update Driver” from the popup menu.
- Step 4- Select “Search automatically for drivers” and follow the instructions.
- After installation, restart your computer for seamless integration of the drivers.