.png)
After installing the microphone, it’s common to encounter issues such as being half-functional or not working. Also, mic compatibility and audio quality are crucial to delivering crisp content.
Therefore, during podcasts or recordings, testing the mic empowers to optimize it according to specific needs. So, to understand the full potential of the mic, this guide will offer valuable insights when testing your microphone for multiple devices.
How to test the microphone for a PC
Ensuring the microphone is set up and functioning well will enhance the overall experience of seamless communication. Therefore, testing the mic on different Windows involves various methods to ensure crisp audio quality.
On Windows 11/10
Windows built-in microphone testing feature allows you to test your voice before starting your recordings or voice calls. So, to avoid possible distortions, follow the step-by-step process to check the microphone’s working.
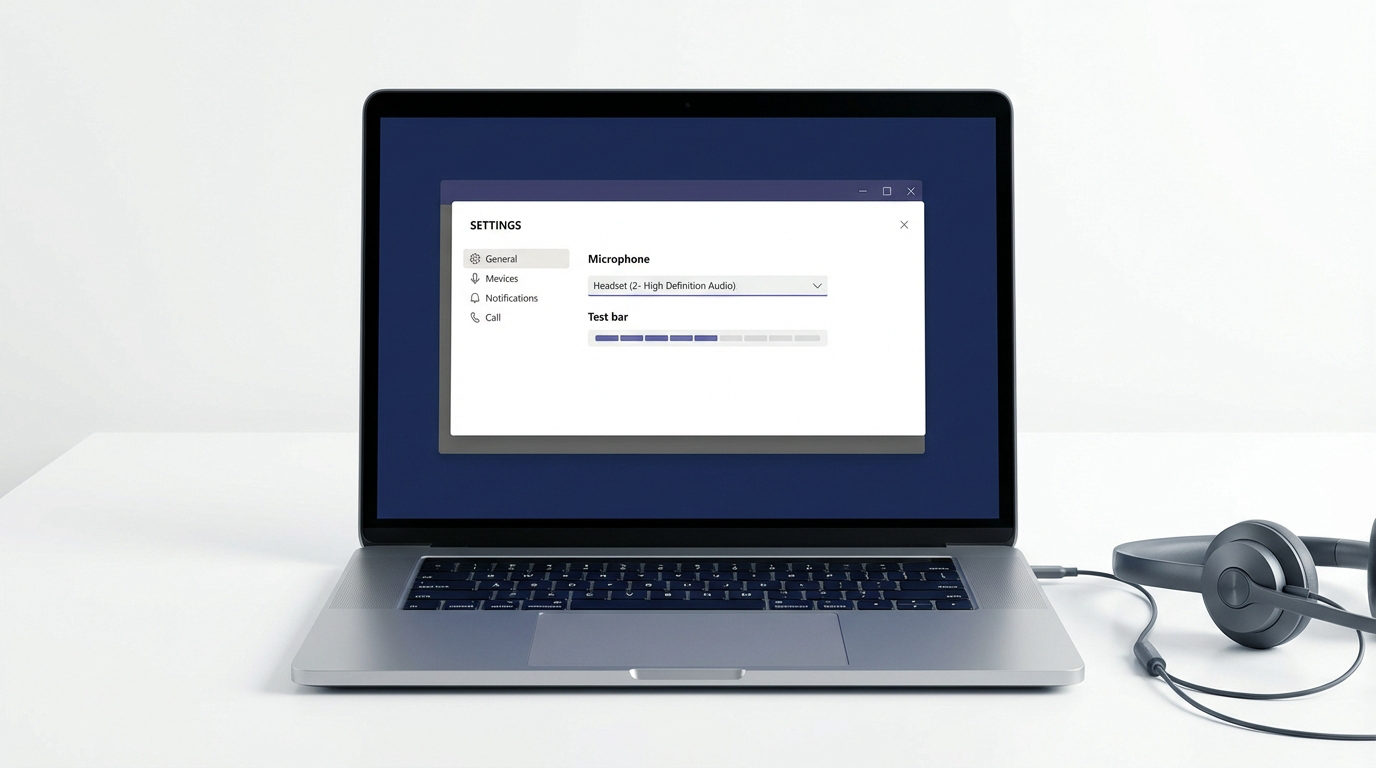
Step 1- Open Settings
- First, ensure the microphone is correctly connected to your device.
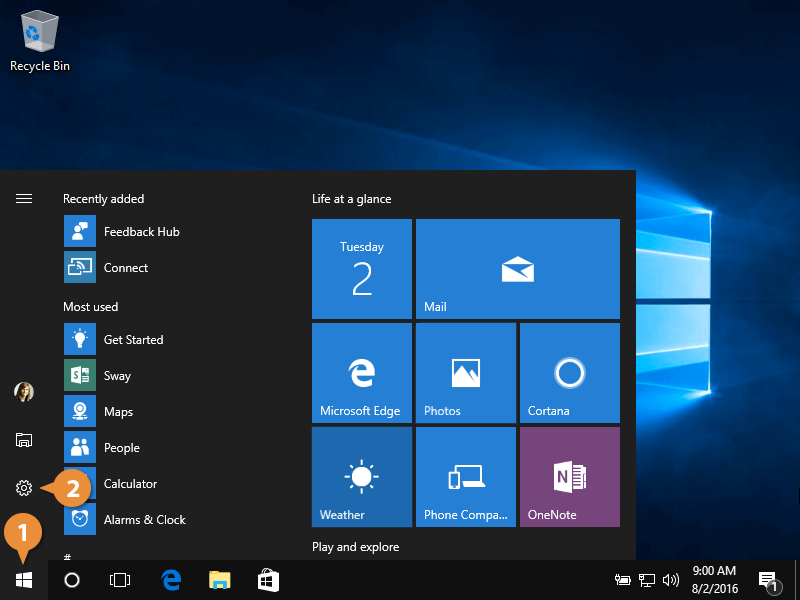
- From the bottom left corner of the taskbar, click on “Start” or “Windows icon,” then tap Start and select “Settings.”
Step 2- Sound settings or microphone
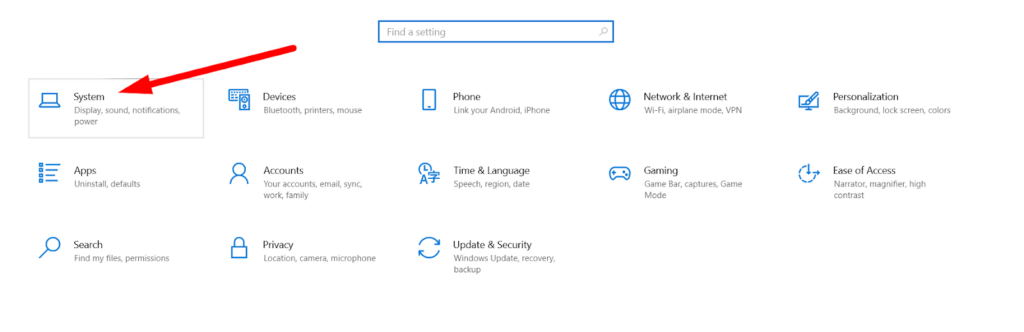
- Click on the “system” and then select “sound.”
- Or click on the “sound icon” from the bottom right corner of the taskbar, then select “open sound settings.”
- Tap on the arrow adjacent to the microphone section
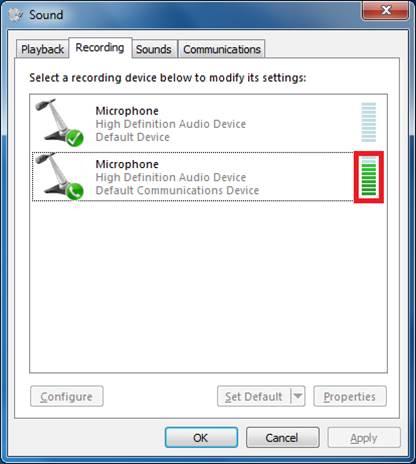
Step 3- Testing the Microphone
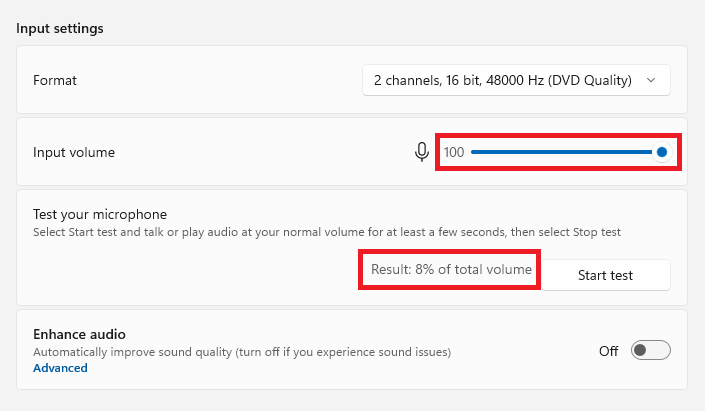
- From the “Input Settings,” click on the connected microphone.
- Select “Add Device” to install the microphone if connecting to a Bluetooth device.
- Then click on the “start test” button and speak into it to test your microphone.
- Ideally, the test results must be above 75% for normal voice. However, if it’s 100%, then the audio is distorted, and the sound is quiet if it’s less than 50%.
After that, check if the input volume bar goes to the right side while speaking into the mic. If the microphone bar is not moving while talking, click the “troubleshoot” button to fix your microphone.
On Windows 7
On Windows 7, if the microphone is not working correctly after connecting it to your device, test run or troubleshoot the mic by the following process.
Step 1- Control Panel
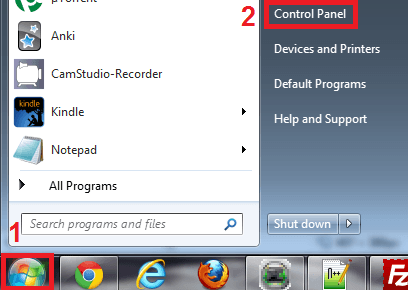
- Click on the “Windows icon” from the bottom-left corner, then select “Control panel.”
Step 2- Manage Audio Devices
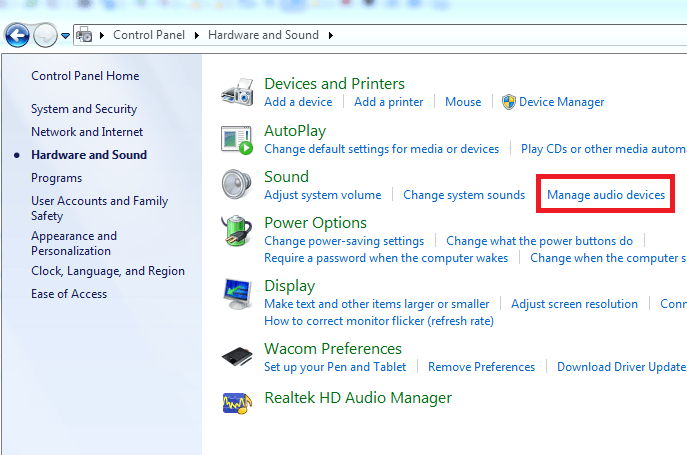
- Then select “Hardware and Sound” from the next window.
- From the “sound” section, click “Manage audio devices.”
Step 3- Select the right microphone
- Click on the “Recording” tab to see a list of installed devices on the device. Then click on your mic.
Step 4- Adjusting Audio Levels
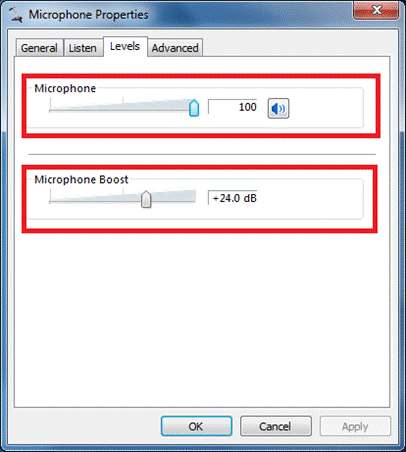
- Double-click on the preferred microphone, and it will open the “Levels” tab, then select the properties.
- Drag the slider to the right until the 100 number is displayed or between the numbers 80-100 and select “OK.”
Step 5- Disable Exclusive Access

- Go to the “Advanced” tab and uncheck “Allow applications to take exclusive control of this device.”
- It will disable apps from controlling the microphone.
Step 6- Testing the microphone
- Now, from the “recording tab,” click on the mic, and you will see the green bar rise while speaking. The mic is configured correctly and is ready for seamless recordings.
How to test the microphone for Mac
Different methods exist to test the microphone to analyze the functionality and ensure optimal audio input. Here’s a complete step-by-step process to test the mic for Mac:
Method 1- System Preferences
Step 1- System Preferences
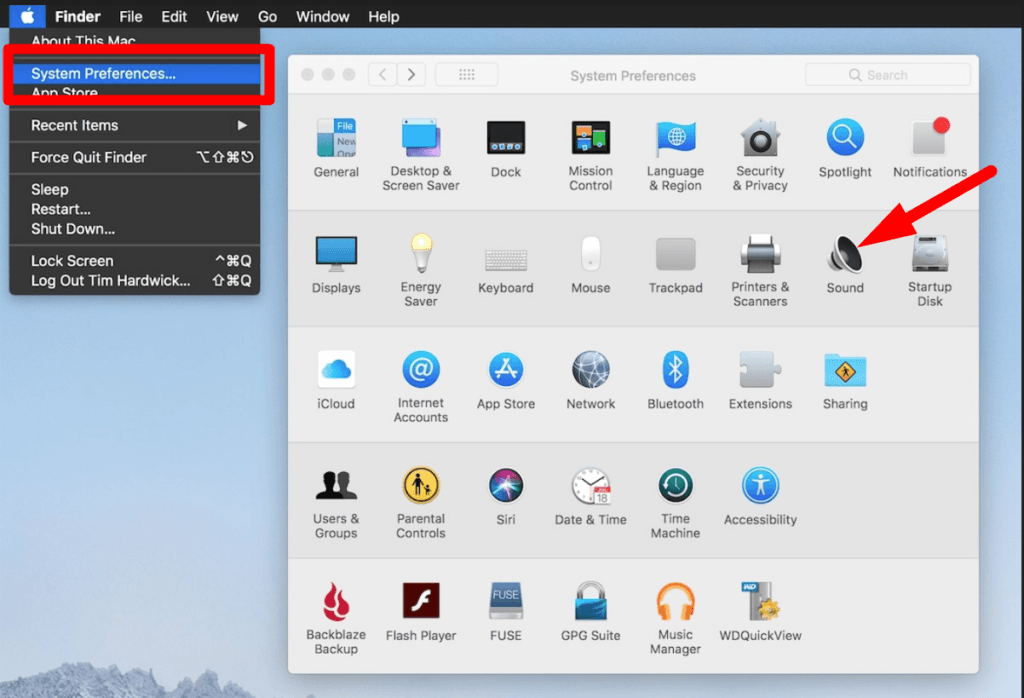
- From the top-left corner of the menu bar, click on the “Apple icon.”
- Then select the “system preferences” from the popup menu.
Step 2- Sound preferences
- Select “hardware” and click “sound” to open the sound preferences.
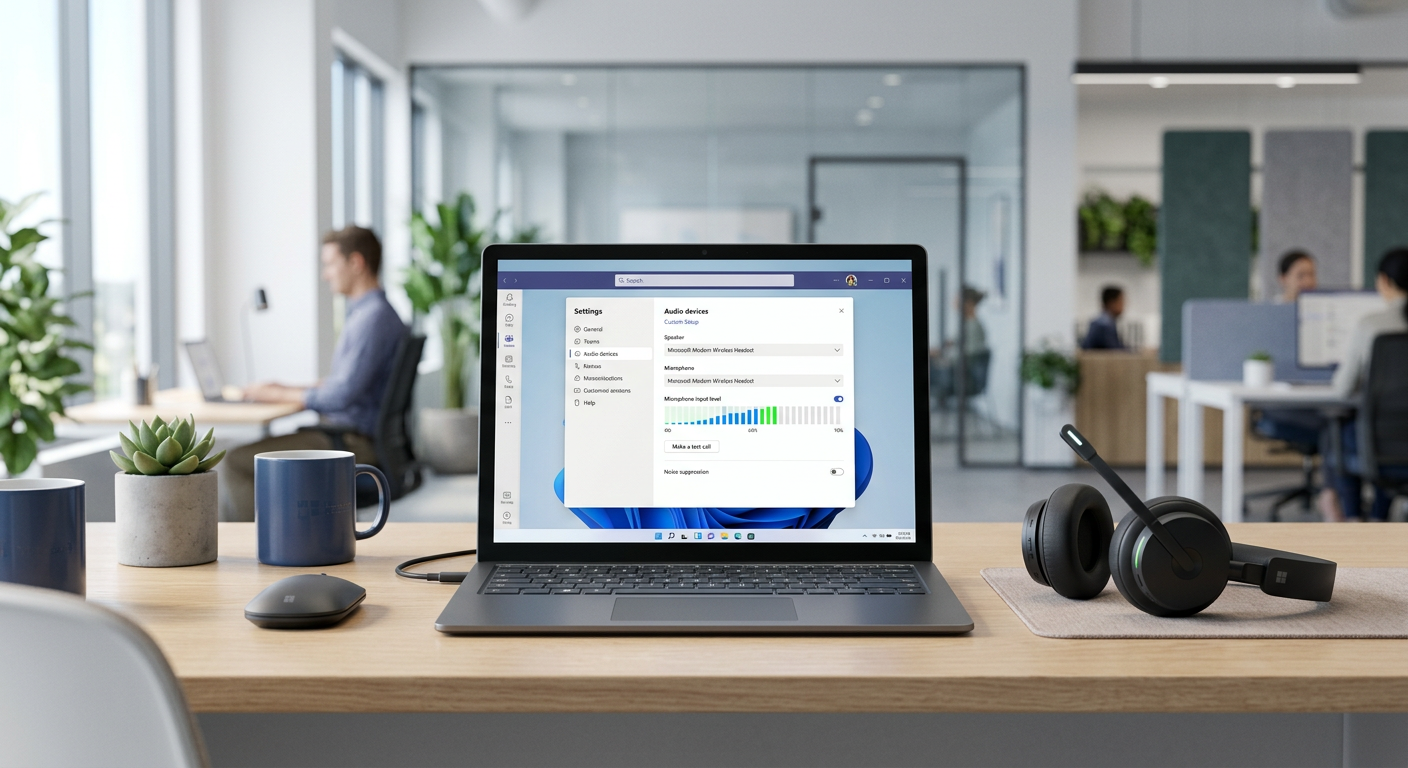
Step 3- Adjusting the Input
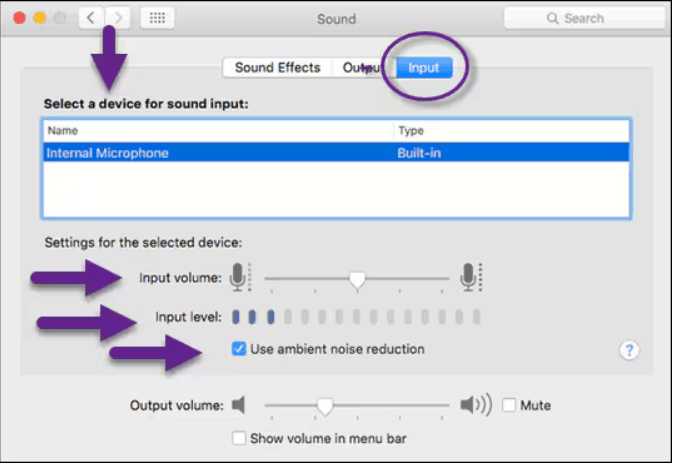
- In the sound window, go to the “input” tab and select the device or mic that you want to test from the input device.
- Adjust the input volume you want the mic to pick up during the test check.
Step 4- Test the microphone
- Speak into the microphone, and the “input level” bar will light up, indicating the sound is detected. If it’s not lit up, the mic is not configured correctly and is not detecting any input.
Method 2- Using built-in applications
Voice Memo
Step 1- Launch Voice Memo
- From the taskbar, click on the “Launchpad” to view all the apps on your MacBook.
- Then select “Voice Memos” or “Quick Time Player” from the applications.
Step 2- Test the microphone audio
- Use the built-in microphone and tap the “red button” to record a short audio clip.
- Playback the recorded voice to assess the microphone functionality and audio quality.
Third-party Applications (Video apps)
You can test the microphone’s functionality and audio quality during voice or video calls.
- You can test the audio from the app’s built-in settings by “free test call” or click “test audio.”
- Speak into the mic and monitor the audio quality.
How to test the microphone for Android
For Android smartphones, testing the microphone is crucial to optimize the audio input and quality. Commonly, smartphones have two built-in mics, one at the bottom or the top, and some capture audio from both. Besides this, using a poor-quality external microphone produces distorted or noisy audio.
Unlike Macs or PCs, Android devices don’t have a built-in feature for testing the mic, but there are several methods to test the microphone.
- Use the Voice Recorder Apps
Step 1- Open the Voice Recorder
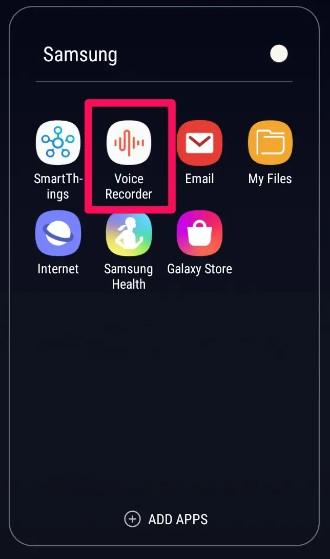
- Search and download the paid or free “microphone test” apps from your device’s Google Play Store.
- Open the app and follow the instructions to test record your voice.
Step 2- Test record the audio
- Ensure that you are recording at a quiet place and speaking at an average level and distance.
- Listen to the playback carefully, and if the audio is clear or without distortions, then the mic is working perfectly.
Some smartphones have built-in voice recorder and audio recorder apps that can be used to test microphone functionality.
- Use the Camera App
Step 1- Start the Recording
- Open the camera app from your phone and switch to the video mode.
- Then, record a short video while speaking into the microphone and stop the recording.
Step 2- Test the audio
- Click to watch the recorded video, and the microphone works fine if the voice is clear without distortion.
- Check Microphone Settings
Some devices have multiple microphones for different purposes, which can affect the audio quality with improper settings. Therefore, check the device and app settings for the mic and ensure that it’s according to your needs. Besides this, hereunder is the process to adjust the audio settings on your Android device.
App Permissions
Step 1- Device Privacy
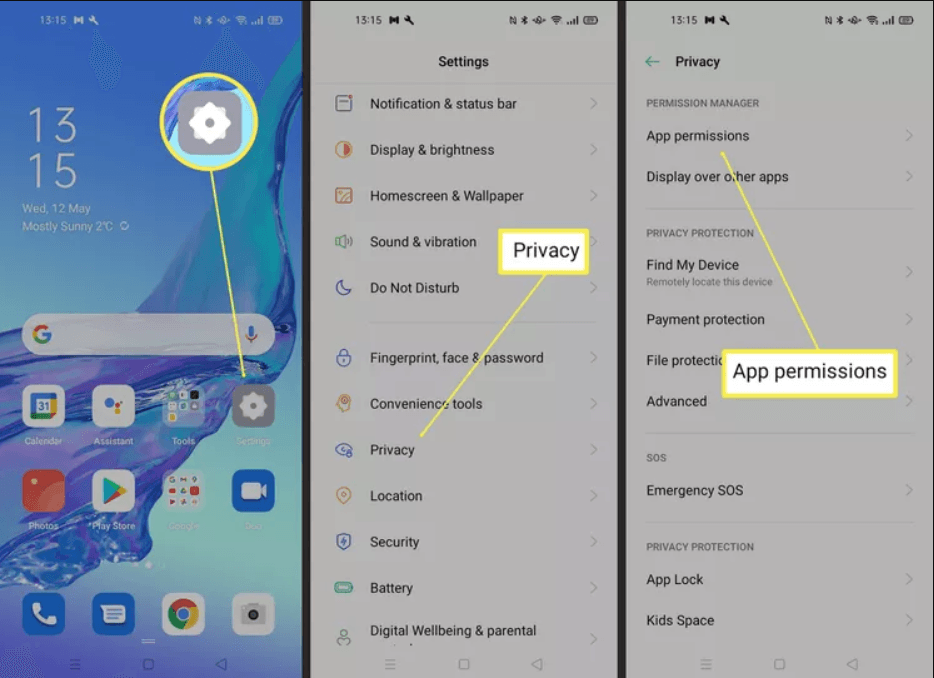
- Go to your device’s “settings,” then scroll down and click on “privacy.”
Step 2- Permission Manager
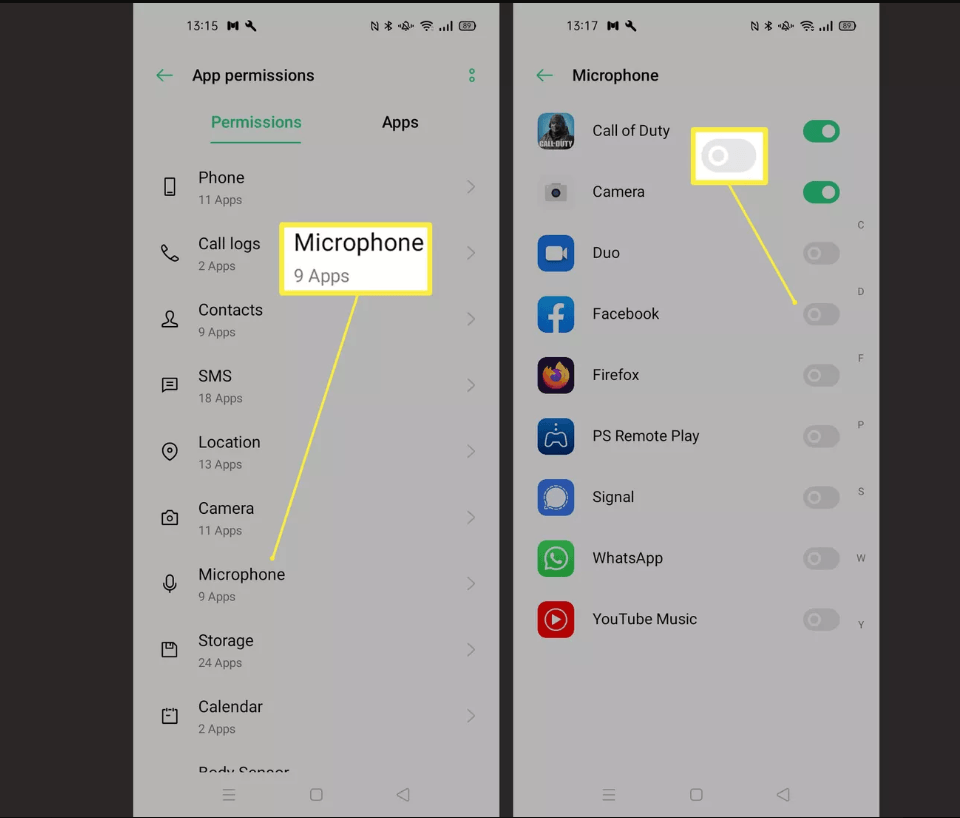
- Select “Permission Manager” and click on the “Microphone” from the next window.
Step 3- Test the Microphone
- Here, you will see the apps with access to the microphone and test records with these granted apps.
- Also, by switching the toggle, you can grant the app access to the microphone and test it to ensure it works fine.
Furthermore, some apps, such as virtual assistants, use voice-to-text features, ensuring that voice-to-speech is appropriately set up from settings.
- Make a Call
The simplest and easiest way to test the microphone is to call someone and ask them about the quality of the sound. Additionally, you can monitor your audio to check distortions or noise by using Google Voice or Skype.
Note: Remove the device screen protector before testing because it can block the microphone. Sometimes, dust or debris accumulates on the microphone, and cleaning it with a soft cloth or blowing the air will clean it.
How to test the microphone for iOS
Testing your microphone on iOS devices is simple because Apple provides precise methods to test the audio input seamlessly.
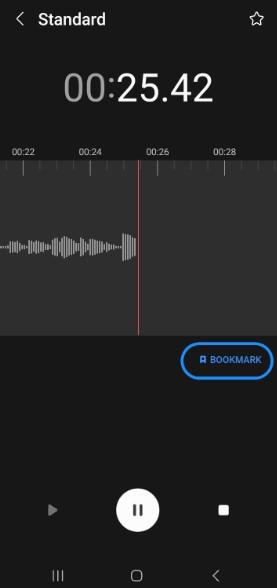
- Voice Memos App
Step-1 Open the Voice Memos App
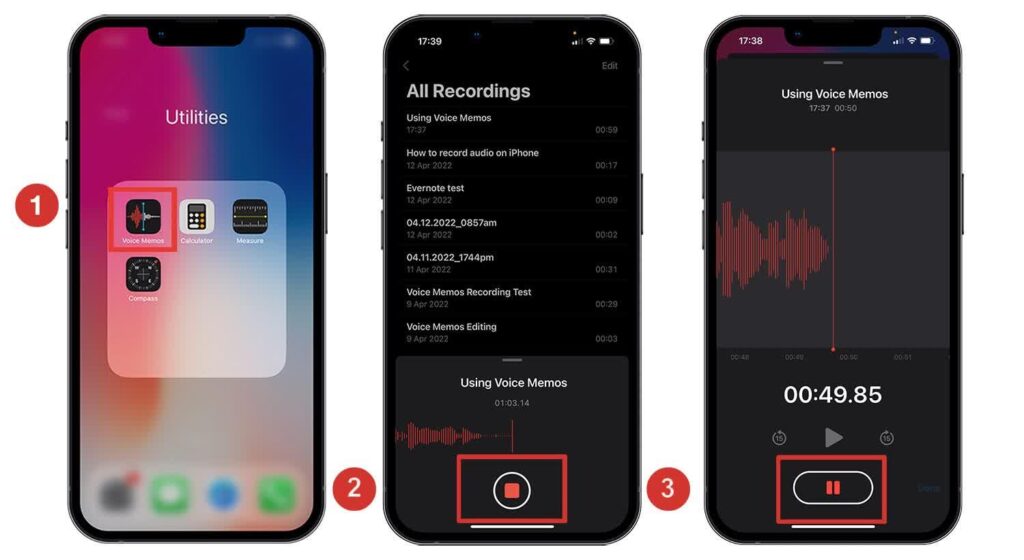
- Launch the “Voice Memos” app from the home screen or click on the “Launchpad” from the taskbar and select the app.
Step 2- Start the recording
- Tap the record button, speak generally to the mic at the bottom of your phone, and tap the stop button when finished.
Step 3- Test the microphone
- Playback the memo, and if the sound is clear without distortions, then the mic is working fine.
- Use the Camera App
Step 1- Recording a Video
- Open the device camera and switch to the video mode.
- Record a short video while speaking into the microphone, then stop the recording.
Step 2- Testing the audio
- Playback the video, and ensure that the sound is clean and crystal-clear.
- Check Microphone Settings
iOS does not have specific microphone settings, and managing app access to the mic is essential to remove the restriction.
Step 1- Open Privacy
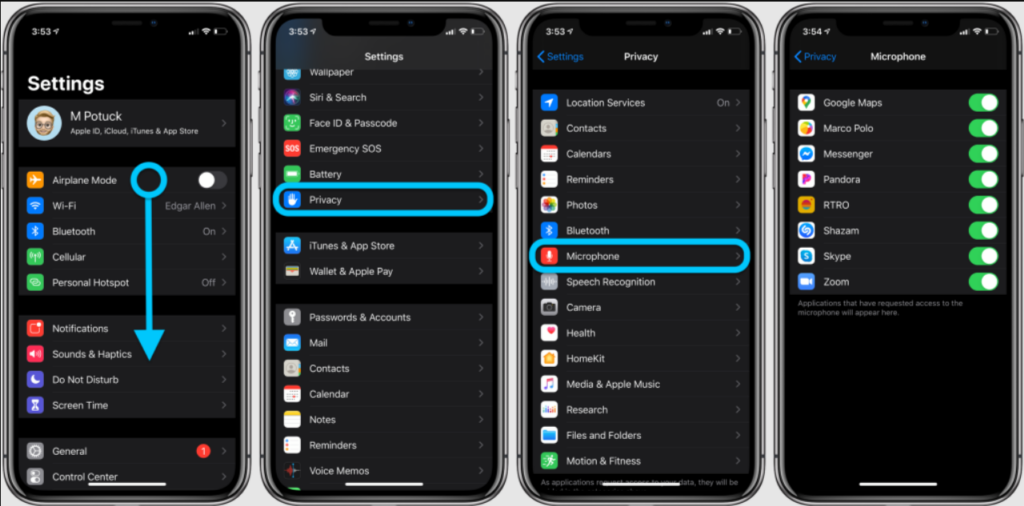
- Open your device “settings,” then navigate and click on “privacy.”
Step 2- App permission
- Click on the “microphone,” and you will see a list of the apps with access to the microphone.
- Switch the toggle next to the app you want to use.
Note: If the audio from video recordings is faint or Siri cannot hear the commands, ensure the case doesn’t cover the receiver and the front mic is clean.
Bonus Tip: Use Hollyland Lark Max Microphone
With its diverse compatibility, Hollyland Lark Max seamlessly connects with multiple devices. So, testing the mic for unparalleled audio quality with its MaxTimber Microphone technology is essential. Therefore, this microphone is easy to connect and provides real-time audio monitoring.

Hollyland LARK MAX - Professional Wireless Microphone
A professional wireless microphone system featuring studio-quality audio with advanced noise cancellation.
Key Features: Studio-Quality Audio | Magnetic Attachment | 8GB Internal Recording
Connecting and testing the microphone
The mic integrates with diverse compatibility with cameras, mobile devices, and computers. It comes with a USB-C or Lightning Cable, USB-C to USB-A, and 3.5mm TRS to 3.5mm TRS Cable.
Testing
- The mic’s transmitters and receiver will pair once it’s out of the box, or you can connect manually.
- Connect the receiver to your device, and it will capture crystal-clear audio. Moreover, the mic also enables real-time audio monitoring from your phone speaker.
Also, the microphone is compatible with recording apps and remains unaffected by improper settings. Additionally, the windproof design and Environmental Noise Cancellation technology ensure ultra-clear sound.
FAQs
How do I fix a microphone that isn’t working?
Fixing a microphone involves diverse troubleshooting methods to analyze and fix the mic issues according to your device.
- Restart your device to remove temporary glitches
- Check for app or system updates
- On Macs and PCs, check for the driver’s updates.
- Ensure that the microphone isn’t muted.
- On Mac, enabling the dictation will activate the microphone by installing the necessary driver automatically.
Can I use external microphones with my smartphone?
Yes, microphones with headphone jack, USB-C, or lightning port can be used and connected seamlessly to smartphones. Additionally, some wireless mics can connect to your phone’s Bluetooth. However, some smartphones require specific adapters to connect to the microphone.
Why is my microphone volume too low or too high?
The standard and primary reason is setting the audio level too low or too high from your device control panel settings. Additionally, some other reasons include:
- An outdated driver or firmware can lead to improper microphone volume control.
- Improper positioning of the mic.
- Some app settings can override or alter the system microphone settings.
- Check the mic’s quality and sensitivity to pick up sound from different patterns.
- With solid background noises, the microphone captures audio at lower levels.
How can I reduce background noise in microphone recordings?
- Choose a quiet place away from the possible noise.
- Low-sensitive mics are less likely to pick up background noises than higher-sensitive mics.
- Set the input level or gain at moderate to capture your audio without clipping and distortions.
- Use a pop filter or windscreen.
- Additionally, good quality mics should be used with noise reduction techniques.
- During the post-editing process, manually edit the recordings or use tools such as “noise gate or noise reduction.”
Is it possible to test my microphone online?
Yes, using a free online “mic test,” you can test your microphone. Select the website you want to use to test your microphone online, grant permission to access the mic when prompted, and start the test.
What should I do if my microphone works on one app but not on another?
The microphone works partially to check the app permissions and ensure access to the particular app is allowed. Here are a few additional steps to resolve the issue:
- App Settings: Sometimes apps have different default mic sets, so go to the app settings and ensure the correct mic is selected.
- Check Audio Driver: Ensure the drivers are updated and maintained regularly.
- Turning off the Permission: Apps can interfere with the mic working, so turn off permission for other apps.
- Disable antivirus or firewall on your PC
- Check Windows updates to remove bugs or compatibility issues.
How do I change the default microphone on my device?
For Windows:
- From the settings/control panel, go to “sound” and click on the “properties.” Click the “recording” and double-click on the mic to set it as default.
For Mac:
- Click the top-left Apple menu, go to “system settings,” then click sound. Tap on “input” on the right and select the device you want to use.
Can I improve my microphone’s sound quality?
Microphones are essential for capturing crisp, clear audio, and using the above steps can improve the audio quality.
- Place the microphone 6-10 inches away for a natural sound.
- Keep the mic away from other objects and off your desk.
- Record quietly and use sound-absorbing or soundproofing materials to reduce reverberations.
- Set the gain at an appropriate level (50-75%) to avoid clipping or distortions.
- Use shock mounts, windscreen, and pop filters to reduce the surrounding noises.
Why does my microphone echo, and how can I fix it?
Causes
- Echo happens when the microphone picks up sound from speakers if placed too close to them.
- Because of software glitches
- Headsets with poor sound isolation
- If the microphone is placed close to the wall or reflective source.
- Directional mic picks up ambient noise if the headphone volume is too high.
Fixes
- Lower the audio input from the control panel microphone settings and uncheck “listen to this device.”
- Move the microphone away from the speakers
- Disconnect and reconnect the mic
- Check and remove the duplicate audio source
How do I clean my microphone safely?
Besides avoiding cross-contamination, a clean mic ensures crisp, clear audio free from dust or debris interferences.
- Remove the pop filter or windscreen and unscrew the microphone grill.
- Wash the foam by dipping it into soap and hot water.
- Use warm demineralized water and gently scrub to remove the accumulated dust.
- Clean the microphone body and handle with a soft cloth.
- After drying, reassemble the microphone, and it will record crisp audio.