.png)
A soundboard is a handy tool. It lets you play, manage, and trigger audio clips or sound effects easily with the press of a button. It’s popular with streamers, podcasters, DJs, and content creators. Soundboards, or audio mixers, let them add sound effects, music, or pre-recorded audio to their projects.
This guide will walk you through the basics of using a soundboard, whether you’re using a physical device or a software-based solution. We’ll cover everything from choosing the right soundboard to setting it up, adding sounds, and using it effectively in your content.
What You’ll Need
Before diving in, make sure you have the essentials. Here’s a detailed checklist to get started:
A soundboard app or device: Popular choices are:
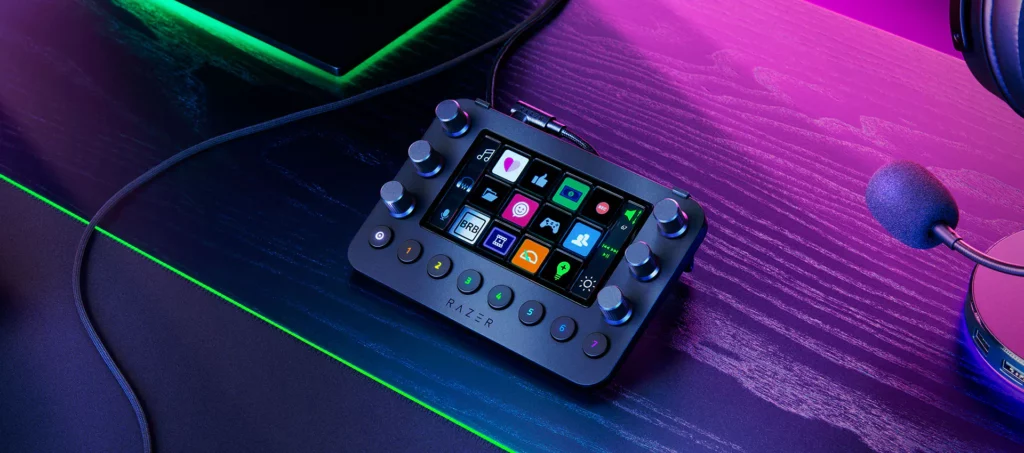
- Hardware: Elgato Stream Deck (a programmable button panel) and Razer Stream Controller.
- Software: Voicemod (with sound effects) and Soundpad.
- Browser-based tools: Myinstants for quick sound playback.
Audio clips: You’ll need sound files in formats like MP3 or WAV. You can download free sound effects from sites like Freesound.org and Zapsplat. You can also record your own using a microphone and audio editing software, such as Audacity.
A PC or mobile device: Most soundboards work on Windows, macOS, or even mobile platforms like iOS and Android, depending on the tool.
Headphones or speakers: To hear your sounds clearly without feedback. Headphones are especially recommended if you’re using a microphone.
(Optional) Virtual audio routing tools: Tools like VoiceMeeter and VB-Cable help manage audio from various sources. For example, they can route audio from a mic, game, or soundboard. This is especially useful for streamers and podcasters.
Tip: If you’re new to soundboards, start with free software like Resanance or browser-based options like Myinstants before investing in hardware. This lets you experiment without upfront costs.
Choosing a Soundboard
The right soundboard depends on your needs, preferences, and budget. Here’s a breakdown of the main types, along with their pros and cons:
Hardware soundboards:
These are physical devices with buttons you can press to trigger sounds (e.g., Elgato Stream Deck or Razer Stream Controller). They offer a tactile, hands-on experience, which feels intuitive and satisfying for live performances. However, they’re pricier (often $100+), require a USB connection, and take up desk space.
Software soundboards:
These are applications you install on your computer or mobile device (e.g., Voicemod, Soundpad, or Resanance). They’re often free or low-cost (e.g., Soundpad costs around $5), highly customizable, and don’t need extra hardware.
You can trigger sounds using your keyboard or mouse, but they might lack the physical feel of hardware.
Online soundboards:
Websites like Myinstants or Soundboard.com let you play sounds directly from your browser. They’re quick to use, require no installation, and are perfect for casual or one-time use.
However, they often lack advanced features (like hotkey assignment) and depend on a stable internet connection.
Tip: Software soundboards are the most beginner-friendly. They’re easy to set up, flexible, and don’t require extra gear, making them a great starting point.
Setting It Up

Once you’ve chosen your soundboard, the next step is to get it installed and configured. The process varies depending on the type:
For Hardware Soundboards:
- Connect the device: Plug it into your computer via USB. Most devices are plug-and-play, so your system should recognize it immediately.
- Install the companion software: Download and install the software from the manufacturer’s website (e.g., Elgato’s Stream Deck software). This is where you’ll configure your buttons.
- Assign sounds to buttons: Open the software, drag your audio files onto the buttons, and customize settings like volume or playback mode (e.g., play once or loop).
For Software Soundboards:
- Download and install the app: Get it from a trusted source, like the developer’s website or an app store (e.g., Steam for Soundpad).
- Choose your audio output: In the app’s settings, select where the sounds should play—your headphones, speakers, or a virtual audio device like VoiceMeeter for streaming.
- Set permissions: Some apps may need access to your microphone or audio devices. Grant these permissions if prompted, especially on mobile devices.
For Online Soundboards:
- Visit the website: Go to a site like Myinstants or Soundboard.com.
- Click to play: Browse or search for sounds and click to play them instantly. No installation or setup is needed—just a browser and internet connection.
Tip: After setting up any soundboard, reboot your computer to ensure everything integrates properly and to avoid potential glitches with audio drivers.
Adding Sounds
Now it’s time to load your favorite audio clips into the soundboard. These could be sound effects (e.g., applause, explosions), voice lines, music snippets, or anything else that fits your content.
- Drag and drop clips: Most soundboards allow you to drag audio files (MP3, WAV, etc.) directly into the app or software interface. Some even support importing multiple files at once.
- Label your sounds clearly: Give each sound a descriptive name (e.g., “Crowd Laugh,” “Game Over”) so you can find it quickly during a live session.
- Organize by profiles or categories: If your soundboard supports it (e.g., Stream Deck or Voicemod), create profiles for different scenarios—like one for gaming, one for podcasting. This keeps your setup tidy and context-specific.
- Use royalty-free sources: To avoid copyright issues, download sounds from free libraries like Freesound.org, Zapsplat, or SoundBible, or record your own using a microphone and free software like Audacity.
Tip: Short clips (under 15 seconds) work best for quick, impactful moments. Longer clips can disrupt the flow of your content, so trim them if needed.
Audio Settings
Proper audio configuration ensures your soundboard works seamlessly with your system and doesn’t cause issues like feedback or low volume.
- Set your output device: In the soundboard’s settings, choose where the sounds should play. For streamers, this might be a virtual audio device (like VoiceMeeter) that routes sound to your streaming software (e.g., OBS or Streamlabs).
- Use audio routing tools: If you’re mixing multiple audio sources (e.g., your mic, game audio, and soundboard), tools like VoiceMeeter or VB-Cable can help you manage and balance them. For example, VoiceMeeter lets you assign different outputs for each source.
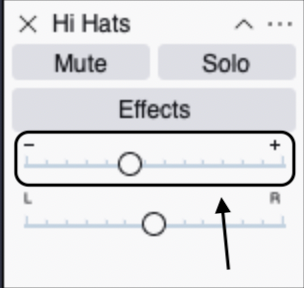
- Adjust individual volumes: Most soundboards let you set the volume for each clip. Test each one to ensure no sound is too loud (clipping) or too quiet compared to your voice or other audio.
Tip: Always use headphones when testing or using your soundboard with a microphone to avoid feedback loops, where the sound plays through speakers and gets picked up again by the mic.
Assigning Hotkeys/Buttons
Triggering sounds should be fast and intuitive, especially during live content. Assigning hotkeys or buttons makes this easy.
- Map each sound to a key or button: In the soundboard software, assign each sound to a specific key (e.g., “1,” “Q”) for software or a button for hardware. Some tools let you use mouse clicks or touchscreen taps too.
- Test for conflicts: Ensure your hotkeys don’t overlap with other applications or game controls. For example, avoid using “W” or “Space” if you’re gaming—test them in your setup first.
- Label everything logically: If you’re using a hardware soundboard, add icons or text labels to the buttons via the software. For software, ensure the interface is organized and easy to navigate.
Tip: Use key combinations like Ctrl + [key] or Alt + [key] to avoid conflicts with other programs. F-keys (F1, F2, etc.) are also great options if they’re not already in use.
Testing
Before going live, thoroughly test your soundboard to catch any issues early.
- Play every sound: Check each clip for volume, clarity, and quality. Listen for distortion, unwanted noise, or clipping (when the sound is too loud and cuts off).
- Run a private test stream or recording: If you’re using the soundboard for streaming or podcasting, do a test run in your software (e.g., OBS, Audacity) to ensure everything syncs properly.
- Check for delays or errors: Some soundboards might have a slight delay, especially with virtual audio routing. Adjust buffer settings or try a different output device if you notice lag.
Tip: Always test your setup in a private environment before going live. It’s better to fix problems beforehand than deal with them mid-stream.
Advanced Tricks
Once you’re comfortable with the basics, explore these advanced features to level up your soundboard game.
- Create multiple profiles: Many soundboards (e.g., Stream Deck, Voicemod) allow you to create different profiles for various use cases—like one for streaming, one for podcasting, or one for trolling friends. Switch between them as needed.
- Loop or layer sounds: Some tools support looping a sound (e.g., background music) or playing multiple sounds at once (e.g., applause over a victory sound). Check your soundboard’s settings for these options.
- Edit or create custom clips: Use free audio editing software like Audacity to trim, fade, or enhance your sound clips. Record your own sounds—like a custom catchphrase—and tweak them to perfection.
- Backup your configuration: Save your soundboard setup and audio files regularly. Store everything in one folder and back it up to a cloud service or external drive to avoid losing your work.
Tip: If your soundboard supports macros or scripts (e.g., Stream Deck), you can automate sequences of sounds or integrate them with other tools for complex effects.
Best Practices
Using a soundboard effectively is about more than just playing sounds—it’s about enhancing your content without overwhelming your audience.
- Keep sounds labeled and categorized: A well-organized soundboard saves time and reduces mistakes during live sessions. Use clear names and group similar sounds together.
- Use royalty-free or original content: Avoid copyrighted sounds unless you have permission. Stick to free libraries or create your own to stay safe and legal.
- Backup your setup regularly: Save your configuration and audio files often, especially after major changes, to avoid losing hours of work.
- Respect your audience’s ears: Don’t spam sounds or use them too frequently. Use them strategically to enhance—not distract from—your content.
Tip: Think of sounds as seasoning—too little and it’s bland, too much and it’s overwhelming. Find the right balance for your style and audience.
Recommended Tools

If you’re unsure where to start, here are some popular and reliable tools to consider:
Hardware:
- Elgato Stream Deck: A customizable LCD button panel with companion software for easy setup. Starts at $150.
- Razer Stream Controller: Similar to the Stream Deck, with a focus on streaming integration. Around $270.
Software:
- Voicemod: A popular choice for streamers, with a large library of sounds and voice effects. Free tier available, premium at $10/year.
- Soundpad: A lightweight, affordable option with hotkey support and easy integration. Costs $5 on Steam.
- Resanance: Free and open-source, great for Discord and streaming with basic features.
Online:
- Myinstants: A vast collection of user-uploaded sounds, playable with a click. Free to use.
- Soundboard.com: Another large library of free sounds, categorized for easy browsing.
Audio Routing:
- VB-Audio VoiceMeeter: A virtual audio mixer that lets you route multiple audio sources. Free with optional donations.
- VB-Cable: A virtual audio cable for directing sound from one app to another. Free with paid upgrades.
Conclusion
Soundboards are simple to set up but incredibly powerful once you master them. It can boost your content. You can use it for a laugh track in your podcast, add sound effects during a stream, or just have fun with friends.
Start small with a few clips, test your setup often, and gradually expand as you get comfortable. With the right sounds and thoughtful use, your streams, podcasts, or recordings will feel more dynamic, professional, and engaging.
FAQs
Q: Where can I get sound clips?
You can find free, royalty-free sound effects on sites like Freesound.org, Zapsplat, or SoundBible. Alternatively, record your own using a microphone and audio editing software like Audacity.
Q: Can I use a soundboard in Discord?
Yes! Route the audio through a virtual audio device like Voicemod or VoiceMeeter, then set it as your output in Discord to play sounds into your voice channel.
Q: Is using copyrighted sound clips safe?
No, using copyrighted sounds without permission can lead to legal issues or content takedowns (e.g., on YouTube or Twitch). Always use royalty-free sounds or create your own to stay safe.