.png)
In today’s ever-changing digital world, user experience is crucial. From the smoothness of multitasking to the flawless navigation of interfaces, each feature made to an operating system seeks to ease our daily interactions with technology. Windows 11, Microsoft’s newest generation of its famous operating system, has taken this aim to heart, offering users an aesthetic and functional redesign that promises a new age of computing. Among the numerous adjustments and updates has emerged a modest yet incredibly useful feature – the audio output switch shortcut.

Microsoft recognizes the importance of audio in the quest of a complete computer experience. Audio acts as a bridge to a deeper digital environment, whether we’re participating in virtual meetings, immersing ourselves in music, delighting in cinematic experiences, or just interacting with various programmes. Windows 11 recognizes its significance by including a subtle yet extremely efficient shortcut that allows users to smoothly move between multiple audio output devices.
Consider this scenario: you’re listening to a riveting podcast on your headphones when you realize you need to share the topic with your coworkers in a conference room. Instead, then scrolling through complicated settings, a simple key combination allows the switch – a quick and easy option that boosts productivity while minimizing disturbances.
This article takes a detailed look at Windows 11’s audio output switch shortcut, going deep into its functionality, applications, and revolutionary power. Beyond the convenience, we investigate the technological foundations that allow this capability to manage sound redirection seamlessly. We’ll also go through the complexities of its application, offering step-by-step instructions to help customers learn this shortcut and integrate it into their everyday operations.
What Is Windows 11 Switch Audio Output Shortcut
There are several ways to change the audio output devices in Windows 11. The Quick Settings Panel is one option. Here’s how to go about it:
How to Use the Quick Settings Panel:
The Quick Settings Panel in Windows 11 makes it simple to control audio settings, such as switching between audio output devices. The steps are as follows:
- To open the Quick Settings Panel, click the volume icon or use the Windows key + A shortcut. There is an Output device icon — switch to a different output device (e.g., headphones vs speakers)
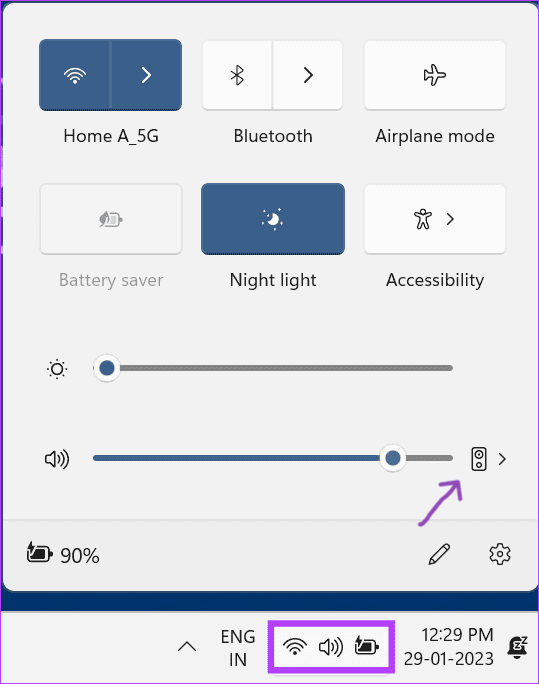
- Simply click on the chosen device in the list to change the audio output device.
- Windows will switch the audio output to the specified device automatically.
Making use of third-party tools or hotkeys:
You may utilize third-party programs or configure custom hotkeys to switch audio output devices more quickly. Here’s how it’s done:
- You may configure hotkeys to switch between audio output devices using third-party utilities like as SoundSwitch or NirCmd.
- First, go to their individual websites and download and install the desired tool.
- Launch the program after installation and customize the hotkey settings. Assigning a key combination, such as Ctrl + Shift + F1, to each audio output device you want to switch between is customary.
- After configuring the hotkeys, you may use the designated vital combination to switch between multiple audio output devices.
- The specific processes and customization choices will depend on the program you select.
Please keep in mind that, although the Quick Settings Panel technique is a built-in feature of Windows 11, utilizing third-party applications necessitates the installation of additional software. Make cautious to only get such programs from reputable websites.
Bonus Tip: More Ways to Switch Audio Output on Windows 11
Sure, here are some other ways to change the audio output on Windows 11:
How to Use the Sound Control Panel:
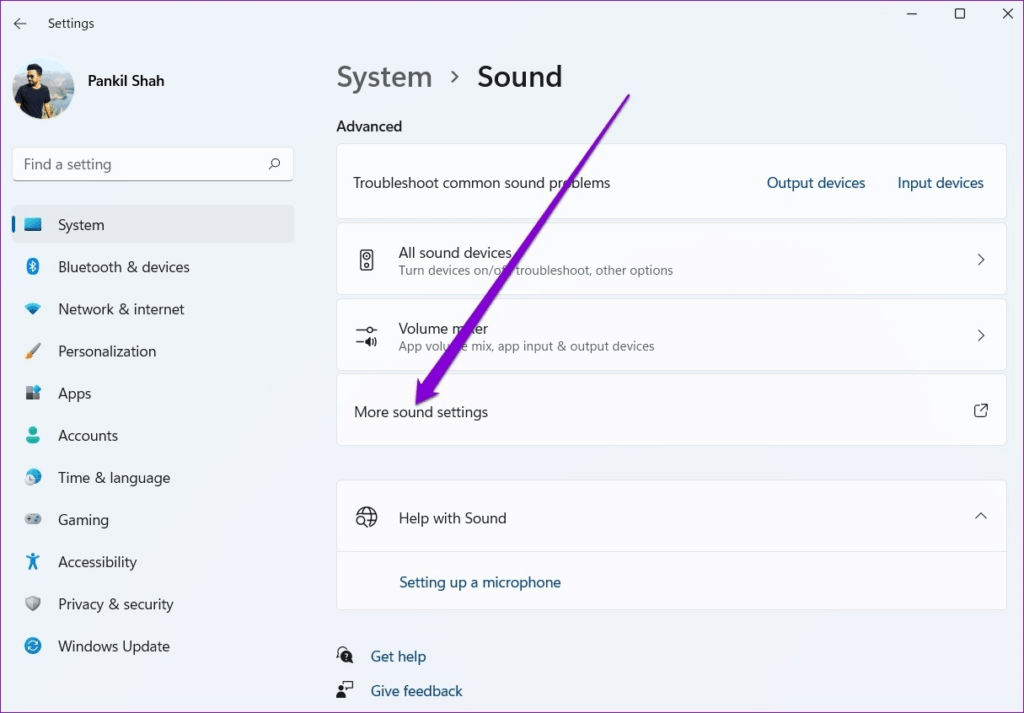
In Windows 11, the Sound Control Panel allows you to control your audio devices and settings, as well as switch between multiple audio output devices.
- Right-click the volume icon in the taskbar and choose “Open Sound Settings.”
- To open the Sound Control Panel, choose “Device properties” from the “Output” section.
- Click the “Playback” tab in the Sound Control Panel to see a list of available audio devices.
- To switch to the appropriate audio output device, right-click on it and select “Set as Default Device.”
- You may also right-click on the audio device and select “Configure” or “Test” to test the audio output.
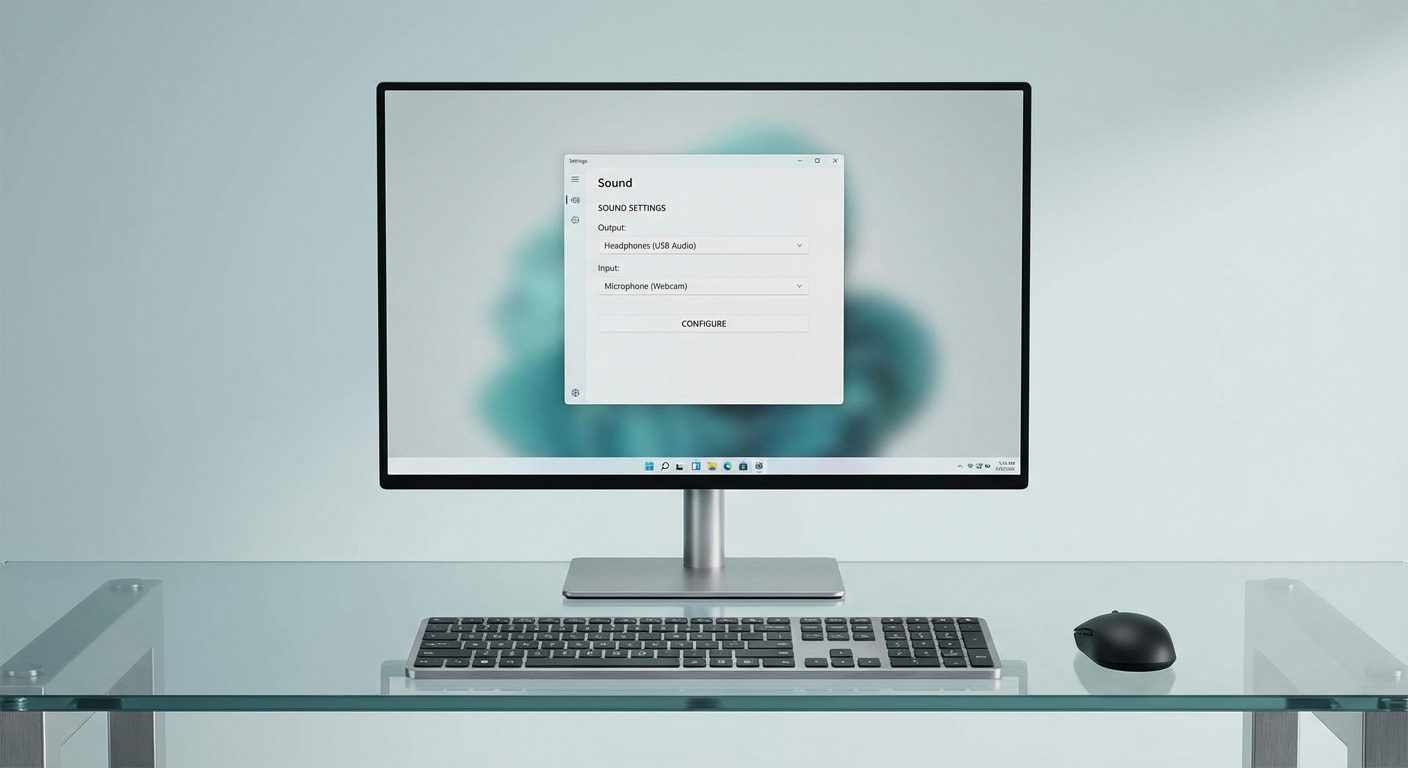
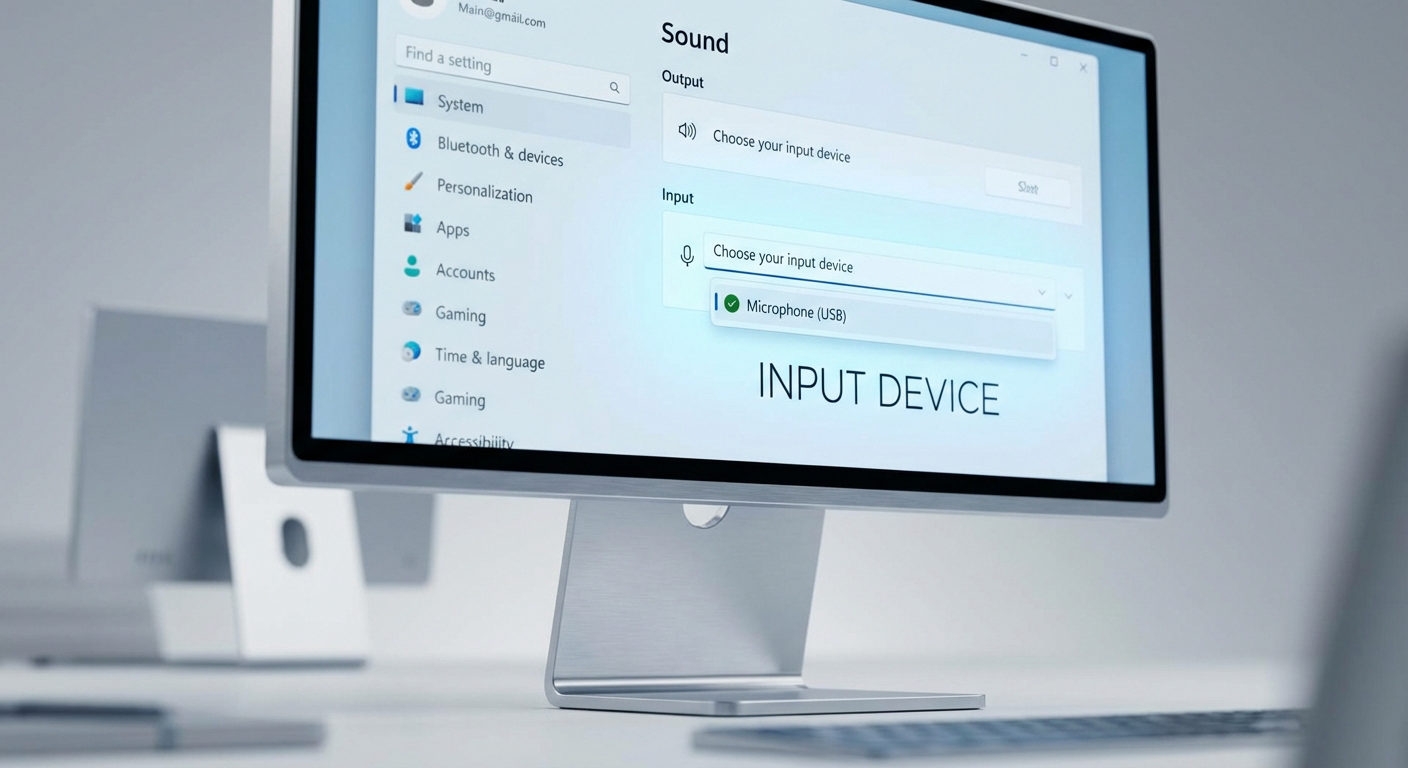
Using the Windows Settings application:
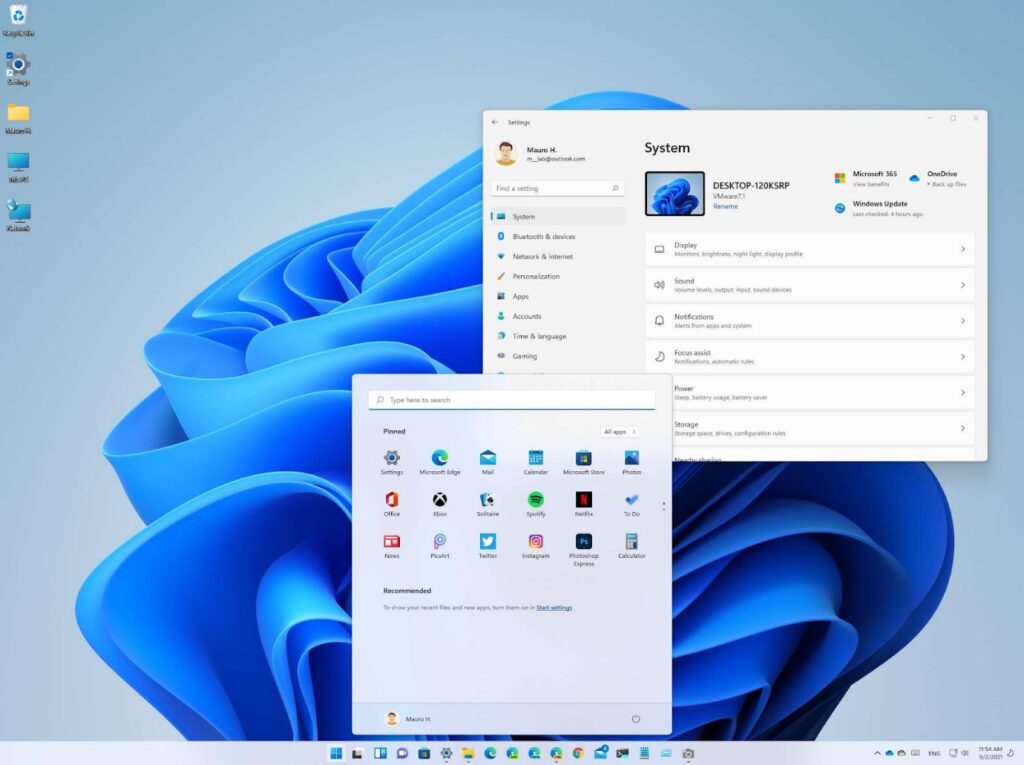
In Windows 11, the windows Settings app also makes it simple to switch between multiple audio output devices.
- To enter the Settings app, use the Windows key + I.
- Click “System” and choose “Sound” from the left menu.
- A list of audio output devices is given under the “Output” section.
- To switch to the chosen device, click on it.
- This menu also allows you to change the volume and other audio settings.
Making use of keyboard shortcuts:
Shortcuts to switch between audio output devices are included by some keyboard manufacturers. These shortcuts may differ depending on the model of your keyboard. Here are some broad guidelines.
- Look for a key combination that consists of the Function (Fn) key plus either a media key or a F key with a speaker icon.
- To switch between audio output devices, press the key combination.
- You may need to modify the keyboard shortcut in the software settings of your keyboard.
Making use of voice commands:
Speech commands can be used to switch between audio output devices if you have a suitable microphone and have speech recognition enabled in Windows 11. The steps are as follows:
- To enter the Settings app, use the Windows key + I.
- Click “Accessibility” and then choose “Voice typing” from the left-hand menu.
- To set up voice recognition, turn on “Online speech recognition” and follow the directions.
- Once speech recognition is enabled, you may switch audio output devices by saying “switch audio output device” followed by the name of the device you want to use.
- Check the “Settings” icon in the speech recognition box to ensure that the device name is accurately recognised.
Conclusion
Finally, there are numerous ways to swap audio output devices in Windows 11.
The Quick Settings Panel makes it simple to switch between audio output devices. Simply access the panel by clicking on the volume icon on the taskbar and selecting the correct device from the list.
The Sound Control Panel enables more sophisticated audio management. Right-click the volume icon to enter the Sound options, then pick the Playback tab. You may then set a device as the default or adjust its settings.
To change audio output devices, utilise the Windows Settings app’s user-friendly interface. Using the Windows key + I shortcut, navigate to System > Sound and choose the chosen device from the available selections.
Some keyboards may include specialised audio output device switching shortcuts. Look for the Function (Fn) key and a media or speaker-related key combination.
Windows 11 allows speech recognition to adjust audio output devices for individuals who prefer voice instructions. Enabling online speech recognition in the Accessibility settings and using voice commands such as “switch audio output device” followed by the device’s name are recommended.
Furthermore, resources such as YouTube video tutorials, community forums, and debates can give more extensive instructions and insights into changing audio output devices in Windows 11.
When utilising third-party tools or changes, remember to choose reputable software and stick to legitimate sources for a pleasant experience.
You may simply switch between audio output devices in Windows 11 by using these methods and resources.
Efficiently managing audio sources can also significantly enhance teamwork, especially during live events or video production setups. A wireless intercom system further streamlines communication and audio management, helping teams collaborate effortlessly while maintaining professional sound quality.
FAQs About Switching Audio Output on Windows 11
Q1: How do I switch audio output devices using the Sound Control Panel?
A1: In the taskbar, right-click on the volume icon and select “Open Sound Settings.” Then, under the “Output” section, select “Device properties.” Click the “Playback” tab in the Sound Control Panel, right-click on the appropriate audio output device, and select “Set as Default Device” to switch to it.
Q2: Can I switch audio output devices directly from the Windows Settings app?
A2: You certainly can. To enter the Settings app, use the Windows key + I. Then, click “System” and then “Sound” from the left-hand menu. A list of audio output devices is given under the “Output” section. To switch to the chosen device, click on it.
Q3: Are there keyboard shortcuts to switch audio output devices?
A3: There are shortcuts for this purpose on some keyboards. Look for a key combination that consists of the Function (Fn) key plus either a media key or a F key with a speaker icon. To switch between audio output devices, press the key combination. You may need to modify the keyboard shortcut in the software settings of your keyboard.