


.png)
.png) Français
Français .png) Deutsch
Deutsch .png) Italiano
Italiano .png) 日本語
日本語 .png) Português
Português  Español
 In the ever-evolving landscape of online content, streaming has taken center stage, offering creators a captivating way to connect with audiences worldwide. Whether you’re a gamer, an artist, or a captivating personality, platforms like OBS and Discord have revolutionized how we share our passions. But what if there’s a way to elevate your streaming experience even further?
Imagine streams where your visuals are matched only by crystal-clear audio — a combination that immerses your viewers in a sensory adventure. The fusion of OBS and Discord opens doors to collaborative streaming, transforming passive watching into active participation.
In this article, we uncover the secrets of seamlessly linking OBS to Discord with impeccable audio. From setup to fine-tuning, you’re about to master the art of crafting engaging live streams that truly resonate. Get ready to explore the world where your voice becomes a conduit for entertainment, forging connections that last far beyond the stream!
What is OBS?
OBS stands for “Open Broadcaster Software.” It is a free and open-source software application that allows users to capture and broadcast their computer screen or a portion of it, along with audio, to various streaming platforms or recording files. OBS is widely used by content creators, gamers, educators, and anyone who wants to share their screen activity or create professional-quality live streams and videos.
With OBS, users can capture multiple sources, including their desktop, specific windows, webcams, and even images and text overlays. The software provides a range of tools for scene composition, audio mixing, transitions, and more, enabling users to create visually appealing and engaging content for their audience.
OBS is highly customizable and compatible with various streaming platforms like Twitch, YouTube, and Facebook Live. Moreover, OBS lets users integrate different mirrorless, DSLRs, and dedicated streaming cameras like the Hollyland VenusLiv for streaming without struggling with configuration.
Likewise, users can attach any wired mic, such as the Rode SmartLav+, or a wireless microphone system, such as the Hollyland Lark Max, and use this platform effortlessly to ensure the audience hears next-level audio. It has gained popularity due to its versatility, community support, and the fact that it’s available for free, making it an attractive option for both beginners and experienced streamers.

Hollyland LARK MAX - Professional Wireless Microphone
A professional wireless microphone system featuring studio-quality audio with advanced noise cancellation.
Key Features: Studio-Quality Audio | Magnetic Attachment | 8GB Internal Recording
What is Discord?
Discord is a versatile communication platform designed for creating communities and facilitating various forms of communication. It originated as a gaming-focused platform but has expanded to serve a broader audience. Users can join servers, which are like topic-based groups, and communicate through text, voice, and video channels. Features include real-time text messaging, voice conversations, video calls, and screen sharing.
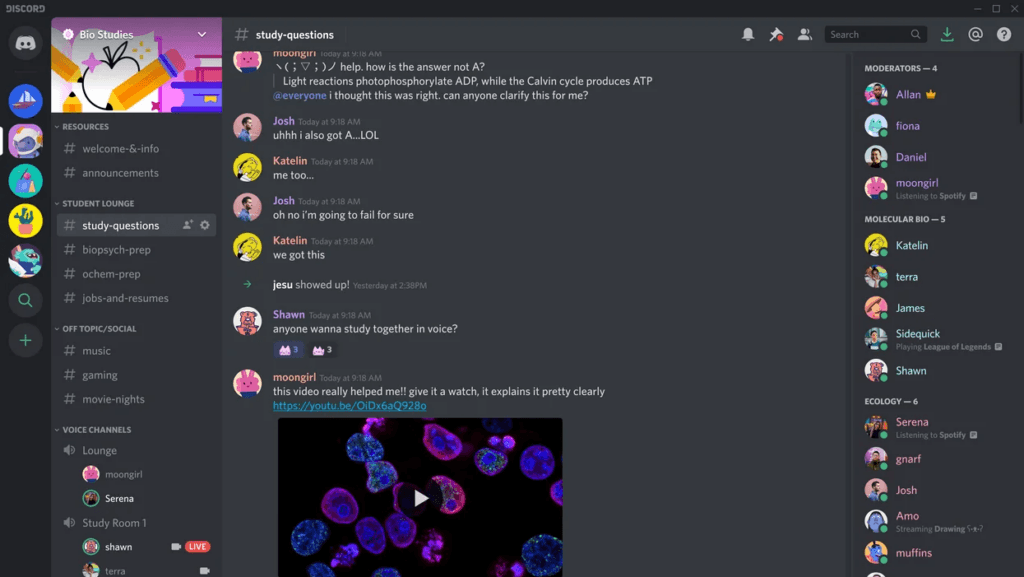
Discord also supports bots for various tasks and offers customization options for profiles and servers. It’s widely used by diverse communities, from gamers to professionals, for communication and collaboration.
Prior Setup of OBS before Streaming on Discord
OBS Studio stands out as the top choice for screen recording and live streaming, compatible with both Mac and Windows systems. Numerous streamers and creators utilize private Discord servers, conducting exclusive streams through premium subscriptions. Mastering the art of streaming OBS to Discord allows you to harness the synergistic potential of these two robust applications.
While you might already be familiar with basic OBS-to-Discord screen sharing, this article delves deeper. Learn how to elevate your game by streaming OBS Studio content to Discord with advanced adjustments for video quality, overlays, and a host of other enhancements.
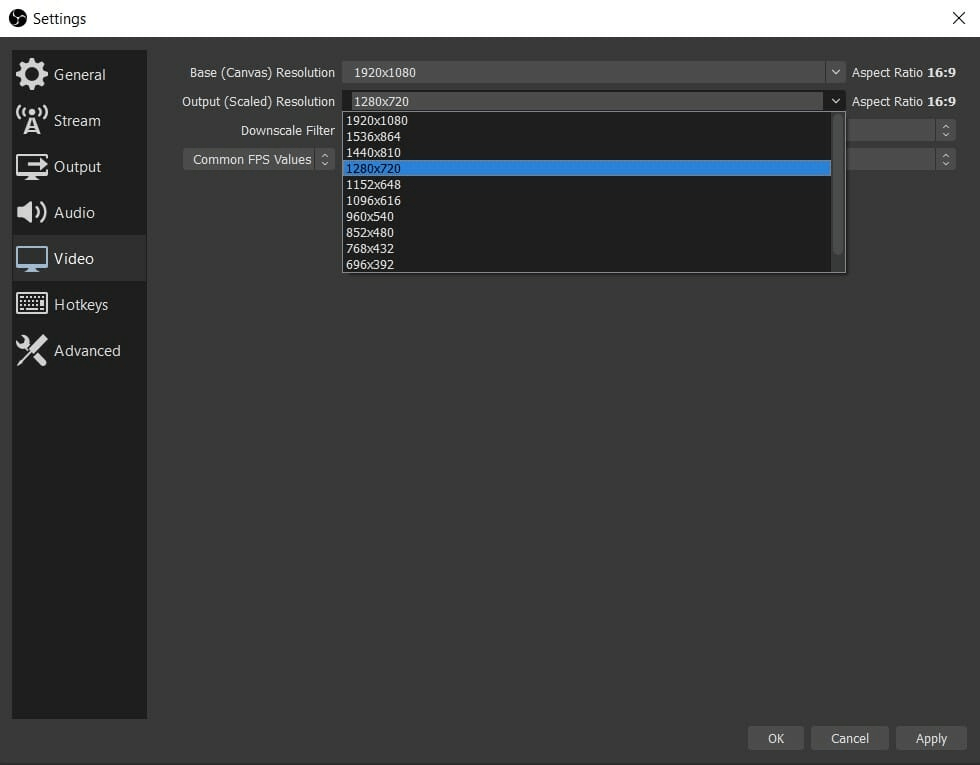
OBS Video Settings
Step 1: Optimize Video Settings
- Download and Launch OBS: Get started by downloading and launching OBS. Access settings and head to the ‘Video’ section.
- Adjust Resolution and Frame Rate: On a capable PC/Mac, opt for 1080p at 60 fps or choose 720p at 30 fps for smoother performance.
Step 2: Enhance Output Quality
- Access Output Settings: Click ‘Output’ to access advanced video options.
- Set Bitrate: Ensure superb output quality with a bitrate ranging from 4000 to 6000 Kbps.
- Choose x264 Encoders: Opt for reliable x264 encoders to ensure top-tier video quality.

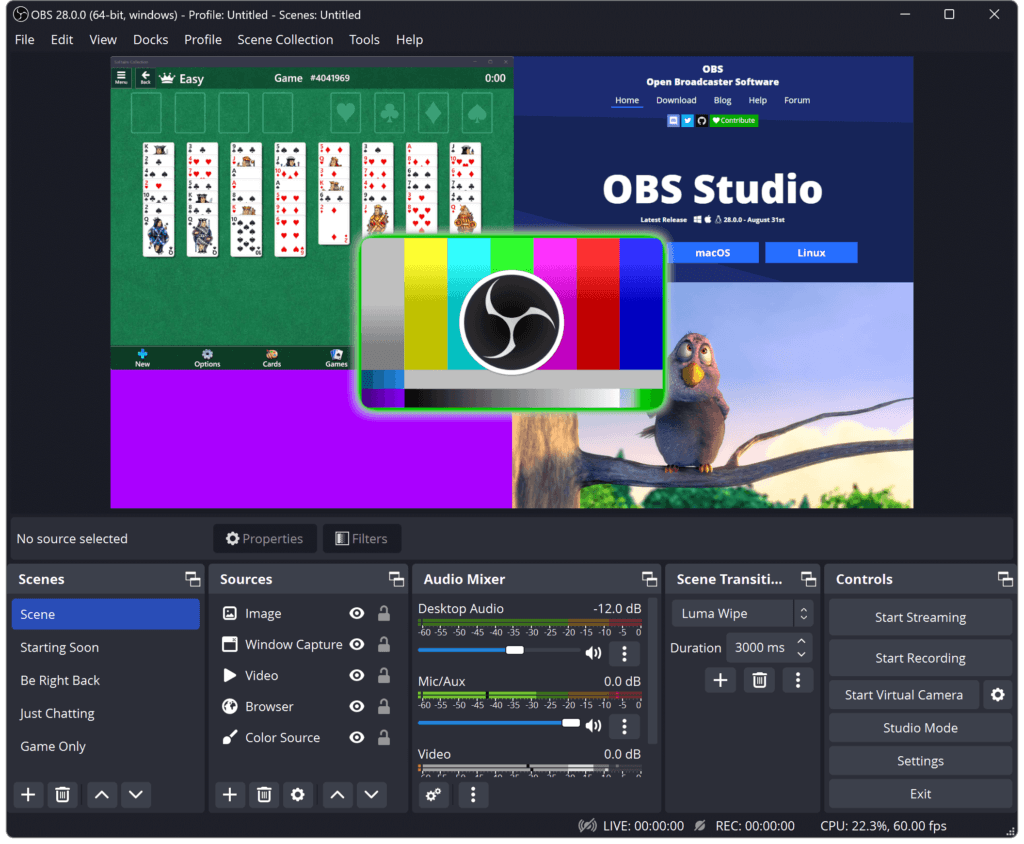
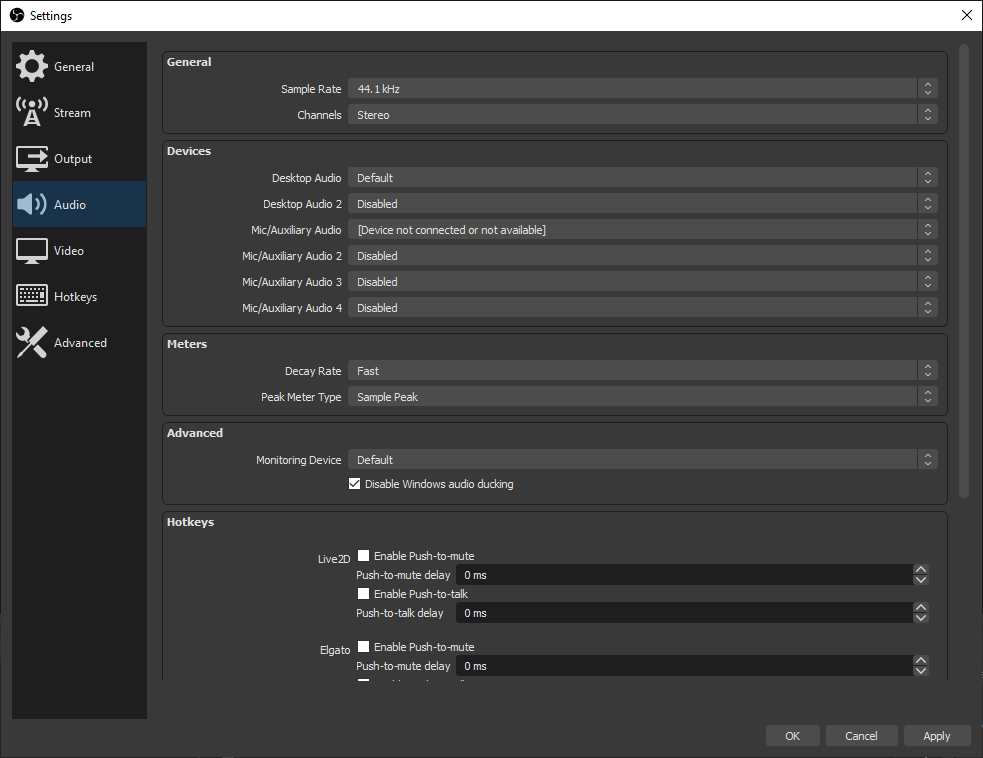
OBS Studio Audio Settings
Often, users overlook the importance of including audio sources to capture desktop sounds and microphone input.
Step 1: Access Audio Settings
Navigate to Settings: Go to the ‘Settings’ menu and select ‘Audio.’
Step 2: Set Audio Sources
- Choose Desktop Audio: Under ‘Desktop Audio,’ select the appropriate source for capturing system sounds.
- Configure Mic/Auxiliary Audio: Set up your microphone or auxiliary audio source for clear communication.
- Set Other Sources to Default: Ensure all other sources are set to default settings.
Adding Sources to Enhance OBS Studio Streams
Step 1: Curate Your Visual and Audio Elements
- Integrate Essential Sources: Elevate your streaming visuals and auditory experience by incorporating the necessary components.
Step 2: Source Selection
- Game Capture, Browser Windows, and More: Select and include sources that resonate with your streaming objectives. These can range from Game Capture to browser windows, applications, or your screen itself.
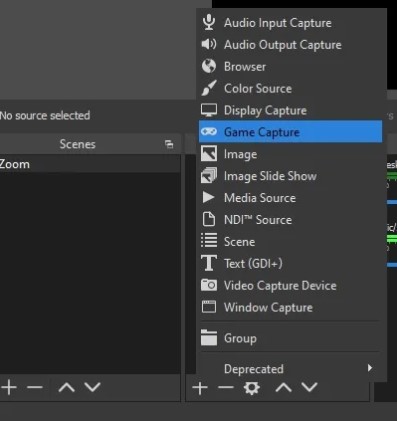
To broaden your stream’s visual horizon, simply locate and click on the Plus (+) icon positioned beside the Sources tab. This action unveils a selection of available sources, allowing you to handpick the ones that resonate with your vision. Furthermore, each source comes with its own set of properties that can be customized to perfection.
For gamers seeking an extra edge, consider incorporating Game Capture as your source of choice. By navigating to its properties, you can effortlessly enable specific checkboxes – a particularly handy feature when integrating third-party overlays for an immersive gaming experience.
How to Stream OBS to Discord with Audio on PC
Step 1: Download OBS and Set Up Accounts
- Get the Apps: Head to the official websites of Discord and OBS Studio to download the applications. Install them and establish your accounts if you haven’t already.
Step 2: Join or Create a Discord Server
- Access Discord: After setting up your accounts, open the Discord app.
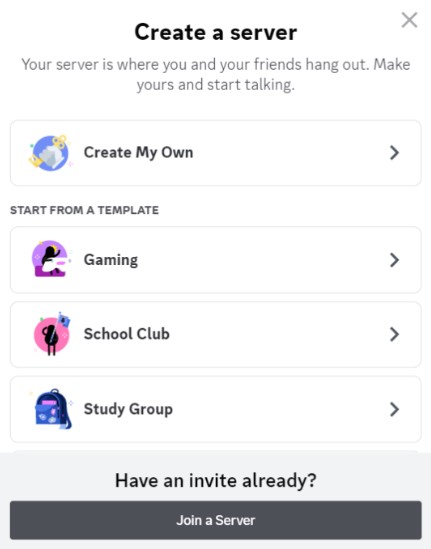
- Server Creation: Locate the Plus (+) button on the left sidebar and click it.
- Create Your Server: Choose “Create my own” from the options, assign a name, and add a photo.
Step 3: Set Up Discord for Streaming
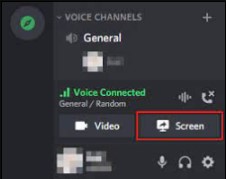
- Enter a Voice Channel: Begin by joining a “voice channel” within your server.
- Initiate Streaming: Look for the Screen button situated above your profile in the lower-left corner. Click on it to start the streaming process.
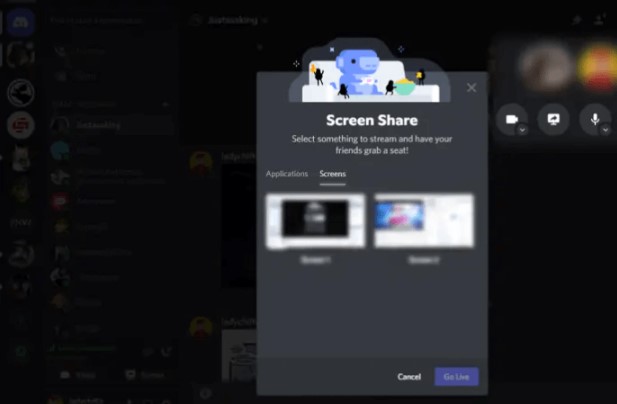
- Stream Configuration: The program largely configures itself, requiring minimal input. Select your preferred content to stream, be it a window, an app, or a browser.
Step 4: To start streaming, click on “Go Live”
Note: If the Screen button isn’t visible, keep in mind that streaming on Discord requires a “Discord Nitro” subscription. This subscription can be purchased for $9.99 per month and unlocks the streaming feature for your account.
Step 5: Integrate OBS with Discord Using Virtualcam Plugin
- Install Virtualcam Plugin: To link OBS Studio with Discord, get the OBS Virtual Plugin. Download and add it to Discord.
- Close OBS: Ensure OBS is closed before proceeding.
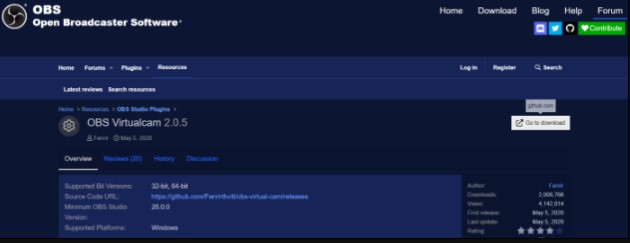
- Download Virtualcam Plugin: Visit the OBS Virtualcam Plugin page and click “Go to Download.” This plugin bridges the gap between OBS and Discord.
Now, reopen the OBS Studio app and adhere to the steps below to integrate Virtualcam with Discord:
- Click on Tools > VirtualCam in the main window.
- Press Start and close the dialog.
- In Discord, navigate to Settings > Voice & Video, and opt for OBS-Camera as your webcam within the video settings.
This process channels your OBS screen content through VirtualCam to Discord, enabling you to utilize it seamlessly. Lastly, when you’re ready to stream on Discord, remember to choose OBS Studio after clicking the Screen button.
Fixes to OBS-Discord Stream with No Audio
When sharing your entire screen on Discord, the platform might not capture your desktop audio. To resolve issues like OBS recording without audio, you’ll need to troubleshoot either OBS or PC settings. Below, we outline potential solutions to address the absence of audio in your OBS Discord stream.
Solution 1: Enable Audio for OBS Studio in the Volume Mixer
If OBS Studio is muted in the Volume Mixer, audio sources won’t register. To rectify this, follow these steps to unmute OBS, and do the same for Discord to ensure sound functionality:
Step 1: Right-click the Speaker icon located at the bottom-right corner of your taskbar.
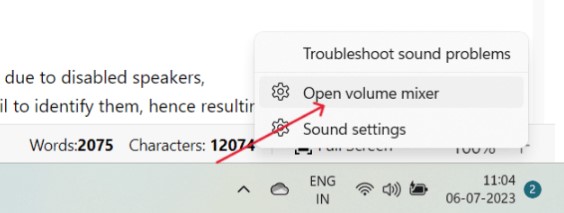
Step 2: Choose “Open Volume Mixer.”
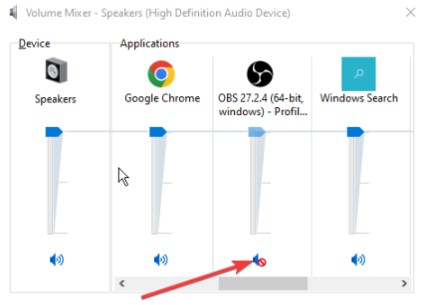
Step 3: Click on the Speaker icon below OBS to unmute the application.
Solution 2: Adjust OBS Audio Settings
Step 1: Launch OBS, click on “File,” and select “Settings.”
Step 2: Navigate to “Audio” settings. Under “General,” pick “Stereo” beside the “Channels” option.
Step 3: Crucial: In “Global Audio Devices,” manage your audio sources. Ensure alignment of sources for Desktop Audio and Mic/Auxiliary Audio.
Step 4: For sections without audio sources, set them to default, allowing system configuration of default sound devices.
Step 5: Apply changes and confirm. Restart OBS and Discord to observe the adjustments.
Solution 3: Verify System Sound Settings
If OBS fails to capture Discord audio, the issue might stem from disabled speakers, microphones, or headphones. This causes the app to overlook these devices, resulting in muted sound. Windows 11 users may experience this issue more prominently.
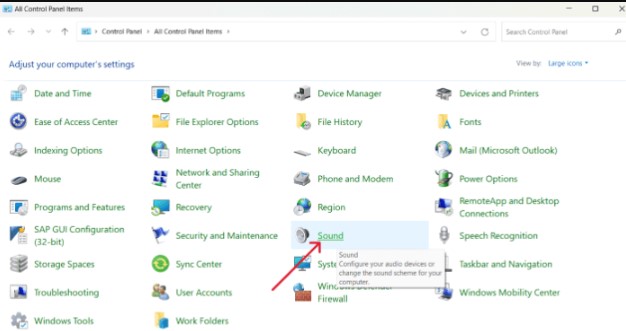
Step 1: Press the Windows key, search for Control Panel, and open it.
Step 2: Windows 10 users, click on Hardware and Sound; expand Sounds. Windows 11 users, simply click on Sounds.
Step 3: Right-click within the window and select Show Disabled Devices.
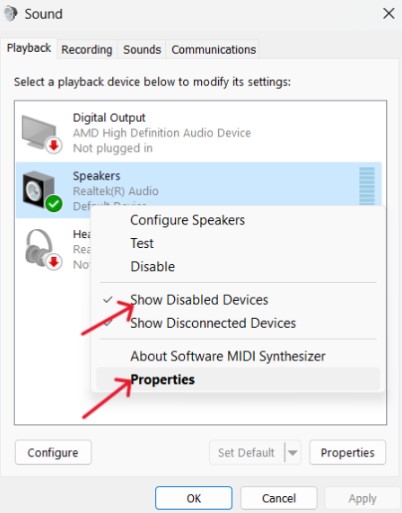
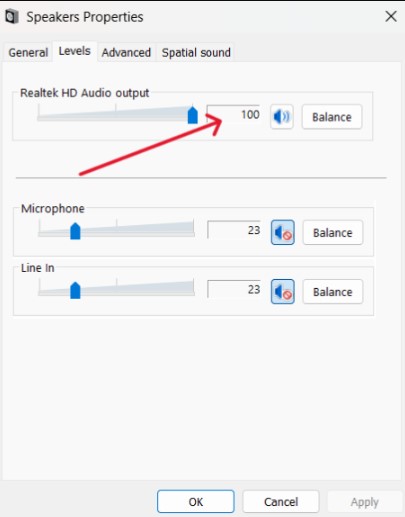
Step 4: Head to the playback tab, click Properties on your audio device.
Step 5: Adjust the levels according to your preference.
Step 6: In the Advanced tab, uncheck “Allow applications to take exclusive control of this device.”
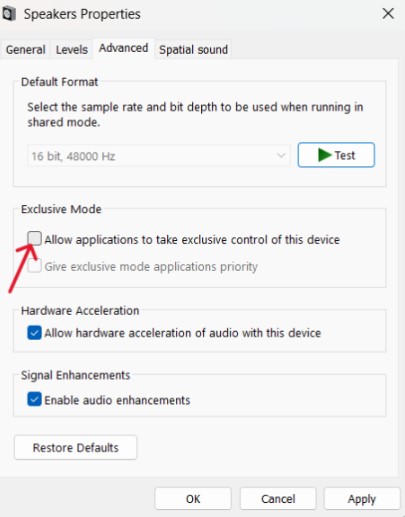
Step 7: Confirm changes by clicking OK.
Step 8: Configure your audio device. A new dialog box will appear. Choose Stereo from the menu. Restart both apps to check if audio detection and recording are resolved.
Solution 4: Set Speakers as Default Audio Device
Making your desktop speakers the default audio device can often resolve audio-related app issues.
Step 1: Open the Control Panel and access the Sounds settings as previously discussed.

Step 2: In the playback tab, select Speakers and opt for the “set default” option.
Step 3: Confirm changes by clicking the Apply button to save them.
Conclusion
From configuring OBS settings to integrating sources and troubleshooting audio challenges, this guide has equipped you with the essential know-how to master the art of streaming OBS to Discord. Whether you’re a gamer, artist, educator, or entertainer, the dynamic synergy between OBS Studio and Discord can amplify your impact and reach.
By following the steps outlined in this article, you’re poised to craft streams that not only captivate visually but also immerse your audience in rich, high-quality audio. As you fine-tune your setups, troubleshoot issues, and explore advanced features, remember that the heart of streaming lies in your ability to create connections and share your passion with the world.
So, embark on your streaming journey armed with the knowledge gained here. Experiment, innovate, and embrace the exciting possibilities that streaming OBS to Discord with audio can bring to your content creation endeavors. Hit the comment section below to give your feedback and if you have any additional queries. Happy streaming!
Frequently Asked Questions
Can OBS Transmit Audio to Discord?
The OBS Virtual Camera doesn’t inherently carry audio. To bridge this, audio availability for your stream is managed through the audio monitoring stream. This stream, separate from the main output, ensures audio reaches your viewers.
Why is Audio Missing During Discord Screen Sharing?
Outdated, corrupted, or missing audio drivers might cause audio loss while screen sharing on Discord. Administrative permissions can also be a factor; some systems require administrator access for audio-enabled screen sharing.
Why Is Streaming Audio Not Audible on Discord?
One straightforward solution involves checking accidental mute settings on your PC’s Audio icon. If muted, unmuting could restore audio for Discord streams.
Does Discord Screenshare Include All Audio?
Sharing your entire screen doesn’t transmit audio. When sharing a specific application, however, its audio accompanies the visual content.
How to Stream OBS via Discord?
In Discord, select OBS VirtualCam as your primary webcam via Settings > Audio & Video. This setup empowers you to commence streaming.
How do I get audio through OBS?
Utilize OBS’s Desktop Audio setting. Within the Audio Mixer, access Desktop Audio, click Settings (gear symbol), then Properties. Designate your audio interface as the Device to relay system audio through streams.
How to use OBS Virtual Camera on Discord?
- In OBS, access Sources, click Plus (+), choose Display Capture or Video Capture, and pick your webcam. Start Virtual Camera.
- In Discord, navigate to App settings > Voice & Video > Camera. Choose OBS Virtual Camera for the virtual feed.
Where is the stream key in Discord?
Discord lacks a Stream Key feature. Instead, use Screen Share to broadcast on your Server: Join a voice channel, spot the Screen icon, select content, adjust settings, and hit Go Live.
Why is OBS not capturing my audio?
Often, incorrect playback device defaults in OBS lead to sound issues. Right-click Speaker icon, opt for Sounds, head to Playback, select your speaker, Set Default, and Apply.
How do I output audio to Discord?
In Discord, find your username’s gear icon, proceed to Voice and Video under App Settings. Tune the output volume to your preference using the provided sliders.


