


.png)
The auto-quality feature on YouTube videos often gives viewers a less-than-ideal visual experience and causes problems. It causes problems resulting in blurriness and lack of sharpness, especially on bigger screens. Moreover, this is particularly annoying when watching high-definition videos or visually detailed content. To address this challenge, users can manually adjust the quality settings.
In addition, YouTube provides various options, like 1080p, 720p, or even 4K if it’s available. Users can take charge of these settings to customize the viewing experience based on your device and network. In this article, we’ll familiarize you with the reasons for the low auto quality of YouTube videos and the fixes to solve these issues.
Why Does YouTube Always Auto Show Video in Low-Quality?
The default setting of YouTube for quality badly affects the viewer’s experience. It can be annoying when videos look pixelated or unclear if they’re supposed to have lots of details. Let’s look into why YouTube’s automatic quality setting usually starts with lower resolutions in the following section.
- Internet Connection Speed: YouTube automatically shows low-quality videos depending on your internet connection speed. It helps ensure smoother playback by adjusting the video resolution to match your available bandwidth. Additionally, it prevents buffering problems and enables users with slower internet connections to stream content.
- Screen Size: The application displays videos in choppy playback to suit different screen sizes. This automatic adjustment in video resolution is tailored for smaller screens to optimize playback for devices with limited display capabilities. Additionally, users can get diverse viewing experiences across devices, though it does mean compromising on video quality.
- Quality of the Video: The goal is to enhance streaming efficiency while preserving faithfulness to the original content. In this way, the video can align with the source material to reduce the strain on bandwidth for videos with lower resolutions.
- Your Browser: YouTube automatically presents videos in reduced quality depending on your browser.
This adaptable feature customizes video resolution to fit with browser capabilities to facilitate smoother playback. While this guarantees compatibility across various browsers, it could result in a trade-off in video quality for browsers with restricted playback support.
What Video Qualities Are Available for Users on YouTube?
YouTube is an extensive platform that includes videos on various topics. While watching videos, you encounter various video qualities that impact how content appears on screens. Understanding these qualities for video creators and those seeking an optimal viewing experience is crucial. So, let’s discuss the different video qualities on YouTube and how they impact our online watching adventure.
| Resolution | Characteristics |
| 240p | Videos on YouTube with a 240p resolution have a basic quality and feature a pixel count of 426×240. This resolution provides less detail and clarity, making it suitable for slower internet connections or older devices. Although lacking in sharpness, 240p videos use less data, making them accessible to users with limited bandwidth. Additionally, it contributes to a smoother playback experience in less-than-ideal conditions. |
| 360p | The 360p resolution on YouTube presents a medium-quality video that offers better detail than lower resolutions. It is suited for users with average internet speeds and strikes a balance between clear visuals and economic data use. Moreover, this resolution guarantees an enjoyable viewing experience on smaller screens. |
| 480p | It is a solid video quality with improved details to find a middle ground between clarity and file size. Users with decent internet speeds can use it on different screen sizes. Plus, it significantly enhances visual quality while remaining a practical option for efficient streaming and data usage. |
| 720p | YouTube’s 720p resolution presents high-definition video quality with a pixel count of 1280×720. It provides exceptional detail with dependable internet for an engaging viewing experience. Furthermore, it signifies clear visuals and a notable improvement in quality for sharpness and streaming. |
| 1080p | This resolution provides excellent high-definition video quality and boasts remarkable detail. A strong internet connection to play this video assures clear, immersive videos with sharp visuals across various screens. Plus, it maintains an ideal equilibrium to ensure an optimal online video experience. |
| 1440p | 1440p resolution of the videos on YouTube represents a step forward in quality. This video quality offers impressive Quad-HD video quality designed for users with high-speed internet. In addition, it tends to include gaming features like high refresh rate and variable refresh rate support and include productivity features. |
| 2160 or 4K | This resolution guarantees extremely sharp visuals and serves as the epitome of video quality. It looks like 2K to most viewers but offers filmmakers more room to zoom in and edit. Besides, you can enjoy enhanced detail and improved color reproduction of the content in 4K resolution. |
How to Fix YouTube Auto Quality Always Low While Playing Videos?
If your YouTube videos mostly look blurry with unclear resolutions, you can make them better by changing some settings. This section will tell you about some smart fixes to solve this kind of issue on YouTube. After going through this section, you will be able to resolve the low auto video quality with the help of a few simple steps.
Fix 1. Adjust Video Quality Preference Settings on YouTube App
If you want to get stable video quality ON YouTube, there are several video settings available for you. You just have to tweak the YouTube settings to get the job done. To use this fix on the mobile YouTube app, follow the given steps:
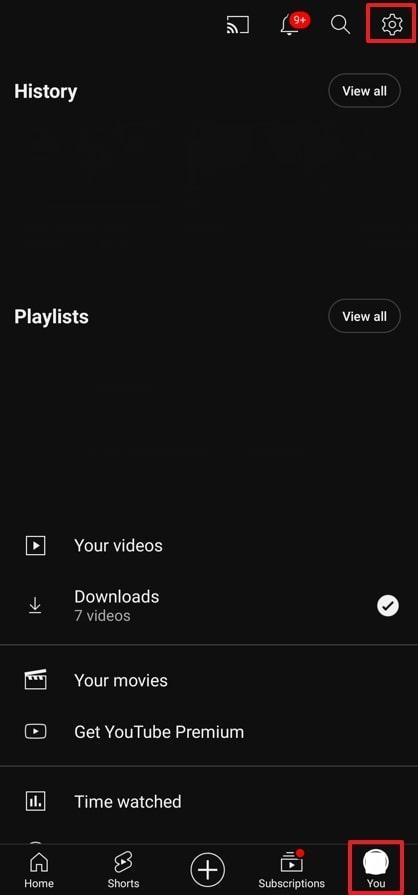
Step 1: First, launch the YouTube app on your mobile to start adjusting your settings. Then, tap on the “Profile” icon on the bottom-right of your screen. From your profile, go to settings by tapping on the “Gear” icon in the upper-right corner.
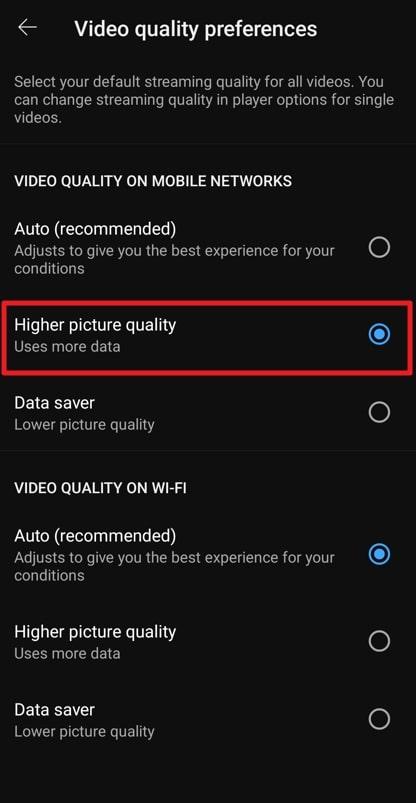
Step 2: Afterward, select the “Video Quality Preferences” option from the list of settings. Under “Video Quality on Mobile Networks,” you can choose the “Higher Picture Quality” option to always get the higher quality video every time you play the video. Likewise, apply the same settings for “Video Quality on Wi-Fi” to fix low video quality issues.
Fix 2. Turn Off Hardware Acceleration Option
Unstable video quality in Chrome might be caused by hardware acceleration. To make your video quality consistent, you can turn off hardware acceleration in your Chrome browser. This section will guide you on how to use this fix in simple steps:
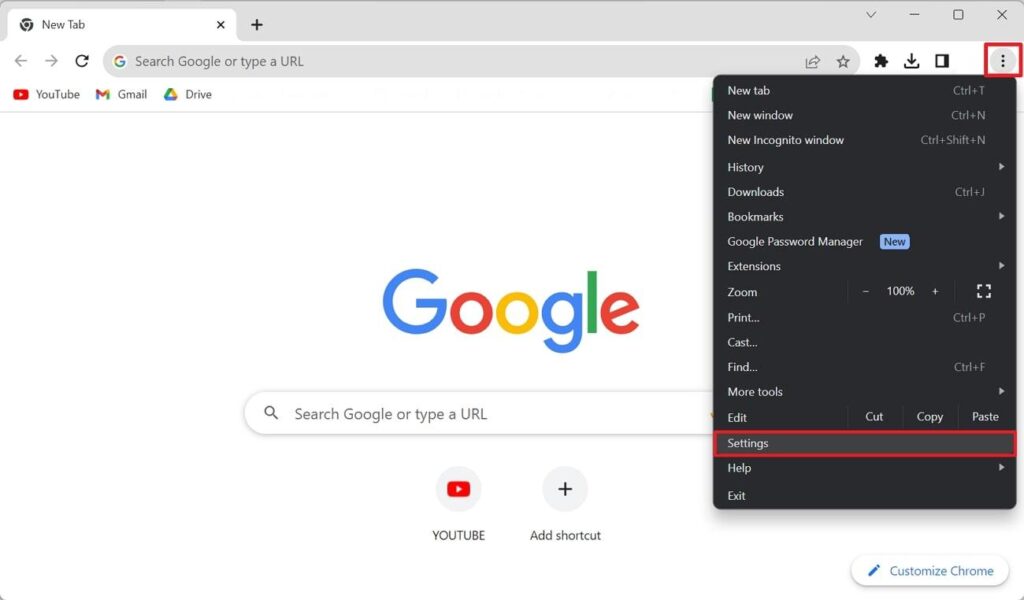
Step 1: After launching Google Chrome, hit the three dots button in the top right area. From the dropdown menu, select the “Settings” options to access a new window.
Step 2: Afterward, select “System” from the left-side panel to access further settings on the right side. Finally, turn the “Use Hardware Acceleration When Available” option off to be able to view videos in higher quality.

Fix 3. Utilize YouTube Extension to Adjust Video Quality on Google Chrome
You may not find any official method to set the default video quality on your system. However, browser add-ons can help you fix the video quality you want on YouTube. This section will guide you in steps on how to utilize this YouTube extension to adjust video quality:
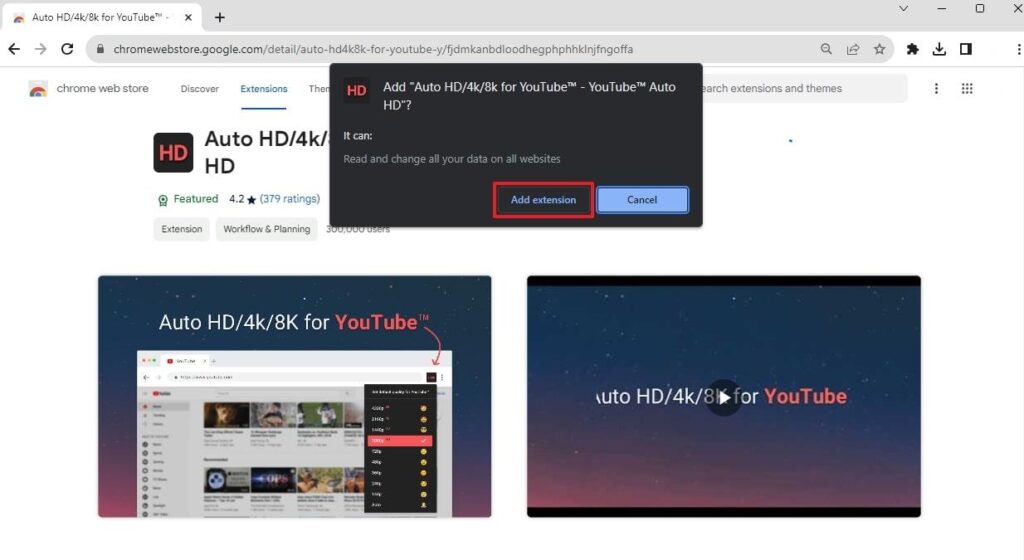
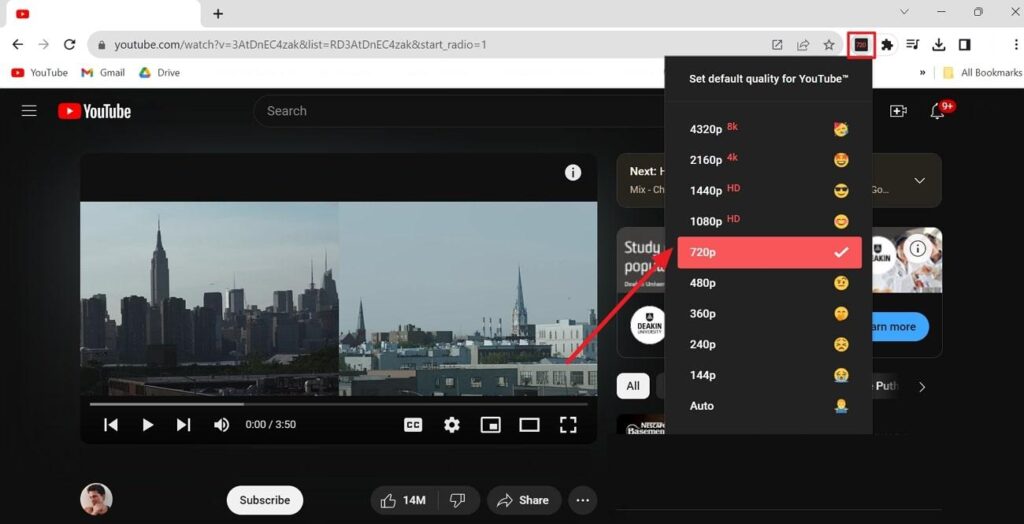
Step 1: Go to the “Chrome Web Store” from your browser’s settings. Then, search for the “Auto HD/4k/8k for YouTube” extension through the search bar. Afterward, click on the “Add to Chrome” button and then select “Add Extension” from the pop-up menu.
Step 2: Now, restart your browser and open YouTube. Then, hit the “Auto HD/4k/8k” extension icon from the extension menu of your browser. The extension will then open with several quality options. Finally, select your desired video quality, and the extension will automatically save your choice for future use.
Fix 4. Make Use of Extension While Watching YouTube Videos on Firefox
If you intend to use the above-mentioned extension on Firefox browser, it’s not available on Firefox. But there’s an alternative to this extension that is available for Firefox for the same purpose. To make use of that extension, go through the steps given below:
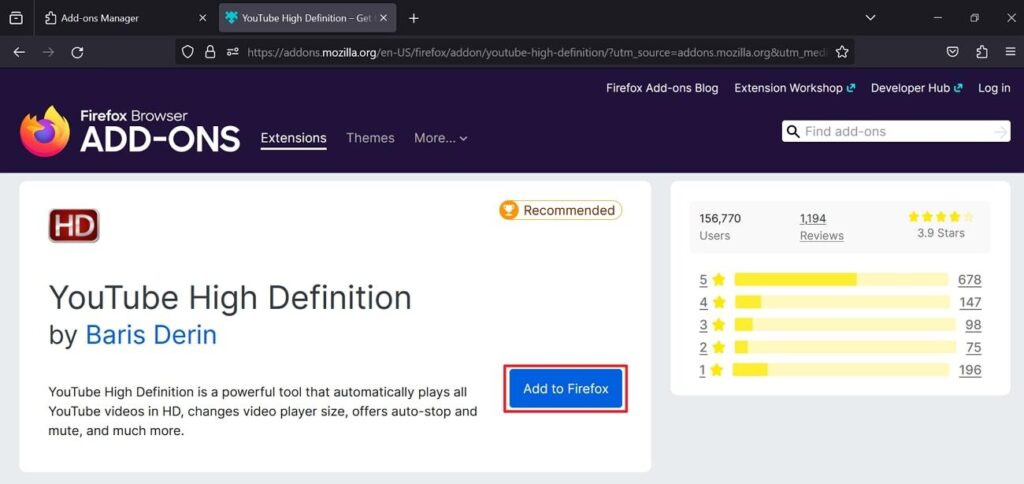
Step 1: After reaching the “Add-ons” menu on Firefox, search for the “YouTube High Definition” extension. Then, proceed to click on the “Add to Firefox” button to successfully add it to your browser.
Step 2: Now, after restarting your browser, launch the YouTube website and play a video. Afterward, hit the “YouTube High Definition” icon from the extension menu. Finally, choose your preferred “Video Quality,” and the extension will load it automatically.

Fix 5. Turn On the AV1 Settings for Smoother HD Streaming
AV1 is a video codec that offers advanced compression, resulting in smoother and high-definition streaming of videos. If you are wondering how to use this setting on YouTube, this section will teach you about it in simple steps:
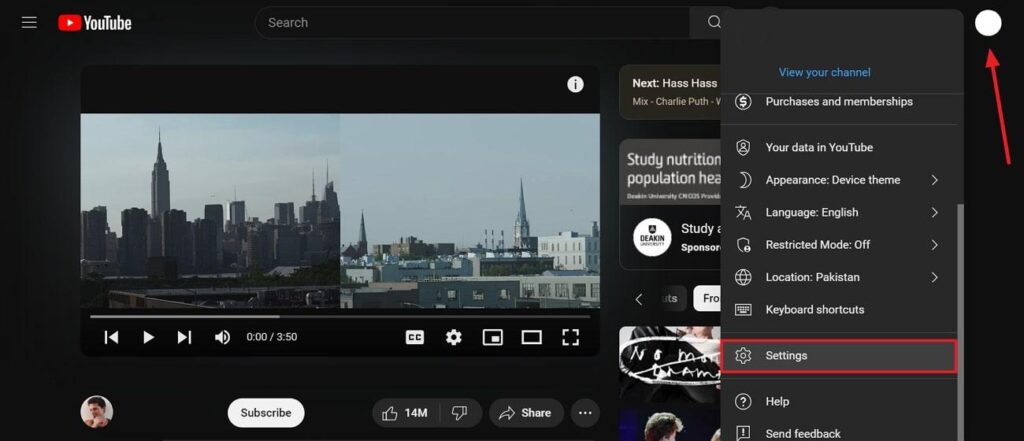
Step 1: First, open YouTube on your browser and then click the “Settings” button on the dropdown menu after clicking the “Profile” icon.
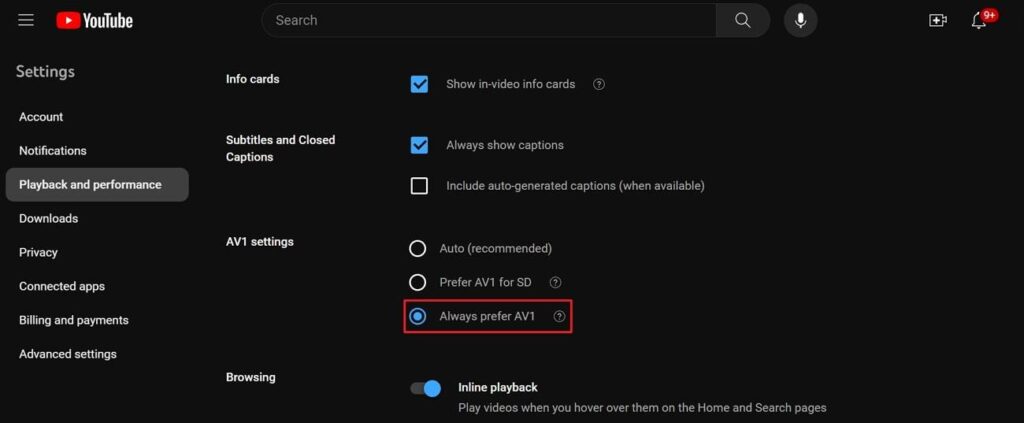
Step 2: Afterward, press the “Playback and Performance” tab to access a new set of settings. Now, scroll to the “AV1 Settings” section, where you will have three options. Here, select the “Always Prefer AV1” option and restart YouTube to enjoy its smoother experience.
FAQs
Q1. How can I change the quality of videos while watching YouTube?
Play any video on YouTube and navigate toward the bottom right of the play screen. Now, you will see various options and proceed by clicking on the “Settings” icon. Then, a pop-up menu will emerge. Navigate to the “Quality” option within this menu and proceed to pick the resolution that best suits your preferences.
Q2. Can I watch any video in 4K quality on YouTube?
Yes, YouTube allows you to watch videos in 4K if the video itself is uploaded in this resolution. Your devices should be optimized for viewing 4K quality videos. For this purpose, you need to choose a 4K video and check video quality in settings. Furthermore, ensure a speedy internet connection and utilize a device that is compatible with a 4K display.
Q3. Why does my video buffer even at lower-quality settings?
Buffering on lower-quality settings can occur due to an unreliable internet connection and network congestion. It can also be due to device constraints, browser glitches, or outdated software. To address this issue, confirm sufficient internet speed, reduce simultaneous device usage, and verify software updates. Plus, you should clear cached data and cookies and consider turning off hardware acceleration.
Q4. Why does the video quality change during playback?
YouTube adapts video quality in real time according to your internet speed. In case of a weaker connection, YouTube reduces quality to prevent buffering. On the other hand, it enhances quality for an improved viewing experience with a stable internet connection. Additionally, users have the option to manually adjust settings to prioritize higher or lower quality as needed.
Conclusion
In conclusion, viewers can be annoyed after seeing blurry videos on YouTube due to their low auto quality. It happens because of slow internet and limitations with your devices that are not compatible with high-quality videos. In addition, we have familiarized you with several other reasons that can cause low auto video quality while streaming on YouTube.
As discussed throughout the article, users can manually adjust the quality preference setting on the application. Plus, you can turn off hardware acceleration or utilize the YouTube extension to adjust video quality on Google Chrome and Firefox. By utilizing all the methods explained here, you can get a smoother streaming experience on YouTube.
If you’re serious about improving your video quality and delivering crisp, reliable content to your audience, upgrading your gear is often essential. A professional streaming camera can greatly enhance your video’s resolution and clarity, ensuring your viewers enjoy a consistently high-quality viewing experience.


