.png)
If your voice recording sounds thin, tinny, or distant, you aren’t alone. Whether you are recording a podcast, a voiceover, or a musical instrument, learning how to add bass to your audio using Audacity equalization is one of the most valuable skills in post-production.
But before you start sliding faders, it helps to understand why your recording lacks depth. Most often, the lack of bass isn’t a software error—it’s a physical one.
Three main culprits usually cause “tinny” audio:
- Microphone Distance: This is the most common issue. The further you are from the mic, the more low-end frequencies you lose. This is known as the Proximity Effect—getting closer naturally increases bass.
- Hardware Limitations: Built-in laptop mics or budget lavaliers often have small diaphragms that physically cannot capture deep frequencies effectively.
- Room Acoustics: A large, empty room can “wash out” the direct sound of your voice, leaving you with a hollow, echoey recording.
Equalization (EQ) fixes this by acting as a targeted volume knob. Instead of turning the entire track up, EQ allows you to boost only the specific low frequencies that provide depth, artificially restoring the “body” that was lost during recording.
The “Goldilocks” Zone: 80Hz to 250Hz
When we talk about “adding bass” to a voice, we aren’t talking about the sub-bass that shakes a car stereo. For human speech, the “warmth” and “authority” live in a very specific frequency range.
- Below 80Hz (The Rumble): This is usually just air conditioning hum, desk vibrations, or wind noise. Boosting this adds “mud,” not bass.
- 80Hz – 250Hz (The Body): This is the sweet spot. Boosting frequencies here brings out the chest resonance in a voice, making it sound closer and more professional.
- 250Hz – 500Hz (The Boxiness): Be careful here. Too much energy in this range makes the audio sound like it was recorded inside a cardboard box.
In the methods below, we will focus specifically on targeting that 80Hz to 250Hz range to give your audio the broadcast-quality weight it’s missing.
Method 1: Using Filter Curve EQ (The Professional Way)
The Filter Curve EQ is the most powerful tool in Audacity for fixing thin audio. Unlike simple bass knobs, this tool allows you to “draw” the exact shape of your equalization, giving you precise control over which frequencies to boost and which to ignore.
Follow these steps to apply a clean, professional bass boost:
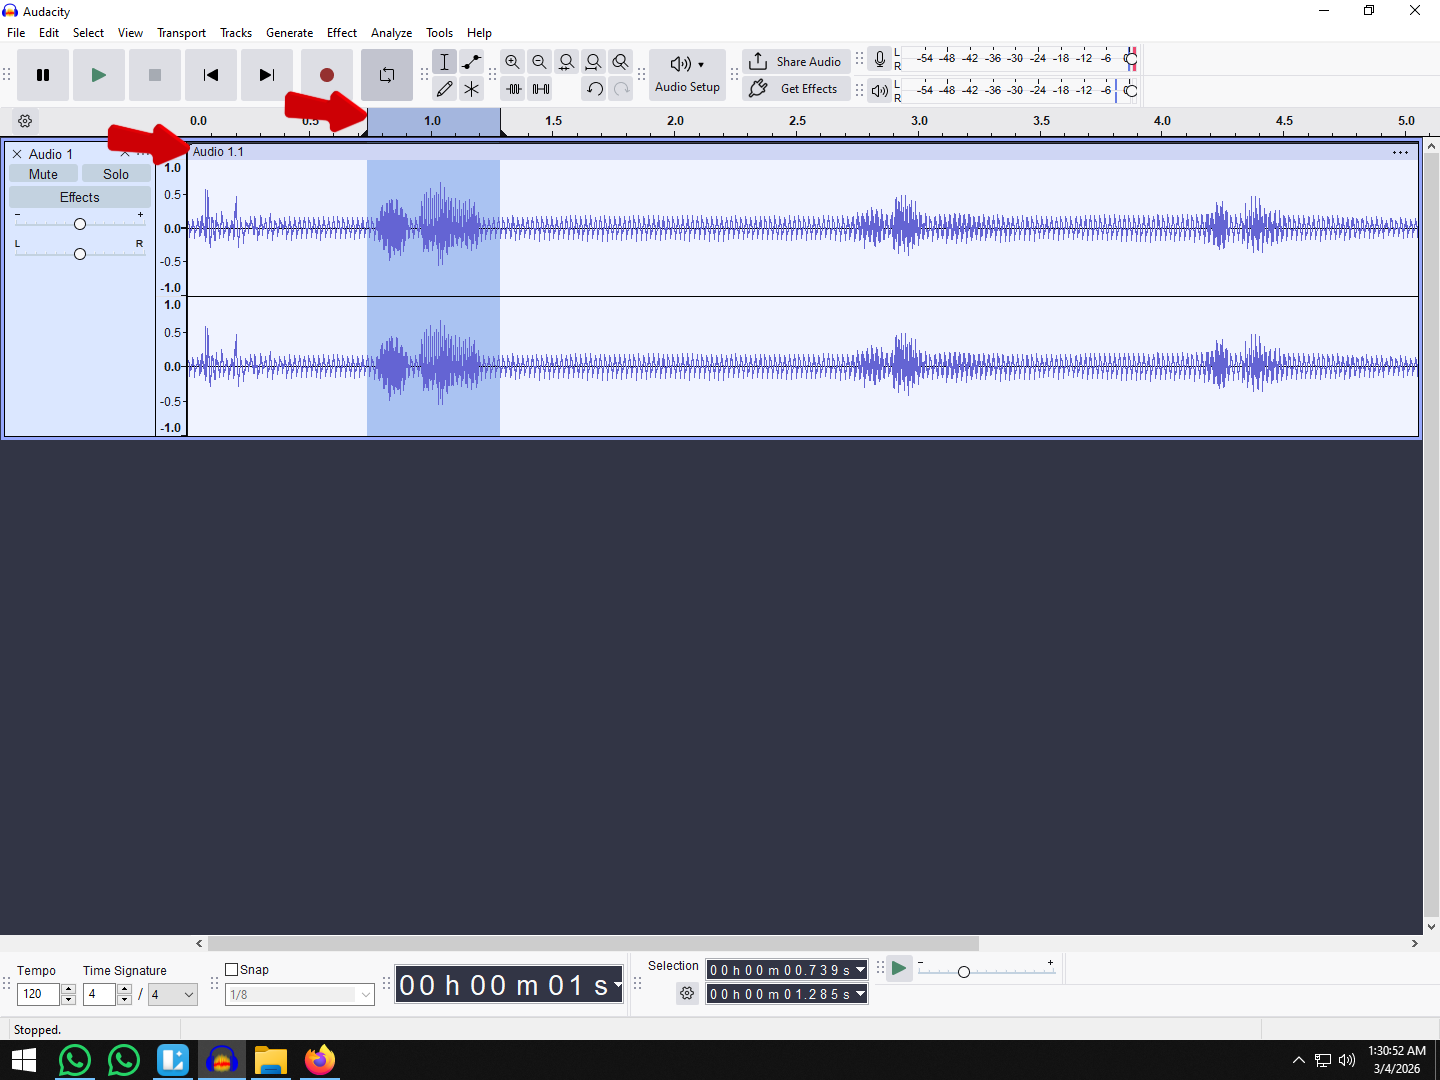
- Select Your Audio: Click on the track header or press Ctrl + A (Cmd + A on Mac) to select the entire recording.

- Go to the Effect: In the top menu, select Effect > EQ and Filters > Filter Curve EQ.

- Load a Preset: Instead of drawing a line from scratch, click the Presets & Settings button (sometimes labeled “Manage”). Go to Factory Presets > Bass Boost.

- Adjust the Intensity: The default preset is often too aggressive (around +9dB). Click and drag the blue dots on the line to lower the curve. A boost of 3dB to 6dB is usually the “sweet spot” for natural-sounding vocals.
- Preview and Apply: Click Preview to listen. If the voice sounds full but clear, click Apply.

How to Fine-Tune the Curve
To avoid a “muddy” sound, you need to understand where to place your boost on the graph:
- The “Body” Zone (80Hz – 150Hz): This is where the warmth of the human voice lives. Create a slight hump/boost here to make the voice sound closer and more authoritative.
- The “Mud” Zone (Below 60Hz): Unless you are mixing a movie trailer or heavy music, you generally do not need to boost frequencies below 60Hz. These frequencies mostly contain room rumble, traffic noise, and microphone handling sounds.
- Pro Tip: If your audio sounds muffled after boosting the bass, try adding a small dip (cut) around 300Hz – 400Hz to clear up the “boxiness.”
Method 2: Using Graphic EQ (The Visual Slider Method)
If drawing curves feels too abstract, the Graphic EQ is the perfect alternative. This tool looks like a physical mixing console, giving you individual vertical sliders for specific frequency bands. It is ideal for beginners because it allows you to visualize exactly which parts of the audio spectrum you are changing.
Follow these steps to add warmth using the slider method:
- Select Your Track: Click on the track header or press Ctrl + A (Cmd + A on Mac).

- Go to the Effect: Select Effect > EQ and Filters > Graphic EQ.

- Identify the Bass Frequencies: Focus on the sliders located on the far left of the window. These control the low end of your recording:
- 60Hz: Deep sub-bass (often just rumble, so use sparingly).
- 125Hz: The “body” and “thump” of the voice.
- 250Hz: Warmth and fullness.

- Boost Gradually: Click and drag the sliders for 125Hz and 250Hz upward. Start with a small boost of +3dB to +6dB. If you need deep vibration, slightly raise the 60Hz slider, but keep it lower than the others to avoid muddiness.
- Apply and Listen: Click “Preview” to hear the changes before applying them permanently.
⚠️ Warning: The Distortion Risk
Graphic EQ is sensitive. Unlike the Filter Curve, which can be subtle, pushing multiple sliders up increases the overall volume (gain) of the track significantly.
If you push the sliders too high (e.g., +12dB or more), your audio will likely clip (hit the red zone) and distort. If this happens, lower the sliders or use the Normalize effect immediately after applying the EQ.
Method 3: The “Bass and Treble” Effect (The Quickest Fix)
If drawing curves or adjusting multiple frequency sliders feels too technical, the Bass and Treble effect is your best option. This tool simplifies the entire process into two main controls, making it ideal for beginners who want a warmer sound without needing to understand audio physics.
This method applies a general boost to the low end rather than targeting specific frequencies. It is less precise than the Filter Curve EQ, but significantly faster.
How to Apply the Quick Fix
- Select Your Track: Click the track header or press Ctrl + A.

- Go to the Effect: Select Effect > EQ and Filters > Bass and Treble.

- Adjust the Bass: Locate the Bass (dB) slider. Move it to the right to increase the low-end presence.
- Start Small: A boost of +3 dB to +6 dB is usually enough for spoken word.
- Avoid Extremes: Pushing this slider past +10 dB will likely make your audio sound unnatural or muffled.
- Preview and Apply: Click Start Playback (or Preview) to hear the changes in real-time. Once you are happy with the warmth, click Apply.

The Trade-Off: Speed vs. Quality
While this method is efficient, it comes with limitations. Because you cannot choose which bass frequencies to boost, you risk amplifying unwanted low-end noise (like mic handling noise or room rumble) alongside your voice.
| Pros | Cons |
|---|---|
| User-Friendly: No knowledge of Hz or frequency ranges required. | Lacks Precision: You cannot target specific “muddy” areas to cut while boosting others. |
| Real-Time Feedback: Easy to hear changes as you move the slider. | “Boomy” Risk: Overusing this effect often makes the audio sound like it’s being played inside a box. |
| Integrated Volume Control: Includes a “Volume” slider to help manage gain while editing. | Distortion: Heavy use requires careful monitoring to ensure the audio doesn’t clip (turn red). |
Critical Step: Preventing Distortion (Clipping)
Boosting bass comes with a hidden cost: Volume.
Low-end frequencies carry a lot of energy. When you use EQ to boost the bass (even by just 3dB or 6dB), you are technically increasing the volume of those specific frequencies. If your audio was already loud, this boost will push the waveform past the digital ceiling (0dB).
In Audacity, this results in Clipping. You will see the playback meter hit the “Red Zone,” and your waveform will look like the tops have been chopped off flat. To the listener, this sounds like harsh crackling or static—ruining the “warmth” you just tried to add.
The Fix: Normalize Your Audio
You must reset the overall volume ceiling after applying your EQ settings. The best tool for this is Normalization, not Amplification.
- Select Your Track: Press Ctrl + A (Windows) or Cmd + A (Mac).

- Go to the Effect: Select Effect > Volume and Compression > Normalize.

- Adjust Settings:
- Check “Remove DC offset.”
- Check “Normalize peak amplitude to.”
- Set the value to -1.0 dB.
- Apply: Click Apply.

Why -1.0 dB?
Setting your peak to -1.0 dB (rather than 0.0 dB) leaves a small buffer of “headroom.” This ensures that if you upload your audio to platforms like YouTube or Spotify, their compression algorithms won’t accidentally cause distortion during the transcoding process.
Pro Tip: Always apply EQ first, then Normalize last. If you Normalize first and then boost the bass, you will likely clip again immediately.
Pro Tip: How to Capture Rich Bass Without Editing
While Audacity is a powerful tool, it operates on a simple rule: You cannot boost frequencies that were never captured.
If your original recording sounds thin, tinny, or distant, using EQ to artificially pump up the bass often results in “muddy” audio or increased background noise (hiss). The most effective way to get that deep, broadcast-quality voice is to capture it at the source.
To avoid spending hours fixing audio in post-production, we recommend starting with a microphone system capable of capturing studio-quality depth, like the Hollyland LARK MAX 2.

Hollyland LARK MAX 2 - Premium Wireless Microphone System
A premium wireless microphone for videographers, podcasters, and content creators to capture broadcast-quality sound.
Key Features: Wireless Audio Monitoring | 32-bit Float | Timecode
Here is why upgrading your input gear solves the “thin audio” problem better than any software plugin:
- Studio-Quality Capture (48kHz/24-bit): Many entry-level mics cut off low frequencies to save bandwidth. The LARK MAX 2 records in high-resolution 48kHz/24-bit, ensuring the natural resonance and “chest voice” (the low end) is preserved exactly as it sounds in real life.
- 32-bit Float Recording: Adding bass in Audacity often pushes volume into the “red zone,” causing distortion. The LARK MAX 2 features 32-bit Float recording, which provides massive dynamic range. This means even if you scream or have heavy bass in your voice, the audio will not distort. You get a perfect, clip-free raw file that takes EQ adjustments beautifully.
- Real-Time Monitoring: Instead of guessing how you sound, you can use the new OWS (Open Wearable Stereo) earphones to monitor your audio wirelessly. This allows you to adjust your mic placement instantly to catch more bass proximity effect before you hit stop.
Common Mistakes When Boosting Bass
Equalization is easy to abuse. If you push the bass too hard, your professional recording can quickly turn into an unintelligible mess. Avoid these three common pitfalls to keep your audio clean.
1. Creating a “Muddy” Mix (The Sub-Bass Trap)
New editors often assume that “more bass equals better audio,” so they boost everything on the low end. However, the human voice rarely produces useful frequencies below 80Hz.
If you boost frequencies in the 20Hz – 60Hz range, you aren’t adding depth to your voice; you are amplifying room rumble, air conditioning hum, and microphone handling noise.
- The Fix: Before adding bass, use a High-Pass Filter (or “Low Cut”). In the Filter Curve EQ, drag the line down for everything below 60Hz-80Hz. This cuts the noise while leaving room for the “good” bass to shine.
2. Over-EQing (The “Robotic” Effect)
Applying aggressive boosts (e.g., +12dB or higher) alters the fundamental character of your recording. This often results in a hollow, robotic, or “phasey” sound that distracts the listener.
- The Fix: Subtlety is key. A boost of 3dB to 6dB is usually enough to add warmth. If you feel the need to boost by more than 6dB, the issue likely isn’t the EQ settings—it’s the original recording quality or microphone placement.
3. Ignoring the “Phone Test”
It is easy to get lost in how good the bass sounds on your expensive headphones or studio monitors. However, most of your audience will likely listen on smartphones or laptop speakers, which physically cannot reproduce deep bass frequencies.
If you balance your audio entirely around the low end, your voice may disappear or sound whisper-quiet on mobile devices.
- The Fix: Always mix for context. Ensure your mid-range frequencies (where speech intelligibility lives) are clear, and treat the bass boost as “icing on the cake” rather than the foundation of your volume.
Frequently Asked Questions (FAQ)
What is the best frequency for bass in Audacity?
There is no single “magic number,” as it depends on the source voice. However, for deep, radio-style authority (“thump”), try boosting between 80Hz and 120Hz. If you want to add “warmth” or “body” to a thin voice without making it sound heavy, try a gentle boost around 200Hz to 250Hz. Avoid boosting below 60Hz.
Why does my bass sound distorted after EQ?
Boosting bass frequencies adds significant volume to your track. If your audio was already loud, this extra gain pushes the waveform above the digital ceiling (0dB), resulting in clipping (distortion). To fix this, run Effect > Volume and Compression > Normalize and set the peak amplitude to -1.0 dB after applying your EQ.
Is Filter Curve EQ better than Graphic EQ?
For professional results, Filter Curve EQ is generally considered better because it offers unlimited precision. It allows you to draw smooth curves and target exact frequencies (e.g., cutting exactly 112Hz while boosting 80Hz). However, Graphic EQ is often preferred by beginners because the fixed sliders offer a more intuitive, visual way to understand how frequency bands affect the overall sound.
Conclusion
Adding bass in Audacity is one of the fastest ways to turn a thin, amateur recording into a professional, broadcast-ready track. Whether you choose the precision of the Filter Curve EQ, the visual simplicity of the Graphic EQ, or the quick fix of the Bass and Treble effect, the goal remains the same: adding warmth and authority without sacrificing clarity.
Remember that moderation is key. A subtle boost of 3dB to 6dB is often all you need to give a voice “body.” Pushing the sliders too far will only result in muddy, distorted audio that fatigues the listener.
However, keep in mind that post-production EQ is a polish, not a miracle cure. You cannot boost frequencies that weren’t captured in the first place. If you find yourself spending hours trying to “fix” thin audio in every project, the limitation is likely your hardware, not your editing skills.
To capture rich, studio-quality bass right at the source, consider upgrading your input gear to the Hollyland LARK MAX 2. With 48kHz/24-bit audio capture and 32-bit Float recording, it records the full depth of your voice naturally, reducing the need for heavy EQ adjustments later. Start with great raw audio, and use Audacity simply to make it shine.