.png)
Figuring out exactly how to connect and add a new microphone to Audacity is usually the first hurdle for any new podcaster, voiceover artist, or content creator. While Audacity is a powerful, free tool, its audio routing can be a bit confusing at first glance. If you are staring at your screen wondering why your new mic refuses to show up in the menu, you are in the right place.
Here is the complete guide to routing your hardware, fixing common connection errors, and getting your first track recorded.
Understanding Audacity’s Audio Routing (Before You Start)
Audacity doesn’t connect directly to your microphone. Instead, the software “listens” to the audio devices your Windows or Mac operating system has already recognized.
Because of this routing process, you must follow the Golden Rule of Audacity: Hardware first, software second.
You must physically plug your microphone into your computer before you open the Audacity application. If you launch the software first, Audacity will load its initial device list. It will completely ignore your newly connected gear until you force it to look again.
To ensure a smooth setup process, verify you have the following ready:
- A working microphone: This can be a direct USB microphone, a wireless system, or an analog mic plugged into an audio interface.
- The correct connection cable or receiver: Ensure your USB-C cable, USB-A cable, or wireless dongle is plugged securely into your computer. Avoid using unpowered USB hubs, as they often cause connectivity dropouts.
- The latest version of Audacity: Always download the newest release from the official website to ensure full compatibility with modern audio drivers.
Step 1: Connect the Microphone to Your Computer (OS Level)
Before Audacity can record your voice, your computer’s operating system needs to recognize the hardware. Plug your microphone (or wireless receiver) directly into an available USB port or audio jack.
Once the physical connection is secure, you must verify that your system is actively receiving the audio signal.
For Windows Users
- Plug in your microphone and wait a few seconds for Windows to automatically configure the device.
- Right-click the speaker icon in your bottom-right taskbar and select Sound settings (or navigate to Settings > System > Sound).
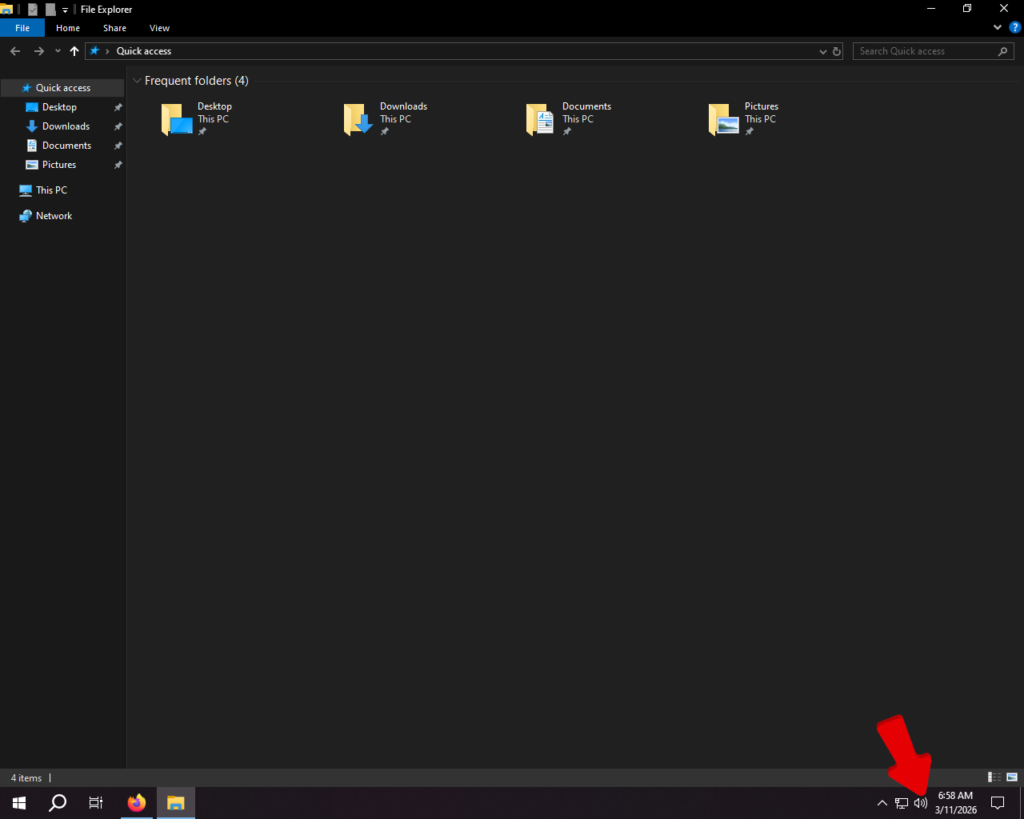
- Scroll down to the Input section.
- Click the dropdown menu and select your new microphone to make it the active input device.

- Speak into the microphone and watch the Test your microphone meter. If the blue bar bounces as you talk, Windows is successfully receiving your audio.

For Mac Users
- Connect your microphone to your Mac via a USB port, dongle, or audio jack.
- Click the Apple logo in the top-left corner of your screen and select System Settings (or System Preferences on older macOS versions).
- Click on Sound in the left-hand sidebar, then click the Input tab on the main screen.
- Select your microphone’s name from the list of available devices to set it as your default audio source.
- Talk normally into the mic and watch the Input level meter just below the device list. If the indicator lights up as you speak, your Mac is ready to record.
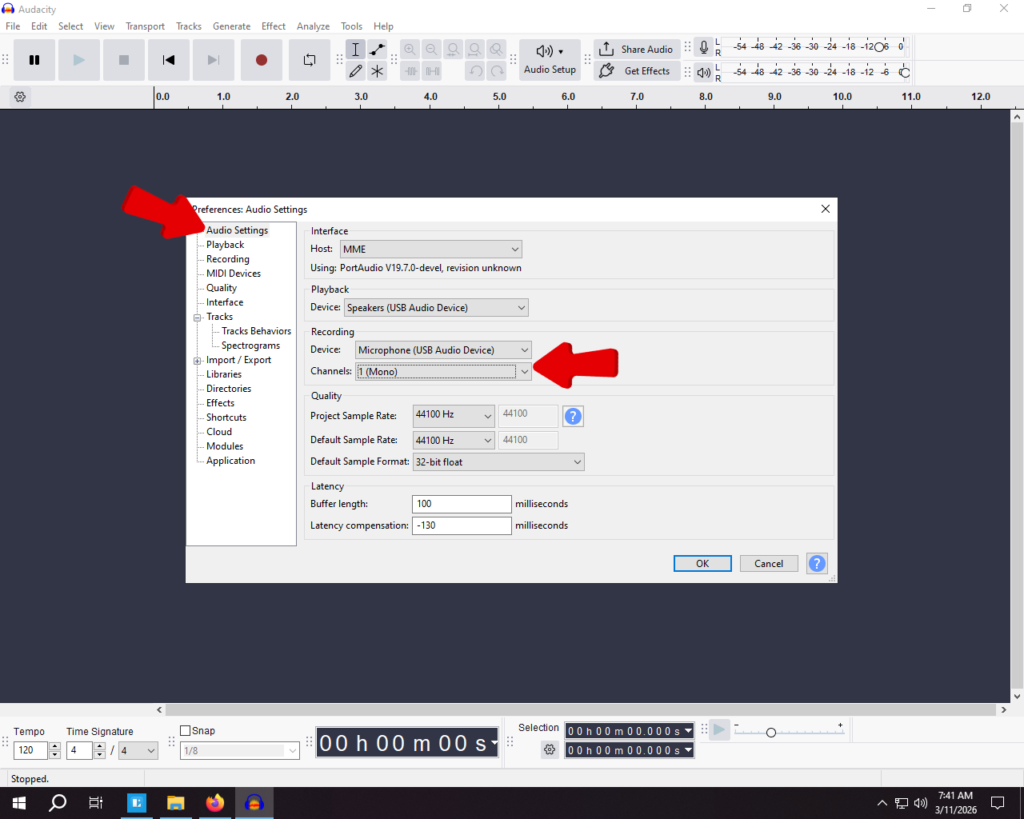
Step 2: How to Add Your Microphone to Audacity (The Setup)
Once your computer recognizes your hardware, you need to route that audio signal into your software. Follow these exact steps to add and configure your new microphone in Audacity:
- Open Audacity. Remember, always ensure your microphone is plugged in before launching the program.

- Locate the Audio Setup button. This is found in the top menu toolbar. (Note: If you are using an older version of Audacity, look for the traditional Device Toolbar dropdowns).
- Click Audio Host. Select MME for Windows or Core Audio for Mac. These are the safest, most compatible default settings for standard recording.
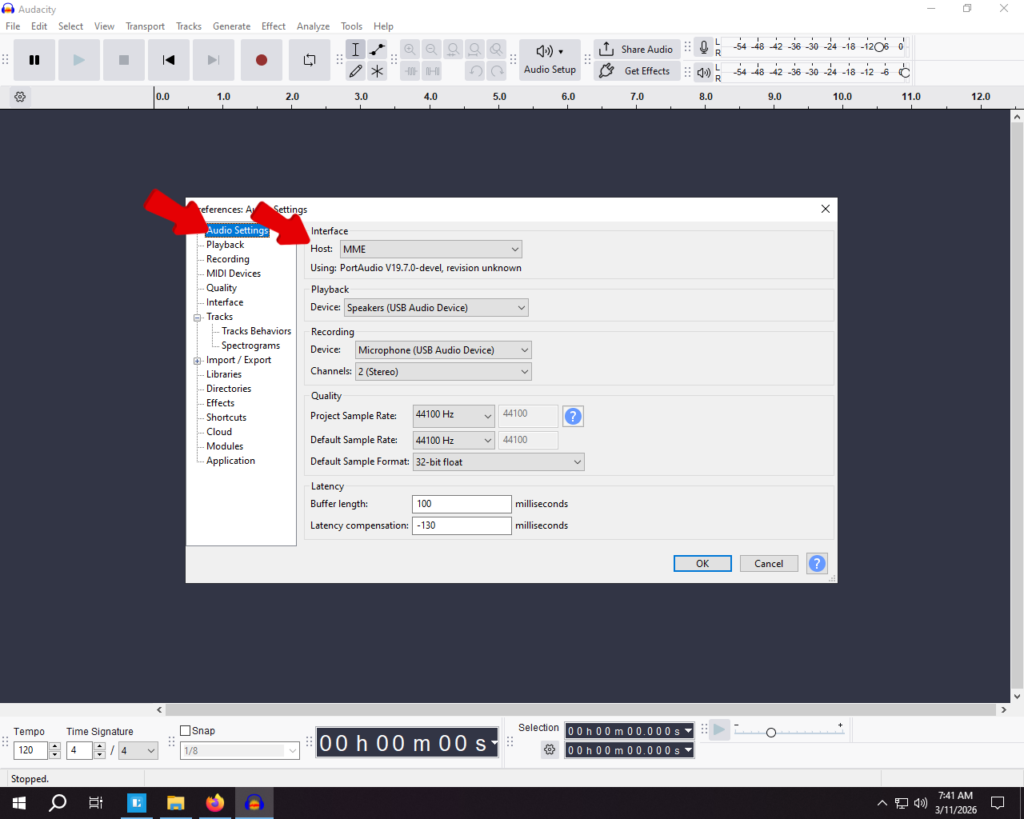
- Click Recording Device. Select your new external microphone from the dropdown list. Double-check this setting so you do not accidentally record using your laptop’s terrible built-in microphone.
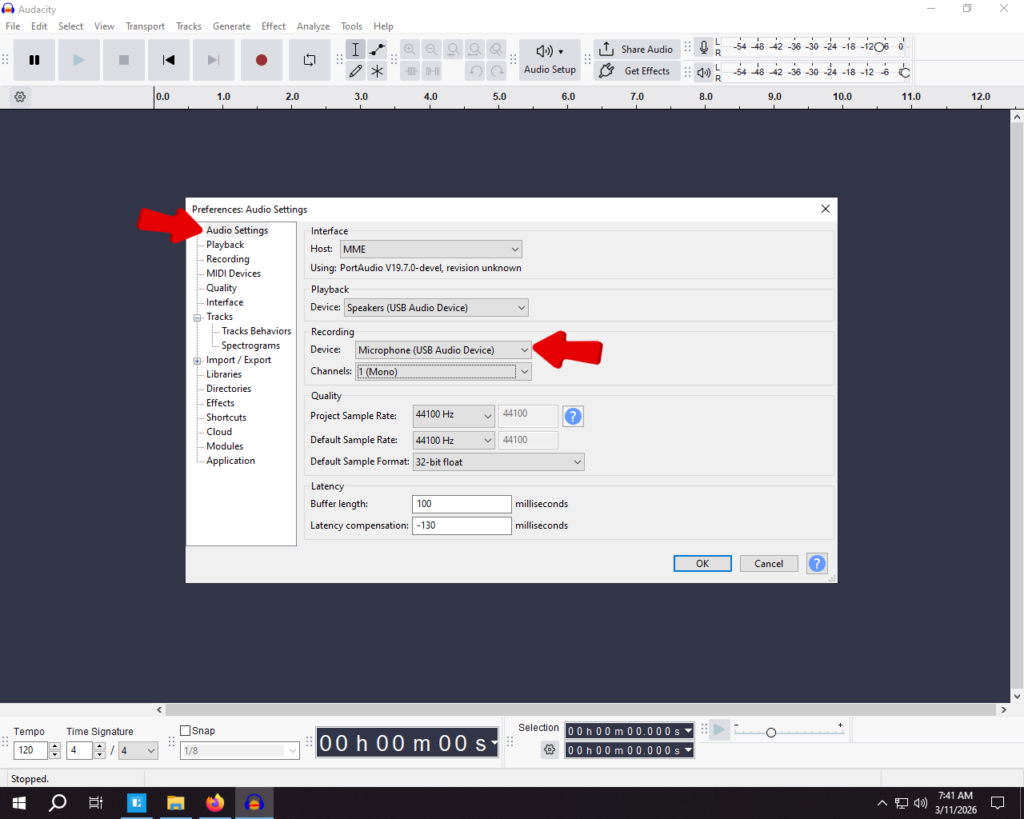
- Click Recording Channels. Select 1 (Mono) for a single voice microphone. This is the industry standard for podcasts, voiceovers, and YouTube videos. Only select 2 (Stereo) if you are using a dedicated stereo microphone or a dual-input setup.
The “Rescan Audio Devices” Trick (If Your Mic Isn’t Showing Up)
You plugged in your new microphone, but when you click the dropdown menu in Audacity, it is completely missing. This is the single most common frustration for beginners.
The culprit is almost always timing. If you opened Audacity before plugging your microphone into your computer, the software won’t see it. By default, Audacity does not automatically detect new hardware on the fly.
Fortunately, you don’t need to close your project, lose your progress, and restart the program. You just need to force a manual hardware refresh.
Here is the instant fix:
- Navigate to the top menu bar in Audacity.
- Click on Transport.
- Scroll down and click Rescan Audio Devices.

Once clicked, Audacity will ping your computer’s operating system to check for any new hardware connections. Open your Recording Device dropdown menu again. Your newly connected microphone will now be listed and ready to use.
Recommended Microphones for Audacity Creators (Editor’s Picks)
If you are struggling with excessive background noise, hissing, or hollow-sounding audio, no amount of software editing will fix a bad source. Upgrading your microphone is the absolute fastest way to get professional, broadcast-ready results in Audacity.
The Professional Studio Upgrade: Hollyland LARK MAX 2
If you want absolute peace of mind while recording, the Hollyland LARK MAX 2 is a premium powerhouse. It delivers 48kHz/24-bit audio with professional Environmental Noise Cancellation (ENC). This provides studio-quality sound that perfectly matches Audacity’s high-resolution recording capabilities.


Its standout feature for Audacity creators is 32-bit Float Recording. Audio clipping is a massive pain point for beginners. With 32-bit float, your audio will never permanently distort. Even if you suddenly scream, laugh loudly, or peak the Audacity meter during a podcast, you can simply lower the gain afterward and recover the audio perfectly.
Additionally, the LARK MAX 2 allows you to monitor your Audacity playback completely wirelessly using the included OWS earphones. This keeps you untethered from your desk while you record and edit.
The Budget-Friendly Plug & Play: Hollyland LARK A1
For beginners, students, or creators on a strict budget, the Hollyland LARK A1 offers an incredibly simple audio upgrade. It uses a foolproof plug-and-play receiver that connects directly to your computer. Because it requires absolutely no drivers, Audacity will recognize it instantly in the dropdown menu.

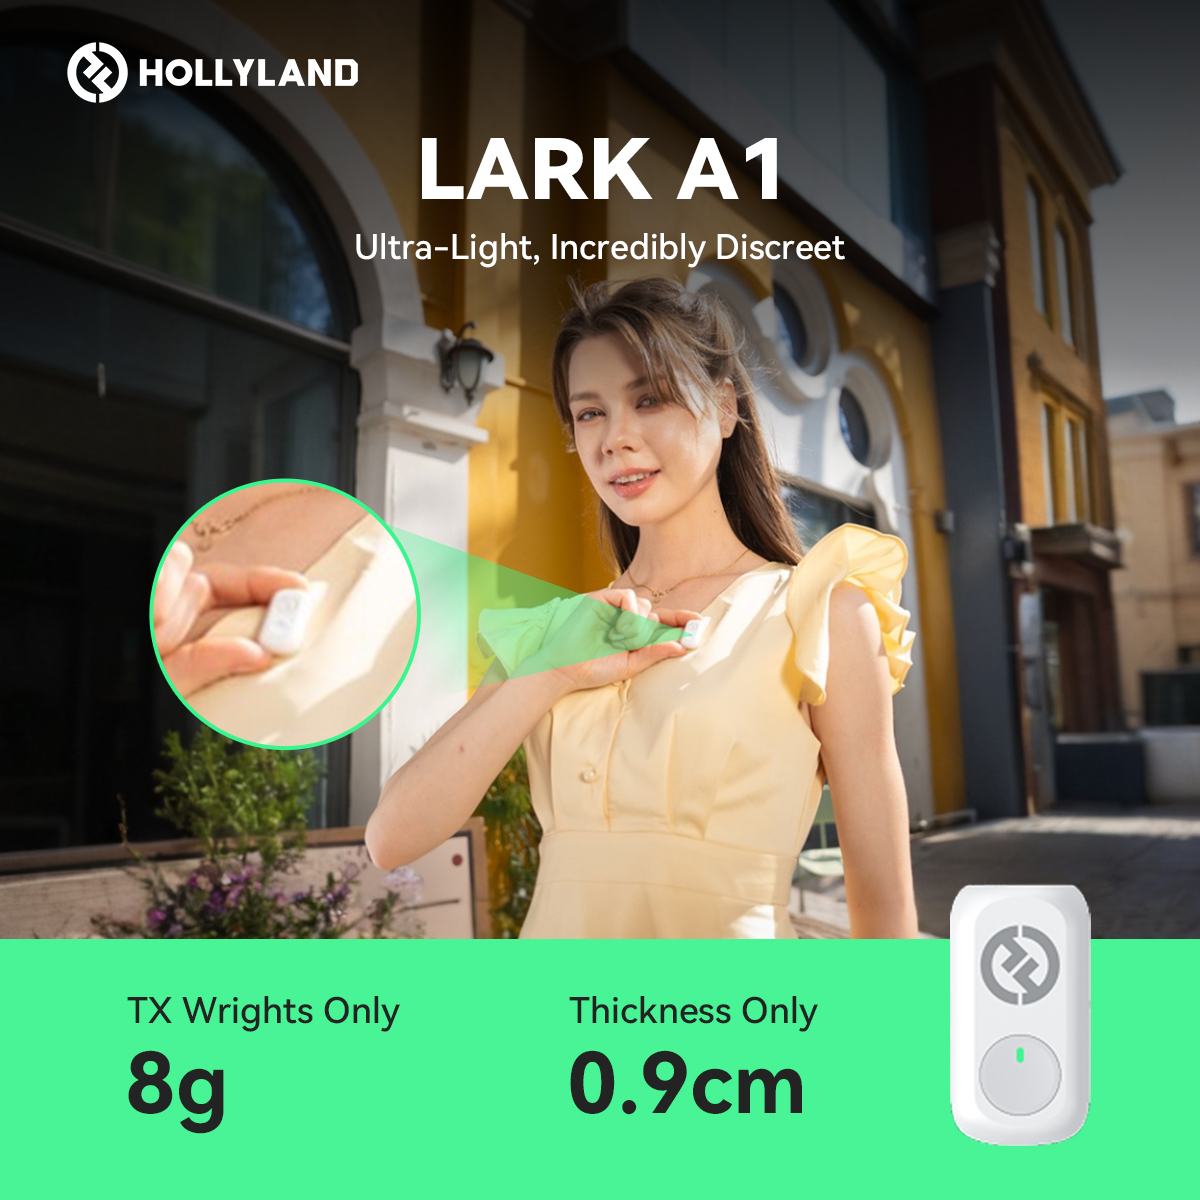
The LARK A1 also features a built-in 3-level noise cancellation system. If you are recording in an untreated room, a noisy dorm, or a busy apartment, this system actively strips out background hums and room echoes before the audio even hits your Audacity track.
Troubleshooting Common Audacity Microphone Issues
Even with the correct hardware connected, audio glitches can quickly derail a recording session. Use this rapid-fire troubleshooting matrix to identify and resolve the most frequent Audacity microphone errors in seconds.
| The Problem | The Quick Solution |
|---|---|
| Recording is picking up loud keyboard typing or room noise. | Check your Input Device dropdown. You likely have your computer’s built-in laptop mic selected instead of your dedicated external microphone. Click the Audio Setup button and switch your recording device. |
| Audio sounds robotic, pitched incorrectly, or distorted. | Check your Sample Rates. Mismatched rates cause severe digital distortion. Ensure Audacity’s Project Rate (located in the bottom-left corner) matches your computer’s system microphone rate (usually 44100Hz or 48000Hz). |
| Voice is only playing back in the left ear/speaker. | Change your Recording Channels. You are likely recording a single-source microphone onto a two-channel track. Go to the Audio Setup menu and change the recording channels from 2 (Stereo) to 1 (Mono). |
Pro Tip: Setting the Right Recording Levels
Once your microphone is connected, simply hitting “Record” isn’t enough. You need to ensure your input levels are set correctly to capture clean audio and avoid permanent distortion.
Look at the recording meter at the top of your Audacity workspace (the bar that lights up green, yellow, and red when you speak). The numbers on this meter represent decibels (dB), with 0dB being the absolute maximum volume limit.
For professional-sounding audio, follow the golden rule of gain staging: aim for your normal speaking voice to peak between -12dB and -6dB.
This range is your “sweet spot.” It guarantees your voice is loud and clear while leaving enough headroom so a sudden laugh, gasp, or shout doesn’t push the meter into the red. If your audio hits 0dB, it “clips.” Clipping creates harsh, robotic distortion that is permanently baked into your standard recording.
The Ultimate Clipping Fix: If you struggle with setting gain levels and constantly hit the red (0dB) causing permanent distortion, upgrading to a 32-bit float microphone like the Hollyland LARK MAX 2 is a massive advantage. Because it uses 32-bit float technology, it captures a massive dynamic range. This allows you to easily recover and fix clipped audio in post-production without losing any quality.
Frequently Asked Questions (FAQ)
Why is my microphone grayed out in Audacity?
If your microphone is connected but grayed out (or throwing an “Error opening sound device” code), your operating system is likely blocking Audacity from accessing it. Both Windows and macOS use strict privacy features to prevent unauthorized microphone access.
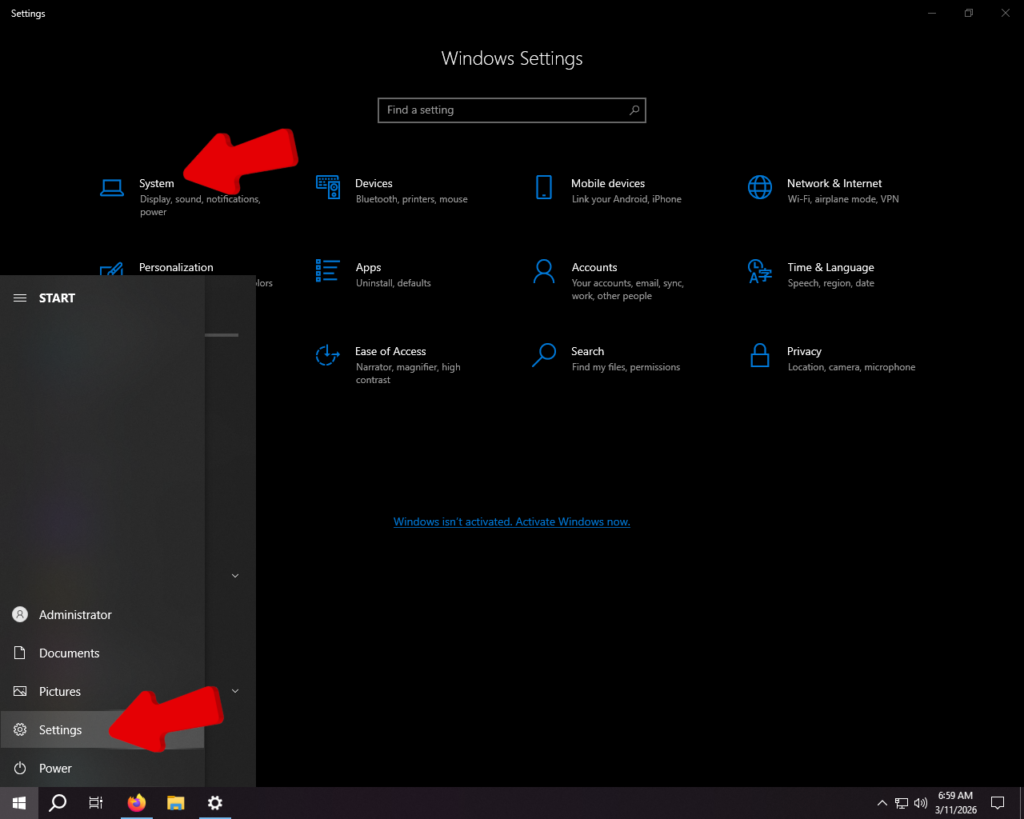
- For Windows: Go to Settings > Privacy & security > Microphone. Ensure “Microphone access” is toggled on, and verify that “Let desktop apps access your microphone” is enabled specifically for Audacity.
- For Mac: Go to System Settings > Privacy & Security > Microphone. Find Audacity in the application list and toggle the switch on to grant it permission. Restart Audacity afterward.
Should I use MME, Windows DirectSound, or WASAPI?
When setting your Audio Host on Windows, you will see three distinct options. Your choice depends entirely on what you are trying to record.
- MME: This is the default and most universally compatible option. If you are simply plugging in a standard USB microphone to record your voice, leave your host set to MME.
- Windows DirectSound: This is an older, slightly lower-latency alternative to MME. It works fine for voice recording but is rarely necessary for modern setups.
- Windows WASAPI: This is the best choice if you want to record your computer’s internal audio (like a Zoom call, gameplay, or browser audio). It enables a “loopback” feature to cleanly capture sounds playing through your speakers.
Can I use two USB microphones in Audacity at the same time?
Natively, no. Audacity is designed to recognize and record from only one input device at a time. If you plug in two separate USB microphones, the software will force you to choose one from the dropdown menu.
To record multiple voices simultaneously, you need a hardware or software workaround. You can use virtual mixing software like Voicemeeter (Windows) or the built-in Audio MIDI Setup (Mac) to combine two USB mics into a single “virtual” input that Audacity can read.
For a more reliable, headache-free setup, skip the dual USB microphones. Instead, use an Audio Interface with multiple analog (XLR) microphones. If you prefer a wireless setup, a dual-channel system sends two separate microphone signals through a single receiver, counting as just one input device in Audacity.
Conclusion & Next Steps
Getting your microphone recognized is usually the biggest technical hurdle for beginners. Once your hardware is properly routed and your levels are set, the software becomes an incredibly powerful blank canvas for your audio projects.
Now that your setup is complete, it is time to test your rig. Hit the red Record button in Audacity, speak normally for 10 seconds, and hit stop. Listen back to ensure your voice is clear, crisp, and free of distortion.
If your test recording sounds a bit echoey or picks up computer fan noise, check out our guide on How to Remove Background Noise in Audacity to clean up your track. Alternatively, if you want to bypass software tweaking entirely, consider upgrading your hardware. Exploring a plug-and-play wireless solution like the Hollyland LARK MAX 2 or LARK A1 will instantly boost your audio quality with built-in noise cancellation and studio-grade resolution right out of the box.