.png)
If you are wondering how to use equalization in Audacity to improve audio, you aren’t alone. Raw recordings rarely sound perfect out of the box. Even with a great performance, your podcast or voiceover might sound “muddy” (too much bass), “harsh” (too much treble), or just distant.
At its simplest, Equalization (EQ) is volume control, but with a twist. The standard volume knob on your speakers turns everything up or down at once. EQ allows you to change the volume of specific frequencies (pitches) independently.
Think of it like the bass and treble knobs on a car stereo, but infinitely more precise. You use EQ to fix specific problems—removing the low rumble of an air conditioner, adding “body” to a thin voice, or boosting the “crispness” so words are easier to understand.
Understanding the Frequency Spectrum
To use EQ effectively, you need to know which frequencies control which parts of your sound. Here is the breakdown of where the human voice lives on the spectrum:
| Frequency Range | What It Controls | What It Sounds Like |
|---|---|---|
| Low End (20Hz – 250Hz) | Bass & Warmth | This is the “power” of the voice. Too much causes “mud” or boominess; too little makes audio sound thin and tinny. |
| Mids (250Hz – 4kHz) | Voice & Body | Ideally, this is where the core of the human voice sits. Too much creates a “boxy” or “nasal” sound (like speaking through a telephone). |
| Highs (4kHz – 20kHz) | Clarity & Air | This adds definition. Boosting this helps listeners distinguish consonants, but too much creates piercing “hiss” or sibilance (harsh ‘S’ sounds). |
Pro Tip: The “Garbage In, Garbage Out” Rule
While EQ is powerful, it is a polishing tool, not a miracle worker. It cannot fix audio that was recorded poorly to begin with. If your input signal is distorted or clipped, EQ will simply make that distortion louder.
To get the most out of Audacity’s tools, start with a high-fidelity source. Wireless systems like the Hollyland LARK MAX 2 record in 32-bit float, ensuring your raw audio captures every detail without distortion. This gives you a clean canvas for editing, making your EQ adjustments significantly more effective.

Hollyland LARK MAX 2 - Premium Wireless Microphone System
A premium wireless microphone for videographers, podcasters, and content creators to capture broadcast-quality sound.
Key Features: Wireless Audio Monitoring | 32-bit Float | Timecode
The Two Types of EQ in Audacity (And Which to Choose)
If you are using a modern version of Audacity (2.4 or later), you won’t find the generic “Equalization” effect anymore. To give creators more control, Audacity split this tool into two distinct effects: Filter Curve EQ and Graphic EQ.
While both tools adjust the volume of specific frequencies, they approach the task very differently.
1. Filter Curve EQ: The “Surgeon’s Scalpel”
The Filter Curve EQ is the most powerful tool in your arsenal and will be the primary focus of this guide. Instead of fixed sliders, it presents you with a frequency line graph. You click to create “points” on this line and drag them up or down to shape your sound.
It offers infinite precision, allowing you to target incredibly specific frequencies.
- Best For: Removing specific background hums, cutting “mud” from a voice without losing body, and precise tone shaping.
- Verdict: This is the industry standard for podcasting and voiceover work.
2. Graphic EQ: The “Broad Brush”
The Graphic EQ mimics the classic hardware equalizers you might see on a stereo system. It creates a bank of vertical sliders, each controlling a fixed frequency band (like 60Hz, 100Hz, 1kHz, etc.).
Think of this as a broad brush. You cannot change the frequencies assigned to the sliders; you can only boost or cut the bands Audacity gives you.
- Best For: Quick, rough adjustments when you want to generally “boost the bass” or “brighten the treble” without worrying about technical graphs.
- Verdict: Good for beginners who find graphs intimidating, but it lacks the nuance required for high-end audio production.
Step-by-Step: How to Use the Filter Curve EQ (Recommended)
For most creators, the Filter Curve EQ is the best tool for the job. Unlike the Graphic EQ, which limits you to fixed frequency bands, the Filter Curve allows you to draw a custom shape across the frequency spectrum.
Follow this workflow to apply your first EQ adjustment:
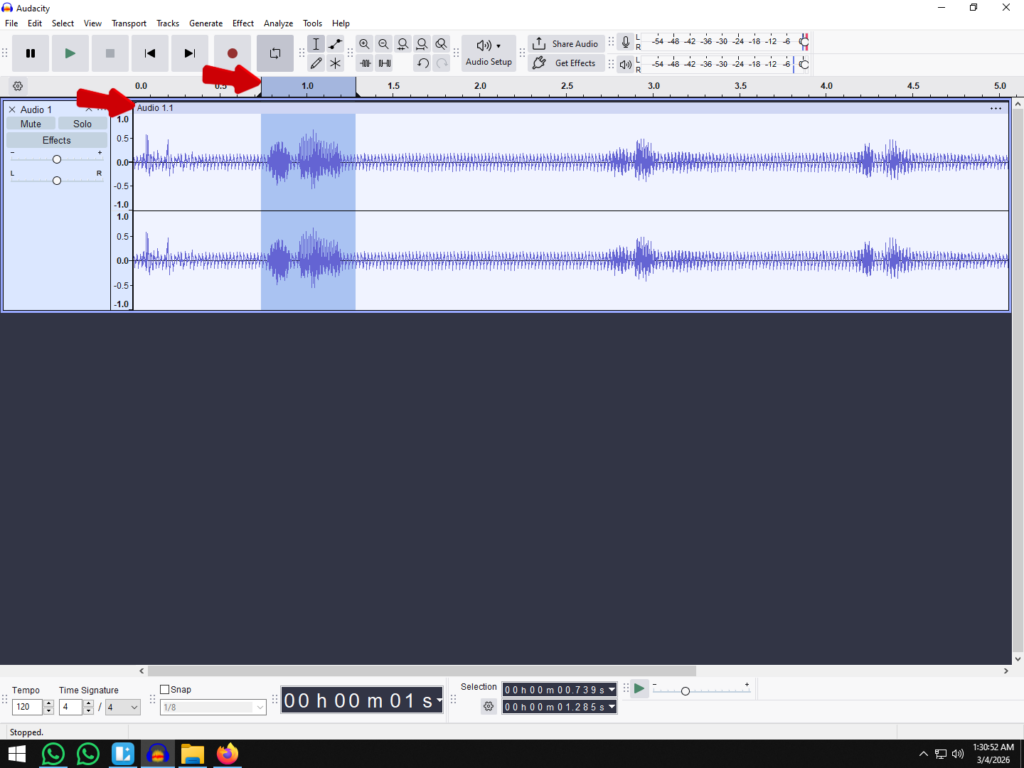
- Select Your Audio
Highlight the specific section of the waveform you want to change. If you want to apply EQ to the entire recording (recommended for consistent voiceovers), press Ctrl + A (Windows) or Cmd + A (Mac) to select the whole track.
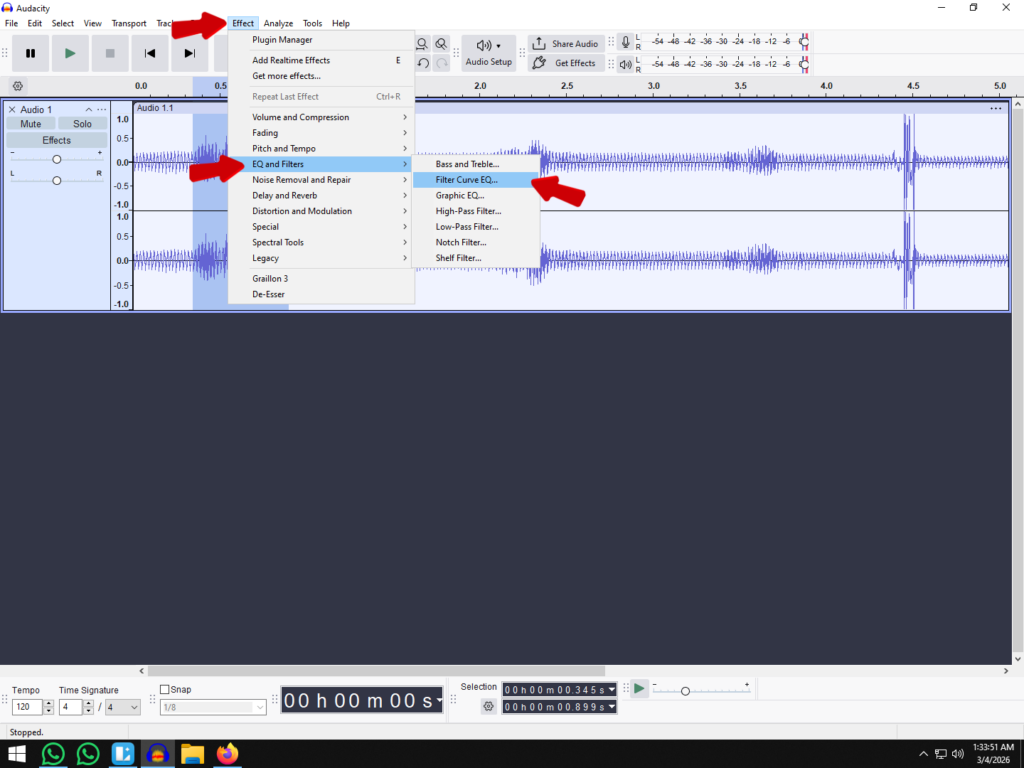
- Open the Effect
Navigate to the top menu bar. Go to Effect > EQ and Filters > Filter Curve EQ.
(Note: In older versions of Audacity, this may simply be listed under Effect > Filter Curve).
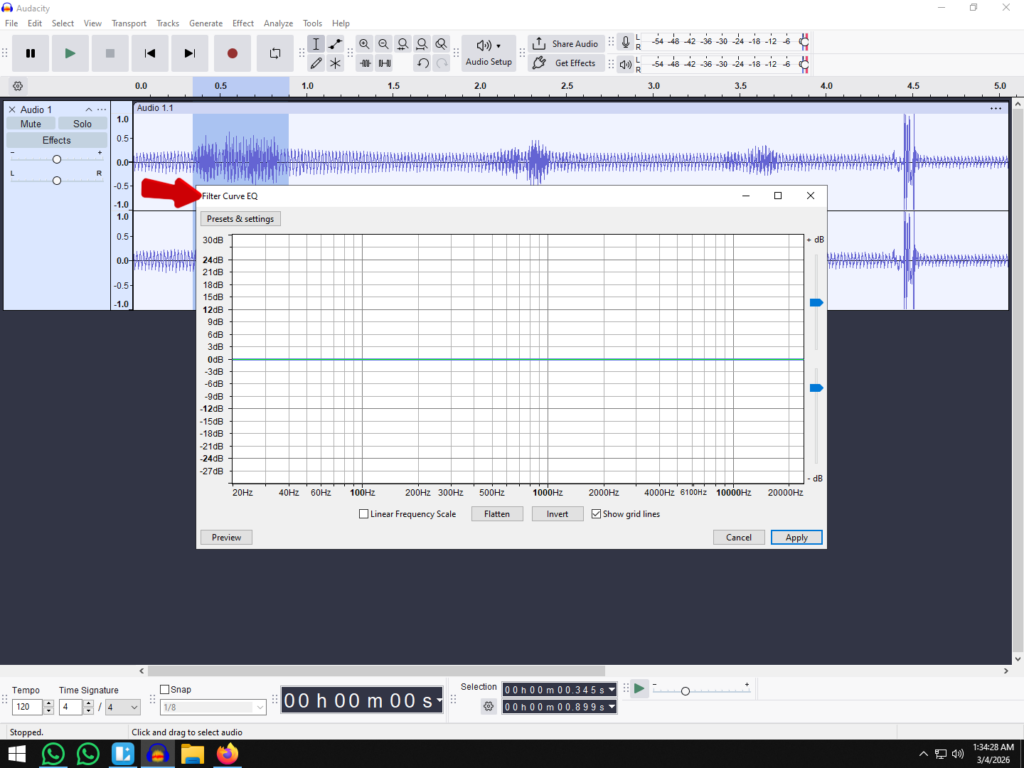
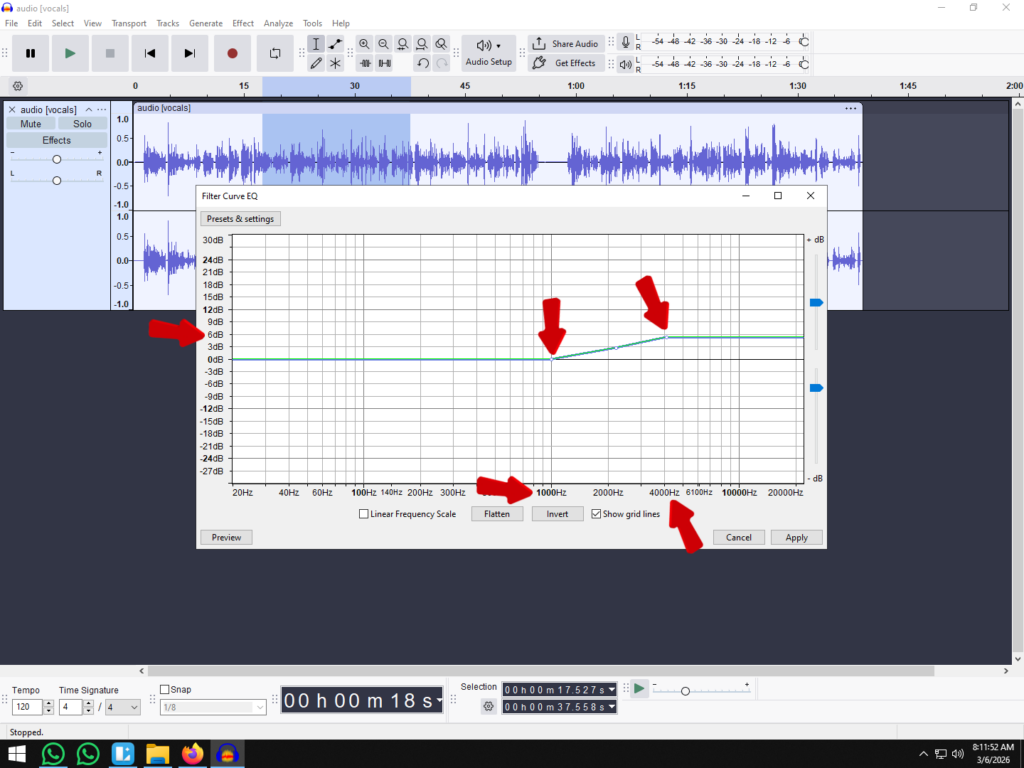
- Understand the Interface
You will see a grid with a blue horizontal line running through the middle.
- The Horizontal Line (0dB): This represents your audio “as is.” If the line is flat, no changes are being made.
- The X-Axis (Bottom): Represents frequency (Pitch). The left side is Bass, the middle is Mids, and the right side is Treble.
- The Y-Axis (Left): Represents volume (Decibels). Moving the line Up boosts the volume; moving it Down cuts the volume.
- Create and Manage Points
Click anywhere on the blue line to create a control point (a small dot).
- To Shape the Sound: Click and drag the dot up to boost a frequency or down to reduce it.
- To Create Curves: Add multiple points. For example, add a point at 100Hz and drag it down to cut bass, then add a point at 5000Hz and drag it up slightly to boost clarity.
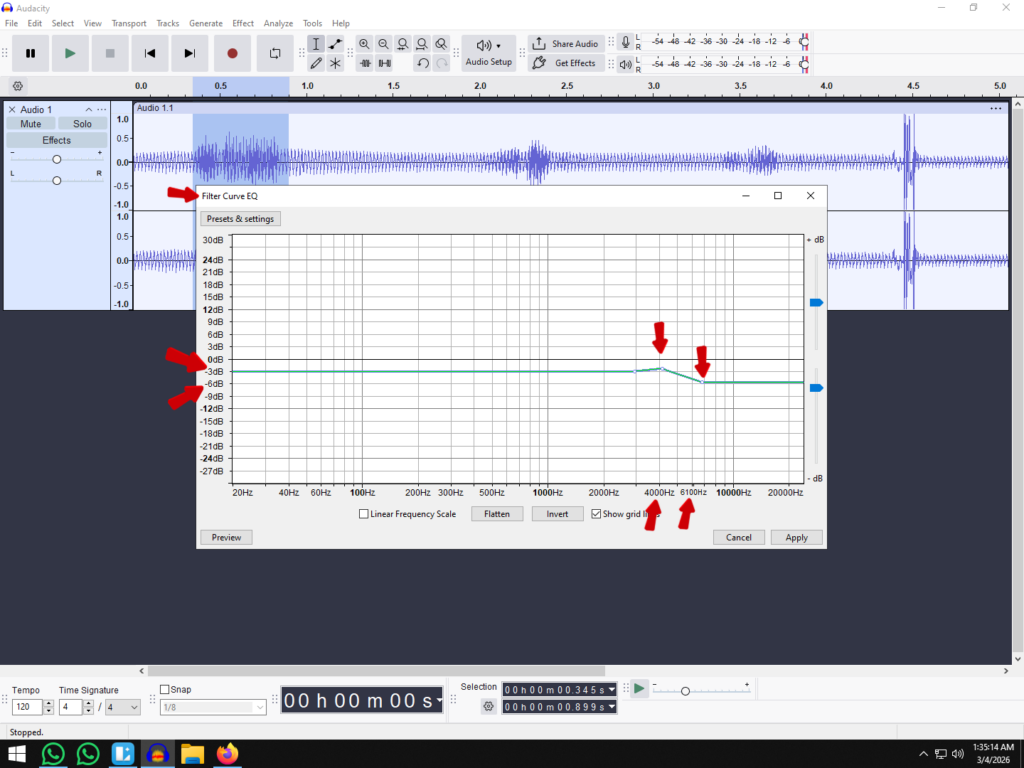
- To Delete a Point: Drag the dot completely off the grid (top or bottom edge).
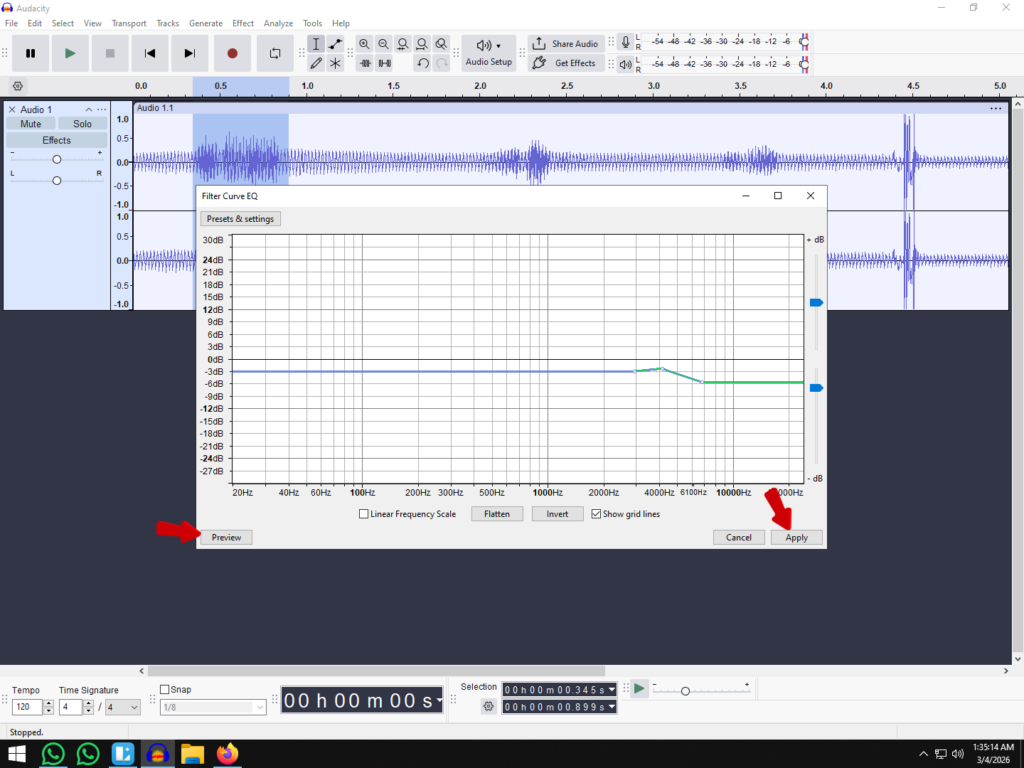
- Preview and Apply
Do not click “Apply” immediately. Click the Preview button in the bottom left corner. This plays a short snippet of your audio with the EQ changes applied.
- If it sounds harsh, lower your boost points.
- If it sounds muddy, cut more from the low end (left side).
- Once you are happy with the result, click Apply.
3 Essential EQ “Recipes” for Voiceovers and Podcasts
You don’t need a degree in audio engineering to improve your sound. Most spoken word audio—whether for podcasts, YouTube tutorials, or professional voiceovers—benefits from the same three fundamental adjustments.
Think of these as your “starter recipes.” Apply these shapes to your graph, listen to the Preview, and tweak slightly to fit your specific voice.
1. The “Low Cut” (High-Pass Filter)
This is the single most important move for cleaner audio. The human voice typically doesn’t produce useful frequencies below 80Hz, but your microphone will still pick up low-end interference like air conditioner hum, desk vibrations, and traffic rumble.
- The Action: In the Filter Curve EQ, drag the line at the far left (20Hz) all the way down. Create a second point at 80Hz or 100Hz and place it on the 0dB line.
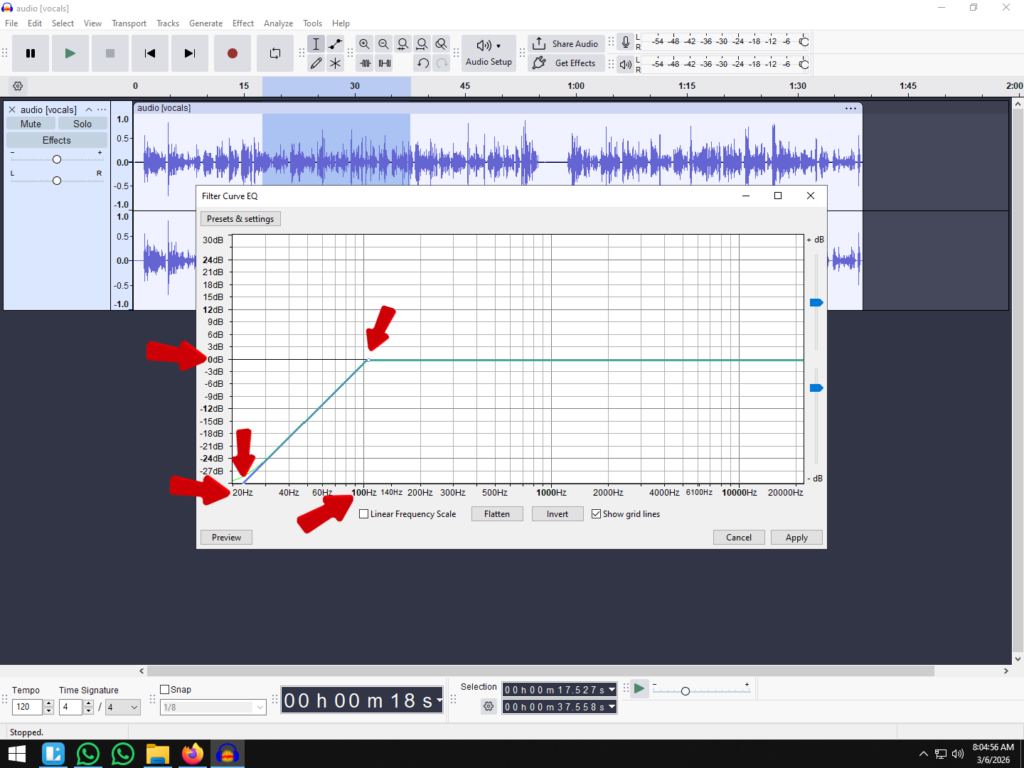
- The Benefit: This “rolls off” the useless low frequencies, instantly removing “mud” and low-end noise without affecting the natural tone of your voice.
2. The “Warmth” Boost
If your recording sounds thin, tinny, or lacks authority, you need to enhance the “body” of the voice. This frequency range represents the resonance of your chest.
- The Action: Create a control point between 150Hz and 250Hz. Drag it up gently to create a small hill, boosting the volume by just 2dB to 3dB.
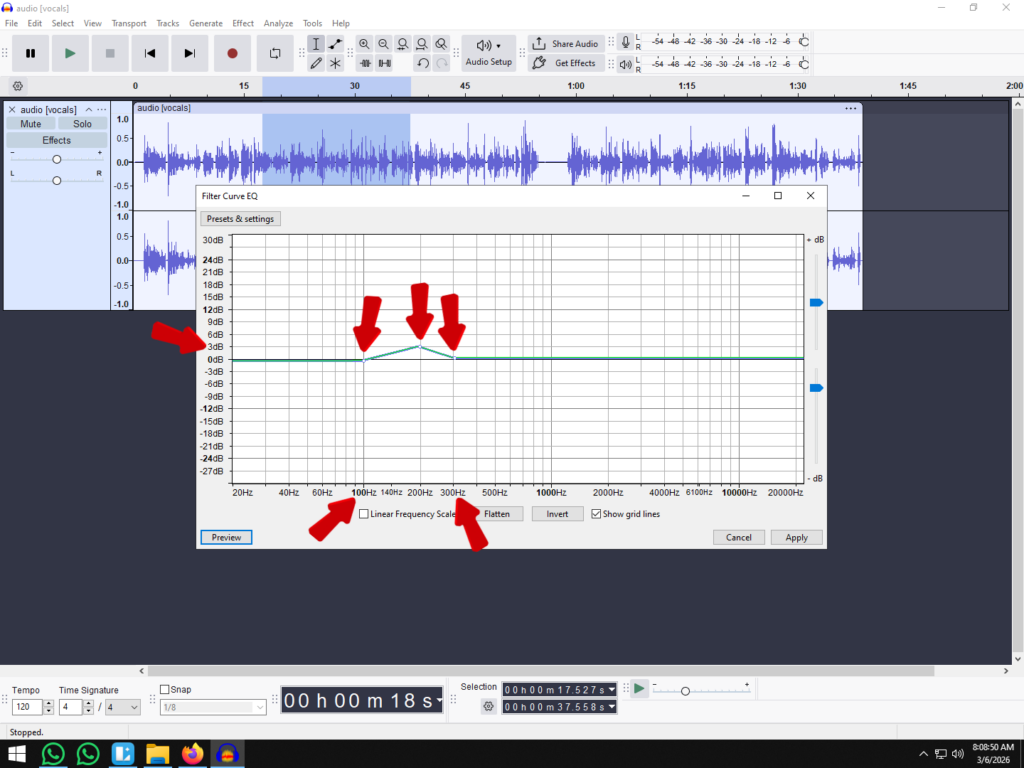
- The Benefit: This adds richness and weight to the audio. Warning: Be subtle here. Boosting this range too aggressively will make your voice sound muffled or “boomy.”
3. The “Clarity” Lift
To get that crisp, “radio-ready” sound, you need to emphasize the treble frequencies. This helps listeners distinguish consonants (like T’s, K’s, and S’s), making your speech much easier to understand.
- The Action: Focus on the right side of the graph. Create a point around 4kHz or 5kHz. Lift the line gradually to the right to create a “shelf” that boosts the high frequencies by about 3dB to 5dB.
- The Benefit: This adds “air” and presence to the recording, lifting the vocal out of the speakers so it doesn’t sound like it was recorded inside a cardboard box.
How to Use Graphic EQ in Audacity (For Quick Fixes)
If drawing points on a graph feels too technical, the Graphic EQ is the alternative you are looking for. It functions exactly like a vintage stereo system or a car radio equalizer, using fixed vertical sliders to adjust volume across specific frequency bands.
While it lacks the “surgical” precision of the Filter Curve EQ, the Graphic EQ is perfect for making broad, quick adjustments to the overall tone of your audio.
Decoding the Sliders
The interface might look intimidating at first because of the number of sliders, but the layout follows a simple logic from left to right:
- The Left Sliders (Low Frequencies): These control the Bass. Raising these adds warmth and rumble; lowering them reduces mud and background noise (like traffic or AC hum).
- The Middle Sliders (Mid Frequencies): These control the Voice. This is where the human voice “lives.” Adjusting these affects how forward or distant the speaker sounds.
- The Right Sliders (High Frequencies): These control the Treble. Raising these adds “air” and crispness; lowering them reduces hissing sounds and harsh sibilance (sharp “S” sounds).
Step-by-Step: Applying Graphic EQ
- Select Your Track: Double-click the waveform to highlight the audio you want to change.
- Open the Effect: Navigate to Effect > EQ and Filters > Graphic EQ.

- Adjust the Sliders:
- Drag a slider up to boost that frequency.
- Drag a slider down to cut that frequency.
- Tip: Don’t move just one slider. Move adjacent sliders gradually to create a smooth “wave” shape. Sharp spikes often sound unnatural.

- Use the “Flatten” Button: If you make a mistake and want to start over, click Flatten to reset all sliders to 0dB (neutral).
- Preview and Apply: Always click Preview to listen to a snippet of the audio with the effect applied. If it sounds better, click Apply.

Common EQ Mistakes That Ruin Audio
Equalization is a powerful tool, but it is easy to abuse. New editors often treat EQ like a magic wand, drastically altering curves in hopes of fixing a bad recording. Unfortunately, this usually leads to unnatural, robotic, or distorted audio.
To keep your sound professional, avoid these three common pitfalls.
Mistake #1: Over-Boosting (The “Louder is Better” Trap)
The most common mistake beginners make is boosting frequencies to hear them better. If the voice sounds thin, they crank the bass by +10dB. If it sounds muffled, they skyrocket the treble.
Why this fails: Drastic boosting introduces phase issues and digital distortion. It raises the “noise floor,” making background hiss louder along with the vocals.
The Fix: Cut Before You Boost.
Adopt the “Subtractive EQ” philosophy. Instead of boosting the treble to make audio clearer, try cutting the muddy low-mids (around 300Hz). This reveals the clarity that was already there without adding artificial noise. Always try to remove the “bad” frequencies before you enhance the “good” ones.
Mistake #2: Ignoring the Source (You Can’t Polish a Bad Signal)
EQ shapes sound; it does not reconstruct it. If your raw recording is filled with static, echo, or clipping, no amount of EQ in Audacity will make it sound like a studio production. You will simply end up with a clearer version of a bad recording.
The Fix: Get It Right at the Source.
If you find yourself constantly fighting background noise, rumble, or distortion in post-production, it is time to upgrade your input rather than your editing skills.
Using a high-quality wireless microphone system like the Hollyland LARK MAX 2 solves these issues at the hardware level. It features professional ENC (Environmental Noise Cancellation) and records in 32-bit float. This ensures your raw audio captures every detail without clipping, meaning you spend less time “fixing” bad audio in Audacity and more time creating content.
Mistake #3: Not Using ‘Preview’
In Audacity, applying an effect from the menu is a destructive action—it permanently changes the waveform unless you undo it. Many users guess the curve shape, hit “Apply,” and hope for the best.
The Fix: Listen While You Tweak.
Always use the Preview button located at the bottom left of the Filter Curve EQ window. This plays a short loop of your audio with the EQ applied.
- Pro Tip: While previewing, toggle the “Bypass” checkbox (if available in your version) or simply remember your original sound to compare the “Before” and “After.” If the change isn’t an obvious improvement, reset the line to flat and start over.
Pro Tip: The Correct Audio Effect Chain
One of the most common mistakes beginners make in Audacity isn’t how they use the tools, but when they use them. Audio engineering is a process of building layers. If you apply effects in the wrong order, you might accidentally amplify background noise or distort your voice.
To get professional-grade sound, follow this standard Effects Chain workflow:
- Noise Reduction (If Necessary)
Always clean your canvas first. If you have background hiss or room tone, use Audacity’s Noise Reduction effect before doing anything else. If you wait until later, other effects (like Compression) will make that quiet hiss much louder and harder to remove. - Equalization (Subtractive)
Think of this as the “surgical” phase. Use the Filter Curve EQ to cut unwanted frequencies—like rolling off the low-end rumble (High-Pass Filter) or dipping harsh sibilance.
- Why here? If you compress your audio before cutting the bad frequencies, the compressor will work hard to make the “mud” louder. Get rid of the garbage first.
- Compression
Now that your audio is clean and free of rumble, use the Compressor to even out your volume levels. This makes the quiet parts louder and keeps the loud parts in check, giving you that consistent “broadcast” sound. - Equalization (Additive – Optional)
This is the “coloring” phase. If your voice sounds a bit flat after compression, you can use EQ again to add a slight “presence boost” in the highs or a “warmth boost” in the lows. Since the dynamics are already controlled, these adjustments will be smooth and musical. - Normalization / Limiter
This is the final polish. Use Normalize (usually to -1.0 dB or -3.0 dB) or a Limiter to ensure your audio is as loud as possible without clipping (distorting) before you export.
Frequently Asked Questions (FAQ)
What is the best EQ setting for vocals in Audacity?
There is no single “magic setting” because every voice and recording environment is unique. However, a great starting point for most spoken word vocals (podcasts or voiceovers) is the “Low Cut + Presence Boost” curve:
- High-Pass Filter: Roll off everything below 80Hz to remove rumble.

- Mud Cut: Apply a slight cut (-2dB to -3dB) between 300Hz and 500Hz to clear up the “boxiness.”

- Presence Boost: Add a gentle boost (+2dB) around 3kHz to 5kHz to make the voice cut through the mix.
- Air: Optionally, add a high shelf boost above 10kHz for sparkle.

Always use the Preview button to listen before applying.
How do I fix muffled audio in Audacity?
Muffled audio is usually caused by an excess of low-mid frequencies or a lack of treble. To fix this using the Filter Curve EQ:
- Cut the Mud: Identify the 300Hz to 500Hz range on the graph and pull it down by 3dB to 6dB. This removes the “blanket over the microphone” sound.

- Boost the Highs: Create a point around 4kHz and drag it up slightly to add clarity.

- Check the Source: If the audio is extremely muffled, check if you recorded into the wrong side of the microphone or if your sample rate was set too low.
What happened to the old ‘Equalization’ effect in Audacity?
If you are watching older tutorials, you might be looking for an effect simply called “Equalization.” In Audacity version 2.4 and later, this effect was removed and split into two separate, more specialized tools:
- Filter Curve EQ: This is the direct successor to the “Draw Curves” mode. It allows for infinite precision and is best for detailed audio shaping.
- Graphic EQ: This replaces the “Graphic” mode, offering fixed frequency sliders for quick adjustments.
Both can be found under the Effect > EQ and Filters menu.
Conclusion
Mastering equalization in Audacity is less about finding a “magic button” and more about developing an ear for balance. Remember the golden rule of audio engineering: Subtractive EQ is powerful. By removing the muddy frequencies first, you allow the natural character of your voice to shine through without adding digital distortion.
Don’t be afraid to experiment. Open your latest project, load up the Filter Curve EQ, and try applying the “Low Cut” and “High Boost” techniques we covered. The more you practice shaping your sound, the more intuitive the decibel graph will become.
However, even the best EQ settings cannot fix a poor recording. Software is for polishing; hardware is for capturing. To truly achieve that broadcast-ready sound, you need a source that delivers high-fidelity data from the start.
Pairing Audacity’s editing power with a professional system like the Hollyland LARK MAX 2 is the industry standard for modern creators. With its 48kHz/24-bit sampling depth and Environmental Noise Cancellation (ENC), the LARK MAX 2 provides the pristine, studio-quality raw audio you need, making the editing process faster, easier, and far more effective.