.png)
If you are switching to Audacity from GarageBand, FL Studio, or another Digital Audio Workstation (DAW), you are likely searching the interface for a metronome icon to toggle on. Stop looking—it isn’t there.
Audacity functions differently than most recording software. It does not have a “live” metronome that plays over your project automatically. Instead, you must generate a dedicated audio track that contains the metronome sounds.
If you are wondering how to use the metronome (click track) in Audacity, the process involves creating a physical audio file that sits in your timeline. Because this is an actual audio track, you have full control over it. You can adjust its volume, mute it, or delete it entirely once your recording is finished.
“Rhythm Track” vs. “Click Track”
Much of the confusion surrounding this feature comes from recent updates. If you are following an older tutorial, you might be looking for a plugin called “Click Track.”
In modern versions of Audacity (3.0 and later), this feature has been renamed to Rhythm Track. It is located in the exact same menu, but it is now more powerful. While the old “Click Track” only produced mechanical beeps, the new Rhythm Track allows you to choose more pleasant sounds, such as cowbells or basic drum loops, making it easier to play along with.
Method 1: Generating a Standard Click Track (The “Rhythm Track” Tool)
Since there is no simple “play” button for a metronome, you need to build the track yourself. Follow these steps to generate your guide:
- Navigate to the top menu bar and select Generate.
- Scroll down the dropdown menu and click Rhythm Track.

- In the pop-up window, set your desired Tempo (BPM) (e.g., 120 BPM).
- Choose your Beats per bar (Time Signature). Keep this at 4 for standard timing, or change it to 3 for a waltz feel.
- Click Generate to create the track.
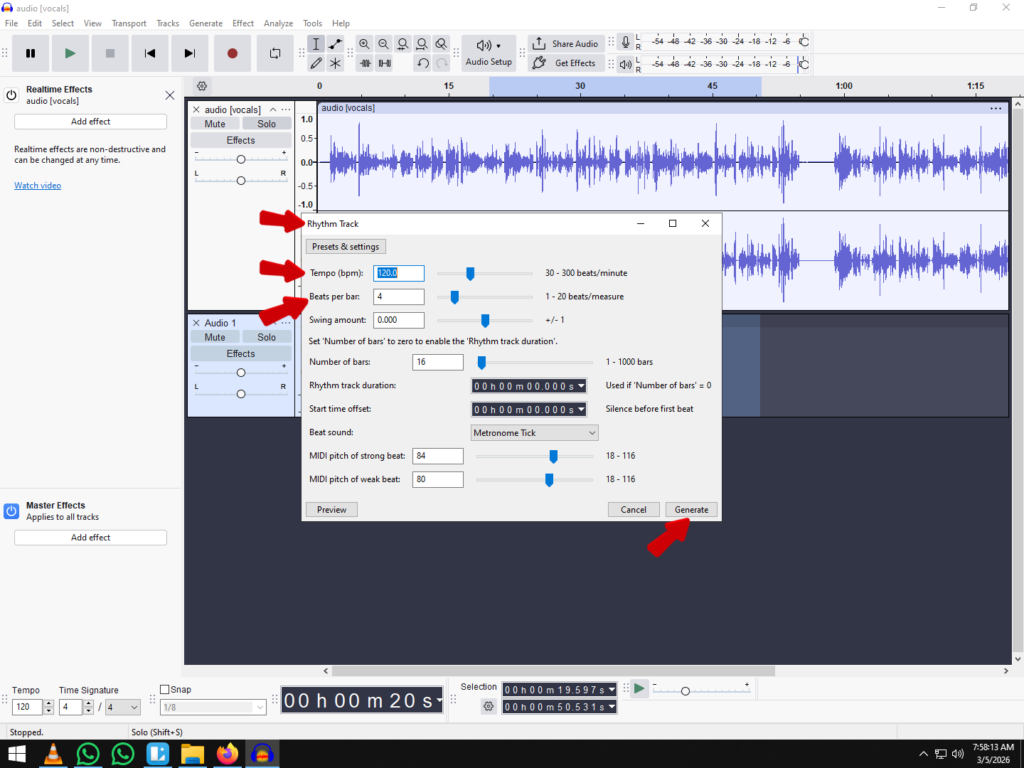
Once generated, you will see a new mono track appear in your timeline displaying the waveform of the beat. You can now press Play (Spacebar) to hear the metronome.
Pro Tip: Audacity automatically places new tracks at the bottom of your project. For better organization, click the track control panel on the left and drag the Rhythm Track to the very top of your project window. This ensures it acts as a constant visual reference while you record subsequent tracks below it.
Customizing Your Click Track Settings
When you open the Rhythm Track menu, the number of sliders and options might look intimidating. Fortunately, you only need to adjust three specific settings to create a functional guide for your recording.
Here is how to configure the track to match your project:
1. Tempo (BPM)
This is the most critical setting. Tempo determines how fast the metronome clicks, measured in Beats Per Minute (BPM).
- For Musicians: If you are covering a song, look up the original BPM online before setting this. If you are writing an original track, standard rock/pop usually sits between 100–120 BPM.
- For Podcasters: You likely won’t need a specific BPM, but setting a slow tempo (around 60 BPM) can help you maintain a consistent speaking pace without rushing.
2. Beats per Bar (Time Signature)
This setting dictates the “groove” of the click track by accenting the first beat of every measure.
- 4 (Standard): Keep this set to 4 for 90% of music (4/4 time). This creates the standard “ONE-two-three-four” count used in pop, rock, and hip-hop.
- 3 (Waltz): Change this to 3 if you are recording a waltz or a track with a triplet feel (3/4 or 6/8 time).
- 1 (No Accent): If you just want a steady stream of clicks with no downbeat emphasis, set this to 1.
3. Rhythm Sound
The default sound in Audacity is often a sharp, digital “Metronome Tick.” While precise, this sound can be piercing and cause ear fatigue during long sessions. It can also be difficult to hear if you are recording loud electric guitars.
Click the dropdown menu next to Rhythm Sound to try better options:
- Cowbell: A classic, cutting sound that is easy to hear over loud instruments.
- Ping (Short/Long): A softer, clearer tone that is less abrasive than the default tick.
- Resonant Noise: Useful if you need a more industrial or synthesized sound.
How to Record Audio While Listening to the Click Track
Generating a Rhythm Track is only the first step. By default, Audacity often won’t play that track back to you when you hit the “Record” button. To play along with your metronome, you need to enable Overdubbing.
This feature tells Audacity to play existing tracks (your click track) through your headphones while simultaneously recording new audio (your voice or instrument) onto a separate track.
Step 1: Enable Overdubbing
Before you hit record, you must change a specific transport setting. If you skip this, you will record in silence.
- Go to the top menu bar and click Transport.
- Hover over Transport Options.
- Check Enable Hear Other Tracks During Recording (sometimes labeled simply as “Overdub” in older versions).
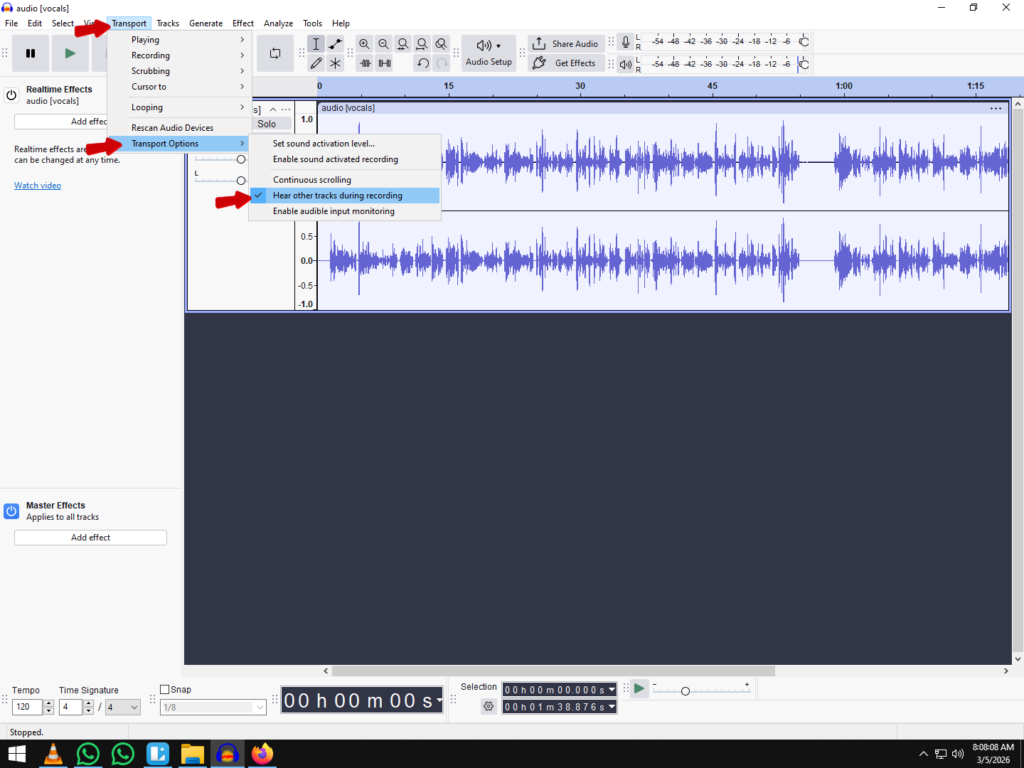
- Ensure Software Playthrough is OFF. (Leaving this on can cause a distracting echo where you hear your own voice delayed in your headphones).
Step 2: Prevent Audio Bleed with Proper Monitoring
Once Overdubbing is on, you face a physical challenge: Audio Bleed.
If you listen to your click track through computer speakers, your microphone will pick up the “click-click-click” sound. This ruins your recording because you cannot remove that clicking sound later without damaging your vocal take. You must wear headphones to keep the guide track isolated from the microphone.
Pro Tool Recommendation: The Wireless Advantage
For the cleanest recording setup, consider upgrading your input chain to the Hollyland LARK MAX 2.


When focusing on timing, technical distractions can kill your performance. The LARK MAX 2 helps solve two critical problems for home studios:
- Zero-Bleed Monitoring: Its Wireless Audio Monitoring allows you to listen to your Rhythm Track via the new OWS earphones while you record. This keeps the click track in your ears and completely out of your microphone.
- Safety Tracks: Beginners often play louder or shout when trying to match a beat. With 32-bit Float Recording, the LARK MAX 2 captures such a high dynamic range that you can focus entirely on your timing without worrying about clipping or audio distortion.
Step 3: Start Recording
With your headphones on and your equipment set:
- Press the Record button (or press R on your keyboard).
- You will see a new track appear below your Rhythm Track.

- Wait for the 4-beat count-in (if you added silence at the start) and begin performing.
- Press Stop (Spacebar) when finished.
You should now see two distinct waveforms: the steady spikes of the Rhythm Track on top, and your organic audio recording on the bottom.
Troubleshooting: Why is My Recording Off-Beat? (Latency Correction)
Nothing is more frustrating than playing a part perfectly in time, only to hit playback and hear that your recording is slightly delayed compared to the metronome.
This is not a reflection of your rhythm; this is a technical issue called Latency.
Latency happens because your computer needs a few milliseconds to process the sound entering your microphone, convert it to digital data, and write it to the hard drive. By the time the computer “writes” the audio, it is slightly behind the beat. Audacity has a built-in feature to automatically shift your recording backward to fix this, but you must calibrate it first.
Step 1: Perform a Loopback Test
To fix the delay, you need to measure exactly how many milliseconds of lag your specific computer and microphone setup are creating.
- Generate a Click: Create a Rhythm Track with a sharp, distinct sound like a “Tick” or “Cowbell.”
- Set Up the Loop:
- If using a Microphone: Place your headphones directly next to your microphone so the mic can “hear” the click track playing from the headphones.
- If using an Audio Interface: Use a patch cable to connect your audio output (Line Out) directly to your audio input (Line In).
- Record: Hit Record and let it run for a few seconds. You will see a new track form with the clicks recorded from your headphones/output.
- Zoom In: Use the Zoom Tool (magnifying glass) to zoom in extremely close on one of the clicks. You will likely see that the “recorded” click (bottom track) starts slightly later than the “original” click (top track).
Step 2: Adjust Latency Compensation
Once you can see the delay, you simply need to tell Audacity how much to correct it.
- Measure the Gap: Use the Selection Tool to highlight the empty space between the start of the original click and the start of your recorded click.
- Check the Duration: Look at the “Length of Selection” or “Start/End of Selection” bar at the bottom of the screen. Change the format to hh:mm:ss + milliseconds. Note the duration (e.g., 130 milliseconds).
- Update Preferences:
- Go to Edit > Preferences (or Audacity > Preferences on macOS).
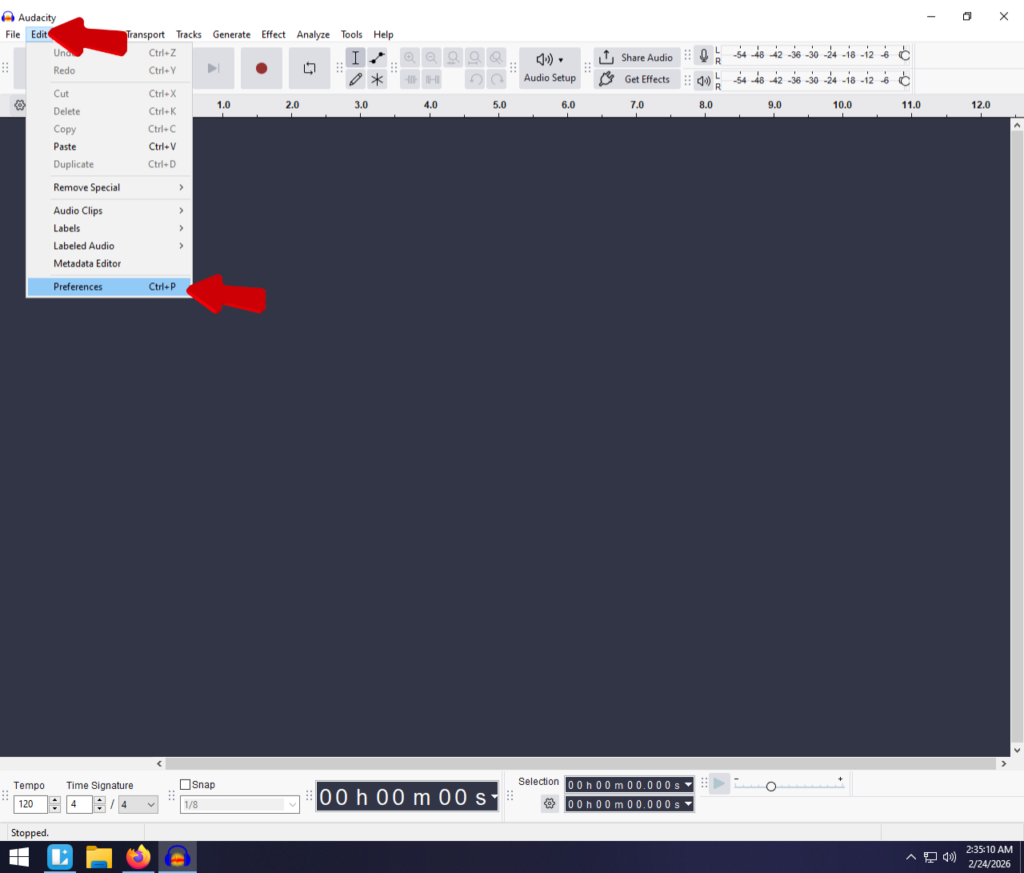
- Select the Audio Settings tab on the left sidebar.
- Locate the Latency compensation field.
- Enter the Value: Add the number you measured to the existing number.
- Note: This number should be negative because you want to move the track backwards. If the measured gap was 130ms, enter -130.

- Re-Test: Delete the test track and record a fresh loopback test. The clicks should now line up perfectly.
Removing the Click Track Before Exporting
One of the most common mistakes beginners make is finishing a great recording session, exporting the file to MP3 or WAV, and realizing too late that the robotic “tick-tock” of the metronome is permanently baked into the final song.
Since the Rhythm Track is just standard audio data in Audacity, it will be included in your final mix unless you silence it. You have two options to handle this before you hit File > Export.
Option A: Muting the Track (Recommended)
This is the safest method. It silences the click track so it won’t appear in your exported file, but keeps the track in your project in case you need to re-record a section later.
- Locate the control panel on the left side of your Rhythm Track.
- Click the Mute button.

- The track’s waveform will turn gray, indicating it is inactive.
- Play your project back; you should hear your voice/instrument, but silence where the click used to be.
Option B: Deleting the Track Completely
Use this method only if you are 100% sure you are finished recording and will never need the tempo guide again.
- Locate the Track Control Panel on the left of the Rhythm Track.
- Click the [X] button in the top-left corner of that panel.
- The track will disappear from the project entirely.
Frequently Asked Questions (FAQ)
Does Audacity have a built-in metronome that plays without generating a track?
No. Unlike Digital Audio Workstations (DAWs) like GarageBand or Ableton Live, Audacity does not have a system-level metronome toggle that plays over your project. You must use the Generate menu to create a physical audio track containing the click sounds.
How do I change the tempo of a click track after generating it?
You cannot change the BPM of a Rhythm Track simply by turning a dial once it has been created. Because the click track is a generated audio file, changing the speed would require time-stretching, which often distorts the sound. The fastest way to change your tempo is to delete the current Rhythm Track and generate a new one with the correct BPM.
Why can’t I hear the click track while recording?
If you can see the Rhythm Track but cannot hear it while you record, your Overdub settings are likely disabled. Go to Transport > Transport Options and ensure Enable Hear Other Tracks During Recording is checked.
What is the difference between “Rhythm Track” and “Click Track”?
They are essentially the same tool, but Rhythm Track is the modern, updated version found in Audacity 3.x and later. The old “Click Track” plugin was limited to basic beeps, whereas Rhythm Track allows for more realistic drum sounds and swing settings.
Conclusion & Next Steps
Mastering the Rhythm Track tool is often the turning point for Audacity users. It transforms a chaotic recording session into a polished, professional production. While generating a track isn’t as instant as a dedicated metronome button found in paid DAWs, the control it gives you over tempo and time signature is the foundation of a tight performance.
Remember, a great recording is built on two pillars: precision and clarity.
Now that your timing is perfect, ensure your audio quality matches it. A perfectly timed take is useless if the input is distorted or noisy. Upgrade your input source to the Hollyland LARK MAX 2 for studio-grade 48kHz/24-bit audio. With its Wireless Audio Monitoring, you can listen to your click track via OWS earphones while you record, ensuring you stay locked in the pocket with absolutely zero microphone bleed.