.png)
Learning how to convert MP4 video to MP3 audio in Audacity often starts with a frustrating error message. You drag a video file onto the timeline, expecting the waveform to appear, but instead, you hit a wall.
This happens because Audacity is a dedicated audio editor, not a video processor. By default, the software doesn’t know how to “crack open” a video container (like MP4, MOV, or AVI) to get to the audio track inside.
If you try this without the right setup, Audacity will throw this specific error:
Error Importing: Audacity attempted to use FFmpeg to import an audio file, but the libraries were not found. To use FFmpeg import, go to Preferences > Libraries to download or locate the FFmpeg libraries.
The Solution? You Need a “Translator.”
To fix this, you need to install the FFmpeg library. Think of FFmpeg as a translator between your video file and Audacity. It tells the software, “Ignore the video visuals; just grab the audio stream.” Once installed, Audacity can import audio from almost any video file format instantly, treating it just like a standard WAV or MP3.
Step 1: Installing the FFmpeg Library (Crucial Prerequisite)
Because of software patents and licensing, the Audacity developers cannot bundle this decoder with the initial installation. You have to add it yourself.
This is a one-time setup. Once installed, you never have to do it again.
Security Warning: Do not download FFmpeg from random third-party software sites. To avoid malware, only use the links provided directly within the Audacity interface or their official documentation.
How to Install FFmpeg on Windows
- Open Audacity.
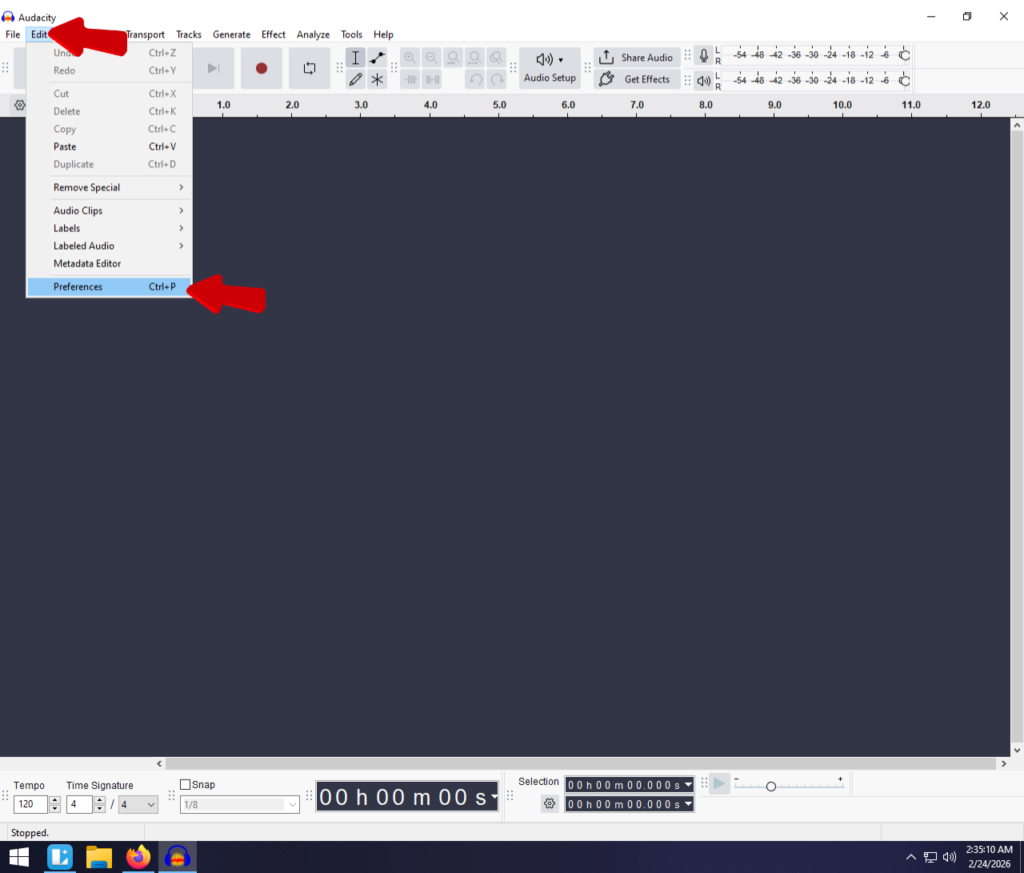
- Go to the top menu bar and select Edit > Preferences (or press Ctrl + P).
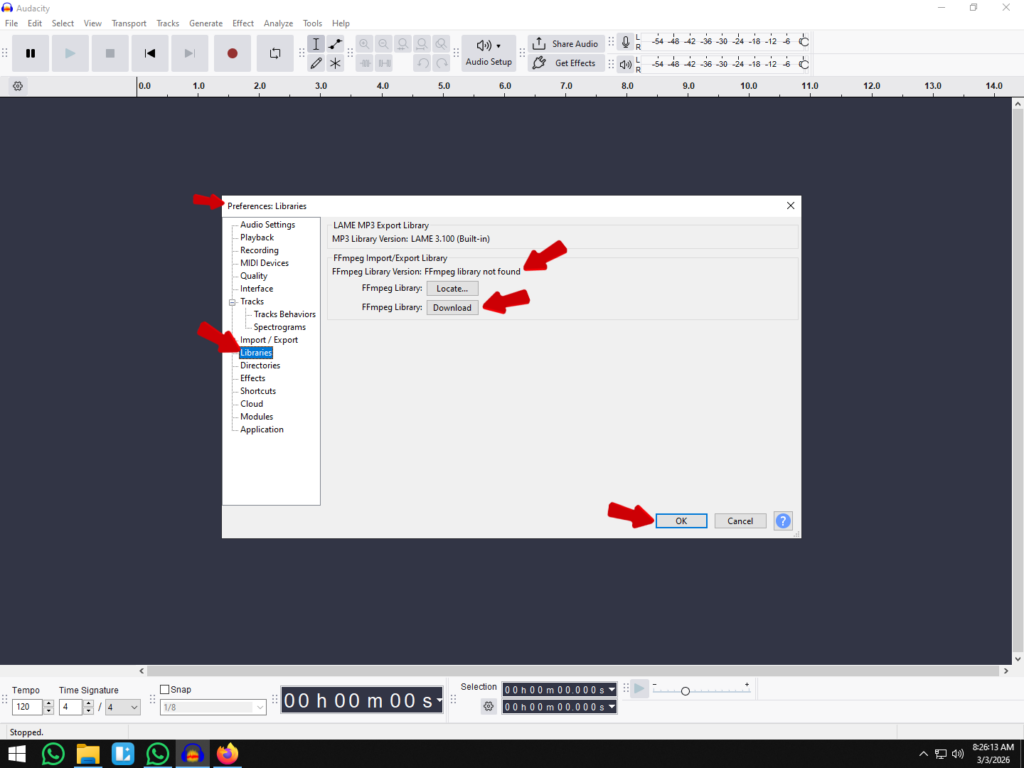
- In the sidebar, click on Libraries.
- Look for the “FFmpeg Import/Export Library” section. If it says “FFmpeg library not found,” click the Download button.
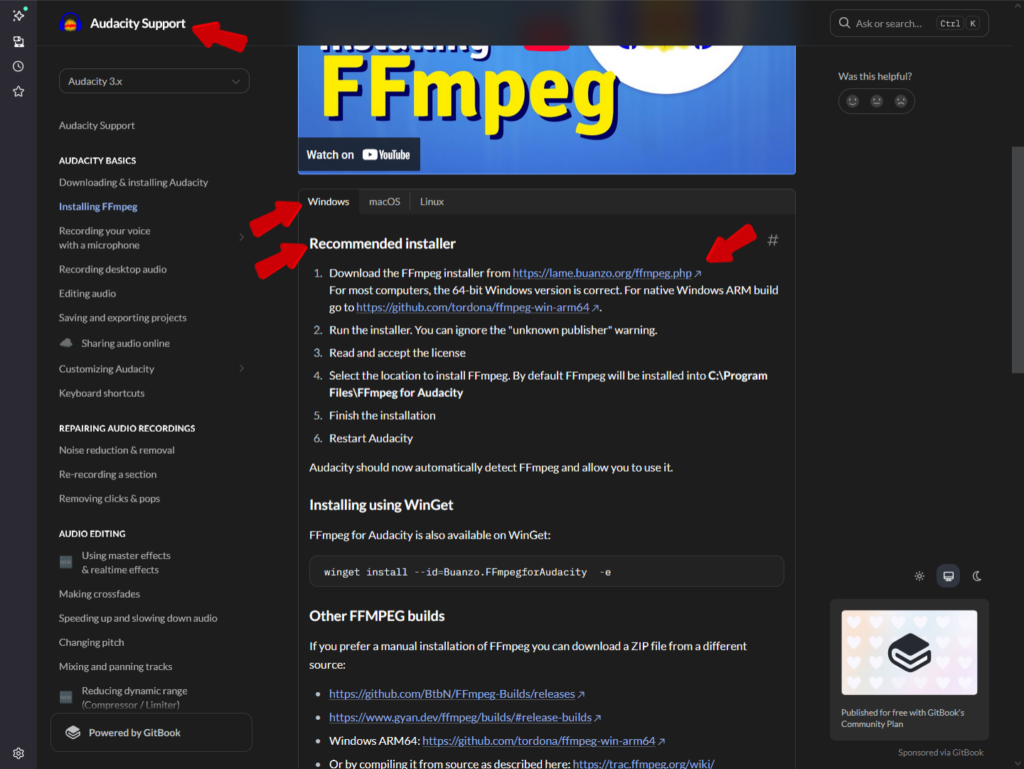
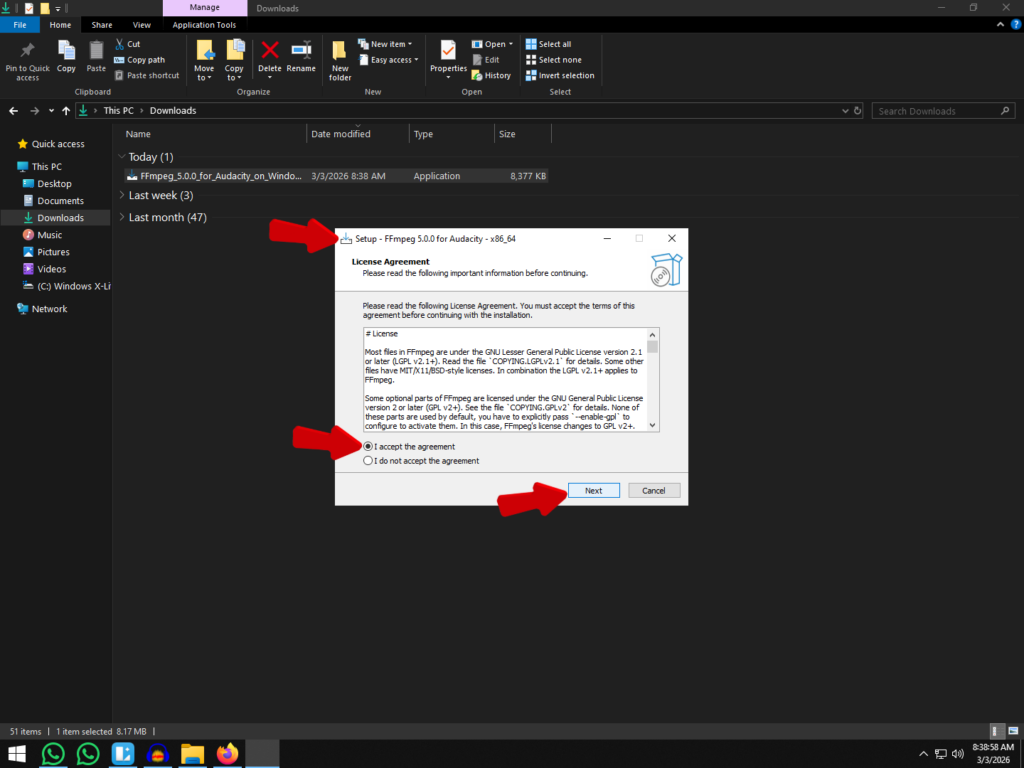
- This opens the official Audacity help page in your browser. Click the recommended link (usually hosted on buanzo.org) to download the FFmpeg v2.2.2.exe (or the latest recommended version).
- Run the installer file and follow the on-screen prompts.
- Restart Audacity. The software should now automatically detect the library.
How to Install FFmpeg on macOS
- Open Audacity.
- Go to the top menu bar and select Audacity > Preferences (or press Cmd + ,).
- Select Libraries from the sidebar.
- Click the Download button next to the FFmpeg section.
- On the download page, locate the FFmpeg_v2.2.2_for_Audacity_on_macOS.pkg (or the 64-bit version for newer Macs).
- Open the downloaded .pkg file and follow the installation steps.
- Restart Audacity to finalize the integration.
Verification Check: To ensure the installation worked, go back to Preferences > Libraries. You should now see a specific version number listed next to “FFmpeg Library Version” instead of “not found.”
Step 2: Importing and Converting MP4 to MP3
With FFmpeg installed, Audacity stops treating your MP4s like alien files. It will automatically strip the visual data and place the audio stream directly onto your timeline.
Here is the workflow to extract your audio and save it as an MP3:
- Launch Audacity and ensure you have a blank project open.
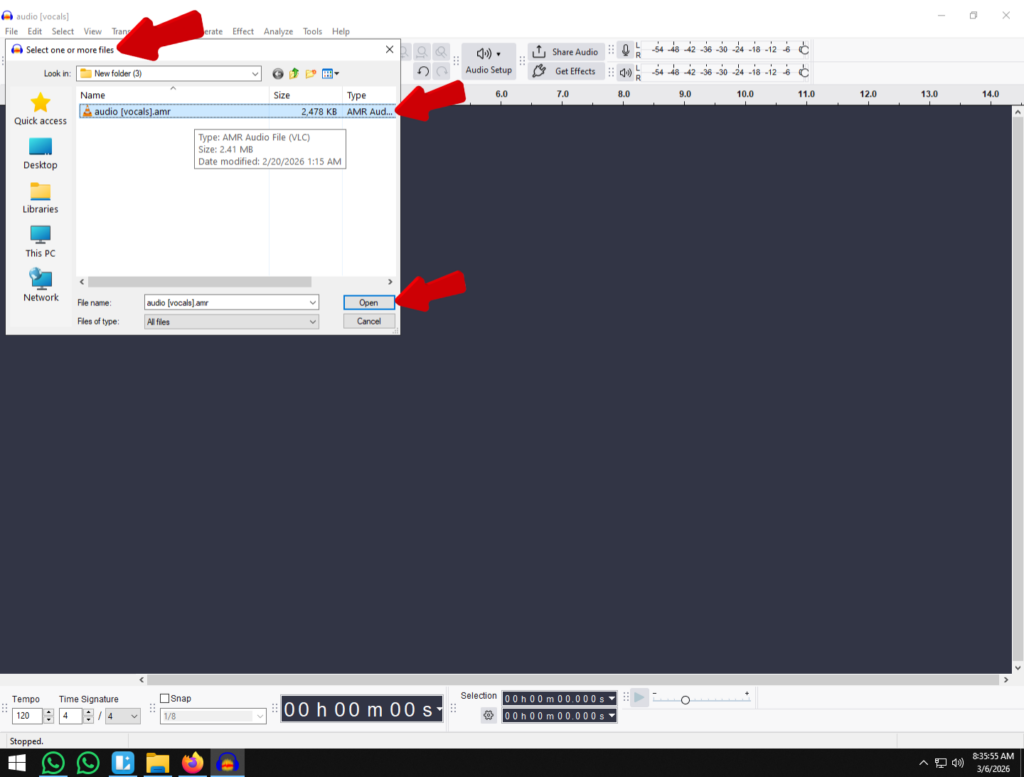
- Navigate to File > Import > Audio (or use the shortcut Ctrl+Shift+I on Windows / Cmd+Shift+I on Mac).

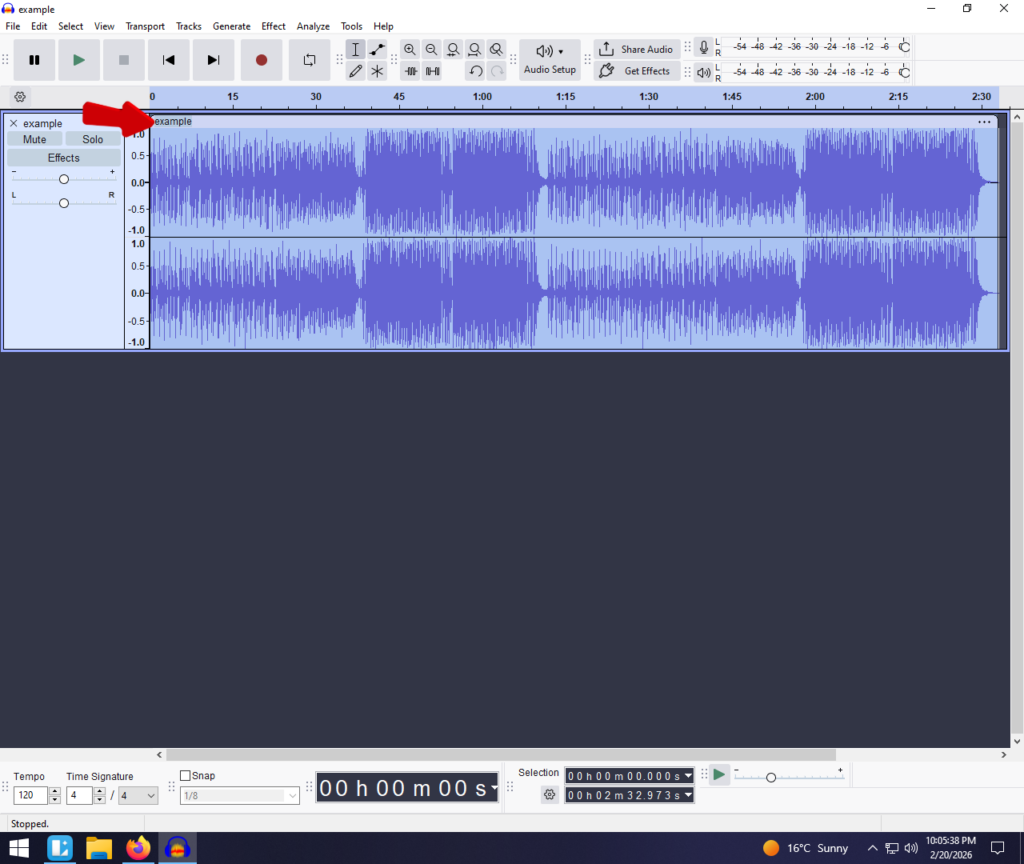
- Select your MP4 video file and click Open. You should now see the audio waveform appear.
- (Optional) Clean the Audio: Since the file is now editable, you can delete silence, normalize volume, or apply noise reduction before exporting.
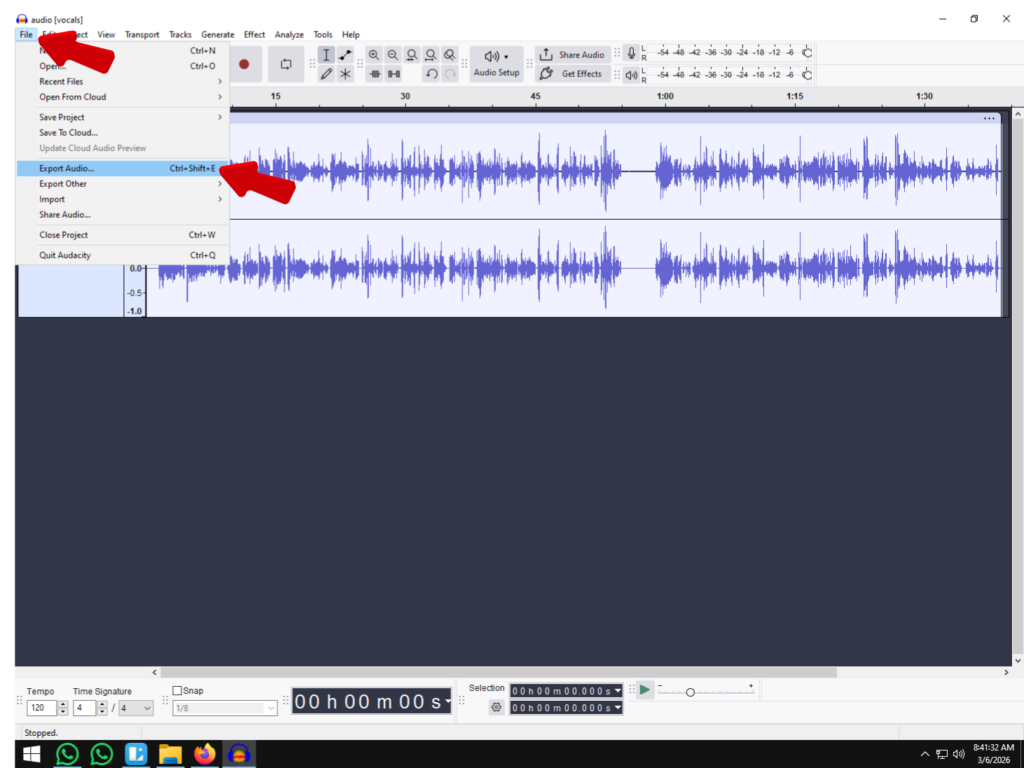
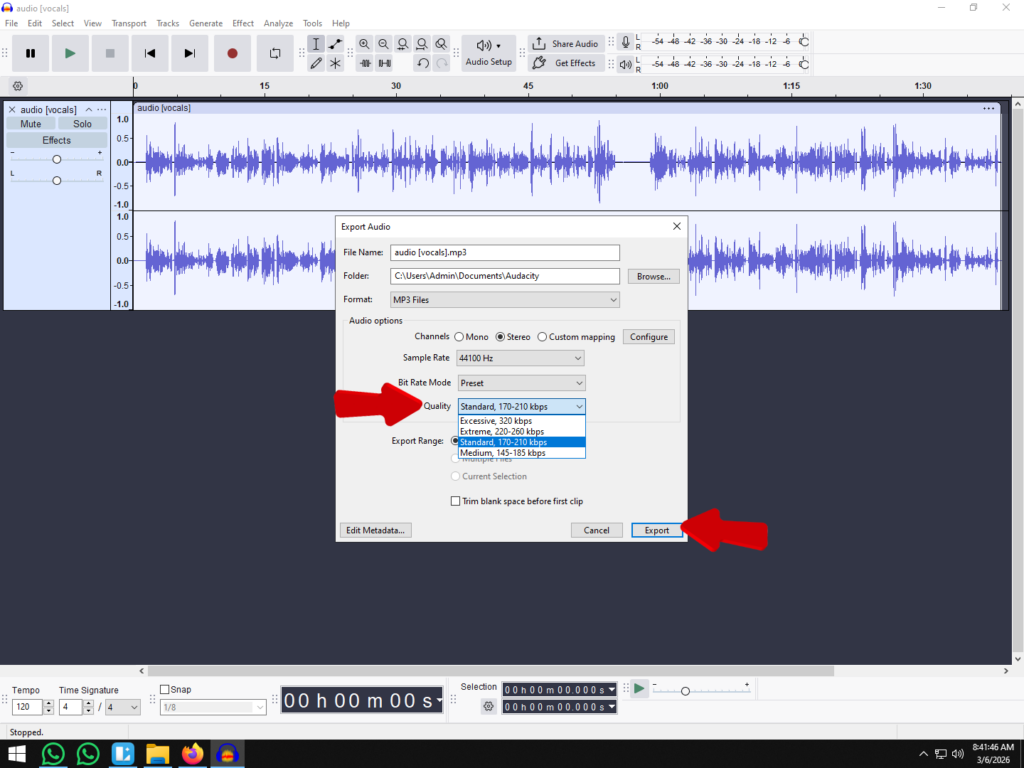
- Go to File > Export > Export as MP3.
- Configure Quality Settings: In the export dialog box, locate “Bitrate Mode.” For standard podcasts, select Constant and set the Quality to 192 kbps.

- Click Save. A “Edit Metadata Tags” window will pop up—fill in your Artist Name and Track Title (this helps podcast players display your info correctly), then hit OK.
Note: The export time depends on your video length and computer speed. Once the progress bar finishes, your MP4 video has been successfully converted into a standalone MP3 audio file.
Pro Tip: Ensuring Studio-Quality Audio Before You Convert
Before you hit “Export,” remember the golden rule of audio engineering: “Garbage in, garbage out.”
Converting an MP4 to MP3 is a lossy process. You are compressing the file to make it smaller, which inevitably discards some data. If your original video recording has background noise, echo, or distortion (clipping), the MP3 conversion will often make these flaws even more noticeable.
While Audacity has tools to repair audio, fixing distorted sound is difficult. The most efficient workflow is to capture pristine audio during the video shoot so you don’t have to fix it later.
The “Unclippable” Audio Solution: Hollyland LARK MAX 2
For creators who want to skip the headache of audio repair, the Hollyland LARK MAX 2 wireless microphone system offers a specific feature that creates a massive advantage in post-production: 32-bit Float Recording.


Here is why this matters for your Audacity workflow:
- No More Clipping: Standard microphones will distort if a speaker suddenly screams or laughs loudly. Once that audio clips, it is usually ruined.
- Infinite Headroom: The LARK MAX 2’s 32-bit float technology captures such a wide dynamic range that the audio is virtually impossible to clip.
- Post-Production Freedom: If you import a 32-bit float file into Audacity that looks like a solid block of distortion, you can simply normalize or lower the gain, and the clean waveform will reappear perfectly intact.
By recording with the Lark MAX 2, you ensure that the source file inside your MP4 is flawless. This means when you eventually convert it to MP3, you are preserving high-fidelity sound rather than compressing a damaged recording.
Alternative Method: Using VLC Media Player (If FFmpeg Fails)
If you can’t get the FFmpeg library to install—perhaps due to a work computer with restricted permissions—you can use VLC Media Player as a workaround.
Instead of teaching Audacity how to read the video file, we will use VLC to extract the audio track first. This creates a standard audio file that Audacity can open natively without any extra plugins.
How to Extract Audio Using VLC
- Open VLC Media Player.
- In the top menu, go to Media and select Convert / Save (Shortcut: Ctrl + R on Windows, Cmd + Shift + S on Mac).

- In the File tab, click the + Add button and select the MP4 video file you want to convert.

- Click the Convert / Save button at the bottom.
- In the Settings section, locate the Profile dropdown menu. Select Audio – MP3.

- Click Browse next to “Destination file,” choose where to save your new audio track, and give it a name ending in .mp3.
- Click Start.

VLC will rapidly “play” through the file (you will see the progress bar move). Once it finishes, you will have a standalone audio file in your destination folder that you can drag directly into Audacity.
Best Export Settings for MP3 in Audacity
Once you click Export as MP3, Audacity presents you with several technical options. Because MP3 deletes data to reduce file size, choosing the wrong settings can result in audio that sounds underwater or metallic.
Your goal is to find the “Sweet Spot” between a manageable file size and clear, crisp audio.
Bitrate Mode: Variable vs. Constant
The most confusing setting for beginners is usually Bitrate Mode.
- Constant (CBR): The audio quality stays the same throughout the entire file. This is the safest choice for podcasts because it ensures maximum compatibility with hosting platforms like Spotify and Apple Podcasts.
- Variable (VBR): The software analyzes the audio and lowers the bitrate during silence or simple speech, raising it only when the audio gets complex. This creates smaller files but can occasionally cause playback sync issues on older devices.
Recommended Settings Cheat Sheet
Use this table to quickly determine which settings match your project needs:
| Purpose | Bitrate Mode | Quality (kbps) | Best Use Case |
|---|---|---|---|
| Voice Memos / Drafts | Variable (VBR) | 128 kbps | Internal review, transcripts, or storage saving. |
| Standard Podcast | Constant (CBR) | 192 kbps | The industry standard for spoken word audio. |
| High-Fidelity / Music | Constant (CBR) | 320 kbps | Music production, sound effects, or archival. |
The “Standard” for Creators: If you are repurposing a YouTube video into a podcast episode, select Constant (CBR) at 192 kbps. While 320 kbps is technically higher quality, the difference is negligible for spoken voice, and it will unnecessarily double your file size.
Frequently Asked Questions (FAQ)
Can Audacity edit the video part of the MP4?
No. Audacity is strictly a Digital Audio Workstation (DAW). When you import an MP4 file using the FFmpeg library, Audacity extracts only the audio stream and discards the video track entirely. If you need to cut or move video clips, you must use video editing software like DaVinci Resolve or Adobe Premiere Pro.
Why is my audio out of sync after converting?
Audio drift usually happens due to a Sample Rate mismatch. Video files typically use a sample rate of 48,000 Hz (48kHz), while many default audio projects are set to 44,100 Hz (44.1kHz). Check the “Project Rate (Hz)” in the bottom left corner of Audacity and ensure it matches your source video (usually 48000).
Is installing FFmpeg safe?
Yes, provided you download it from the correct source. FFmpeg is a standard, open-source library used globally for multimedia handling. However, always follow the download links provided directly within the Audacity Manual or the official Audacity support wiki to ensure the file is free of malware.
Does converting MP4 to MP3 lose quality?
Yes. MP3 is a “lossy” format. Every time you export to MP3, you lose a small amount of audio fidelity. If you plan to edit the audio further, export it as a WAV (16-bit or 24-bit) first. WAV is lossless and preserves the original quality. Only convert to MP3 as the very final step before uploading.
Conclusion
Converting video files to audio in Audacity might seem intimidating due to the initial setup, but remember: installing the FFmpeg library is a one-time task. Now that you have configured the libraries, you can drag and drop MP4s directly into your timeline for every future project.
However, the quality of your final MP3 export depends heavily on the quality of your source recording. While Audacity is excellent for editing, “fixing it in post” is always more time-consuming than capturing clear audio on set.
To save yourself hours of repair work in the future, pay close attention to your input levels. For a truly stress-free workflow, consider gear like the Hollyland LARK MAX 2. With its 32-bit float recording, you capture such a massive dynamic range that clipping becomes a thing of the past. Instead of struggling to repair distorted peaks in Audacity, you start with pristine audio every time, making your conversion and export process instant and professional.