.png)
You don’t need $500 software to make a hit; you need a workflow.
Many beginners believe that producing “radio-ready” music requires expensive industry standards like Pro Tools or Ableton Live. This isn’t true. While paid software offers advanced automation, Audacity is a powerful tool for multitrack recording.
If you want to learn how to create and produce music in Audacity—specifically recording vocals, layering instruments, and mixing a full song—this free software is more than capable.
The “Truth Filter”: Audio Editor vs. MIDI Sequencer
Before setting up, it is important to set the right expectations. Audacity is a Digital Audio Editor, not a MIDI Sequencer.
- What Audacity IS NOT: It isn’t designed for “clicking in” drum beats on a grid or programming virtual synthesizers like you would in FL Studio. If you want to make electronic beats from scratch using only a mouse, Audacity will feel limiting.
- What Audacity IS: It excels at recording real audio. This means capturing vocals through a microphone, plugging in a guitar, or importing a pre-made beat and recording over it.
This guide focuses on the output workflow: taking a raw performance—whether it’s a rap verse, an acoustic cover, or a podcast intro—and polishing it using professional layering (overdubbing) and mixing techniques.
Step 1: Essential Gear & Setup for High-Quality Audio
Audacity is a powerful editor, but it cannot fix a bad recording source. If your input is distorted or noisy, no amount of mixing will save the track. Before you open the software, check your physical setup.
Here is the essential hardware you need to start producing:
- Computer: A PC or Mac (Audacity is lightweight and runs on most modern laptops).
- Audio Input: A high-quality microphone or audio interface to capture vocals and instruments.
- Monitoring: Closed-back headphones or in-ear monitors to hear the backing track without sound leaking into the microphone.
- Cables: The necessary USB or 3.5mm connections.
The Microphone Solution: Why You Don’t Need a Complex Studio
The biggest barrier for new producers is the “Audio Interface” hurdle. Traditionally, professional sound required a dedicated XLR interface, an XLR microphone, and expensive cables. This is costly and messy.
For a modern, streamlined workflow, we recommend the Hollyland LARK MAX 2.


While often used for video, this wireless microphone system is a secret weapon for budget-conscious musicians for three specific reasons:
- 32-bit Float Recording: This is a massive advantage for vocalists. If you belt out a loud chorus, standard microphones will “clip” (distort), ruining the take. The LARK MAX 2’s 32-bit float recording captures such a wide dynamic range that you can lower the volume in post-production without any distortion. You never lose a perfect take to bad levels again.
- Studio-Grade Specs: It records at 48kHz/24-bit, the industry standard for high-fidelity audio. This ensures your acoustic guitar or vocals sound crisp, not like a phone memo.
- Wireless Freedom: You can clip the mic to your shirt or place it near an instrument without being tethered to your computer.
Monitoring: Hearing Yourself Without the “Bleed”
When recording music in Audacity, you will use “Overdubbing” (recording new sounds over old ones). You must wear headphones during this process. If you use speakers, your microphone will pick up the beat, creating a nasty feedback loop.
- Closed-Back Headphones: These seal around your ear to keep sound in.
- Wireless Monitoring (OWS): If you use the Hollyland LARK MAX 2, it includes OWS (Open Wearable Stereo) earphones. These allow you to monitor your audio wirelessly with low latency, letting you hear exactly what the mic is capturing while keeping your setup entirely cable-free.
Step 2: Configuring Audacity for Music Production
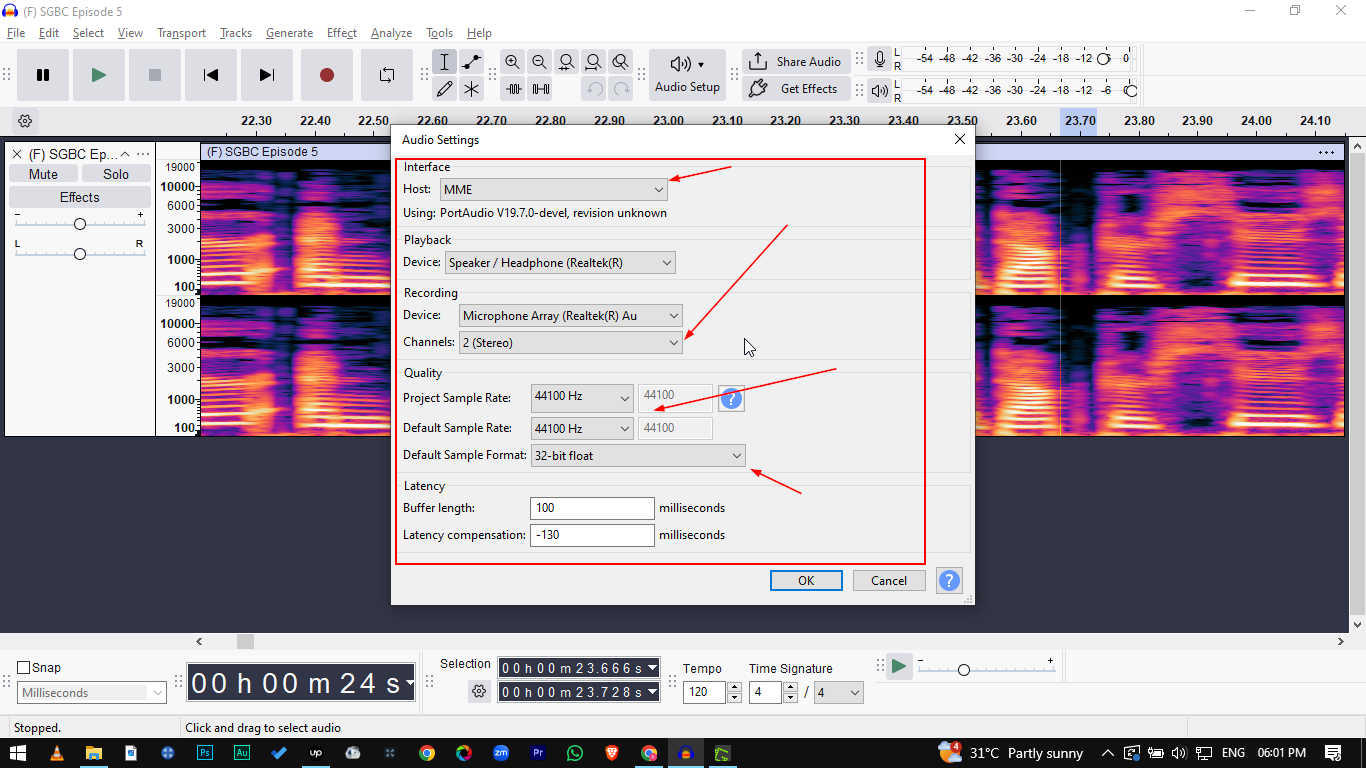
Before hitting record, you must configure Audacity’s internal settings. The default settings are often optimized for simple voice memos, not music production. Incorrect settings here are the main cause of lag and audio glitches.
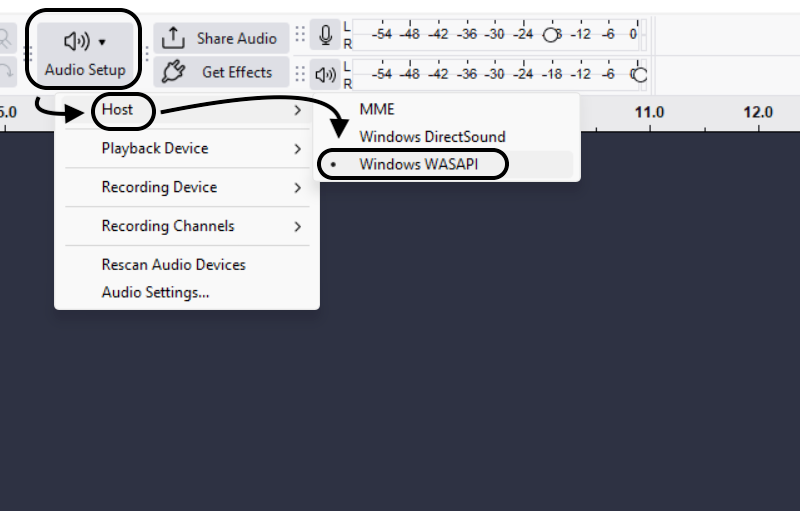
Selecting the Right Audio Host
The “Audio Host” is how Audacity talks to your sound card. Find this dropdown menu in the Audio Setup toolbar.
- Windows Users:
- MME: The default setting. It is compatible with everything but has significant delay. Avoid this for music.
- Windows WASAPI: The best choice. It allows Audacity to communicate directly with your audio device, drastically reducing latency for higher-quality recording.
- Mac Users:
- Core Audio: This is your only option, and fortunately, it is highly efficient and stable for music production.

Setting the Project Sample Rate
The Project Rate determines audio resolution. Find this in the bottom-left corner of the Audacity window (or under Audio Setup > Audio Settings).


- 44100 Hz (44.1 kHz): The standard for audio CDs.
- 48000 Hz (48 kHz): The standard for video and modern digital production.
Recommendation: Set your project to 48000 Hz. If you are using high-quality hardware like the Hollyland LARK MAX 2, you want to match its native 48kHz studio-quality output. Matching your project rate to your hardware prevents Audacity from having to “resample” your audio, which can cause lag or quality loss.
Choosing Recording Channels: Mono vs. Stereo
Beginners often mistakenly record everything in Stereo, which can lead to vocals coming out of only one speaker. Go to Audio Setup > Audio Settings.

- Choose Mono (1 Channel): For single sources like a lead vocal, a guitar plugged into an interface, or a bass line. You can add stereo effects (like reverb) later.
- Choose Stereo (2 Channels): Only use this if you are recording a synthesizer with stereo outputs or a live drum kit with multiple mics mixed down to two channels.
Step 3: The “Overdubbing” Workflow (Layering Your Track)
This is the most critical step. Overdubbing is the process of playing back a recording while recording a new track alongside it. This allows you to build a song layer by layer—starting with drums, adding bass, and finishing with vocals.
Without enabling this specific setting, Audacity will simply record into a void, and you won’t hear your backing track.
1. Establish Your Foundation (The Guide Track)
You need a blueprint. In music, this is your Guide Track.
- Import a Beat: If you have a pre-made instrumental, go to File > Import > Audio and select your file.

Generate a Click Track: If you are recording instruments from scratch, you need a metronome. Go to Generate > Rhythm Track, select your Tempo (BPM), and click OK.


2. Enable Overdubbing (Vital Step)
By default, Audacity might not play the existing tracks while you record a new one. Toggle this manually:
- Go to the top menu bar and click Transport.
- Hover over Transport Options.
- Check “Hear other tracks during recording”.

Once checked, when you hit Record (R), Audacity will play your Guide Track through your headphones and record your new input onto a fresh track below it.
3. Layering Your Instruments
To keep your mix clean, record in a logical order:
- Rhythm First: Record drums or percussion.
- Bass Line: Record the bass guitar or synth bass to lock in the groove.
- Harmony: Record rhythm guitars, pianos, or pads for structure.
- Melody/Vocals: Record lead vocals and solos last.
Pro Tip: If you are using the Hollyland LARK MAX 2, use the USB-C receiver for direct digital audio and the OWS earphones for monitoring. This gives you the freedom to move while performing energetic vocals without being tethered to the desk.
Step 4: Solving the Latency Issue
If you have ever recorded a perfectly timed vocal track, only to play it back and hear that it is slightly “late” or dragging behind the beat, you are experiencing latency. This is the most frustrating hurdle for beginners, but it is fixable.
Why Does This Happen?
Latency occurs because it takes a few milliseconds for audio to travel from your microphone, process through your computer, and write to the hard drive. Audacity has a built-in feature called Latency Compensation to fix this, but you must calibrate it first.
How to Run the Latency Test
Before recording your song, measure the delay your specific computer creates.
- Start Fresh: Open a new project.
- Generate a Click Track: Go to Generate > Rhythm Track.

- Prepare for Loopback:
- Microphone: Take your headphones off and hold one earcup close to the mic.
- Interface: Use a loopback cable if available.
- Record: Press Record. The mic will “hear” the clicks from the headphones and record them onto a new track.
Stop: After a few seconds, press Stop.

Measuring and Fixing the Delay
You will see two tracks: the original click track on top, and your slightly delayed recording on the bottom.
- Zoom In: Use Ctrl + Scroll to zoom in very close to the first click.
- Analyze the Gap: You will see the bottom waveform starts slightly to the right of the top one.
- Measure: Use the Selection Tool to highlight the empty space between the start of the original click and the start of your recorded click. Look at the Selection Toolbar for the “Length” (e.g., 130 milliseconds).

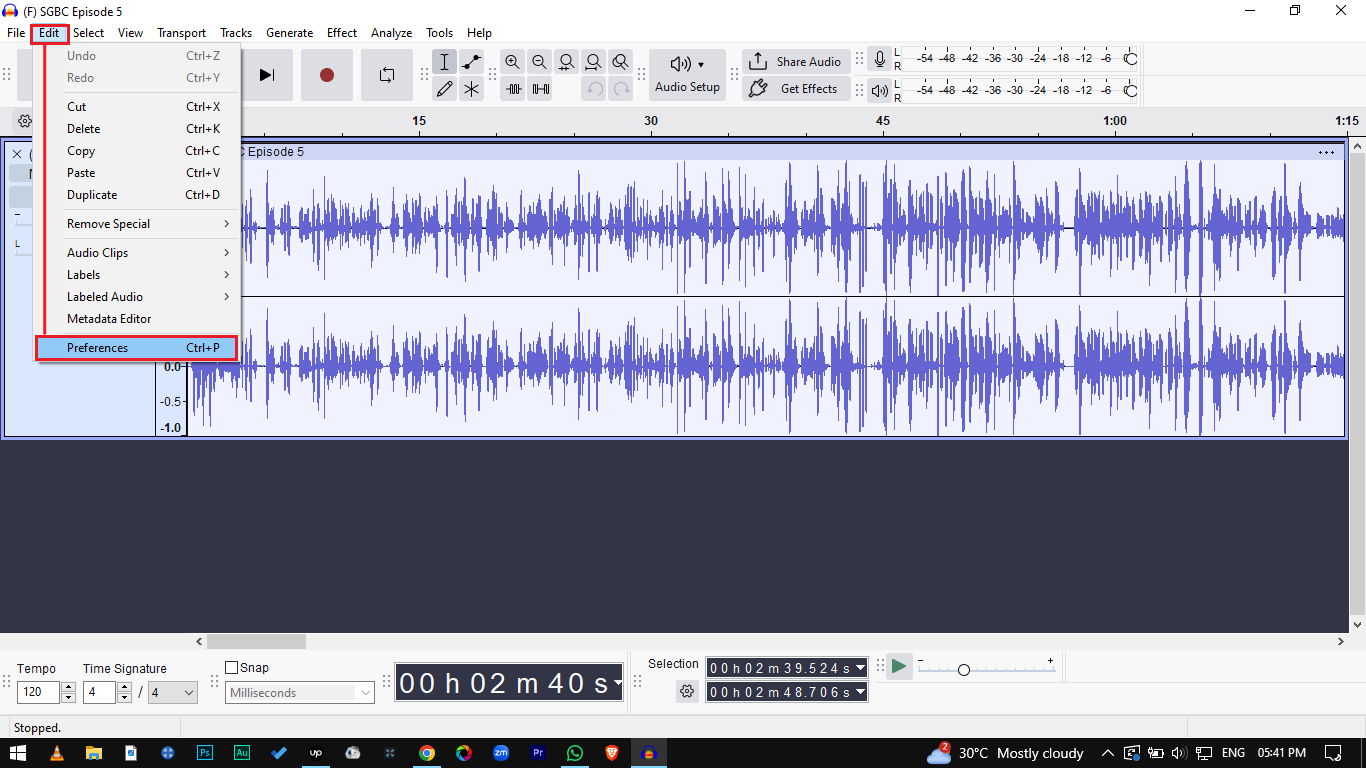
- Adjust Settings:
Go to Edit > Preferences or Audacity > Preferences on MacOS.

- Go to Audio Settings, scroll down and look for Latency Compensation.
- Enter your measured number as a negative number (e.g., -130).
- Click OK.

Verification: Delete the recorded track and run the test again. The new recording should now line up perfectly.
Step 5: Mixing and Applying Effects
Mixing is where you turn a collection of raw files into a song. Audacity provides all the tools necessary to polish your sound directly on the timeline.
Panning: Creating Stereo Space
If every instrument sits in the center, the song will sound flat. Panning helps you place instruments in a virtual space (Left to Right).
- How to do it: On the Track Control Panel (left of the waveform), use the L—-R slider.
Strategy: Keep lead vocals, bass, and kick drums in the Center. Pan rhythm guitars or keyboards slightly Left and Right to create width.

EQ & Compression: The Basics of Polish
1. Equalization (EQ)
EQ shapes the tone. Use the Filter Curve EQ to remove unwanted frequencies.

- Cut before you boost: If a track sounds muddy, cut the low frequencies first.
- High-Pass Filter: Cut frequencies below 100Hz on vocals and guitars to leave room for the Bass and Kick drum.
2. Compression
Compression evens out volume, making quiet parts louder and loud parts softer.
How to do it: Go to Effect > Volume and Compression > Compressor.

- Standard Settings: For vocals, try a Threshold of -12dB to -18dB and a Ratio of 2:1.

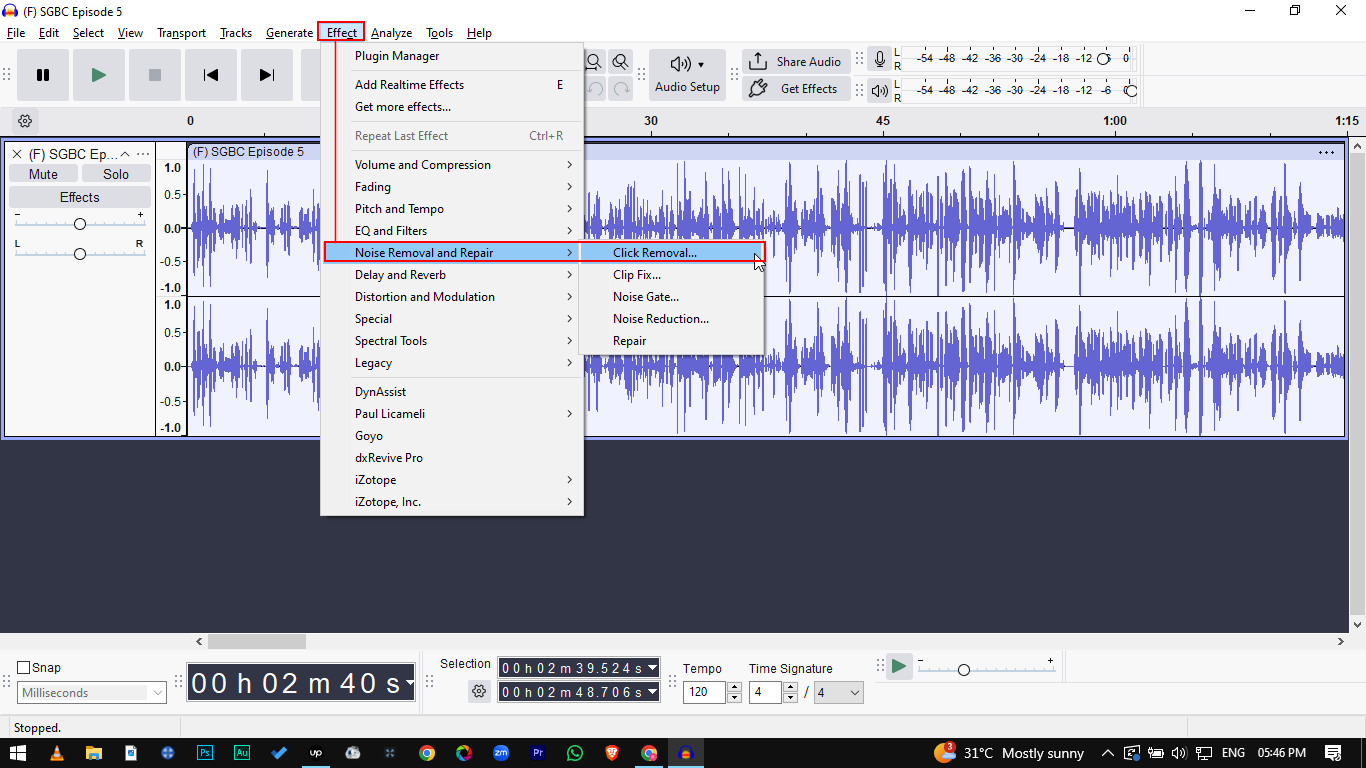
Noise Reduction: Cleaning Up Background Hiss
If you recorded in an untreated room, you likely have “room hiss.”
Get Noise Profile: Highlight a small section of “silence” where only the background noise is audible. Go to Effect > Noise Removal and Repair > Noise Reduction and click Get Noise Profile.


- Apply Reduction: Select the entire track, go back to Effect > Noise Removal and Repair > Noise Reduction, and click OK.

Note: If you use the Hollyland LARK MAX 2, you can activate its Environmental Noise Cancellation (ENC) feature during recording. This eliminates low-frequency rumble at the source, often allowing you to skip this editing step entirely.
Reverb: Adding Depth
Raw recordings can sound unnatural and dry. Reverb places your sound in a virtual room.
- Go to Effect > Delay and Reverb > Reverb.

- Keep Wet Only unchecked so you hear both the vocal and the echo.

- Tip: Apply reverb until you can just barely hear it, then dial it back slightly. Too much will wash out the mix.
Step 6: Exporting and Mastering Your Track
Once your mix sounds balanced, it’s time to finalize. You cannot simply hit “Save” (which creates an Audacity project file); you must Export the audio to create a playable file.
The “Quick Master” Workflow
Raw recordings are often quieter than professional songs. Use this simple chain to get your track to commercial loudness standards.
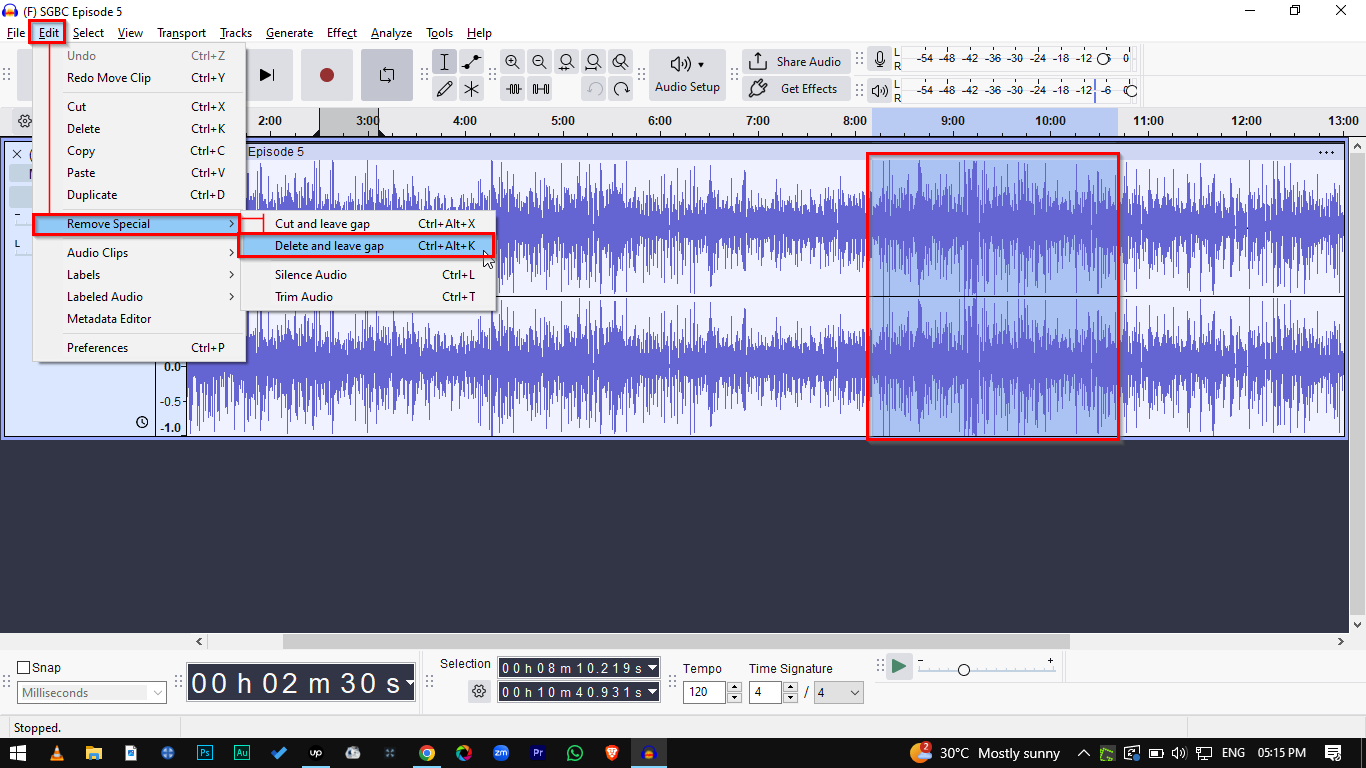
- Mix and Render: Select all tracks (Ctrl + A) and go to Tracks > Mix > Mix and Render. This collapses all layers into one stereo track.

- Apply Limiter: Go to Effect > Volume and Compression > Limiter.

- Set Limit to (dB) to -1.00.
- Adjust Input Gain to boost volume (start with +3.00 dB).
- This pushes the quiet parts up while preventing distortion.

Choosing the Right Format: WAV vs. MP3
| Feature | WAV (Signed 16-bit PCM) | MP3 |
|---|---|---|
| Quality | Lossless. Exact copy. Highest fidelity. | Compressed. Discards data to save space. |
| File Size | Large (~10MB per minute). | Small (~1MB per minute). |
| Best Use | Archiving & Uploading. Use for SoundCloud/Spotify. | Sharing. Use for emailing demos. |
Pro Tip for MP3s: Always select “Insane, 320 kbps” in the Quality menu to reduce digital artifacts.
Pro Tips for Better Recordings in Audacity
Even with a perfect setup, poor habits can ruin a performance. Use these techniques to ensure your raw audio is clean.
1. Watch Your Input Levels (Gain Staging)
The most common mistake is recording “too hot.” If your audio waveform hits the top and bottom edges (0dB), it causes clipping—distortion that cannot be fixed.
- The Rule: Aim for peaks between -12dB and -6dB.
- The Safety Net: If you use the Hollyland LARK MAX 2, its 32-bit Float Recording acts as insurance. Even if your levels clip during a loud chorus, the data is preserved. You can lower the gain in Audacity later without distortion, saving a take that would be unusable on standard mics.
2. Capture Room Tone
Audacity’s Noise Reduction tool needs a reference. Before every performance, record 10 seconds of absolute silence. Don’t play or move. This captures the “room tone” (fan noise, AC hum) so the software knows exactly what to remove later.
3. Master the Shortcuts
Clicking menus kills flow. Memorize these:
| Shortcut | Function | Why Use It? |
|---|---|---|
| R | Record New Track | Starts recording immediately on a new track. |
| Shift + R | Append Record | Starts recording at the end of the current track. |
| Spacebar | Play / Stop | The fastest way to review or stop. |
| P | Pause | Pauses the cursor exactly where it is. |
Frequently Asked Questions (FAQ)
Is Audacity good for making rap beats?
No, not for creating the beat itself. Audacity is an Audio Editor, not a MIDI Sequencer like FL Studio. It lacks the tools to program drums and melodies from scratch. However, it is excellent for recording vocals over existing beats.
How do I fix audio that is out of sync?
This is a latency issue. You can fix it manually by dragging the track with the mouse, or permanently by running the “Loopback Test” in Preferences > Latency and entering a negative number in the Compensation box.
Can I use VST plugins in Audacity?
Yes. Audacity supports 64-bit VST effect plugins, allowing you to use third-party Equalizers and Reverbs. Note that it generally does not support VST instruments (you can’t plug in a keyboard and play a virtual synth).
What is the best microphone for Audacity beginners?
For a balance of quality and ease of use, the Hollyland LARK MAX 2 is a top choice. Its 32-bit float recording prevents distortion on loud vocals, and the wireless OWS earphones solve the problem of monitoring your backing track without cables getting in the way.
Conclusion
Music production isn’t about how much money you spend on software; it’s about your creativity and workflow. While Audacity lacks the flashy interface of paid DAWs, it is a robust tool for anyone willing to master multi-track overdubbing and latency correction. By understanding how to layer tracks and sync audio, you can produce professional demos and songs right from your bedroom.
Remember: the most critical step is capturing a clean source signal. Great music starts with a great take. Ensure your input is pristine with tools like the Hollyland LARK MAX 2, using its 32-bit Float tech as a safety net for your vocals.
You have the software, and you have the knowledge. Now, hit that red Record button and start creating.