.png)
Most audio editing happens in the standard Waveform view—that familiar blue shape representing your audio. While this view is excellent for adjusting volume or cutting out silence, it has a major limitation: it treats all sounds as a single layer. If a phone rings while you are speaking, the waveform simply shows a “louder” spike. You cannot cut the ring without also cutting your voice.
To fix complex audio issues, you need to switch dimensions.
Learning how to use Audacity Spectral Tools for advanced editing allows you to view and manipulate audio based on frequency (pitch) rather than just amplitude (volume). By converting the visual representation of your audio into a Spectrogram, you can identify specific sounds—like a high-pitched whistle, a low hum, or a sudden click—visually distinct from the rest of the recording.
The “Photoshop” of Audio Editing
Think of Spectral Editing as Photoshop for your ears. Just as you might remove a blemish from a photo without deleting the skin behind it, Spectral Tools allow you to surgically remove a specific frequency (like a siren or a cough) without deleting the dialogue happening at the same exact moment.
Waveform vs. Spectrogram: What’s the Difference?
Understanding the visual difference is the first step to mastering repair:
- Waveform View (The “Blob”): Displays Time (X-axis) versus Loudness (Y-axis). It tells you how loud the audio is at any given second, but it cannot tell you what the sound is made of.
- Spectrogram View (The “Heat Map”): Displays Time (X-axis) versus Pitch (Y-axis). The color intensity represents loudness. In this view, a deep bass voice appears at the bottom of the graph, while a high-pitched hiss appears at the top.
This frequency separation gives you the power to “see” a car horn in the background and delete only those specific frequencies, leaving the speaker’s voice largely untouched.
Setting Up Your Workspace for Spectral Editing
Before you can perform surgical audio repair, you need to leave the standard Waveform view behind.
How to Switch to Spectrogram View
By default, Audacity displays audio as a blue waveform. To access the spectral data:
- Locate the control panel on the left side of your audio track.
- Click the three dots (,,,) near the track name (or right-click the track header).

- Select Spectrogram from the dropdown menu.
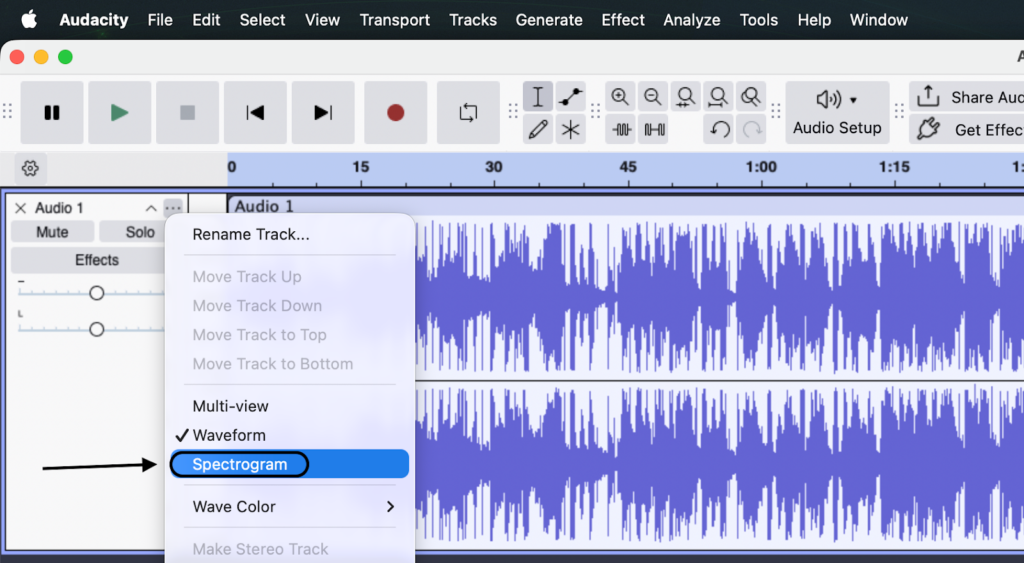
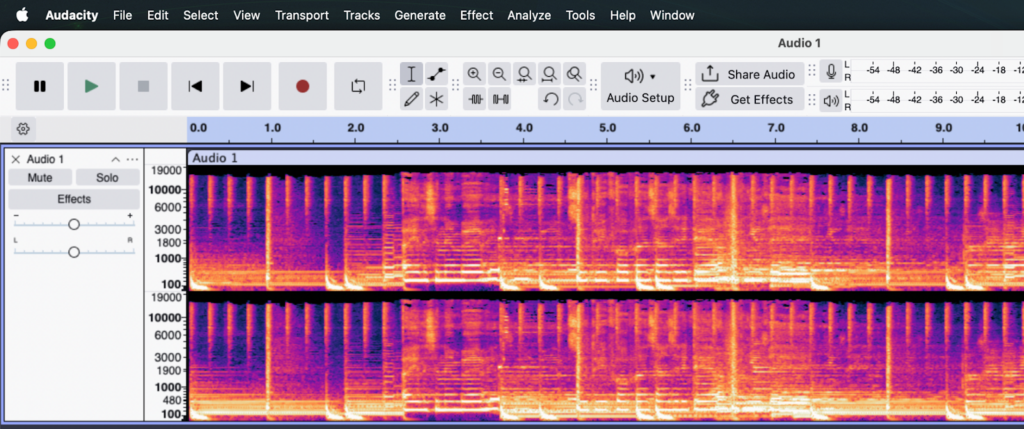
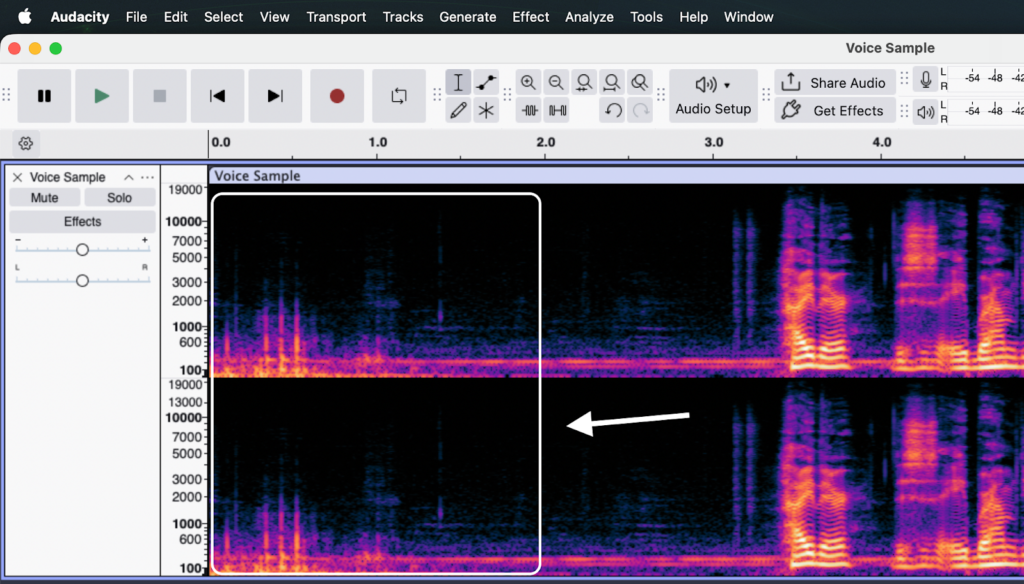
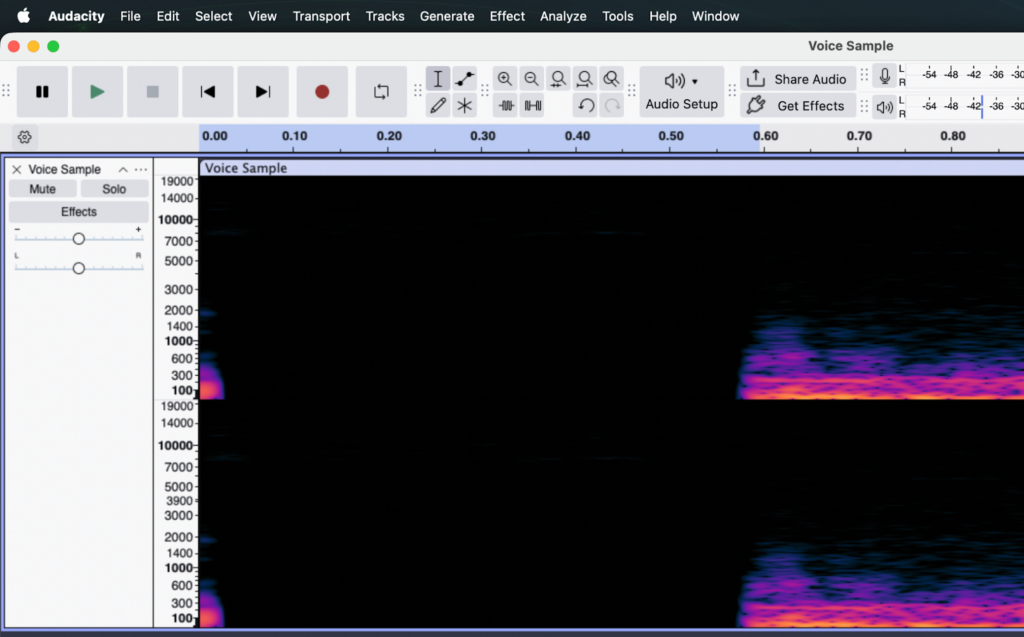
Your track will transform from a blue wave into a colorful heat map. If the track looks compressed or hard to read, click and drag the bottom edge of the track to expand its vertical height. This gives you more room to work.
How to Read the Spectrogram
The Spectrogram can look intimidating at first, but it is simply a graph of your audio across three dimensions:
- Left to Right (X-Axis): This is Time, just like the standard view.
- Bottom to Top (Y-Axis): This is Pitch. Low bass sounds are at the bottom; high-pitched sounds (like “S” sounds or whistles) are at the top.
- Color: This is Loudness. Darker colors (blue/black) are silence. Brighter colors (red/white/pink) are loud, intense audio.
Pro Tip: Fix Blurry Visuals
The default Spectrogram settings in Audacity often look blurry, making it difficult to spot precise clicks or hums. You can sharpen the visual by adjusting the “Window Size.”
- Go to Edit > Preferences (or Audacity > Preferences on macOS).
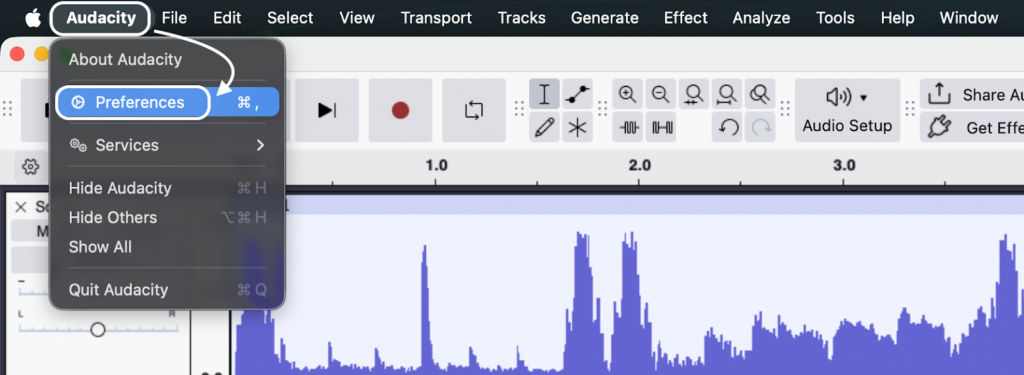
- Select Spectrograms from the left-hand menu.
- Locate the Window Size setting.
- Change the value from the default (often 256) to 1024 or 2048.
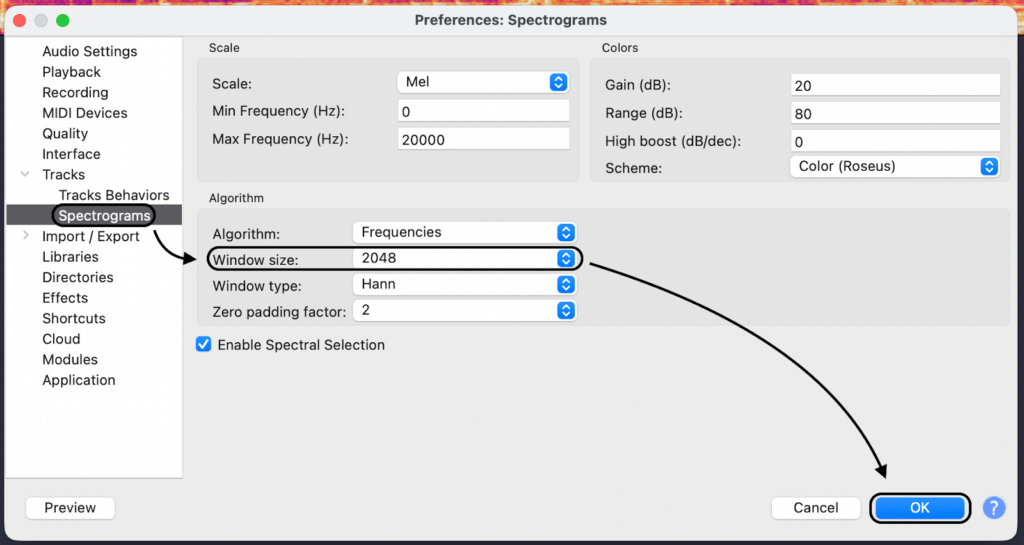
Why this matters: Increasing the Window Size improves frequency resolution, making horizontal lines (like a consistent hum or ring) appear much sharper. Be careful not to go too high (e.g., 8192), or you might lose the ability to see exactly when a sound happens. For most dialogue repair, 1024 is the sweet spot.
The Core Toolkit: Understanding Audacity’s Spectral Features
Standard editing tools in Audacity treat audio like a flat strip of tape—if you cut a section, you cut everything. Spectral tools are different. They allow you to operate surgically, targeting specific pitches without affecting the surrounding audio.
Here is a breakdown of the three essential tools you will use:
| Tool Name | Function | Best Used For |
|---|---|---|
| Spectral Selection Tool | Allows you to draw a “box” selection on the spectrogram, defining both a specific time range and a specific frequency range. | Isolating precise artifacts like high-pitch whistles, feedback, or a specific hum. |
| Spectral Edit Multi-Tool | A smart effect that automatically applies a High Pass, Low Pass, or Notch filter depending on the size and shape of your selection. | General cleanup, de-essing (taming harsh “S” sounds), and smoothing frequency transitions. |
| Spectral Delete | Mathematically removes the selected frequencies and fills in the gap using the surrounding audio data. | Removing distinct, isolated background events like a phone ringing, a cough, or a bird chirp. |
Accessing the Tools
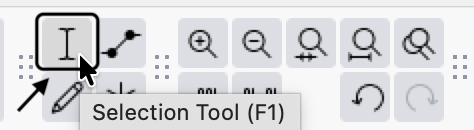
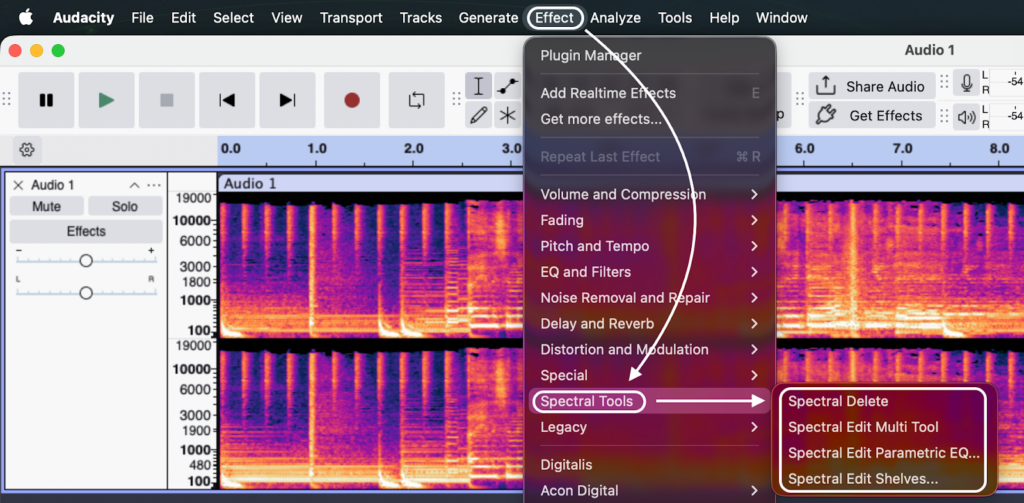
- Spectral Selection Tool: Found in the main Tools Toolbar (icon looks like a selection box).
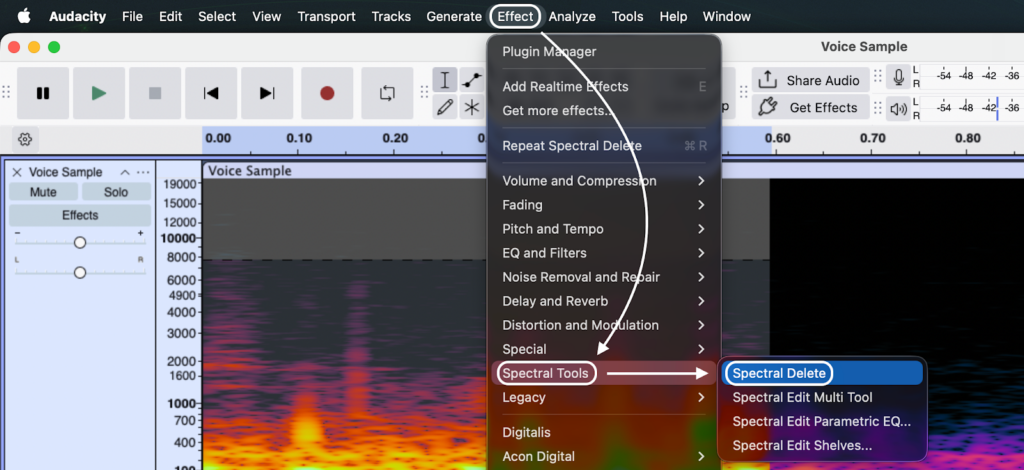
- Spectral Effects (Multi-Tool & Delete): These are located in the main menu under Effect > Spectral Tools. You must make a selection using the Spectral Selection Tool first before these effects become active.
Step-by-Step Guide: 3 Common Repair Scenarios
Knowing what the tools do is important, but knowing when to apply them saves the recording. Below are three specific workflows for common audio issues that standard EQ cannot fix.
Scenario 1: Removing Background Noises (e.g., Phone Rings)
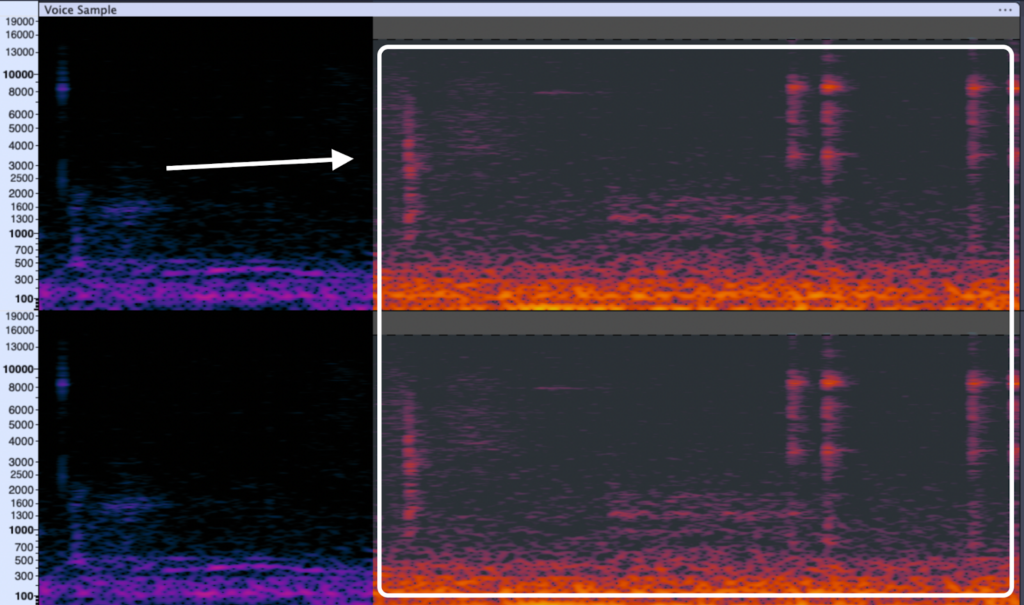
Continuous tonal sounds, like a phone ringing or a distant siren, are difficult to remove with a standard noise gate because they overlap with the human voice. In the Spectrogram View, however, these sounds appear as distinct horizontal lines.
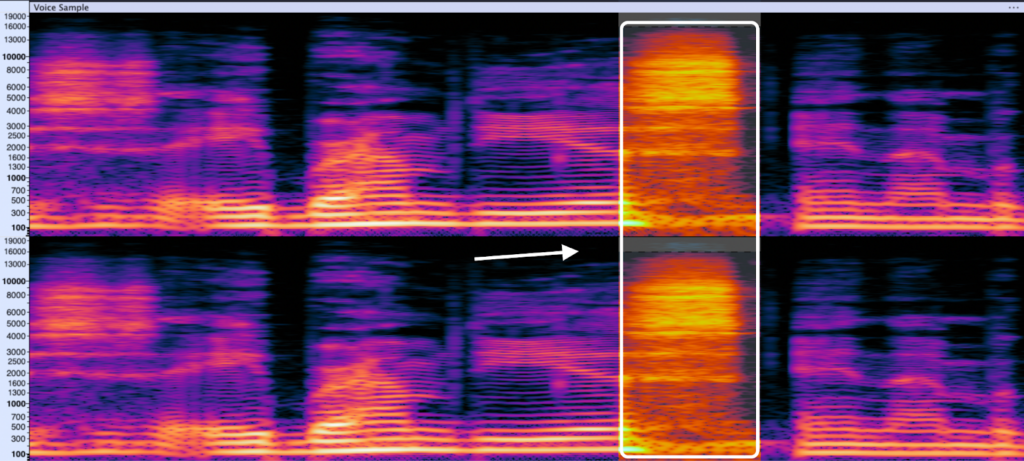
- Identify the Artifact: Look for bright, horizontal lines that persist across the screen. A phone ring often appears as a “ladder” of stacked lines.
- Select the Frequency: Select the Selection Tool from the toolbar.
- Draw the Box: Click and drag to draw a box strictly around the horizontal line. Be careful not to select the voice frequencies above or below the noise.
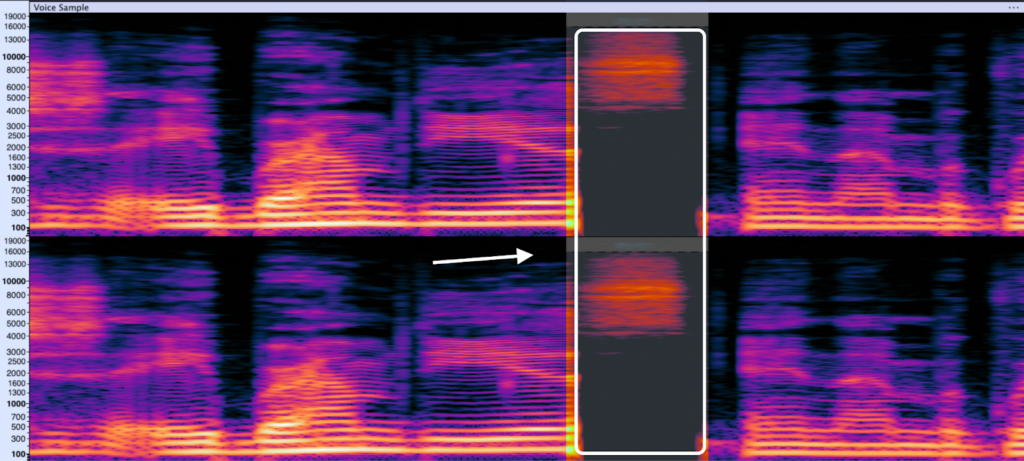
- Apply the Fix: Go to Effect > Spectral Delete. This erases the ring while keeping the background room tone intact.
Scenario 2: De-Essing (Taming Harsh “S” Sounds)
Sibilance—those piercing “S”, “T”, or “Ch” sounds—can ruin a podcast. While a traditional De-Esser plugin works well, manual spectral editing offers surgical precision for stubborn cases.
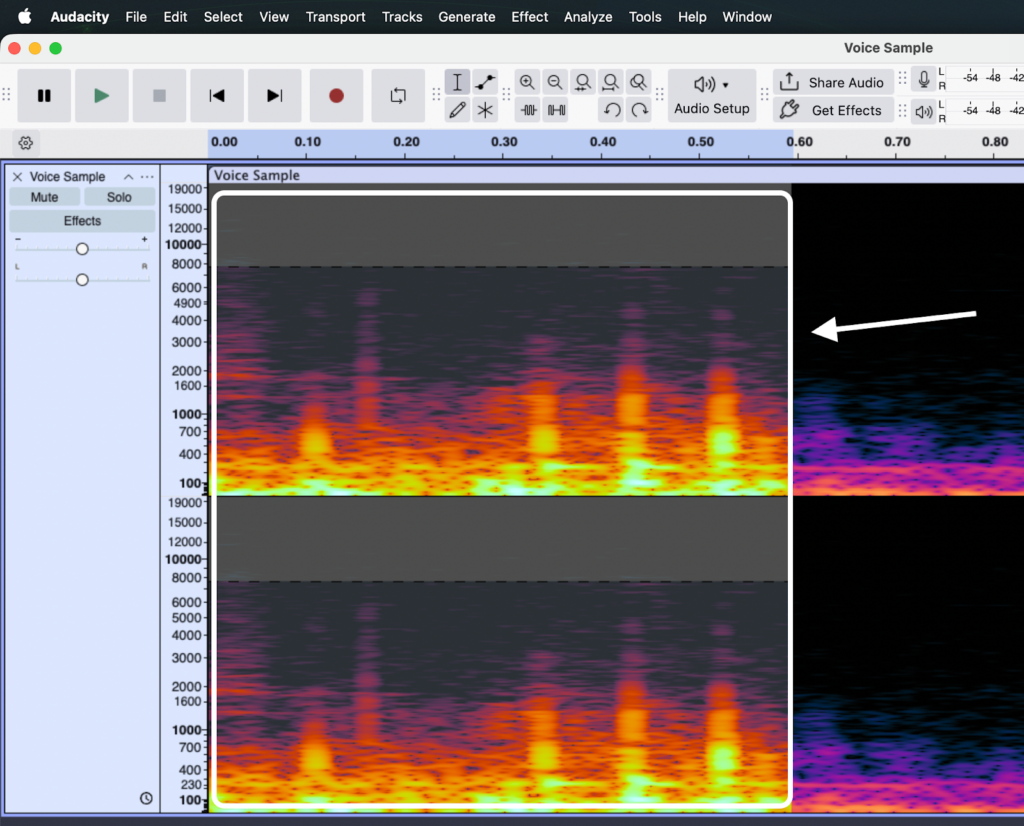
- Locate the Sibilance: Listen to your track and pause on a harsh “S.” In the Spectrogram, this looks like a dense, bright cloud of energy, usually sitting between 5kHz and 8kHz.
- Isolate the Range: Use the Selection Tool to highlight only the time duration of the “S” sound and the specific frequency range where the brightness is most intense.
- Soften the Blow: Instead of deleting this (which creates a lisp), use the Spectral Edit Multi-Tool. This acts as a notch filter, lowering the volume of just those harsh frequencies to make the “S” sound natural, not piercing.

Scenario 3: Fixing Mouth Clicks
Mouth clicks and lip smacks are transient spikes. Unlike the horizontal lines of a phone ring, clicks appear as thin, vertical lines spanning a wide range of frequencies.
- Zoom In Tight: You cannot fix a click from a zoomed-out view. Zoom in on the waveform until you can see the individual milliseconds.
- Spot the Spike: Look for a sharp, vertical line that interrupts the visual flow of the audio. It often looks like a scratch on a film negative.
- Attenuate, Don’t Delete:
- Select the click using the Selection Tool.
- Apply Effect > Spectral Delete (for very narrow selections) or run the Spectral Edit Multi-Tool.
- Note: Avoid using the “Silence” command. Silencing a click creates a “black hole” in your audio (zero room tone), which sounds unnatural. Spectral tools lower the click’s volume to match the surrounding noise floor, making the edit invisible.
Pro Tip: Avoid Extensive Editing with Better Source Audio
While spectral editing effectively rescues damaged files, it should be your last line of defense.
“Surgical” audio repair is tedious—often requiring 10 minutes of editing for every 1 minute of audio. Furthermore, every time you delete frequencies, you risk making the voice sound hollow or robotic.
The best edit is the one you never have to make.
The Problem: Why Clipping is Fatal
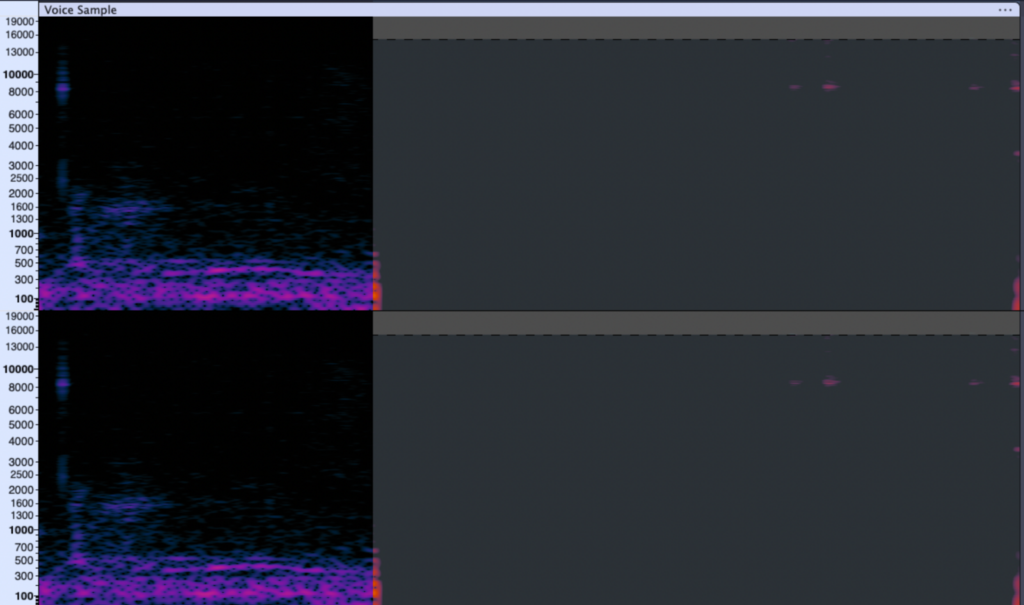
The most difficult issue to fix in a spectrogram is digital clipping (distortion). When audio peaks above 0dB, the waveform is “chopped” off. In the Spectrogram view, this appears as a solid wall of noise extending across the entire frequency spectrum. No amount of spectral painting or filtering can perfectly restore that lost data.
The Solution: 32-bit Float Recording
To bypass hours of post-production repair, professional creators generally upgrade their input chain to the Hollyland LARK MAX 2.


The specific advantage here is 32-bit Float Recording. Unlike standard 24-bit audio, 32-bit float captures a massive dynamic range that is virtually impossible to clip. If your subject screams, laughs suddenly, or the environment gets unexpectedly loud, the audio will not distort. Instead of trying to reconstruct a clipped waveform in Audacity, you simply lower the gain in post-production, and the signal remains pristine.
Monitor Frequencies in Real-Time
Prevention also requires active listening. The LARK MAX 2 supports Wireless Audio Monitoring, allowing you to pair Open-Ear (OWS) earphones directly to the system.
This lets you hear frequency interference—like the hum of a refrigerator—while you are recording. Catching these noises on location is infinitely faster than trying to “paint” them out in Audacity later.
Advanced Tips for Natural Sounding Edits
Spectral editing is powerful, but it is easy to abuse. If you are too aggressive, your audio will sound “phasey” or robotic—often worse than the original noise. To maintain a professional, organic sound, you need to refine your approach.
Don’t Over-Process: Attenuate, Don’t Delete
The biggest mistake beginners make is completely deleting a frequency range. When you remove a slice of the spectrum entirely, you also remove the “air” and harmonics of the voice that exist in that same space. This creates an unnatural vacuum in the audio.
Instead of deleting a noise, attenuate it.
- The Goal: Reduce the noise just enough that the human brain ignores it, while keeping the background ambience intact.
- How to do it: Instead of using Spectral Delete, use the Amplify effect on your spectral selection and enter a negative value (e.g., -6dB or -10dB). This pushes the noise down into the mix without leaving a digital hole.
Smoothing Transitions
Sudden changes in the frequency spectrum can sound like glitches. If you apply a heavy filter to a specific block of time, the edges where the effect starts and stops can be jarring.
To make your edits invisible, use the Spectral Edit Multi-Tool. It often applies bells or notch filters that naturally curve the audio reduction, sounding much smoother than a hard cut. Always listen specifically to the split second before and after your edit. If you hear a “pop,” expand your selection slightly into the silence to catch the transient fully.
Re-Synthesis: Filling the Void
Sometimes, a noise is so loud (like a car horn) that you have to delete the frequencies entirely, leaving a noticeable gap of silence. This dead space draws attention to itself.
In advanced repair, professionals use re-synthesis or “spectral patching.”
- Find a clean section of “room tone” or background noise from elsewhere in the track.
- Copy a similar frequency range.
- Paste it into the gap you created.
This acts like “spackle” on a wall, covering the hole with texture that matches the surrounding environment so the listener never notices the edit.
Frequently Asked Questions (FAQ)
Is spectral editing destructive in Audacity?
Yes. Unlike some modern DAWs that use real-time plugins, Audacity applies edits directly to the audio data. Once you use Spectral Delete, that information is removed from the waveform permanently.
Pro Tip: Always duplicate your track (Ctrl + D on Windows / Cmd + D on Mac) before starting spectral repairs. Mute the original track and keep it as a safety backup.
Why is my Spectrogram view blurry?
If your spectrogram looks like a fuzzy blur rather than distinct lines, your Window Size is likely set too low. Go to Edit > Preferences > Spectrograms and increase the Window Size to 1024 or 2048. This sharpens the frequency visibility, making it easier to see horizontal pitch lines.
Can I remove vocals entirely using spectral tools?
Not perfectly. While spectral tools allow you to manually erase the frequencies where vocals sit, vocals are complex and cover a wide frequency range that often overlaps with other instruments.
Trying to manually “paint out” a voice usually results in a hollow, robotic sound. For full vocal removal, you are better off using Audacity’s automated “Vocal Reduction and Isolation” effect or dedicated AI stem separation tools. Reserve manual spectral editing for surgical cleanup of specific artifacts like lip smacks or breaths.
Conclusion
Mastering Audacity’s Spectral Tools transforms you from a standard editor into an audio surgeon. By learning to “see” sound, you gain the ability to excise specific problems—like a background phone ring, a stubborn mouth click, or harsh sibilance—that standard EQ simply cannot touch without ruining the voice.
However, this power comes with a cost: time. Spectral editing is meticulous, frame-by-frame work. While it can rescue a ruined recording, the most efficient workflow is always capturing pristine audio at the source.
If you find yourself spending hours in Spectrogram view trying to repair clipped or distorted audio, it might be time to upgrade your input chain. The Hollyland LARK MAX 2 is designed to solve these problems before they reach your timeline. With its 32-bit Float Recording, you capture a dynamic range so vast that audio distortion is virtually impossible, ensuring your raw files are studio-quality from the moment you hit record.
Start by customizing your Spectrogram settings in Audacity today to practice these techniques. But for your next project, consider gear that keeps you out of the repair shop and focused on creating content.