.png)
For over two decades, Audacity has been the undisputed king of free audio software. Whether you are launching a podcast, recording a voiceover for YouTube, or digitizing old cassette tapes, this open-source software is likely your starting point. It isn’t just popular because it is free; it is popular because it works.
If you are wondering how to edit audio in Audacity—ranging from basic cuts to advanced processing—you are in the right place.
However, opening the software for the first time can feel like stepping into the cockpit of an airplane. The interface is cluttered with menus and boasts a waveform display that looks more like a science experiment than a creative tool.
Why Pros Still Keep It Installed
You might assume professional sound engineers only use expensive Digital Audio Workstations (DAWs) like Pro Tools or Adobe Audition. While they do use those for complex mixing, many still rely on Audacity for specific tasks.
The key difference lies in Destructive vs. Non-Destructive Editing:
- Non-Destructive (Most DAWs): When you cut a clip or add EQ, the original file on your hard drive remains untouched. The software just “remembers” your edits.
- Destructive (Audacity): When you delete a section or apply an effect in Audacity, you are altering the actual digital data of that waveform immediately.
This “destructive” workflow makes Audacity unbeatable for speed. If you simply need to trim silence, normalize a single clip, or quickly convert a file format, Audacity is often significantly faster than waiting for a heavy DAW to load a massive project file.
Your Roadmap to Broadcast Quality
You do not need to memorize every effect in the “Generate” menu to get professional results. In fact, 90% of a great edit comes down to just four or five specific tools. This guide cuts through the noise, taking you from a rough recording to a polished master file.
Let’s start by mastering the waveform.
Phase 1: The Basics of Audacity Audio Editing
When you first open Audacity, the interface can look intimidating. You can safely ignore most of the buttons for now. You only need a handful of tools to turn a raw recording into a clean track.
Here are the five fundamental actions that make up the core editing workflow:
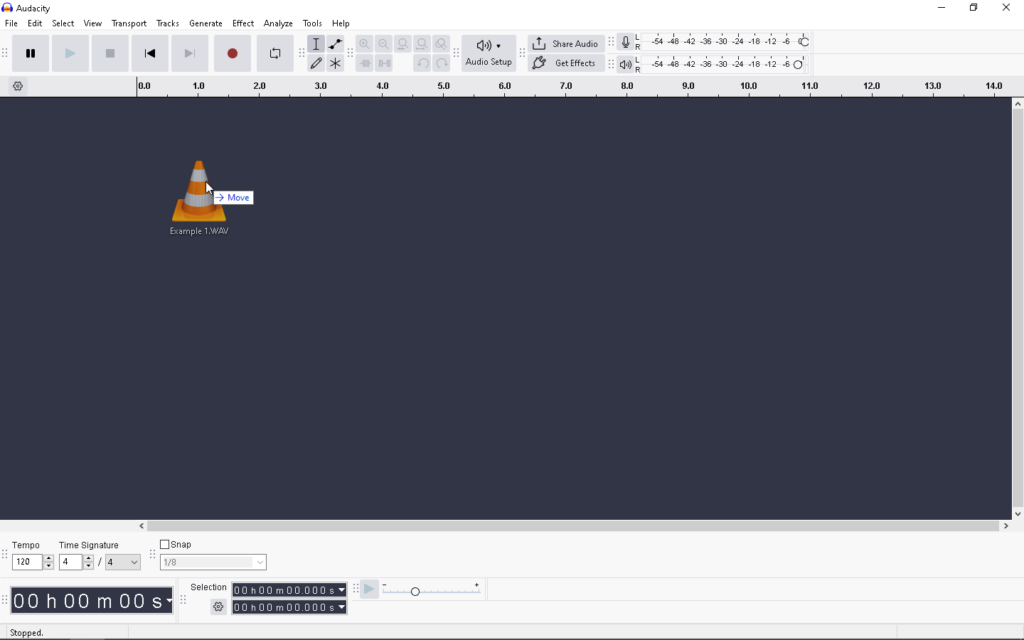
1. Importing Your Audio
The fastest way to get started is drag-and-drop. Simply locate your audio file (MP3, WAV, or AIFF) on your computer and drag it directly into the gray workspace in Audacity.
- Alternative: Go to File > Import > Audio.

- Tip: Audacity converts the file into a visual “waveform.” The loud parts are tall peaks; the quiet parts (or silence) are flat lines.
2. The Selection Tool (F1)
This is your primary weapon. Look for the “I-Beam” icon in the top toolbar (or press F1). This tool works exactly like highlighting text in a Word document.
- How to use: Click and drag across any part of the blue waveform to highlight it.
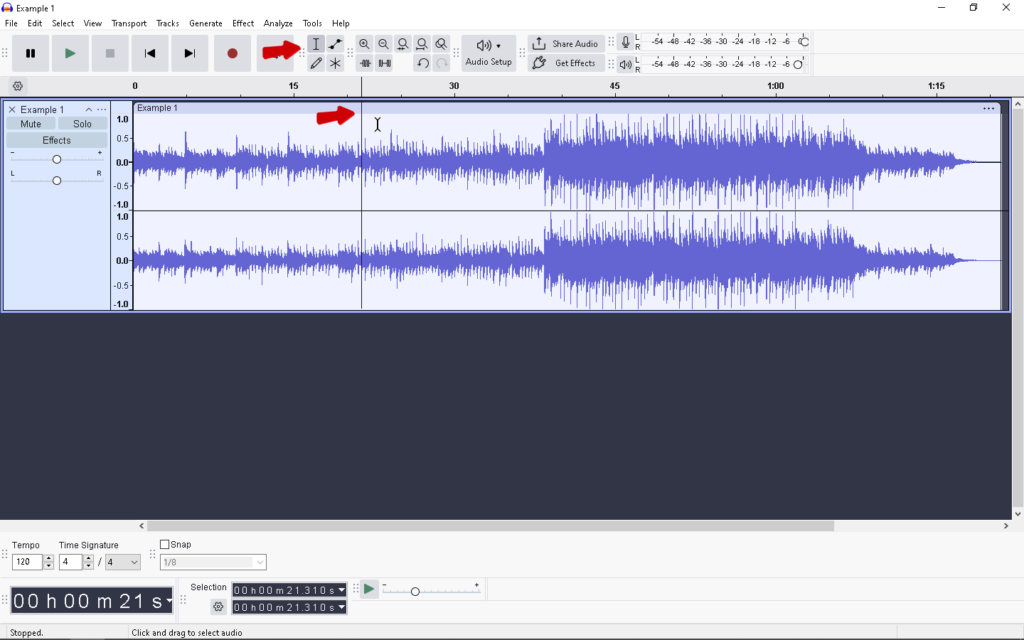
- Why use it: You must highlight a section of audio before you can apply any effect, deletion, or adjustment to it.
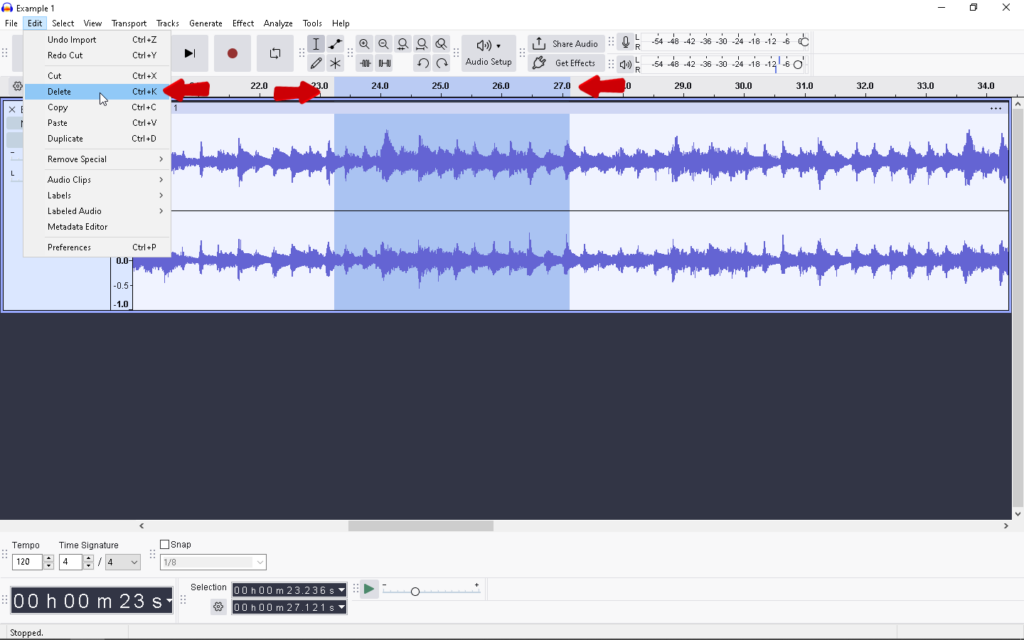
3. Cut vs. Delete
Beginners often use these interchangeably, but they serve different purposes. Both remove audio and shift the remaining track to the left (closing the gap).
- Cut (Ctrl+X / Cmd+X): Removes the selected audio and saves it to your clipboard. Use this if you want to move a segment to a different location.
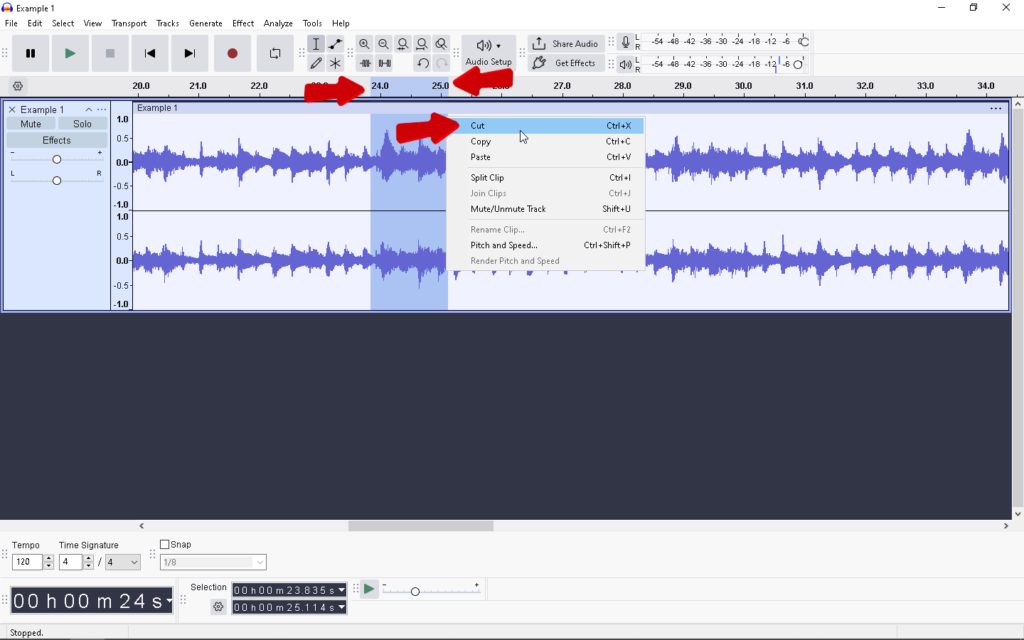
- Delete (Del / Backspace): Simply erases the audio forever. Use this for mistakes, “umms,” or false starts you don’t need to keep.
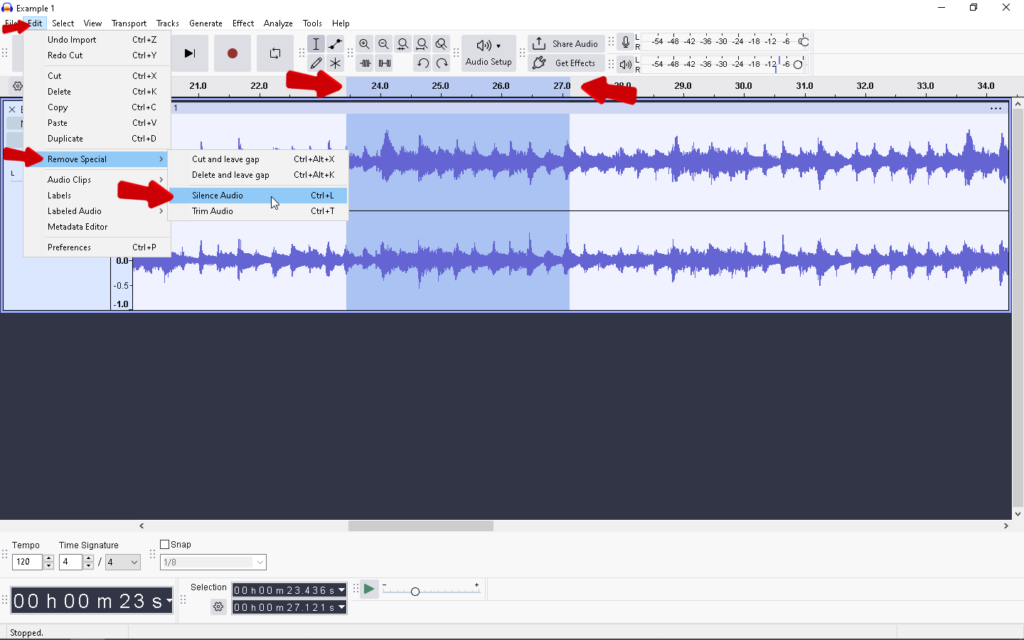
4. Silence Audio (Ctrl+L / Cmd+L)
This is the most underrated tool for keeping your podcast in sync. Unlike “Delete,” which removes time and shifts your track (potentially ruining the timing of background music), Silence replaces the noise with absolute quiet without changing the track length.
- Best Use Case: Removing loud breaths, coughs, or background sirens between sentences.
- Action: Highlight the noise and press Ctrl+L. The waveform will turn into a flat line.
5. Fades (In and Out)
Never start a track with an abrupt cut; it sounds amateur. Smooth out your intro and outro using fades.
- Fade In: Highlight the first few seconds of your audio, then go to Effect > Fading > Fade In. This ramps the volume up from silence.
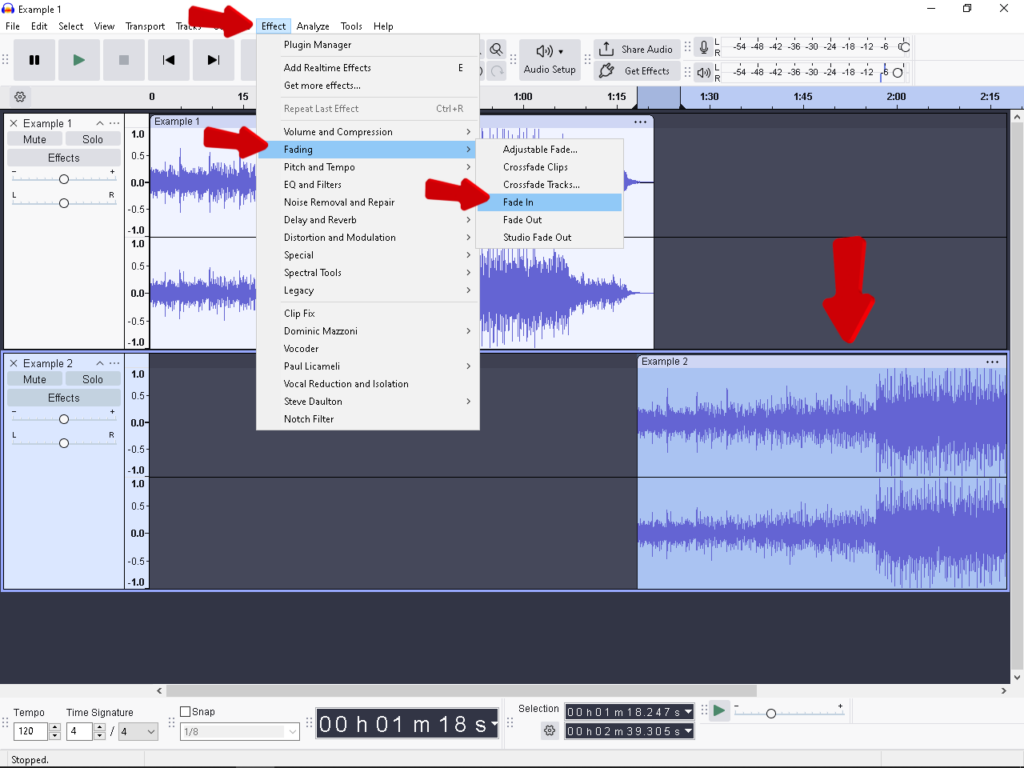
- Fade Out: Highlight the last few seconds and select Effect > Fading > Fade Out. This gently lowers the volume to silence.
Phase 2: Cleaning Up “Dirty” Audio (Noise Reduction)
Nothing ruins a podcast or video voiceover faster than the constant hiss of an air conditioner, computer fan, or electrical hum. Fortunately, Audacity’s Noise Reduction tool is the industry standard for fixing this, but it requires a specific two-step workflow to work.
The Concept: “Teaching” Audacity
Audacity cannot automatically distinguish between your voice and the background noise. You must “teach” the software what the noise sounds like so it can mathematically subtract those frequencies from the rest of your audio.
This is why professional recordists always capture 5–10 seconds of “Room Tone” (absolute silence) at the beginning of every recording. Without this sample of silence, the Noise Reduction tool is useless.
Step-by-Step: The Noise Reduction Workflow
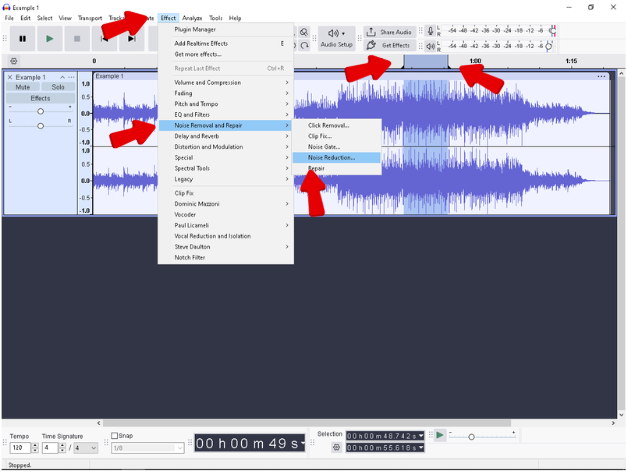
Step 1: Get the Noise Profile
- Zoom in on a section of your audio where no one is speaking (just the background hiss).
- Highlight this silent section with the Selection Tool.
- Navigate to Effect > Noise Reduction.
- Click the button labeled “Get Noise Profile”.
- Note: The window will close immediately. This is normal; Audacity has simply analyzed that sample.
Step 2: Apply the Reduction
- Select the entire track (Ctrl+A / Cmd+A) or the specific section you want to clean.
- Go back to Effect > Noise Reduction.
- Adjust your settings (see guidelines below) and click OK.
Understanding the Settings
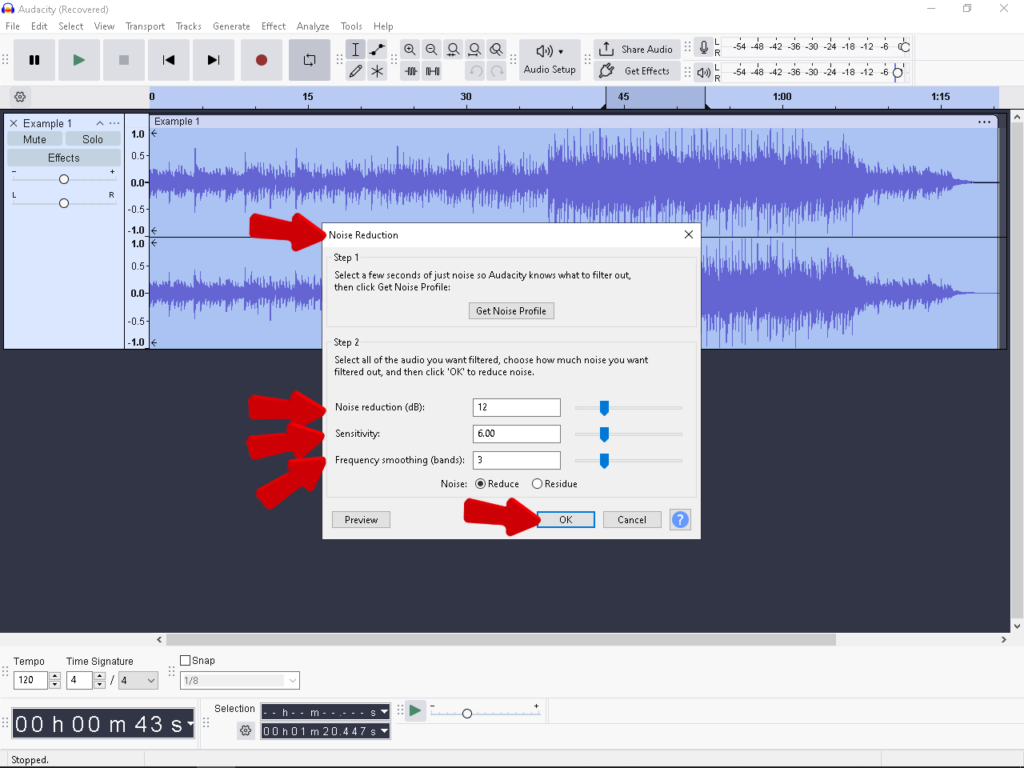
When you return to the menu for Step 2, you will see three sliders. Understanding these is the difference between clean audio and distorted garbage.
- Noise Reduction (dB): This controls how much volume is removed from the detected noise. A setting of 6 to 12 dB is usually sufficient for mild hiss.
- Sensitivity: This determines how aggressive the tool is in identifying noise. A higher sensitivity removes more noise but risks removing parts of your voice. Keep this around 6.00.
- Frequency Smoothing: If the audio sounds “tinkly” or “digital” after reduction, increasing this (bands 1–3) can soften those artifacts.
Pro Tip: Avoid the “Underwater” Effect
Beginners often drag the Noise Reduction (dB) slider all the way to the right to kill all background noise. Do not do this.
Over-processing causes a phasey, robotic artifact often described as sounding “underwater.” It is far better to have a tiny bit of background hiss with a rich, natural voice than absolute silence with a distorted, robotic voice.
Phase 3: Advanced Processing for Professional Sound
Once your audio is clean and cut, it’s time to make it shine. This is often called the “Effect Chain.” The goal is to turn a thin, flat recording into a rich, broadcast-quality file.
Order matters here. Follow this specific sequence—EQ, Compression, then Normalization—to ensure you aren’t amplifying bad frequencies or distorting your final mix.
1. Equalization (EQ): Shaping the Tone
Think of EQ as a scalpel. You use it to remove “mud” (low-frequency rumble) and add “sparkle” (clarity). In Audacity, the best tool for this is the Filter Curve EQ.
- How to apply it: Go to Effect > EQ and Filters > Filter Curve EQ.

- Step A (The High-Pass Filter): On the left side of the graph, drag the line down to create a slope that cuts off everything below roughly 80Hz to 100Hz. This removes air conditioner hum and desk bumps without affecting human speech.

- Step B (The Treble Boost): On the right side (around 3000Hz to 6000Hz),

- slightly raise the line by 2–3dB. This adds presence and makes your voice easier to understand.

2. Compression: Consistent Volume
Compression is the secret to the “FM Radio” sound. It automatically lowers the volume of your loudest moments (peaks) and raises the quietest moments (whispers), reducing the overall dynamic range. This ensures your listeners don’t have to constantly adjust their volume knob.
- How to apply it: Go to Effect > Volume and Compression > Compressor.

- Recommended Settings for Voice:
- Threshold: -12dB to -18dB (This tells Audacity when to start compressing).
- Noise Floor: -40dB.
- Ratio: 3:1 (For every 3dB over the threshold, output increases by only 1dB).
- Attack Time: 0.20s (Fast enough to catch peaks).
- Release Time: 1.0s.

Note: After compression, your waveform will look “fatter” and more uniform, which is exactly what you want.
3. Normalization: The Final Polish
Now that your audio is shaped and balanced, you need to bring the overall volume up to industry standards. Normalization simply applies a constant amount of gain to the entire track to reach a specific target “Peak Amplitude.”
- How to apply it: Go to Effect > Volume and Compression > Normalize.

- The Target: Set “Normalize peak amplitude to” -1.0 dB.
- Why -1.0 dB? Setting it to 0.0 dB (the absolute maximum) risks distortion if the file is converted to MP3 later. Leaving 1 decibel of “headroom” ensures your audio remains clean on Spotify, YouTube, or Apple Podcasts.

The “Garbage In, Garbage Out” Rule: Reducing Editing Time
The most powerful tool in your audio workflow isn’t a plugin inside Audacity—it is the quality of your raw recording.
There is a golden rule in audio engineering: you cannot polish bad audio; you can only rescue it. Heavy use of noise reduction, aggressive compression, and EQ fixes will often leave your audio sounding thin, robotic, or filled with digital artifacts.
To cut your editing time in half, you need to focus on capturing the cleanest signal possible at the source.
Understanding the “Red Zone” (Clipping)
The biggest enemy of a clean edit is Digital Clipping. In Audacity, if your waveform hits the top and bottom edges of the track (0dB), the peaks are chopped off.
- Visual Cue: The waveform looks like a solid block or a sausage with flat edges.
- Auditory Result: A harsh, distorted crackling sound.
In traditional 16-bit or 24-bit recording, clipping is destructive. Once that data is lost, it is gone forever. Audacity’s “Clip Fix” tool can attempt to reconstruct the peaks, but it is effectively guessing. If you record a podcast guest laughing too loudly or a sudden shout, that take is usually ruined.
The Pro Solution: 32-bit Float Recording
To avoid unfixable distortion, professional sound engineers and creators are moving toward 32-bit Float Recording.
Unlike standard audio formats that have a hard “ceiling” at 0dB, 32-bit float captures a massive dynamic range. This means the audio file retains data well above the 0dB mark.
If you record a scream that sounds completely distorted, you can simply import the file into Audacity, use the Amplify effect to lower the volume (e.g., -10dB), and the waveform will magically restore itself with zero distortion.

Pro Tip: The Hardware Advantage
Software can’t fix a bad microphone capsule, but the right hardware can save your workflow. The Hollyland LARK MAX 2 is a flagship choice for creators who want this safety net.
- Distortion-Free Workflow: Because the LARK MAX 2 features internal 32-bit Float Recording, it is virtually impossible to clip your audio. You can whisper or scream, and simply adjust the volume in Audacity later without losing quality.
- Studio Fidelity: It captures audio at 48kHz/24-bit, ensuring your source material is pristine before you even apply your first EQ filter.
By upgrading your input source to a device like the LARK MAX 2, you stop editing to fix problems and start editing to enhance your story.
Working with Multitracks: Podcasting & Music
Professional audio rarely consists of a single voice track. Whether you are producing a podcast with an intro theme or a video essay with background ambience, you need to master multitrack editing. This involves layering different audio files on top of each other and managing how they interact.
Syncing Tracks (Moving Clips Around)
The first step in multitrack editing is alignment. You need your sound effects to hit exactly when you make a joke, or your intro music to fade out exactly when you start speaking.
If you have used older versions of Audacity, you might be looking for the “Time Shift Tool” (the double-ended arrow icon). Note: In Audacity 3.0 and later, this tool has been retired.
Here is the modern workflow for syncing audio:
- Import your files: Drag your music and voiceover files into the project. They will appear as stacked tracks.
- Locate the Clip Handle: Hover your mouse over the top bar of the audio waveform (the lighter colored strip at the top of the clip).
- Drag and Drop: The cursor will change to a hand icon. Simply click and drag the clip left or right to align it with your other tracks.
The Envelope Tool: Professional Audio Ducking
One of the biggest mistakes beginners make is simply lowering the volume slider on the entire music track. This makes the music too quiet during the intro and too loud when you are speaking.
The solution is Audio Ducking—lowering the music volume only while you are speaking and raising it back up during pauses. In Audacity, you achieve this using the Envelope Tool.
How to use the Envelope Tool:
- Select the Tool: Click the icon that looks like a line with two dots (or press F2 on your keyboard). Your track will now have blue lines at the top and bottom.

- Create Control Points: Click anywhere on the blue line to create a “control point” (a white dot). You need four points to duck audio effectively:
- Point 1: Just before you start speaking (keeps volume at 100%).
- Point 2: Just as you start speaking (drag this down to lower volume).
- Point 3: Just before you stop speaking (keeps volume low).
- Point 4: Just after you stop speaking (drag this up to return to 100%).

- Shape the Sound: Drag the inner two points down to reduce the volume of that specific section. This creates a smooth “ramp” down and back up, ensuring your voice is always clear without killing the energy of the background track.
Exporting Your File: Formats & Standards
Your edit is complete. The background noise is gone, the levels are balanced, and the audio sounds crisp. However, Audacity saves projects as .aup3 files, which only Audacity can open. To share your work with the world—whether on Spotify, YouTube, or a client’s inbox—you must export it into a standard audio format.
Go to File > Export Audio to open the export menu. While Audacity offers many extensions, you will primarily use three main formats. Choosing the wrong one can either crush your audio quality or fill up your hard drive unnecessarily.
Comparison: Which Format Should You Choose?
| Format | Compression Type | Quality | File Size | Best Use Case |
|---|---|---|---|---|
| WAV | Uncompressed (Lossless) | Exact copy of recording | Massive (approx. 10MB per minute) | Master Archives. Use this for your final “Master” file or if you plan to edit the audio again in video editing software. |
| MP3 | Compressed (Lossy) | Good to Excellent (depending on bitrate) | Small (approx. 1MB per minute) | Distribution. The industry standard for podcasts, streaming, and email. |
| OGG | Compressed (Lossy) | Excellent (more efficient than MP3) | Small | Specific Platforms. Often used in game development or open-source applications, but less compatible with standard players. |
1. WAV (Microsoft 32-bit float PCM)
Think of a WAV file as your digital master tape. It is lossless, meaning it retains every bit of data from your session.
- When to use it: Always export a WAV version first for your personal archive. If you are importing your audio into Adobe Premiere or DaVinci Resolve for a video, use WAV to ensure you aren’t compressing the audio twice.
- The Trade-off: These files are heavy. A one-hour podcast in WAV format can easily exceed 600MB.
2. MP3 (MPEG-1 Audio Layer III)
MP3 removes data that the human ear struggles to hear to drastically reduce file size. This is the format you will upload to podcast hosts or send to clients for review.
- The Bitrate Rule: When exporting MP3s, quality is determined by Bitrate.
- 128 kbps: Acceptable for speech only, but can sound slightly “swirly.”
- 192 kbps: The sweet spot for most podcasts (good balance of quality vs. size).
- 320 kbps: The maximum quality for MP3. Indistinguishable from WAV to most listeners, but larger file size.

The Final Step: Metadata Tags
Before the file saves, Audacity will pop up the Metadata Tags window. Do not skip this. This is where you input the Artist Name, Track Title, and Year.
- Why it matters: If a listener downloads your podcast or song, this data ensures your name appears on their player instead of “Unknown Artist.” Fill this out, hit OK, and your audio is ready for the world.
Frequently Asked Questions (FAQ)
How do I remove vocals from a song in Audacity?
Removing vocals to create a karaoke track is one of the most popular uses for Audacity. While you can rarely remove them 100% perfectly without affecting the music, the Vocal Reduction and Isolation effect is your best tool.
- Select the entire track (Ctrl + A).
- Go to Effect > Vocal Reduction and Isolation.

- In the “Action” dropdown menu, select Remove Vocals.
- Click Apply.

Note: This works best on stereo tracks where the vocals are panned to the “center” and the instruments are panned left and right.
Why is my recording only playing in the left ear?
This usually happens when you record a single microphone (a mono source) onto a Stereo Track. Audacity places the audio on the left channel (Channel 1) and leaves the right channel silent.
To fix this in post-production:
- Click the dropdown arrow on the track name (left side of the waveform).
- Select Split Stereo to Mono.

- Delete the silent bottom track.

- The remaining track will now play through both speakers (center panned).
To prevent this in the future: Change your recording settings in the Audio Setup toolbar from “2 (Stereo) Recording Channels” to “1 (Mono) Recording Channel.”
Is Audacity good for professional music production?
It depends on your goal. Audacity is an Audio Editor, not a full Digital Audio Workstation (DAW) like Logic Pro, FL Studio, or Ableton Live.
- Good For: Recording vocals, editing podcasts, chopping samples, and mixing pre-recorded audio files.
- Bad For: Composing music from scratch using MIDI, virtual instruments (VSTi), or synthesizers. Audacity does not have a “Piano Roll” for sequencing beats and melodies.
How do I fix distorted (clipped) audio in Audacity?
If your waveform hits the top and bottom edges of the track (the “ceiling”), it creates digital distortion known as clipping.
You can attempt to repair this using the Clip Fix tool:
- Zoom in closely on the distorted section.
- Go to Effect > Repair and Restoration > Clip Fix.

- Set the threshold slightly below 100% and apply.
The Hard Truth: Clip Fix is a “band-aid”—it guesses what the waveform should have looked like. It cannot recover lost data.
The Pro Solution: The only way to truly “fix” distortion is to prevent it during recording. This is why professionals are switching to 32-bit Float recorders, like the Hollyland LARK MAX 2. Unlike traditional microphones, the LARK MAX 2 records with a massive dynamic range, making it virtually impossible to clip. If you struggle with blown-out audio, upgrading your hardware is more effective than any software plugin.
Conclusion
Audio editing is equal parts art and science. While the sheer number of menus in Audacity can feel overwhelming at first, the secret to professional sound isn’t using every tool—it’s using the right tools in the correct order.
Start by mastering the basics: get comfortable with the Selection Tool, make clean cuts, and apply gentle Noise Reduction. Once your workflow is stable, layer on EQ and Compression to shape the tone. Remember, the goal of editing is transparency; your listeners should hear the message, not the effects.
However, the most effective editing hack happens before you even open the software.
If you want to cut your post-production time in half, focus on capturing pristine source audio. Upgrading to a microphone system like the Hollyland LARK MAX 2 can eliminate common headaches like clipping and distortion. Thanks to its 32-bit float recording technology, you get “unbreakable” raw audio files, allowing you to skip the rescue work and go straight to creative polishing.
Ready to start creating? Download Audacity today, check your levels, and turn those raw recordings into broadcast-ready masterpieces.EndFragment