.png)
If you have a cluttered workspace with multiple vocal takes, background music, and sound effects, you likely need to combine them into a single, manageable file. However, Audacity doesn’t have a giant “Merge” button, which often confuses beginners. Instead, it offers a few specific tools depending on how you want to combine your audio.
Whether you are stacking layers to play at the same time or stitching clips together back-to-back, this guide covers how to merge tracks in Audacity using the three most effective methods.
Understanding “Merging” (Read Before You Start)
Before you start clicking menu options, you need to know exactly what you are trying to achieve. In Audacity, “merging” can mean two completely different things. If you choose the wrong method, you might ruin your project structure.
Determine which result you need:
1. Mixing Down (Vertical Merging)
This combines multiple tracks so they play simultaneously.
- Think of it as: Stacking layers like a sandwich.
- Use Case: You have a voiceover on Track 1 and music on Track 2. You want them to play together in one stereo file.
2. Concatenating (Horizontal Merging)
This joins clips so they play sequentially (one after another).
- Think of it as: Lining up train cars on a track.
- Use Case: You have an “Intro” and an “Interview.” You want the Interview to start exactly when the Intro ends.
A Warning on “Destructive” Editing
Audacity handles merging differently than some paid software. When you use the Mix and Render command, the edit is destructive.
This means Audacity permanently combines the data. Once you mix the tracks, save the project, and close the software, you cannot separate them again. You lose the ability to adjust the volume of the background music independently of the vocals.
Pro Tip: Always save a backup of your original multi-track project (.aup3 file) before performing a final mix-down.
Method 1: How to Combine Multiple Tracks into One (Mix and Render)
If your project is messy—full of stacked vocals and sound effects—Mix and Render is the best way to clean it up. This takes multiple tracks playing at the same time and flattens them into a single stereo or mono file.
Editors often do this to simplify the project before applying effects like compression or normalization to the whole mix at once.
Step-by-Step Instructions
- Select the tracks: Hold Ctrl (Windows) or Cmd (Mac) and click the track headers you want to combine. To select everything, press Ctrl + A / Cmd + A.

- Go to the menu: Click Tracks in the top menu bar, then hover over Mix.
- Choose your render type:
- Select Mix and Render to replace the original tracks with the new combined track.
- Select Mix and Render to New Track to create a combined version while keeping your original tracks safe (highly recommended for beginners).

- Verify the merge: You will see a single, unified waveform appear in your workspace.
Important: Because this locks your changes, use the Envelope Tool (F2) to adjust your volume levels before you render. Once the tracks are baked together, you can’t lower the music volume without lowering the vocals too.

Method 2: How to Join Tracks End-to-End (Sequential Merging)
If you don’t want sounds to play at the same time, but rather one after the other (like Intro > Podcast Body > Outro), you need sequential merging.
There are two ways to do this: the precise Cut and Paste method or the visual Clip Handle method.
Note: The “Time Shift Tool” is Gone
If you haven’t used Audacity in a few years, you might be looking for the double-ended arrow icon (Time Shift Tool). Audacity removed this tool in version 3.0.
Now, every audio clip has a **”Clip Handle”**—the title bar at the top of the waveform. You can simply click and drag this bar to move clips without switching tools.
Option A: Cut and Paste (Most Precise)
Use this to combine two separate tracks into a single track line.
- Select the Audio: On your second track (e.g., the Outro), double-click the waveform to highlight it.
- Cut: Press Ctrl + X (Windows) or Cmd + X (Mac).

- Position the Cursor: Click on the first track (e.g., the Interview). Press the End key on your keyboard or click manually at the very end of the waveform.

- Paste: Press Ctrl + V (Windows) or Cmd + V (Mac). The second clip will appear

- immediately after the first.
- Cleanup: Delete the now-empty second track by clicking the “X” in the top-left corner of its control panel.

Option B: Drag and Align (Visual)
If you prefer to keep your audio on separate tracks but want to line them up visually:
- Grab the Handle: Hover your mouse over the top edge (Clip Handle) of the clip you want to move.

- Drag: Click and hold to slide the clip to the right.
- Snap: Drag until it lines up with the end of the previous track. Audacity will show a Vertical Yellow Line when the start of your new clip snaps perfectly to the end of the previous one.

Method 3: Exporting (The Final Merge)
Many users think they have to manually “Mix and Render” inside the project before they can save their song or podcast. You don’t.
The Export function acts as an automatic merger. It takes every track that isn’t muted and “bounces” them into a single file. This is actually the safest method because it leaves your Audacity project file with separate tracks, allowing you to go back and make changes later.
How to Export and Merge Simultaneously
- Check Your Tracks: Make sure the tracks you want are audible. If a track is Muted (grayed out), it won’t be in the final file.
- Go to Menu: Navigate to File > Export.

- Select Format: Choose Export as MP3 (standard for listening) or Export as WAV (high quality for archiving).
- Confirm: After naming your file, Audacity will warn you: “Your tracks will be mixed down and exported as one stereo file.”
- Finish: Click OK.

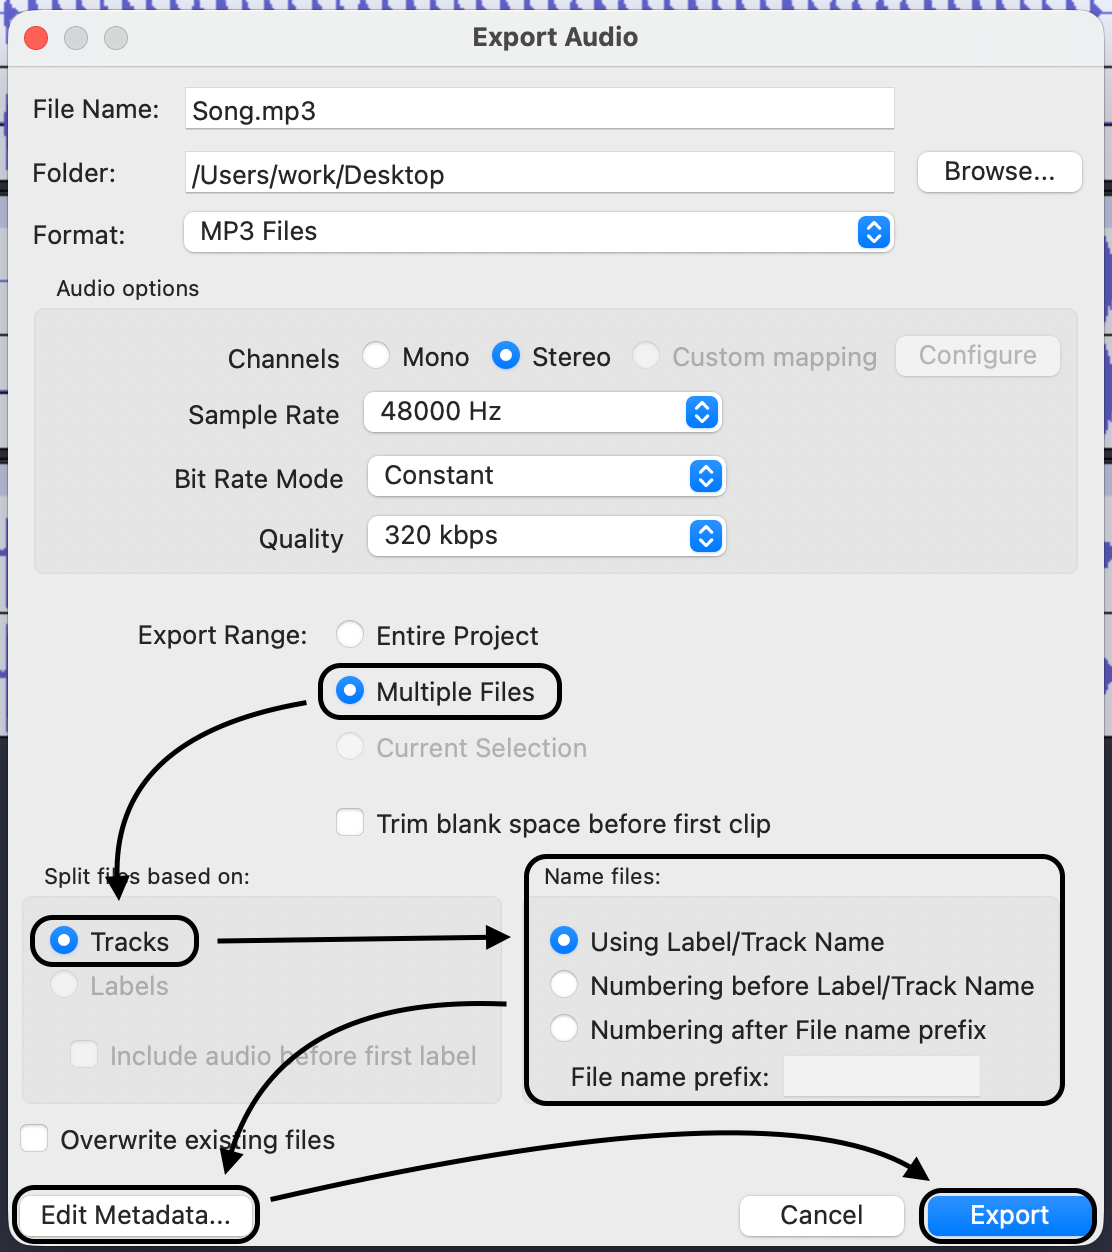
Warning: Avoid “Export Multiple”
In the File menu, you will see an option called Export Multiple. Do not use this if you want to combine tracks. This feature saves every single track as a separate file. It is used by audio engineers who need to move files to different software, but for most users, it just creates a messy folder full of fragmented audio.
Pro Tips for a Cleaner Mix (Before You Merge)
Merging bad audio just creates a bigger file of bad audio. Once you combine a clear voiceover with a distorted background track, fixing it is nearly impossible. Professional editors ensure their source audio is clean before hitting the merge button.
1. Balance Your Levels
If you merge two loud tracks, the combined volume might hit the “digital ceiling” (0dB), causing harsh distortion.
- Rule of Thumb: Adjust the Gain Slider (on the left of the track) so no individual track peaks above -6dB. This leaves “headroom” for the tracks to combine safely.
2. Apply Noise Reduction First
Don’t wait until after the merge to clean up background hiss. Once tracks are mixed, Audacity can’t tell the difference between the “noise” in your room and the “quiet parts” of a song. Apply the Noise Reduction effect to individual tracks first.

3. Prevent Distortion at the Source (The 32-bit Float Advantage)
The biggest enemy of a clean mix is clipping—that crackling sound when audio is recorded too loud. If your source recording is clipped, no amount of mixing in Audacity can fix it.
To avoid this, many creators are switching to 32-bit float recorders.
The Hollyland LARK MAX 2 Solution

Hollyland LARK MAX 2 - Premium Wireless Microphone System
A premium wireless microphone for videographers, podcasters, and content creators to capture broadcast-quality sound.
Key Features: Wireless Audio Monitoring | 32-bit Float | Timecode
If you want fail-safe audio, the Hollyland LARK MAX 2 is a strong choice. It features internal 32-bit Float Recording, which captures a massive dynamic range.
- Why it matters: If a speaker suddenly laughs or screams, the audio won’t distort. When you import that file into Audacity, you can simply lower the volume, and the detail is still there.
- Studio Quality: It also records in 48kHz/24-bit, giving you a pristine waveform to merge rather than a compressed, noisy mess.
Troubleshooting Common Merging Issues
If your merged track doesn’t look or sound right, check these three common settings.
Issue 1: “Why did the volume drop after merging?”
If your merged track looks like a thin line or sounds quiet, you likely lowered the volume sliders too much to prevent clipping.
- The Fix: Select your new merged track and go to Effect > Volume and Compression > Normalize. Set the peak amplitude to -1.0 dB and click Apply. This makes the track as loud as possible without distorting.

Issue 2: “My Stereo track became Mono”
This happens if you combine a Mono track (one channel) with a Stereo track (two channels). Audacity often defaults to the format of the first track.
- The Fix: Check your track settings before mixing. If you are mixing a mono voiceover with stereo music, ensure your project settings are set to Stereo, or duplicate the mono track to create a “fake” stereo track before merging.
Issue 3: “The tracks are out of sync”
You edited a section of dialogue, but the sound effects later in the timeline didn’t move with it. Now everything is misaligned.
- The Fix: Enable Sync-Lock Tracks (under the Tracks menu). When this is on, cutting or moving audio on one track shifts all other tracks by the exact same amount, keeping your project aligned.
Frequently Asked Questions (FAQ)
Can I un-merge tracks in Audacity?
Technically, no. Once you “Mix and Render” and close the project, the layers are baked into a single waveform. However, if you are still in the same session, you can press Ctrl + Z (Undo). To be safe, always save a backup project before merging.
What is the difference between “Mix and Render” vs. “Mix and Render to New Track”?
- Mix and Render replaces your original tracks with the merged one. It keeps your workspace clean but deletes the originals.
- Mix and Render to New Track creates the merged version on a new track but keeps your original tracks (muted). This is safer for A/B testing.
Does merging tracks reduce audio quality?
Not inherently. Audacity uses high-quality math (32-bit float) to combine audio. However, quality loss happens if you allow the volume to peak above 0dB (clipping) or if you export the final merge as a low-quality MP3 (like 128kbps).
Final Thoughts
Merging tracks is the bridge between a cluttered project file and a polished, shareable episode. Whether you are using Mix and Render to simplify layers or Export to finish your project, the goal is organization.
Just remember the golden rule of audio editing: Non-Destructive Workflow.
Once you merge, you limit your options. Always save a copy of your project (File > Save Project > Save Project As…) and label it something like “Podcast_Pre_Mix” before you commit to that final render. This ensures that if you spot a mistake later, you don’t have to start from scratch.EndFragment