.png)
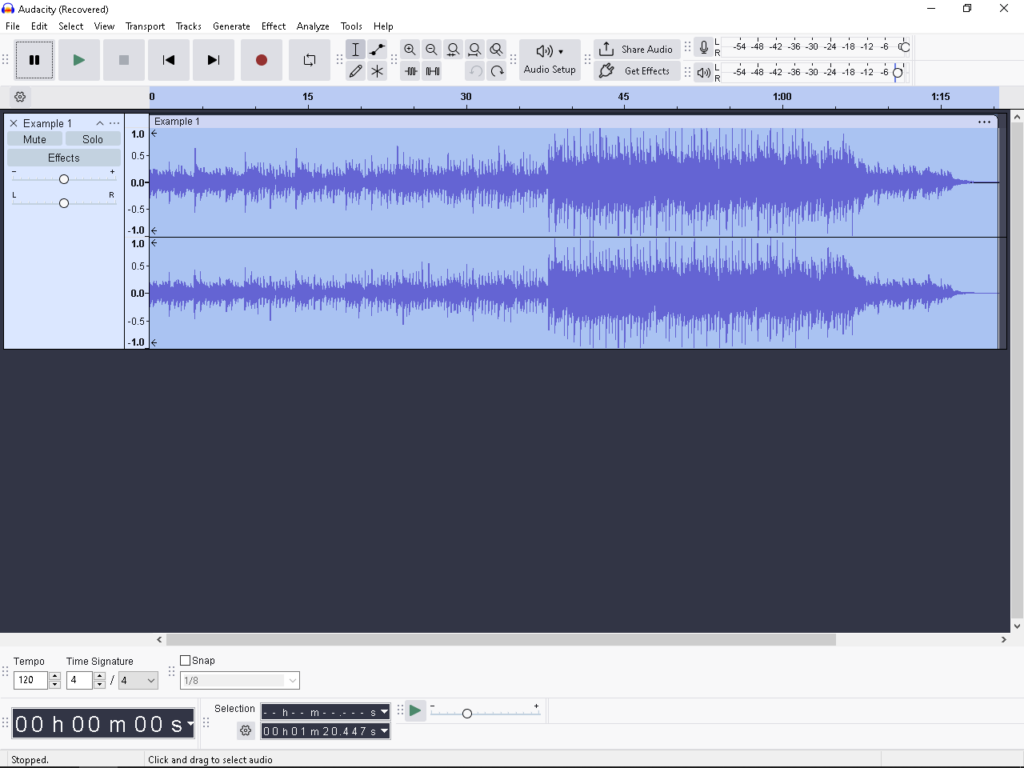
If you’ve ever hit playback on a recording only to find the waveform looking like a flat line, you know the panic. You need to make it louder, but you’re afraid of ruining the quality with static or harsh “crunchy” sounds.
Learning how to boost volume in Audacity without distortion is a critical skill for saving quiet recordings. Whether you are fixing a podcast intro or trying to salvage a quiet interview, the goal is simple: get professional loudness while keeping the audio clean.
Here is how to fix your levels in post-production, and how to prevent the problem from happening in the first place.
Why is My Audio So Quiet? (Understanding Gain vs. Volume)
Before applying effects, it helps to understand why the recording is quiet. There is a big difference between Gain and Volume, and confusing the two is the most common reason for poor audio quality.
- Gain (Input): This is how sensitive your microphone is during the recording. If your gain is too low, the mic doesn’t capture enough detail.
- Volume (Output): This is simply how loud the audio plays back through your speakers.
When you try to fix quiet audio in Audacity, you are artificially increasing the volume of a low-gain recording. The danger is that you are boosting everything—including the background hiss (noise floor)—and risking Clipping.floor)—and risking Clipping.
What is Clipping?
In the digital world, there is an absolute volume ceiling: 0dB.
If you boost your audio so much that the waveform hits this 0dB ceiling, the tops and bottoms of the sound waves get chopped off. In Audacity, this usually appears as a vertical red line in your track.
When audio clips, it sounds distorted and harsh. More importantly, digital clipping is permanent data loss. The computer stops recording data at the ceiling, meaning the details of that sound are gone forever. You cannot simply lower the volume later to “fix” a clipped file because the information no longer exists.
Method 1: Using the ‘Amplify’ Effect (The Quick Fix)
If you need to make your audio louder instantly, the Amplify effect is the quickest solution. Audacity automatically calculates the math for you, ensuring you get the maximum possible volume without accidentally destroying your audio quality.
Follow these steps to boost your volume safely:
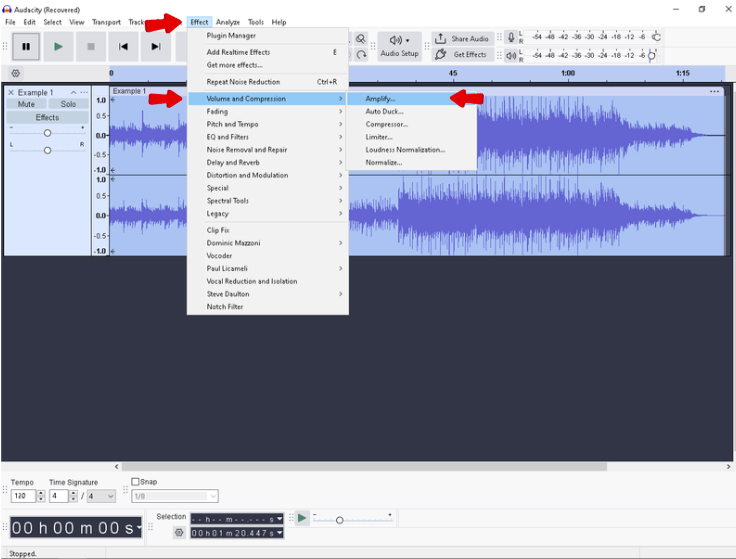
- Select Your Audio: Click the track you want to edit. To select the entire recording, use Ctrl + A (Windows) or Cmd + A (Mac).

- Open the Effect: Go to the top menu bar and select Effect > Volume and Compression > Amplify.
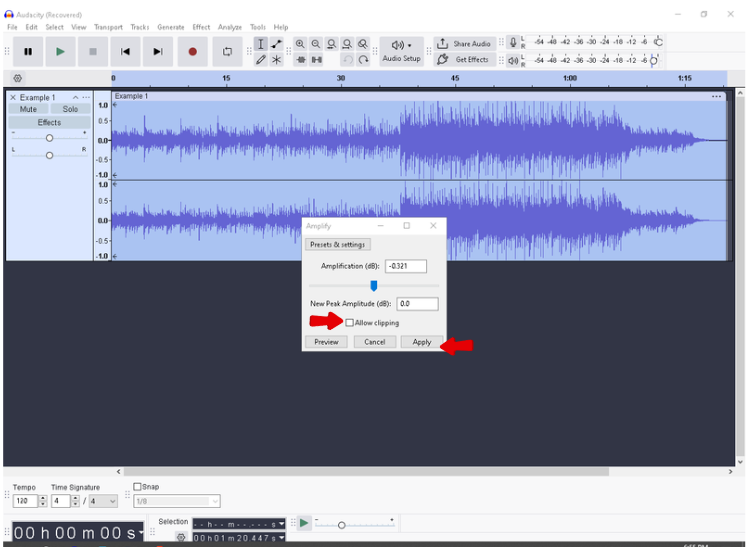
- Let Audacity do the Math: You will see a box labeled “Amplification (dB).” Audacity automatically fills this with the exact amount of volume you can add before the audio hits the “ceiling.”
- The Safety Switch: Ensure the box labeled “Allow Clipping” is UNCHECKED. If you check this box, you are telling Audacity it is okay to push the volume past digital limits, which results in distortion.
- Apply: Click Apply. Your waveform should instantly look larger.
Pro Tip: Watch the Numbers
In the Amplify window, look at the “New Peak Amplitude” field.
- If the number is negative (e.g., -2.0 dB), you are safe.
- If the number is positive (e.g., +1.5 dB), your audio will clip.
By leaving “Allow Clipping” unchecked, Audacity prevents you from entering that danger zone.
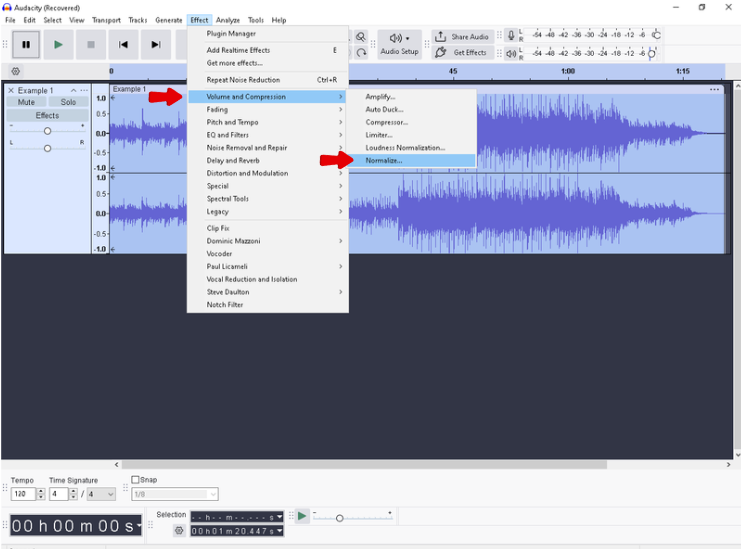
Method 2: Using ‘Normalize’ (The Safer Standard)
Amplify adds a fixed amount of volume to a clip, but Normalize works backward from a target. It asks, “How loud do we want the loudest peak to be?” and adjusts the entire track to meet that ceiling.
This is the professional standard—especially if you are editing a podcast or video with multiple clips. It ensures every file peaks at the exact same volume, giving your listeners a consistent experience.
How Normalize Protects Your Audio
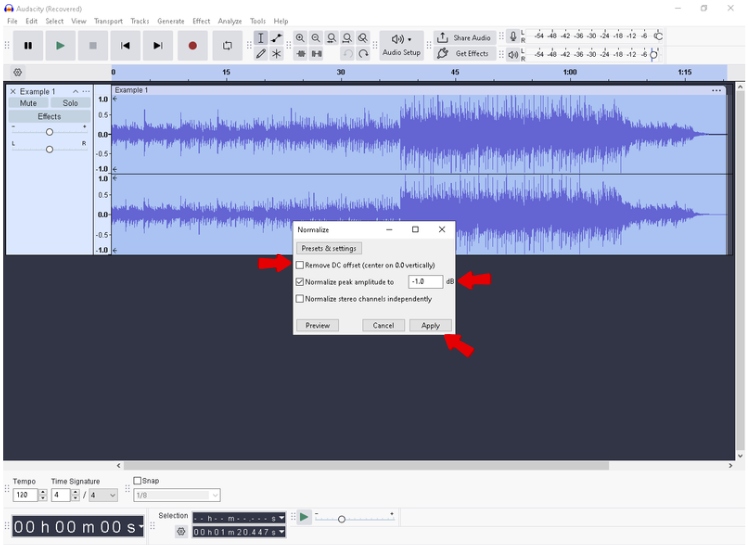
When you use this effect, you set a specific Peak Amplitude (usually -1.0 dB). This acts as a safety barrier. Audacity scans your audio, finds the loudest spike, and raises the overall volume just enough so that spike hits your target. Because you are setting a limit below 0.0 dB, it is mathematically impossible to distort the audio during this process.
Step-by-Step: How to Normalize in Audacity
- Select Your Track: Press Ctrl + A / Cmd + A to select the waveform.
- Open the Effect: Go to Effect > Volume and Compression > Normalize.
- Remove DC Offset: Ensure “Remove DC offset” is checked. This centers your waveform on the timeline, preventing clicks and pops during editing.
- Set Peak Amplitude: Enter a value of -1.0 dB.
- Apply: Click the Apply button.
Why Leave “Headroom”?
You might be tempted to set your normalization to 0.0 dB (maximum volume), but this is risky. When you upload audio to Spotify or YouTube, their compression algorithms can alter the file slightly. If your audio is already at the absolute limit, this compression can push it over the edge, causing distortion.
The Solution: Always leave “Headroom.”
- -1.0 dB: The standard safety zone for most digital content.
- -2.0 dB: Recommended if you plan to add more effects later (like EQ).
Method 3: Using a Compressor (The Professional Approach)
Amplify and Normalize have a weakness: they are limited by the single loudest moment in your track. If you have one loud laugh in an otherwise quiet recording, those tools will stop boosting the volume to prevent that one laugh from clipping. The rest of your dialogue remains quiet.
A Compressor fixes this. Instead of just turning everything up, a compressor lowers the volume of the loudest parts (peaks) so you can safely raise the volume of the entire track. This makes your audio sound “thicker” and louder without distortion.
How to Apply Compression in Audacity
- Select your entire audio track.
- Navigate to Effect > Volume and Compression > Compressor.
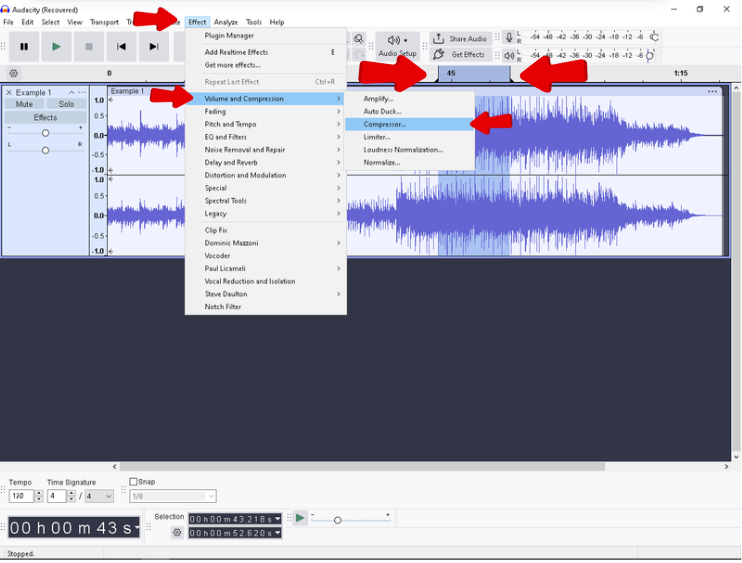
- Adjust the settings (use the “Safe Start” preset below).
- Ensure Make-up gain for 0 dB is checked.
- Click Apply.
The “Safe Start” P
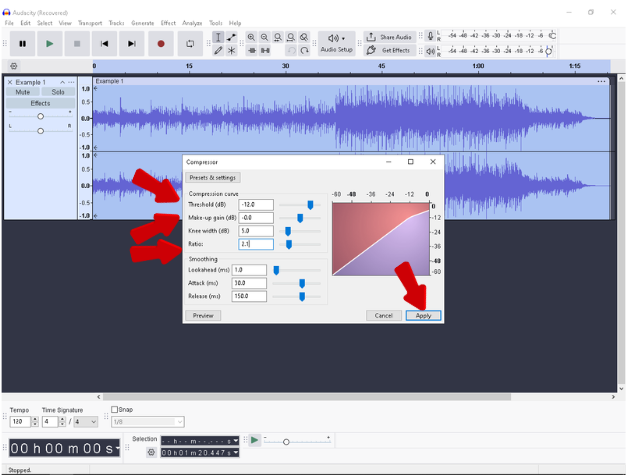
reset for Voice
Compression can be intimidating because of the knobs. If you are recording a podcast or voiceover, start with these conservative settings:
- Threshold (-12 dB to -16 dB): Any sound louder than this level gets compressed. If your audio is very quiet, try lowering this to -20 dB.
- Noise Floor (-40 dB): This prevents the compressor from boosting background hiss.
- Ratio (2:1): This controls how much the volume is reduced. A 2:1 ratio is gentle and natural.
- Make-up gain for 0 dB (CHECKED): This is the most important step. After the compressor squashes the loud peaks, this setting automatically boosts the overall volume to the maximum level.
The Root Cause: How to Record Audio That Never Distorts
Fixing audio levels in post-production is standard, but it has limits. If your original recording hit the “Red Zone” (clipping) during the shoot, that data is lost forever. No amount of editing can fully restore a distorted waveform.
The most effective way to manage volume isn’t better editing—it’s capturing a source file that is mathematically impossible to distort.
The Solution: 32-Bit Float Recording
This is where upgrading your hardware solves the problem permanently. The Hollyland LARK MAX 2 is designed to eliminate “gain anxiety” for creators.


Its standout feature is 32-bit Float Recording. Unlike traditional microphones that “clip” when the input volume exceeds 0dB, 32-bit float captures such a massive dynamic range that the audio file retains its integrity regardless of volume spikes.
Why this matters for your Audacity workflow:
- Impossible to Clip: You can scream into the mic, and even if the waveform looks like a solid block, you can simply lower the volume in Audacity to reveal a perfectly clean wave.
- Recover Quiet Audio: If you record too quietly, you can boost the volume significantly without the digital artifacts usually associated with heavy amplification.
Professional Monitoring
Beyond the safety net of 32-bit float, the LARK MAX 2 allows for Wireless Audio Monitoring. You can connect earphones directly to the receiver to hear exactly what the mic is capturing in real-time. This lets you catch issues before you hit record, rather than trying to fix them later.
Dealing with the “Noise Floor” (Hissing Sounds)
There is a catch to boosting your volume: Audacity cannot distinguish between your voice and the background noise. When you use Amplify or Normalize, you also raise the volume of the “Noise Floor”—that annoying hiss caused by air conditioning or computer fans.
If your audio sounds like it was recorded inside a wind tunnel after you boost the levels, you have two options.
The Software Fix: Audacity Noise Reduction
Audacity has a built-in tool to separate the hiss from the speech:
- Get Noise Profile: Select a small section of your audio where no one is speaking (just the room tone). Go to Effect > Noise Removal and Repair > Noise Reduction and click “Get Noise Profile.”
- Apply Reduction: Select your entire track. Go back to the Noise Reduction effect. Leave the default settings (usually 12 dB reduction) and click OK.
The Hardware Fix: Prevention
Cleaning up noise in post-production often makes voices sound robotic. A better strategy is to eliminate the noise at the source.
The Hollyland LARK MAX 2 features ENC (Environmental Noise Cancellation) built into the transmitter. It detects human voice frequencies and actively suppresses background hums. By recording a cleaner signal, you can amplify your audio in Audacity as much as you want without boosting the dreaded hiss.
Amplify vs. Normalize: Which Should You Use?
Both effects make your waveform bigger, but they do it differently. Using the wrong one can lead to inconsistent audio levels.
| Feature | Effect > Amplify | Effect > Normalize |
|---|---|---|
| Primary Goal | Quick, specific volume adjustments. | Setting a consistent volume ceiling. |
| Calculation | Increases volume by a specific amount (e.g., +3 dB). | Increases volume until the loudest peak hits a target (e.g., -1.0 dB). |
| Stereo Channels | Changes Left/Right channels by the same amount. | Can adjust Left/Right channels independently. |
| DC Offset | Does not correct DC Offset. | Automatically centers the waveform. |
| Best Used For… | Boosting a specific quiet section. | Finalizing a podcast episode. |
Use Amplify when you want to act like a manual volume knob. It’s best for quick checks or boosting a specific quiet whisper without changing the rest of the track.
Use Normalize as your “Standardizer.” It is the best choice for the final stage of editing to ensure your audio peaks at a safe standard (usually -1.0 dB) so it doesn’t distort on streaming platforms.
Frequently Asked Questions (FAQ)
What is the ideal dB level for voice recording?
For raw recordings, aim for peaks between -12 dB and -6 dB. This leaves “headroom” for laughter or shouting. Once you are finished editing, Normalize your final track to -1.0 dB for export.
Why does my audio sound distorted after boosting?
You likely hit the Digital Ceiling (0 dB). Unlike analog tape, which sounds warm when pushed, digital audio has a hard limit. If a sound wave tries to go above 0 dB, the computer chops off the top of the waveform, creating a harsh crackle.
Can I fix distorted audio in Audacity?
Technically, no. You cannot fully restore clipped audio because the data for those peaks was never recorded. However, Audacity’s Clip Fix tool can attempt to repair mild crackles by mathematically guessing what the waveform should look like.
Conclusion
Fixing quiet audio in Audacity is a fundamental skill. Whether you use Amplify for a quick boost or Normalize to set a consistent ceiling, the goal is always the same: loudness without the “crunch.”
Remember, while these tools are powerful, they are limited by the quality of your original recording. Boosting volume will always boost background noise, and fixing clipped audio is nearly impossible.
If you want to stop fighting with levels in post-production, consider upgrading to a system like the Hollyland LARK MAX 2. With 32-bit float recording, you can capture audio that is technically impossible to clip, allowing you to focus on your content rather than staring at waveforms.EndFragment