.png)
You recorded a podcast, a voiceover, or a YouTube video, and now you’re listening back in horror. The volume is too low, there’s a hiss in the background, or the audio sounds muffled. If you are wondering how to improve poor quality audio in Audacity, you are in the right place.
The “Garbage In, Garbage Out” Reality
Before we start moving sliders, we need to manage expectations. Audio engineering follows a strict rule: the quality of your final export depends heavily on the quality of your source recording.
Audacity is powerful, but it isn’t magic. It cannot restore data that isn’t there.
- If your audio is “Bad” (heavy distortion, wind noise louder than the voice), Audacity can make it passable and understandable.
- If your audio is “Okay” (quiet volume, slight room hiss), Audacity can make it sound great and professional.
Important: Destructive vs. Non-Destructive Editing
One of the biggest mistakes beginners make is misunderstanding how Audacity works. Unlike some expensive software that uses “virtual” knobs you can tweak later, standard editing in Audacity is Destructive.
When you apply an effect (like Noise Reduction), Audacity permanently alters the waveform of your file. If you realize three steps later that you applied too much, you can’t just “turn it down.” You have to “Undo” (Ctrl+Z) all the way back.
The Safety Net: Always duplicate your audio track (Ctrl + D) before you start editing. Mute the original track and keep it as a “Raw” backup. If you mess up the edit, simply delete the bad track and start fresh from the backup.
Step 1: Cleaning Up Background Noise
The most common issue is a persistent hiss, hum, or buzz—often caused by air conditioning, computer fans, or low-quality microphone cables. Audacity handles this with a two-step process: first, you “teach” the software what the noise sounds like, and second, you tell the software to remove it.
Follow this workflow:
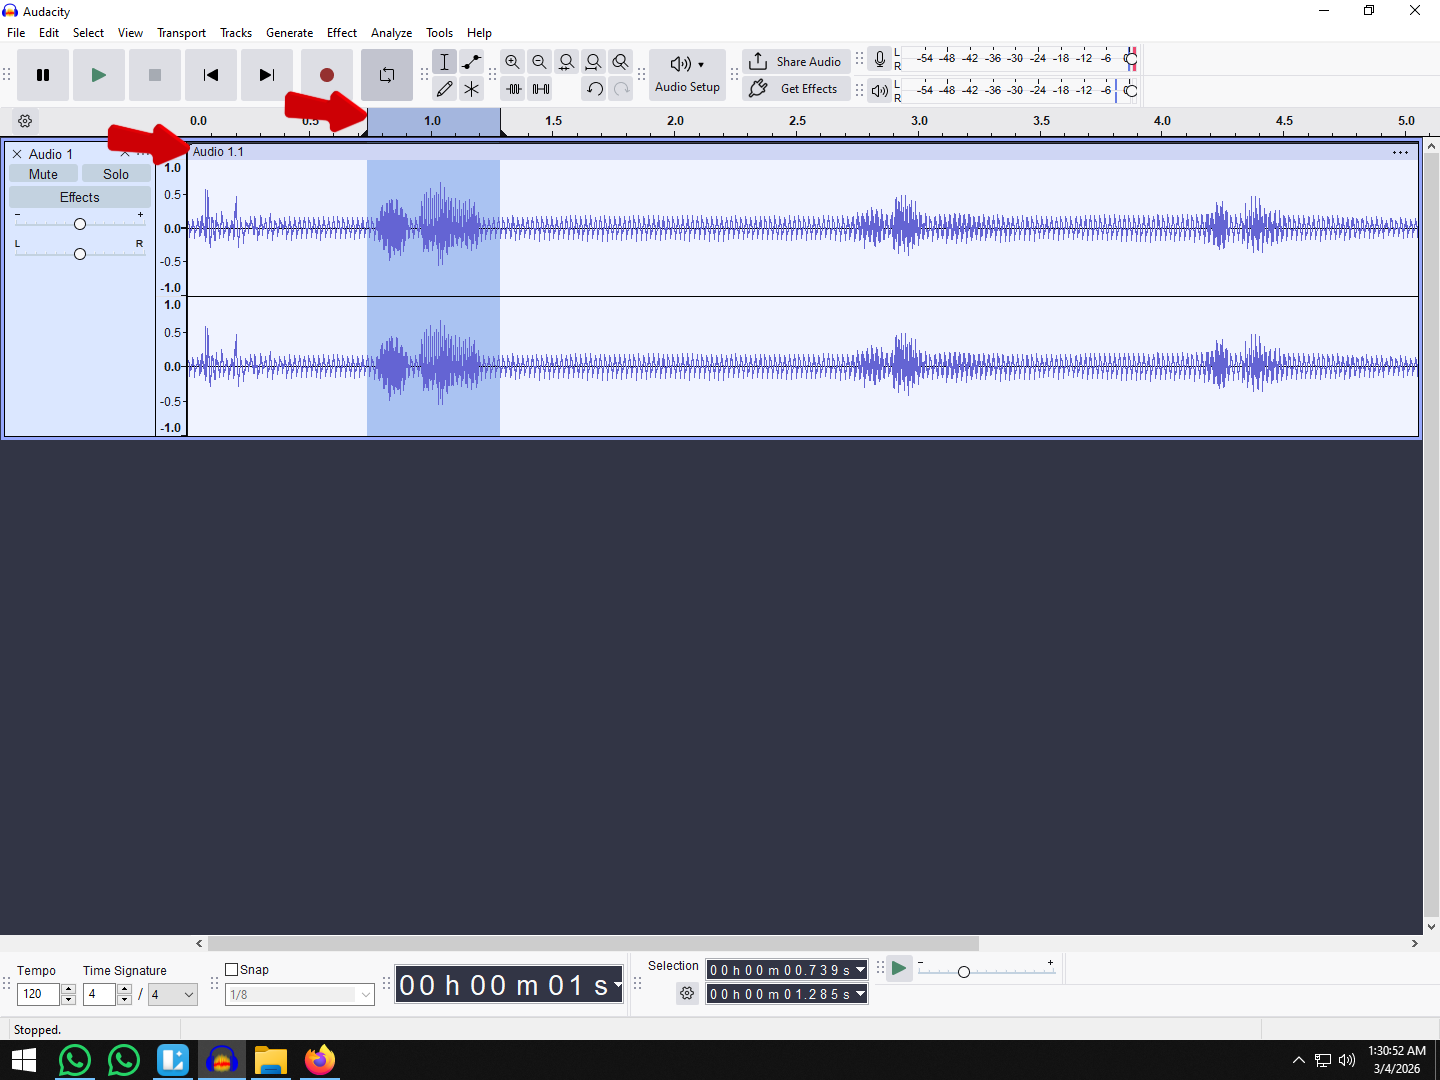
- Get the Noise Profile: Highlight a small section of your audio (3–5 seconds) that contains only the background noise (no talking or breathing). Go to Effect > Noise Removal and Repair > Noise Reduction and click “Get Noise Profile”. The window will close.


- Apply the Reduction: Select your entire audio track (Ctrl+A / Cmd+A). Go back to Effect > Noise Removal and Repair > Noise Reduction. Adjust your settings (see below) and click OK.

Critical Settings to Avoid “Robot Voice”
Many beginners crank the sliders to the maximum. This results in audio that sounds bubbly, metallic, or “underwater” because Audacity accidentally removes parts of your voice that overlap with the noise frequencies.
For natural results, use these conservative settings:
- Noise Reduction (dB): Start between 6 and 12 dB. Anything higher usually damages voice quality.
- Sensitivity: Set this to 6.00.
- Frequency Smoothing (Bands): Set this to 3. This helps blend the processed audio to prevent harsh digital artifacts.
Pro Tip: The “Two-Pass” Technique
If your audio is still noisy, do not undo it and increase the reduction to 24 dB. Instead, keep the settings low (around 6–9 dB) and run the effect a second time. Two gentle passes sound far more natural than one aggressive pass.
Step 2: Balancing Volume Levels (Compressor vs. Normalization)
Nothing ruins a listening experience faster than inconsistent volume. If your listeners have to turn their volume up to hear a whisper and then scramble to turn it down when you laugh, they will stop listening.
To fix this, we need to manage the Dynamic Range using a combo of Normalization and Compression.
Phase 1: Normalization (The Ceiling)
Think of Normalization as a volume knob that turns the entire track up until the loudest moment hits a specific ceiling. It makes the whole file as loud as possible without distortion.
- Select your entire track (Ctrl + A).
- Go to Effect > Volume and Compression > Normalize.

- Set “Normalize peak amplitude to” -1.0 dB.
- Click Apply.

Why -1.0 dB? Setting the peak to 0.0 dB is the maximum, but it leaves no “headroom.” If you add effects later (like EQ), the volume might increase slightly and cause distortion. Staying at -1.0 dB is safer.
Phase 2: Compression (The Glue)
Normalization makes the track loud, but the quiet parts might still be too quiet. This is where the Compressor comes in.
Compression automatically lowers the volume of the loud parts so you can turn the overall volume up. This makes your voice sound “thicker” and consistent, similar to a radio broadcast.
- With the track selected, go to Effect > Volume and Compression > Compressor.

- Use these standard settings for spoken voice:
- Threshold: -18 dB to -20 dB (Tells Audacity: “If volume goes above this, squash it.”)
- Ratio: 3:1 (A moderate, natural-sounding compression.)
- Attack Time: 0.10s or 0.20s.
- Release Time: 1.0s.
- Make-up gain: 0db

Step 3: Fixing Muffled or Harsh Audio (Equalization)
Once you have removed noise and balanced the volume, your audio might still sound “muddy.” This is where Equalization (EQ) helps. Think of EQ as a volume knob for specific frequencies—like deep bass or high treble.
In Audacity, use the Filter Curve EQ to make vocals sound crisp.
1. The High-Pass Filter (Cutting the Mud)
First, remove low-frequency energy that isn’t part of the human voice. Sounds below 80Hz–100Hz usually consist of traffic rumble or vibrations from your desk.
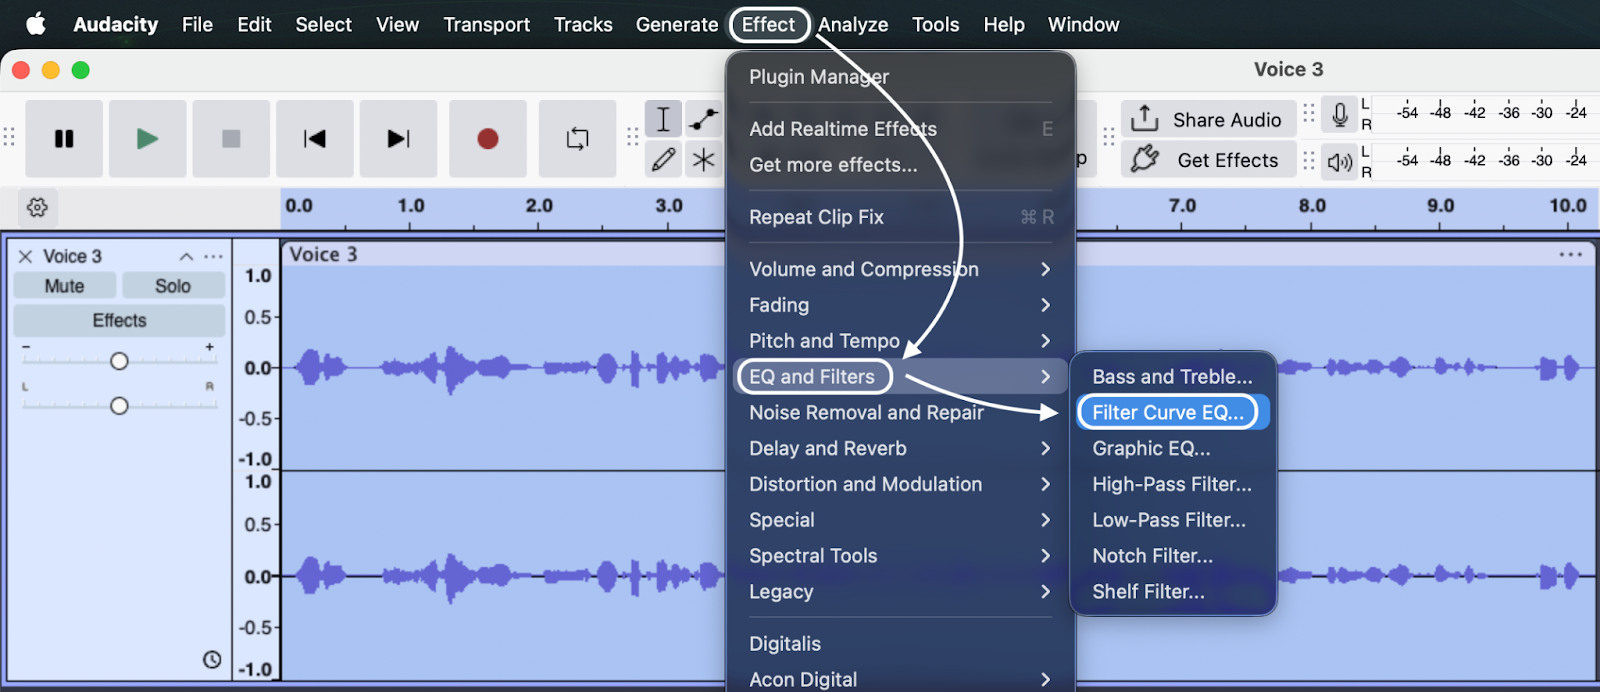
- Select your track and go to Effect > EQ and Filters > Filter Curve EQ.

- On the left side of the graph, drag the line all the way down for everything below 100Hz.
- Shortcut: Look for a preset called “Low Roll-off for Speech” or “100Hz Rumble.”

2. The Treble Boost (Adding Clarity)
If your voice sounds like you are speaking through a blanket, you need to boost the “presence” frequencies (3kHz to 5kHz).
- In the Filter Curve EQ window, look at the middle-right section (3000Hz to 5000Hz).
- Click the line to create a point and drag it up slightly (about +3dB to +6dB).
- This adds “sparkle” to the voice, making it easier to understand.

Note: Be careful not to boost this too high, or “S” and “T” sounds will become piercing (sibilance).
Step 4: Repairing Distorted or “Clipped” Audio
Digital distortion—called clipping—is usually a death sentence for audio. It happens when your recording volume was too high, hitting the “ceiling” (0dB) and flattening the waveform. This creates a harsh, crackling sound.
While usually fatal, Audacity offers a “Hail Mary” tool called Clip Fix.
The “Honesty Check”
Software cannot restore data that was never recorded. When audio clips, the information at the peak of the wave is lost. The Clip Fix tool uses math to guess what the waveform would have looked like.
- It works for: Occasional, slight peaks.
- It fails on: Heavily distorted audio where the waveform looks like a solid brick.
How to Use Clip Fix Correctly
You must create “headroom” first, or the tool won’t work.
- Create Headroom: Select the distorted section, go to Effect > Volume and Compression > Amplify, and set the “New Peak Amplitude” to -5.0 dB. This lowers the volume to make space for the repair.


- Open the Tool: Go to Effect > Noise Removal and Repair > Clip Fix.

- Adjust Threshold: Set the threshold to around 95%.
- Apply: Audacity will attempt to reconstruct the peaks. The crackle should be reduced, though rarely eliminated completely.

How to Stop Fixing and Start Recording Pro Audio
You’ve likely just spent 30 minutes tweaking sliders, applying noise reduction, and hoping the “Clip Fix” tool works. While Audacity is a fantastic rescue tool, the reality is simple: prevention beats post-production.
The most efficient workflow isn’t about being a wizard at fixing bad audio—it’s about capturing clean audio so you don’t have to fix it. If you constantly fight background hiss or distorted peaks, the bottleneck isn’t your software; it’s your hardware.
This is where the Hollyland LARK MAX 2 solves the exact problems you are currently struggling with in Audacity.

Hollyland LARK MAX 2 - Premium Wireless Microphone System
A premium wireless microphone for videographers, podcasters, and content creators to capture broadcast-quality sound.
Key Features: Wireless Audio Monitoring | 32-bit Float | Timecode
Never Clip Again with 32-bit Float
Remember Step 4, where we tried to repair distortion? That is often a losing battle. The LARK MAX 2 solves this with 32-bit Float Recording.
Unlike standard microphones, 32-bit float captures a massive dynamic range. If you scream into the mic, the audio doesn’t distort—it just gets loud. In post-production, you simply turn the volume down, and the waveform is perfectly preserved. It effectively makes it impossible to ruin a recording due to bad volume levels.
Kill Noise at the Source
Running aggressive noise reduction (Step 1) often leaves your voice sounding robotic. The LARK MAX 2 prevents this with Studio Quality ENC (Environmental Noise Cancellation) built directly into the microphone.
Instead of stripping away frequencies in post-production, the LARK MAX 2 eliminates background hums—like air conditioners or traffic—before they ever hit your recording file. You get crisp, 48kHz/24-bit studio audio that is ready to publish the moment you hit stop.
Stop wrestling with Audacity and capture studio-grade sound instantly. Upgrading your input source is the fastest way to cut your editing time in half.
Advanced Tip: Using Free AI Tools within Audacity
If the native “Noise Reduction” tool isn’t cutting it—perhaps the background noise is complex (like traffic) or the audio is too damaged—you might need stronger tools.
Recently, Audacity introduced support for Intel OpenVINO, a suite of free, open-source AI plugins that run locally on your computer. These use machine learning to distinguish human speech from unwanted noise.
The Two Must-Have OpenVINO Effects
Once you install the plugin pack (available on the official Audacity website), you get access to:
- AI Noise Suppression: Unlike the standard tool which needs a “noise profile,” this works in real-time. It is excellent at removing complex noises like keyboard typing, dogs barking, or sirens that standard EQ cannot touch.
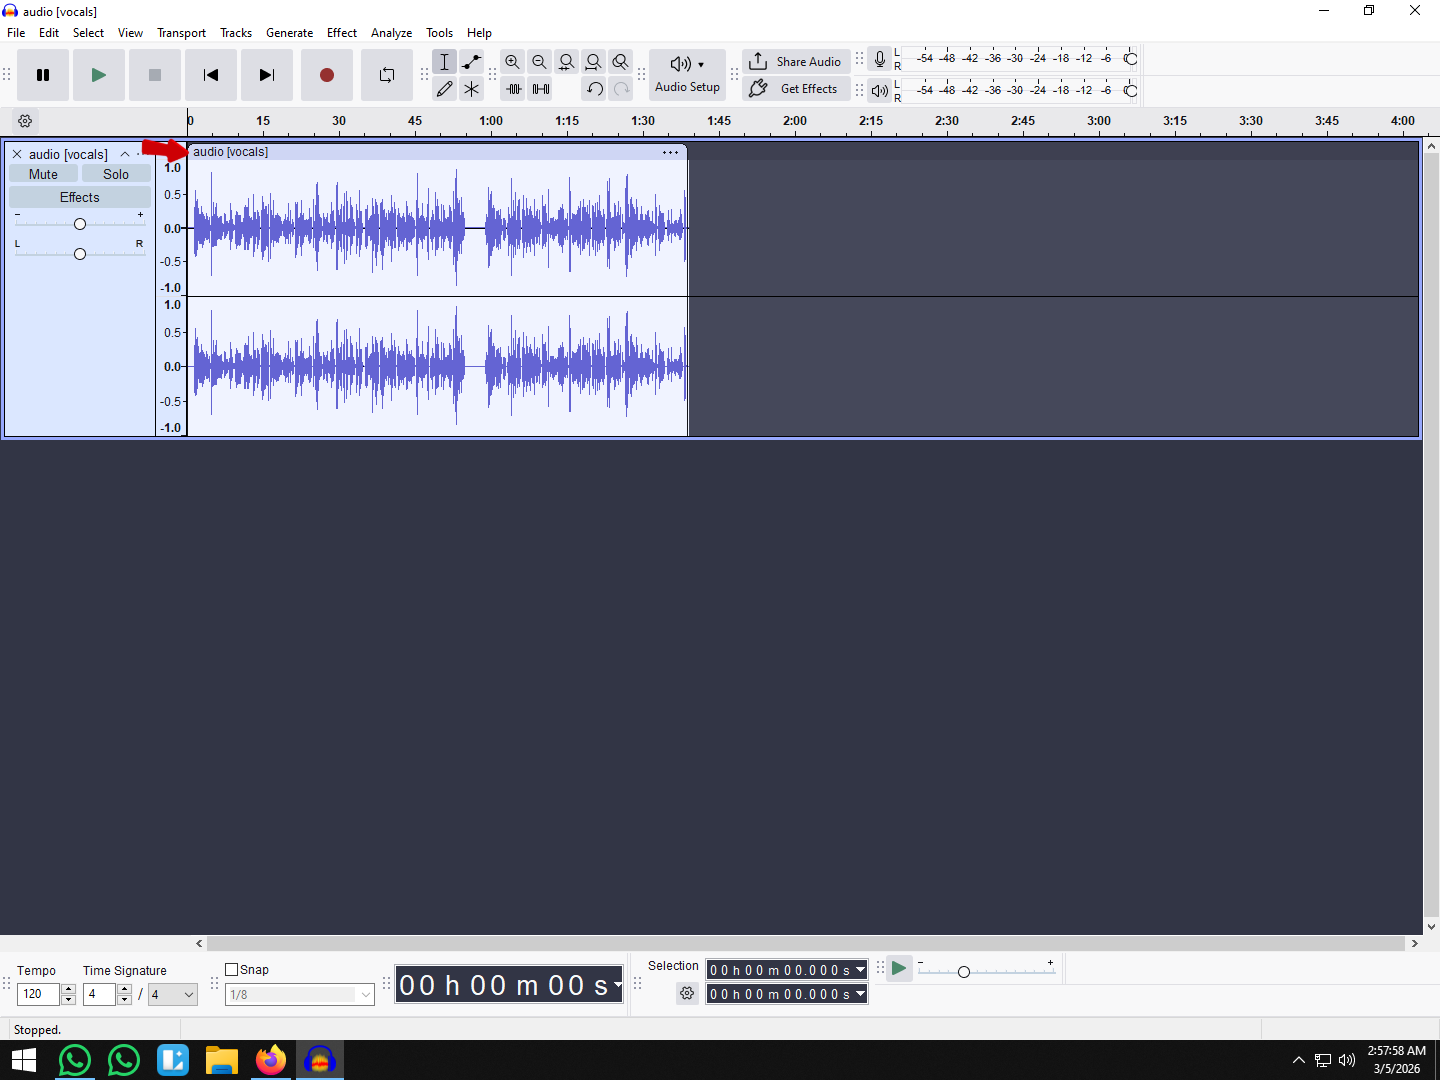
- Music Separation: If you accidentally recorded an interview with background music, this tool can split the track into separate “stems” (Vocals, Drums, Bass). You can isolate the “Vocal” stem and mute the rest.
Frequently Asked Questions (FAQ)
Why does my voice sound robotic after noise reduction?
This happens when settings are too aggressive. The software deletes parts of your voice along with the noise. To fix it, undo the effect and try again with lower settings (Noise Reduction: 6–12 dB, Sensitivity: 6.00). It is better to run a gentle effect twice than a harsh effect once.
Can Audacity remove echo or reverb?
Natively, no. Echo is your voice bouncing off walls, so standard tools can’t separate the “echo” from the “voice.” However, the free OpenVINO AI plugins mentioned above can often remove reverb using machine learning.
What is the best sample rate for voice recording?
For most projects, use 48,000 Hz (48kHz). This is the standard for video production (YouTube, TV). 44.1kHz is fine for audio-only podcasts, but 48kHz is safer if you ever plan to use video.
Conclusion
Fixing bad audio in Audacity is a rite of passage for every creator. While you can’t turn a smartphone recording in a windy tunnel into a Hollywood track, following this workflow will significantly improve your results.
Remember the “Rescue Chain”:
- Noise Reduction: Clean up the hiss.
- Compression: Squeeze the volume to make it consistent.
- EQ (Filter Curve): Cut the rumble and boost the clarity.
- Limiting/Normalization: Maximize volume without clipping.
Work Smarter: If you use these settings often, save them as a Macro in Audacity (Tools > Macro Manager). This lets you apply the entire chain with one click, saving you hours of repetitive work.