.png)
Whether you are transcribing a fast-talking interviewee, shortening a podcast episode, or creating a “chipmunk” sound effect, figuring out how to change playback speed in Audacity is a fundamental skill. However, the interface can be tricky—choose the wrong tool, and you might accidentally ruin the pitch of your recording or permanently alter a file you only meant to preview.
Here is how to control speed correctly, whether you just want to listen faster or permanently edit the track.
The 3 Ways to Control Speed in Audacity: A Quick Overview
Before you start clicking buttons, you need to know the difference between playback speed (listening only) and rendering speed (editing the file).
- Temporary (Playback Only): This lets you listen to the audio faster or slower without changing the actual file. This is perfect for transcription or reviewing long interviews. If you export the file, it returns to normal speed.
- Permanent (Rendering): This physically changes the audio data. Use this to shorten a podcast or create a sound effect. When you export the file, the speed change is “baked in.”
Here is a quick breakdown to help you choose the right tool:
| Method | Best Use Case | Permanent Change? | Affects Pitch? |
|---|---|---|---|
| Play-at-Speed Toolbar | Transcribing or previewing audio. | No (Listening only) | No |
| Change Tempo Effect | Shortening podcasts while keeping voices natural. | Yes (Edits file) | No |
| Change Speed Effect | Creative sound effects (e.g., “Chipmunk” voices). | Yes (Edits file) | Yes |
Method 1: Using the “Play-at-Speed” Toolbar (For Transcribing)
If you need to type out an interview or review a lecture, you don’t want to permanently change the file. You just want to hear it faster while you work.
The Play-at-Speed toolbar is the best tool for this. It adjusts playback speed in real-time without changing the pitch—so voices won’t sound squeaky; they will just speak faster.
How to use Play-at-Speed
- Locate the Toolbar:
In newer versions of Audacity (3.2+), this toolbar is often hidden or docked at the bottom left. If you don’t see a slider with a small green play button next to it, go to the top menu:
- Click View > Toolbars.
- Check Play-at-Speed Toolbar.

- Adjust the Speed Slider:
Drag the slider to your desired speed.
- 1.0x is normal speed.
- Below 1.0x slows it down (great for typing complex quotes).
- Above 1.0x speeds it up (ideal for skimming).

- Click the Correct Play Button:
Crucial: Do not press the spacebar or the big “Play” button at the top. Those will play the audio at normal speed, ignoring your slider.
You must click the small green “Play” arrow directly on the Play-at-Speed toolbar (next to the slider) to hear the change.

Note: This method is non-destructive. If you export your file after using this toolbar, the MP3 or WAV will still play at normal speed. If you need the change to be permanent, use Method 2.
Method 2: How to Change Tempo (Speed Up Without Changing Pitch)
Most beginners make the mistake of using the “Change Speed” effect, which ties speed to pitch. This results in the “chipmunk effect.”
If you want to shorten a podcast or slow down a fast talker while keeping their voice sounding natural, use the Change Tempo effect. This permanently changes the duration but keeps the pitch locked.
Step-by-Step Guide
- Select Your Audio: Highlight the section you want to edit. To select the whole track, press Ctrl + A (Windows) or Cmd + A (Mac).


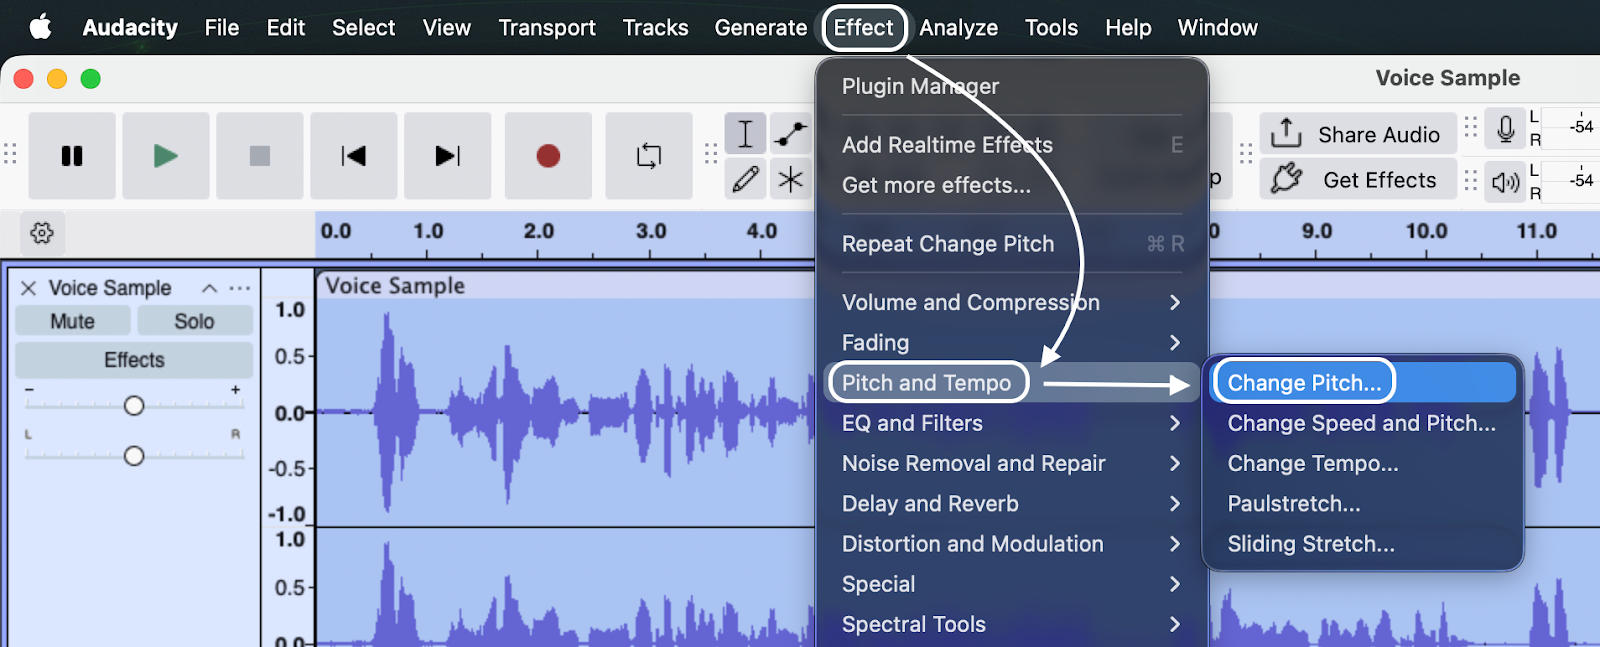
- Open the Menu: Go to Effect > Pitch and Tempo > Change Tempo.

- Input the Change: Look at the box labeled Percent Change.
- Enter a positive number (e.g., 10) to speed up by 10%.
- Enter a negative number (e.g., -10) to slow it down.
- Preview and Apply: Click Preview to hear a snippet. If it sounds natural, click Apply.

Tip: If you need your audio to fit an exact timeframe (like a 30-second ad), ignore the percentage box and type 30.00 into the Length (seconds) field.
Critical Setting: High Quality Stretching
Inside the “Change Tempo” box, you will see a checkbox labeled Use high quality stretching (slow).
Always check this box for voice recordings.
- Unchecked: Audacity processes faster but often creates “robotic” glitches.
- Checked: It takes a few seconds longer, but the algorithm works harder to keep the voice clear and natural. For podcasts, this is mandatory.

Method 3: How to Change Speed (Affects Pitch)
If you want to create sound effects—like a deep “monster” voice or a high-pitched cartoon voice—you need the Change Speed effect.
Unlike “Change Tempo,” this links speed and pitch together, just like spinning a vinyl record faster. Because it doesn’t need complex math to stabilize the pitch, the audio quality is often cleaner, provided you want that pitch shift.
How to Apply the Change Speed Effect
- Select Your Audio: Highlight the track or section.


- Open the Menu: Go to Effect > Pitch and Tempo > Change Speed and Pitch.

- Adjust the Parameters:
- Speed Multiplier: A value of 2.00 makes the audio twice as fast (and higher pitched). 0.50 makes it half as fast (and deeper).
- Standard Vinyl RPM: If you digitized a record at the wrong speed (e.g., played a 45 RPM record at 33 RPM), use the dropdowns to instantly fix it.
- New Length: Type a specific duration (e.g., 5.00 seconds) to force the audio to fit that length.
- Preview and Apply: Click Preview to check the pitch shift, then click Apply.
Pro Tip: Better Source Audio Means Less Editing
Audacity is powerful, but it can’t miraculously fix bad source audio. If you find that speeding up your track makes it sound metallic or “underwater,” the issue might be your recording gear, not the software.
Time-stretching puts stress on an audio file. If you apply these effects to a low-quality phone recording, the audio degrades quickly.
For creators looking to minimize editing headaches, we recommend the Hollyland LARK MAX 2.

Hollyland LARK MAX 2 - Premium Wireless Microphone System
A premium wireless microphone for videographers, podcasters, and content creators to capture broadcast-quality sound.
Key Features: Wireless Audio Monitoring | 32-bit Float | Timecode
Here is why upgrading your input gear improves your Audacity workflow:
- 32-bit Float Recording: This feature captures an enormous dynamic range. If your guest laughs loudly or whispers, the audio will not distort (clip). You spend less time fixing levels and more time on creative edits.
- Superior Time-Stretching: The LARK MAX 2 records in Studio Quality (48kHz/24-bit). High-resolution audio gives Audacity more data to work with. When you slow down or speed up these files, the software has more information to reconstruct the sound, resulting in smoother speed changes with far fewer glitches than standard audio.
The best workflow starts with a recording that doesn’t need repair.
Troubleshooting Common Speed Issues
Even with a simple interface, Audacity has a few quirks. If the effects aren’t working, check these three common culprits.
Why is the “Change Speed” option grayed out?
This is the most frequent issue for beginners. In Audacity, you cannot edit the track while it is merely paused—it must be stopped.
- The Fix: Look at the playback controls. If the Pause button (two vertical lines) is pressed down, click the Stop button (black square). The Effect menu will become active immediately.

Why does my audio sound robotic?
If you used Change Tempo and the voice sounds “warbly,” you likely applied too much stretch. To change duration without changing pitch, Audacity has to delete or duplicate tiny snippets of audio. Push this too far, and artifacts appear.
- The Fix: Keep tempo changes within +/- 20%. If you need a bigger change, do it in two smaller passes. And always ensure “Use high quality stretching” is checked.

The “Play-at-Speed” Toolbar is missing
If you don’t see the slider with the green arrow, you may have hidden it or it’s buried in a menu.
- The Fix: Reset your workspace.
- Go to View > Toolbars.
- Click Reset Toolbars.
- If it still doesn’t appear, go back to View > Toolbars and click Play-at-Speed Toolbar to toggle it on.

Frequently Asked Questions (FAQ)
Does changing speed in Audacity affect sound quality?
Yes, but it depends on the method.
The Play-at-Speed toolbar won’t affect quality since it’s just for listening. However, Change Tempo permanently alters the file. Extreme changes (over 20-30%) can make the audio sound metallic. Always use the “High quality stretching” checkbox to minimize this.
How do I speed up a song without changing the key?
Use the Change Tempo effect, NOT “Change Speed.”
- Select the track.
- Go to Effect > Pitch and Tempo > Change Tempo.
- Adjust the percentage slider.
This keeps the original key (pitch) while changing the speed.

Can I automate speed changes over time?
Yes. If you want a “tape stop” effect (gradually slowing down), use the Sliding Stretch effect.
Go to Effect > Pitch and Tempo > Sliding Stretch. This lets you set an Initial Tempo and a Final Tempo (e.g., start at 0% and end at -50%) to create a smooth deceleration.

Conclusion
Mastering speed control in Audacity comes down to knowing your end goal. If you confuse the playback toolbar with the rendering effects, you might waste time exporting files that haven’t actually changed.
- Use the Play-at-Speed Toolbar for transcribing or previewing.
- Use Change Tempo for podcasts and interviews (keeps pitch natural).
- Use Change Speed for sound design and special effects (alters pitch).
Remember, software effects degrade quality if pushed too far. To get professional results, start with high-fidelity source audio. Tools like the Hollyland LARK MAX 2 provide the clean, 32-bit float audio that handles heavy editing without falling apart.
Go ahead and experiment with the Change Tempo settings on your next project—a subtle 5-10% boost is often the secret to a tighter, more engaging podcast.