.png)
There is a persistent myth in the audio world that you need to spend hundreds of dollars on a Digital Audio Workstation (DAW) like Pro Tools, Logic Pro, or Ableton to get a “radio-ready” sound. This is false.
While paid software offers advanced workflow shortcuts and sleek interfaces, the fundamentals of audio engineering remain the same regardless of the price tag. A listener cannot tell which software you used; they can only hear the final result.
If you are looking for How to Mix Music in Audacity: A Beginner’s Guide, you are in the right place. This guide will walk you through the entire process, debunking the idea that free software means “cheap” sound.
What is “Mixing” Really?
Mixing is often overcomplicated by technical jargon. At its core, mixing is simply the art of blending multiple audio tracks into a cohesive final product. Whether you are working in a high-end studio or on a laptop in your bedroom, the goal is controlling three core elements:
- Balance: Adjusting volume levels so no single instrument drowns out the others (e.g., ensuring the vocals sit on top of the guitar, not behind it).
- Frequency: Using Equalization (EQ) to carve out sonic space so low-end frequencies don’t clash with high-end details.
- Dynamics: Using compression to tame volume spikes, ensuring the track sounds consistent from start to finish.
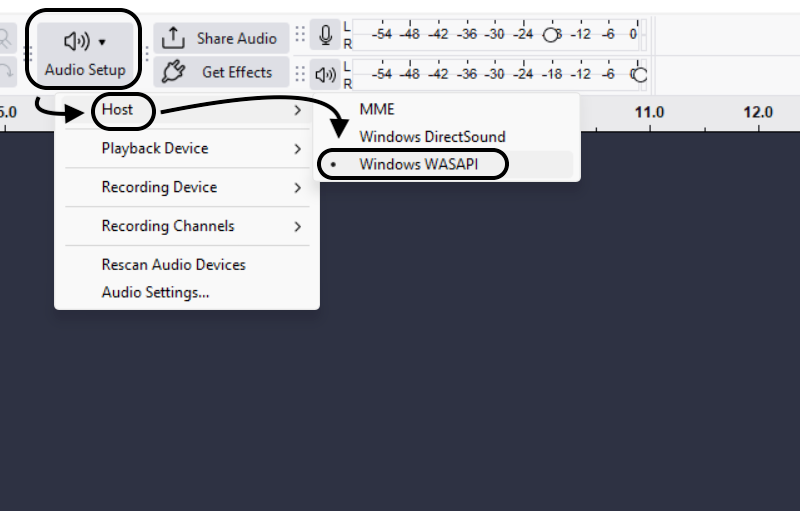
Why Audacity is Viable
Historically, professional engineers avoided Audacity because of a major workflow flaw: Destructive Editing. In older versions, if you added reverb to a track, it was permanently “baked” into the file. You couldn’t change your mind later without undoing months of work.
That has changed.
Recent updates to Audacity introduced Real-Time Effects. You can now add, tweak, and bypass effects like EQ and compression on the fly without permanently altering your source audio. This update transforms Audacity from a simple wave editor into a legitimate, non-destructive mixing environment capable of producing professional-quality music and podcasts.
Phase 1: Preparation & The “Golden Rule” of Mixing
Before you touch a single fader, you need to set up your workspace. A chaotic timeline leads to a chaotic mix. If you have ten tracks all named “Audio 01” or “Rec_Final_Final,” you will spend more time searching for the right clip than actually mixing it.
Organizing Your Session
Professional engineers follow a strict hierarchy to keep their ears focused on the sound, not the software.
- Naming Tracks: Immediately rename every track to exactly what it is (e.g., “Lead Vocal,” “Kick Drum,” “Acoustic Guitar”). In Audacity, click the name at the top-left of the track control panel to rename it.
- Track Order: Drag your tracks into a logical flow. A standard industry layout is:
- Top: Rhythm section (Drums, Bass)
- Middle: Harmonies (Guitars, Keys, Synths)
- Bottom: Vocals (Lead first, then Backing Vocals)
- Visual Grouping: Audacity allows you to change the track background color (Track Menu > Track Color). Use this to visually separate your instrument groups—for example, make all vocal tracks blue and all drum tracks red. This helps you navigate the mix instantly.
The Golden Rule: Source Quality Matters
The most important rule in audio engineering is “Garbage In, Garbage Out.”
Many beginners believe that mixing is magic—that you can take a distorted, noisy recording and “fix it” with plugins. You can’t. If your source audio is clipped (distorted) or thin, EQ and compression will only magnify those flaws. Mixing is about enhancing a good recording, not rescuing a bad one.
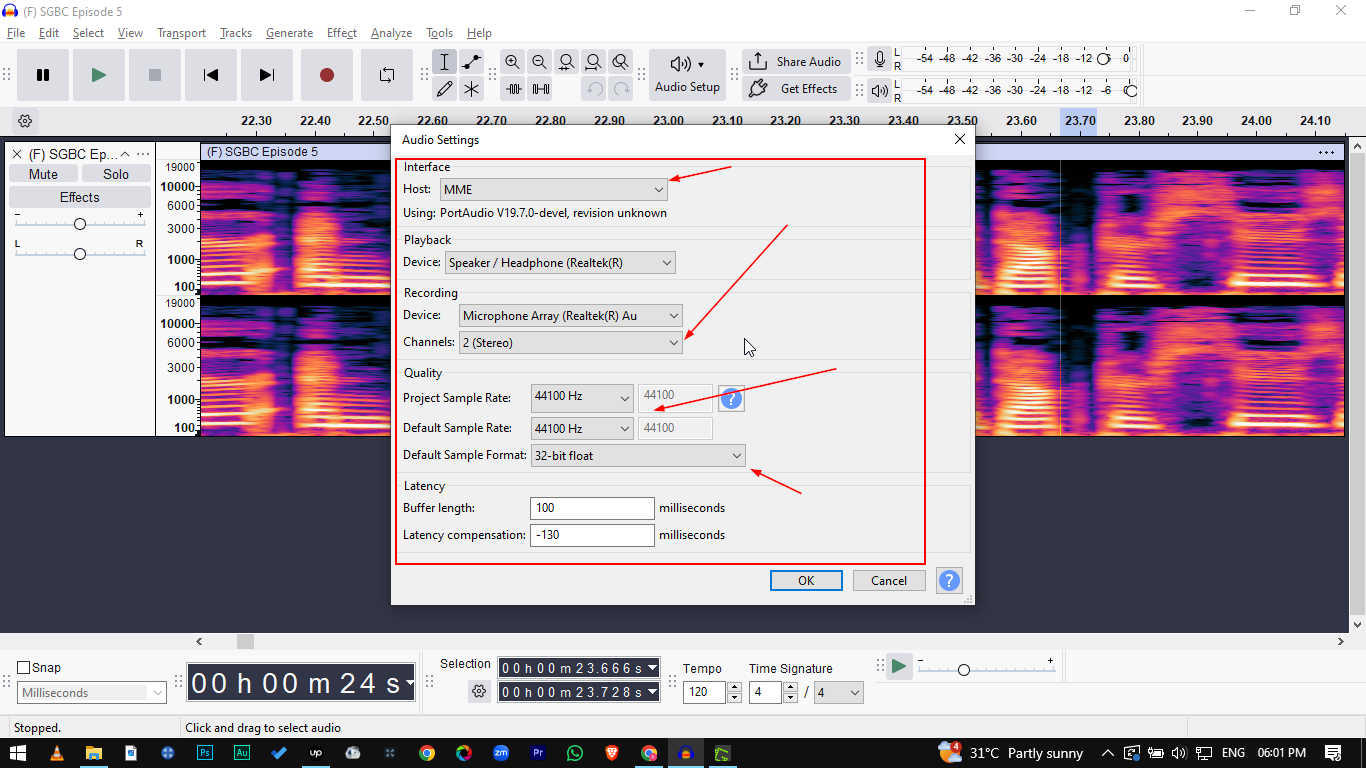
To ensure your raw tracks are mix-ready, you need hardware that supports high-fidelity capture. The Hollyland LARK MAX 2 is ideal for creators here because its 32-bit Float Recording prevents audio distortion entirely. Even if you scream into the mic during a loud session, the 32-bit float format allows you to recover the audio without clipping.

Hollyland LARK MAX 2 - Premium Wireless Microphone System
A premium wireless microphone for videographers, podcasters, and content creators to capture broadcast-quality sound.
Key Features: Wireless Audio Monitoring | 32-bit Float | Timecode
Combined with its Studio Quality 48kHz/24-bit sampling rate, the LARK MAX 2 ensures the signal hitting Audacity is clean, rich, and detailed. A clean input means you spend less time trying to repair audio and more time making it sound creative.
Phase 2: The Static Mix (Balancing & Panning)
Before opening any plugins, you must establish a Static Mix. This is the foundation of your production—simply balancing the volume and position of your tracks so they sit correctly together.
Think of this phase as arranging the musicians on a stage. If the drummer is playing too loud or standing in front of the singer, no amount of EQ will fix the problem. You need to move them first.
Follow these three steps to build a solid static mix:
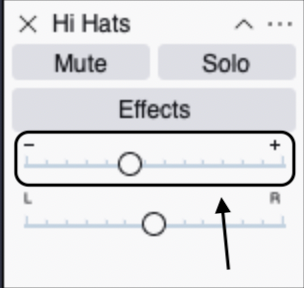
- Gain Staging (The Headroom Rule)
Locate the Gain Slider (labeled -/+ on the left control panel of each track). Adjust this slider so that your Master Playback Meter peaks around -6dB during the loudest sections. You are not trying to make it loud yet; you are creating “headroom.” This safety margin ensures your audio doesn’t clip (redline) later when you add EQ and compression. - Panning (Creating the Stereo Field)
Use the Pan Slider (labeled L/R) to move instruments across the stereo field. This prevents frequencies from clashing in the middle.
- Center: Keep lead vocals, kick drums, snare drums, and bass guitar in the center to anchor the track.
- Mid-Sides (30-50% L/R): Push rhythm guitars, keyboards, or high-hats slightly to the left or right.
- Hard Pan (100% L/R): Use this for double-tracked guitars or background vocal harmonies to create width.
- Mute/Solo Check (Context vs. Isolation)
Use the Solo button to check tracks for specific issues (like clicks or pops), but do the majority of your balancing with all tracks playing. A guitar might sound “thin” when soloed, but sit perfectly in the mix when supported by the bass. Always mix in context.

Phase 3: Cleaning & Shaping Sound (EQ & Noise Reduction)
Now that your levels are balanced, it is time to clean the audio. If your tracks have background hiss or frequency clashes (where two instruments fight for the same sonic space), the final mix will sound “muddy” no matter how well you balance the volume.
Step 1: Silence the Hiss (Noise Reduction)
Even with great gear, room tone or computer fan noise can creep into recordings. Audacity’s Noise Reduction tool is powerful, but it requires a specific two-step workflow to function correctly.
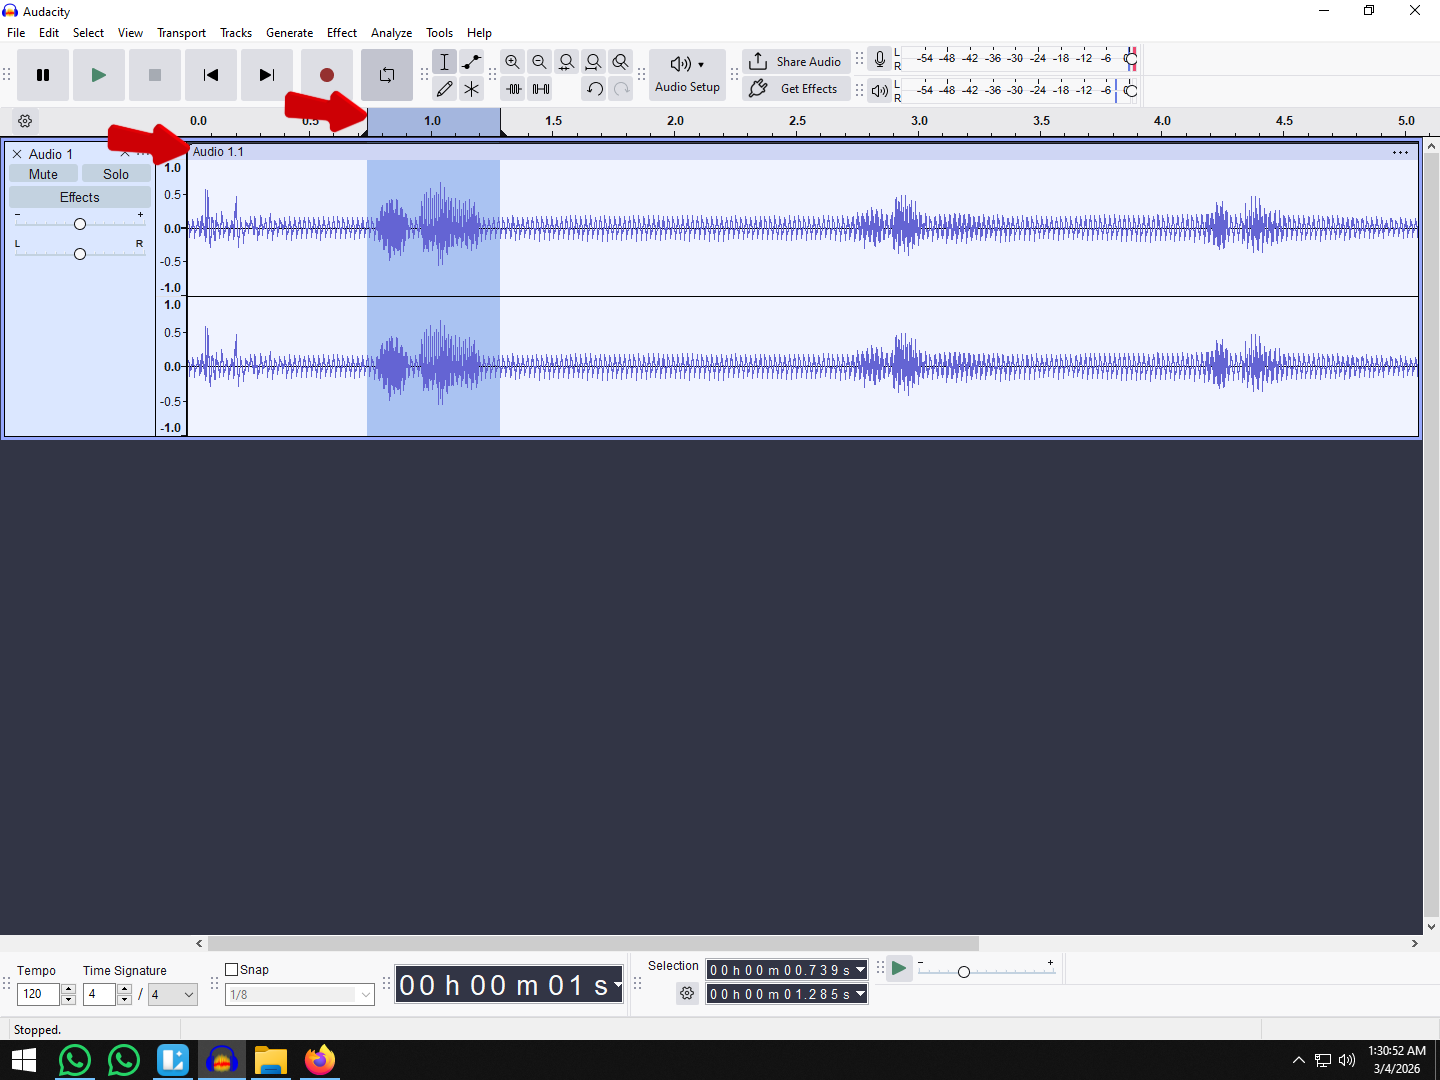
- Capture the Profile: Highlight a small section of your track where only the noise exists (no talking or playing).
- Teach Audacity: Go to Effect > Noise Removal and Repair > Noise Reduction and click “Get Noise Profile.” The window will close—this is normal. Audacity has now “learned” what the noise sounds like.
- Apply the Removal: Select the entire track (Ctrl+A / Cmd+A). Go back to Effect > Noise Reduction.
- Adjust Settings: Start with Noise Reduction (dB): 6 and Sensitivity: 6. Click OK.

Warning: Be careful with these settings. If you push the reduction too high, your audio will sound robotic or “underwater.” It is better to have faint background noise than destroyed audio artifacts.
Step 2: Carving Space with Filter Curve EQ
Equalization (EQ) is the art of boosting or cutting specific frequencies. In a mix, your goal is to ensure instruments aren’t fighting each other. The most critical tool for this in Audacity is the High-Pass Filter.
A High-Pass Filter cuts out low frequencies (rumble) and lets high frequencies pass through. This is essential for:
- Vocals: Human voices rarely have useful information below 80Hz-100Hz.
- Guitars/Keys: These don’t need deep sub-bass frequencies.
How to apply it:
- Select your vocal track.
- Go to Effect > EQ and Filters > Filter Curve EQ.

- On the left side of the graph, drag the line down to eliminate frequencies below 100Hz.
- This removes “mud” and instantly makes the vocals sound clearer without increasing volume. It also reserves the low-end frequencies for instruments that actually need them, like the Kick Drum and Bass Guitar.

Pro Tip: Cut, Don’t Boost
Beginners often try to make a track sound “brighter” by boosting the treble (high frequencies). Avoid this.
Boosting frequencies adds gain, which increases the risk of clipping (distortion) and often sounds unnatural. Instead, use Subtractive EQ:
- Don’t boost the highs to make vocals crisp.
- Do cut the “boxy” frequencies (usually around 300Hz–500Hz) to reveal the clarity that is already there.
Think of EQ like sculpting a statue: you don’t add clay to reveal the shape; you chip away the unnecessary parts.
Phase 4: Dynamics & Control (Compression)
If your mix sounds uneven—where the vocals are too loud one second and disappear behind the music the next—you don’t need to re-record. You need Compression.
Compression is often the most confusing tool for beginners, but it is the secret to a professional “glued-together” sound. Think of a compressor as an automatic volume hand. Imagine a tiny engineer sitting inside your track who instantly turns the volume knob down when the audio gets too loud and turns it up when it gets too quiet. This reduces the dynamic range, keeping your levels consistent and punchy.
In Audacity, you apply this by selecting your track and going to Effect > Volume and Compression > Compressor.

Recommended Compressor Settings for Beginners
Audacity’s default settings can be aggressive. Use this guide as a starting point to tame your audio without making it sound robotic or “squashed.”
| Setting | Recommended Start Point | Purpose |
|---|---|---|
| Threshold | -12dB to -18dB | Determines the level at which the compressor “kicks in.” Any sound louder than this will be turned down. |
| Ratio | 2:1 (Vocals) / 4:1 (Bass) | Controls how much volume reduction occurs. A 2:1 ratio means for every 2dB over the threshold, the output allows only 1dB. |
| Attack Time | 0.10s (approx. 100ms) | Decides how fast the compressor reacts. A slower attack (0.10s) preserves the initial “punch” or transient of the sound. |
How to Fine-Tune Your Sound
- Adjusting Threshold: Lower the threshold slider until you see the gain reduction meter moving during the loud parts of your track. If it’s always moving, you are compressing too much; if it never moves, you aren’t compressing at all.
- Make-up Gain: After compression, your track will be quieter because you’ve turned down the peaks. Ensure the “Make-up gain for 0 dB after compressing” box is checked. This automatically boosts the overall volume back up, making the quiet parts louder and more audible.
- The “Squash” Test: If your vocals sound unnatural or muffled, lower your Ratio (try 1.5:1) or raise your Threshold. You want control, not distortion.
Phase 5: Adding Space & Depth (Reverb & Delay)
A “dry” recording—one with no effects—often feels unnatural, like the musician is singing directly inside your ear. To make your track sound professional, you need to simulate an acoustic environment. This is where Reverb and Delay come in. They trick the listener’s brain into thinking the instruments are playing in a real physical space, like a studio room or a concert hall.
The Rule of Subtlety
Beginners often apply too much reverb, washing out the mix and pushing the vocals to the back of the “room.” Your goal is subtlety. You should feel the space, but you shouldn’t necessarily notice the reverb effect unless you turn it off.
Using Real-Time Reverb (Recommended)
In older versions of Audacity, you had to apply effects permanently. In modern versions (3.2+), you should use Real-Time Effects. This allows you to adjust the room size and intensity while the track is playing, rather than guessing and pressing “Undo.”
- Click the Effects button on the track control panel (left side).

- Click Add Effect > Reverb > Reverb (Audacity).
- Open the effect interface to adjust your settings live.

Mastering the Wet/Dry Balance
The most critical setting in any reverb plugin is the balance between the Dry Signal (your original audio) and the Wet Signal (the effected echo).
- Dry Gain: This preserves the clarity and punch of your original recording. Keep this high (around 0dB or slightly lower).
- Wet Gain: This controls how much “room sound” is added. Start low (around -20dB) and slowly increase it until it sits just under the main vocal.
Pro Tip: If your mix sounds muddy, lower the Wet Gain and increase the Pre-Delay. Pre-delay adds a tiny gap (in milliseconds) before the reverb kicks in, allowing the main vocal to “pop” before the echo washes over it.
Recommended Start Settings
Different instruments require different spaces. Use these settings as a baseline:
| Parameter | Vocals (Intimate) | Drums (Punchy) | Ballad/Atmosphere |
|---|---|---|---|
| Room Size | 30% – 50% | 10% – 20% | 70% – 80% |
| Reverberance | 20% | 10% | 60% |
| Wet Gain | -18dB | -24dB | -10dB |
When to Use Delay Instead
Sometimes reverb takes up too much sonic space, cluttering the mix. If you want depth without the thick “tail” of a reverb, use Delay (Echo).
A subtle Stereo Delay with a low feedback setting (1 or 2 repeats) works wonders on vocals. It creates a sense of width and polish without muddying the frequency spectrum, keeping the lyrics intelligible and the mix clean.
Phase 6: Automation (The Envelope Tool)
If you set your volume sliders once and never touch them again, your mix will sound robotic and “static.” Professional tracks breathe; the volume changes dynamically to highlight specific moments. In Audacity, you achieve this using the Envelope Tool.
This is essentially manual volume control, allowing you to “draw” volume changes directly onto the waveform without cutting the audio clips.
Understanding the Envelope Tool (F2)
The Envelope Tool changes how you interact with a track. Instead of selecting audio to cut or copy, you are manipulating the volume line (amplitude).
- Activate it: Click the icon that looks like two dots connected by a line in the toolbar, or simply press F2 on your keyboard.
- The Blue Lines: Once active, you will see thick blue lines appear at the top and bottom of your waveform. These represent your volume ceiling.
Technique: “Ducking” Music Under Vocals
The most common use for automation is ducking—lowering the background music automatically when a voice starts speaking or singing, and raising it back up during pauses.
Here is how to create a professional “ducking” effect manually:
- Identify the Vocal Entry: Look at your vocal track to see exactly where the singing or speaking begins.
- Create “Anchor” Points on the Music Track: With the Envelope Tool active, click on the blue line of the music track slightly before the vocals start. This creates a Control Point. Create a second point right where you want the volume to be fully lowered.
- Create the Release Points: Go to the end of the vocal phrase. Create two more points: one where the vocals end, and one slightly after where the music should return to full volume.
- Draw the “Valley”: Drag the line between the inner two points downward. You will see the waveform visually shrink.
- Result: The music stays loud, fades down quickly just as the vocals enter, stays quiet while you speak, and fades back up when you stop.
Smoothing Out Uneven Performances
You can also use this tool to fix a vocal track where the singer moved too far from the microphone.
Instead of compressing the whole track, zoom in on the quiet word or phrase. Add four control points around the quiet section and drag the line upward to boost just that specific moment. This creates a much more natural sound than heavy compression.
Pro Tip: Don’t forget to switch back to the Selection Tool (F1) when you are finished. A common frustration for beginners is trying to highlight a track to delete it, only to accidentally create volume points because they are still in Envelope mode.
Phase 7: Finalizing & Exporting (The Master)
Once your tracks are balanced and shaped, you have one final hurdle: Mastering. In the context of Audacity, this doesn’t mean sending it to a separate studio; it means applying a final layer of volume control to the entire project so it sounds competitive on streaming platforms without distorting.
Applying the Limiter
If you export your project right now, it might sound quiet compared to professional songs on Spotify. If you simply turn up the volume, you risk “clipping” (hitting the red zone), which creates harsh digital distortion.
The solution is the Limiter. Think of this as a brick ceiling. It allows you to boost the overall volume of your track while guaranteeing the audio never crosses a specific maximum point.
How to apply a Limiter in Audacity:
- Select All: Press Ctrl + A (Windows) or Cmd + A (Mac) to select your entire mix.
- Open the Effect: Go to Effect > Volume and Compression > Limiter.
- Configure Settings:
- Type: Select Hard Limit.
- Limit to (dB): Set this to -1.0 dB. This leaves a small “headroom” buffer so the audio doesn’t distort when played on different devices.

- Input Gain: Use this to gently boost the volume until your waveform looks full but healthy.
- Apply: Click Apply. You should see your waveforms get larger without hitting the very top or bottom edges of the track.
Note: For streaming standards (like Spotify), producers often aim for -14 LUFS. While Audacity doesn’t display LUFS natively on the main meter, setting your peak to -1.0 dB is the industry-standard safety net to ensure your export is clean.
Exporting Your Track
Never delete your original Audacity project file (.aup3), but you cannot play that file in a car or on a phone. You need to export two specific versions of your song.
1. The Archive Master (WAV)
This is your “Golden Copy.” It is uncompressed and retains 100% of the audio data. Use this file for uploading to distribution services (DistroKid, CD Baby) or for further video editing.
- Go to File > Export Audio.

- Encoding: Select 32-bit float (or Signed 24-bit PCM).
- Why: 32-bit float prevents clipping data from being lost and offers the highest possible fidelity.

2. The Sharing Copy (MP3)
This is a compressed file, meaning some data is removed to make the file size smaller. This is ideal for emailing to friends or quick uploads to SoundCloud.
- Go to File > Export Audio.
- Bit Rate Mode: Preset.
- Quality: Select Excessive, 320 kbps.

- Why: 320 kbps is the highest quality MP3 available. Anything lower (like 128 kbps) will make your cymbals and vocals sound “swirly” or underwater.
Essential Gear for a Better Mix
While Audacity provides the digital tools to balance your tracks, your physical gear dictates what you actually hear and capture. You cannot fix a frequency clash if your speakers don’t play it, and you cannot mix a performance that was distorted from the start.
Here is the essential hardware toolkit for a professional workflow.
1. Flat-Response Headphones or Monitors
Most consumer headphones (like Beats or AirPods) are “colored”—they artificially boost bass and treble to make music sound exciting. If you mix on these, your final track will sound weak and thin on other systems because you compensated for bass that wasn’t actually there.
- Studio Monitors: Speakers designed to give a “flat” or neutral representation of the sound.
- Studio Headphones: If you are mixing in an untreated room (like a bedroom), open-back studio headphones are often a better investment than speakers, as they remove room acoustics from the equation.
2. A High-Fidelity Microphone System
As mentioned earlier, no amount of EQ or compression in Audacity can save a recording that has interference, clipping, or latency lag.
For capturing vocals or instruments wirelessly with zero latency issues, the Hollyland LARK MAX 2 is a top choice. Unlike standard USB mics that leave you tethered to a desk, this system offers complete freedom of movement without sacrificing audio fidelity.
Crucially, its Wireless Audio Monitoring feature allows you to listen via the new OWS (Open Wearable Stereo) earphones while recording. This creates a real-time feedback loop, ensuring you catch issues like wind noise or peaking levels before they hit the Audacity timeline, saving you hours of repair work later.
3. Audio Interface (Optional)
If you are using traditional XLR microphones, you will need an audio interface to convert the analog signal to digital for your computer. However, modern systems like the Lark Max 2 bypass this need by connecting directly to your PC or Mac via USB-C, streamlining your setup while maintaining high-resolution 48kHz/24-bit audio quality.
Frequently Asked Questions (FAQ)
How do I make my voice sound professional in Audacity?
To achieve a “radio-ready” vocal sound in Audacity, follow this chain of effects:
- Noise Reduction: Clean up background hiss first.
- EQ (Filter Curve): Use a High-Pass Filter to cut frequencies below 80Hz. This removes low-end rumble.
- Compression: Set the Threshold to around -15dB and Ratio to 2:1. This levels out volume spikes.
- Normalization: Use Normalize to bring peak amplitude to -1.0 dB.
How do I mix vocals with background music in Audacity?
The best way is to use the Auto Duck feature. Place your vocal track above your music track. Select the music track, go to Effect > Volume and Compression > Auto Duck. Audacity will automatically lower the music volume whenever it detects sound on the vocal track. Alternatively, use the Envelope Tool (F2) to manually lower the music volume during vocal parts.
Is Audacity good for music production?
It depends on what you are producing.
- Yes, for Audio Recording: It is excellent for recording live instruments, vocals, or podcasts, supporting high-quality audio (up to 32-bit float) and VST plugins.
- No, for Beat Making: Audacity is an Audio Editor, not a sequencer. It has poor support for MIDI and virtual instruments. If you want to program drums or play software synths, you will need a full DAW like FL Studio or Ableton.
What is the difference between mixing and mastering in Audacity?
Think of it like baking a cake. Mixing is combining the ingredients (vocals, guitar, drums) and baking them. Mastering is the icing. In Audacity, mastering usually involves applying a final Limiter to the single exported file to boost the overall loudness to commercial standards.
Conclusion: Your Mix, Your Sound
Mixing music in Audacity is no longer just a workaround for beginners—it is a legitimate workflow capable of producing broadcast-ready audio. You now have the roadmap to balance levels, sculpt frequencies with EQ, and control dynamics with compression. But remember, technical knowledge is only half the battle; the rest is trusting your ears.
While plugins and effects are powerful, the ceiling of your production quality is always dictated by your source material. You cannot “fix” a bad recording in the mix; you can only hide it.
To make your next session easier, focus on capturing the cleanest possible signal right at the source. Tools like the Hollyland LARK MAX 2 are a major advantage here. By utilizing its 32-bit Float Recording, you eliminate the risk of audio clipping before you even open the software, ensuring your raw tracks are rich, clear, and ready for mixing.
Don’t let perfectionism paralyze you. The best way to learn is to finish tracks. Hit Export, listen to your mix on different speakers (your car, your phone, your headphones), and take those notes into your next project.
Now, go make some noise.