.png)
If you’ve ever hit playback on a recording only to hear your voice swimming in room noise, you know the frustration. Whether you are a podcaster, a student, or a YouTuber, figuring out how to remove echo and reverb in Audacity is a common hurdle.
While software can’t magically “un-bake a cake,” Audacity offers several free tools to tighten up your audio and minimize that hollow, distant sound. Below are three proven methods to clean up your tracks, plus a strategy to stop echo before it starts.
Why Does My Recording Sound Like a Bathroom? (Echo vs. Reverb)
If your audio sounds “muddy” or “distant,” you are hearing the sound of your room, not just your voice. This happens when sound waves from your mouth bounce off hard surfaces—like drywall, tile floors, or windows—and reflect back into the microphone milliseconds later.
Before applying any fixes, it is critical to understand what you are actually fighting.
Echo vs. Reverb: What’s the Difference?
While both are caused by sound reflections, the distinction lies in time and perception:
- Echo: This is a distinct, delayed repetition of the original sound (think of shouting into a canyon: “Hello… hello… hello”). This usually happens in large spaces or when you are far from a reflective surface.
- Reverb (Reverberation): This is a complex “wash” or build-up of thousands of reflections arriving at the ear so quickly that they blend together. This creates the “room tone” or “bathroom sound” typical in home offices or untreated bedrooms.
Most content creators are struggling with Reverb, not Echo.
⚠️ Critical Warning: Back Up Your Files
Audacity is a destructive editor. This means when you apply an effect like Noise Reduction or a Noise Gate, it permanently alters the waveform of that file. If you over-process the audio and hit “Save,” you cannot undo those changes after closing the session.
Before you touch a single slider:
- Locate your original raw recording.
- Duplicate the file (Ctrl+C / Ctrl+V).
- Only edit the copy.
Method 1: Using the “Noise Gate” Effect (Best for Voiceovers)
If you are recording spoken word audio, such as a podcast or voiceover, the Noise Gate is your most effective native tool in Audacity.
Think of a Noise Gate like a security guard for your audio. It allows loud sounds (your voice) to pass through, but completely shuts the door when the volume drops below a certain level. Since reverb and echo usually linger in the quiet moments between words, a Noise Gate effectively silences these “tails,” making your voice sound tighter and more present.
Steps to apply a Noise Gate:
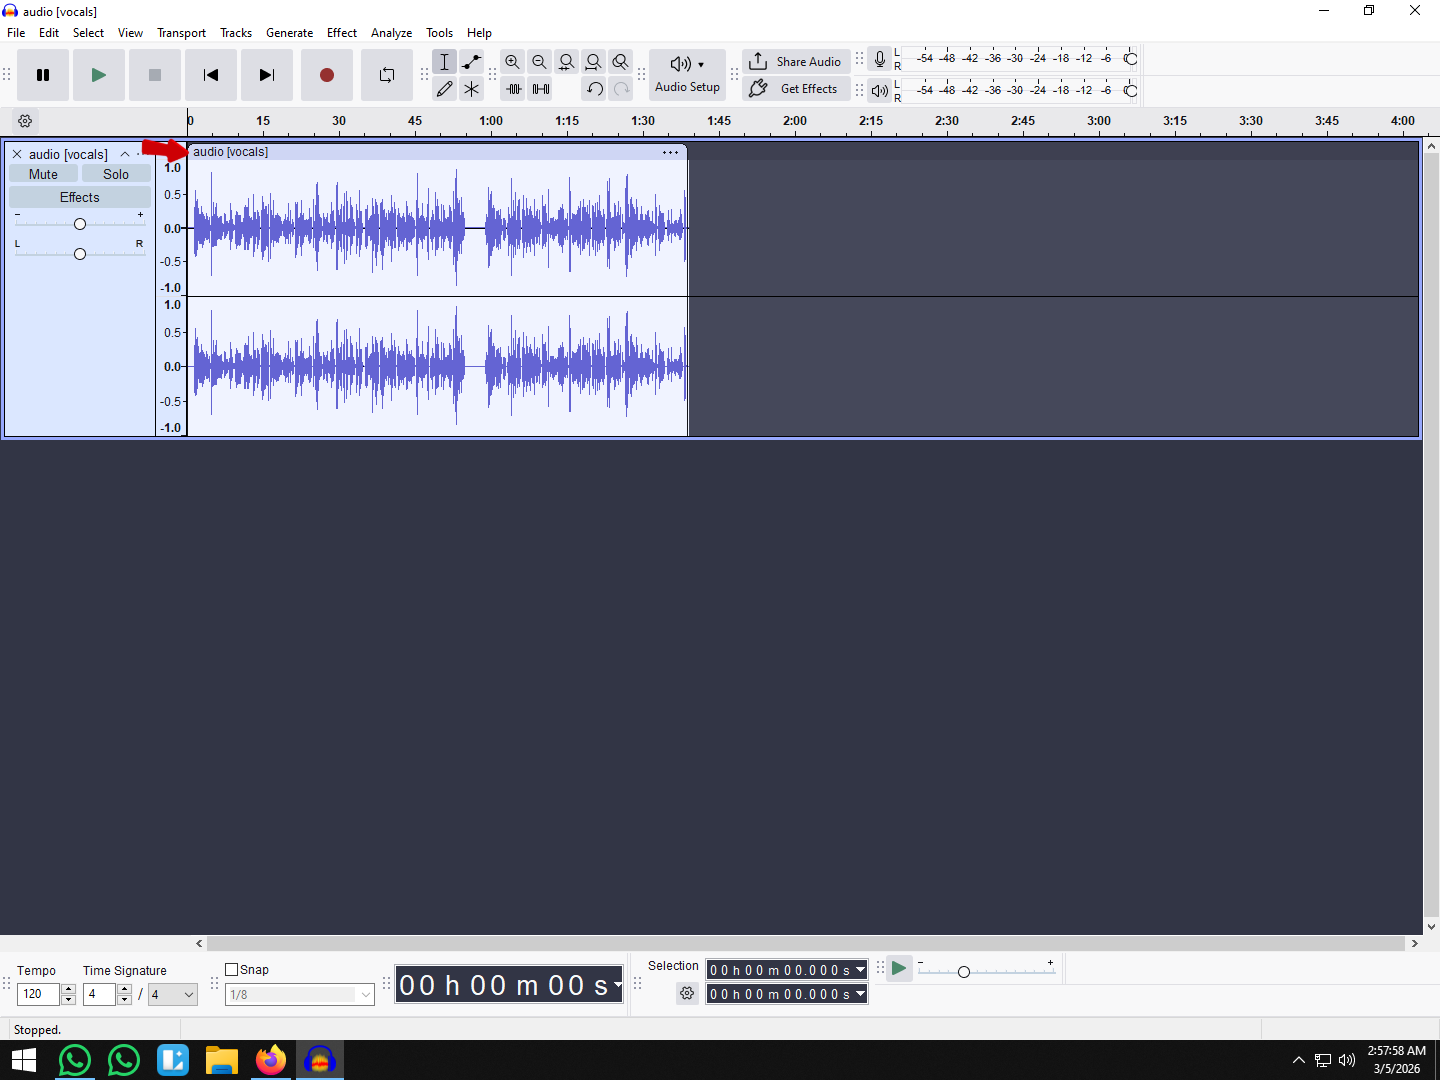
- Select Your Audio: Click the track header on the left or press Ctrl + A (Windows) / Cmd + A (Mac) to select the entire waveform.
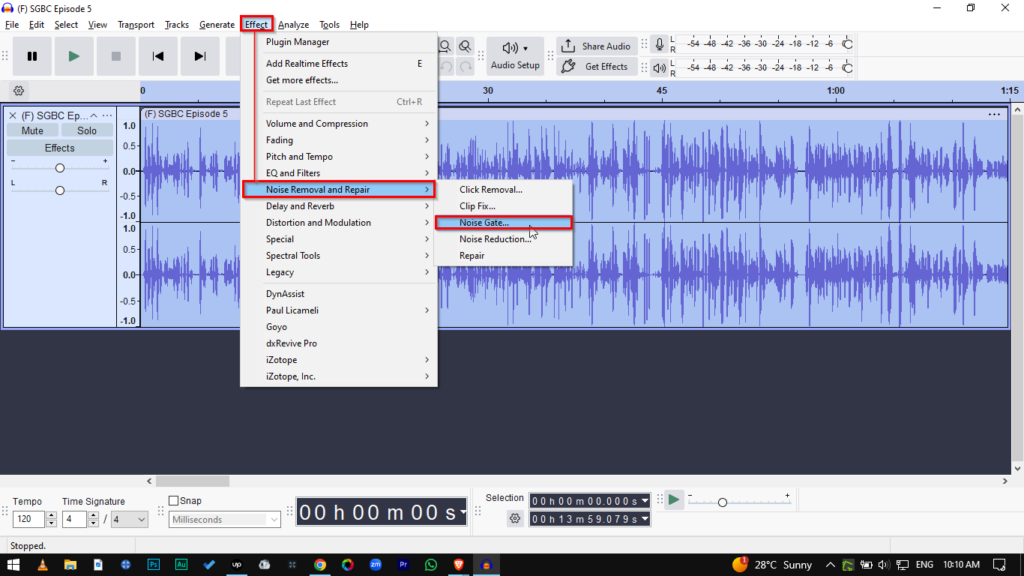
- Open the Plugin: Go to Effect > Noise Removal and Repair > Noise Gate.
- Set the Gate Threshold: This is the most critical setting. Start with a value between -30dB and -40dB. This tells Audacity, “Silence anything quieter than this level.”
- Adjust Attack and Decay:
- Attack (10ms): Keeps the gate fast so it opens the instant you start speaking.
- Decay (250ms – 500ms): A slower decay keeps the gate open slightly longer after you stop speaking. This creates a natural fade-out rather than an abrupt, jarring silence.
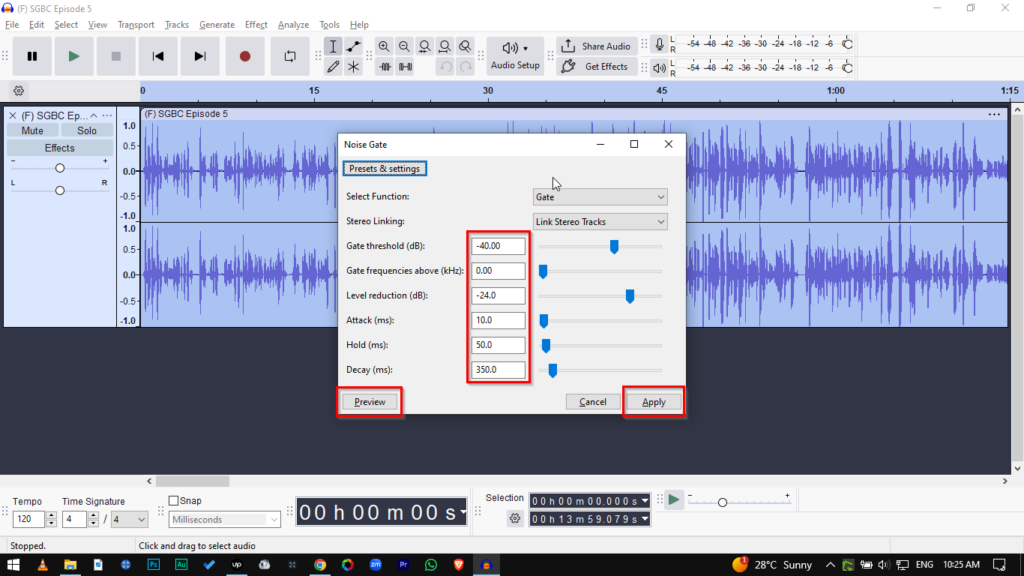
- Preview and Apply: Click Preview. If the silence between words sounds clean, click OK.
Pro Tip: Be careful not to set your Gate Threshold too aggressively (e.g., -10dB). If the threshold is too high, the gate will chop off the beginning or end of your words, resulting in a stuttering, robotic sound.
Method 2: Noise Reduction and EQ (The Fine-Tuning Approach)
If the Noise Gate is a blunt instrument that chops off silence, this method is the scalpel. It doesn’t remove the echo itself, but it cleans up the room tone and “muddy” frequencies that make reverb sound overwhelming. By clarifying the voice, you push the echo further into the background.
Step 1: Clean the Room Tone with Noise Reduction
Room echo often blends with background hiss (air conditioning, computer fans). Reducing this noise floor makes the voice stand out, making the remaining reverb less distracting.
- Select a “Silent” Section: Highlight a few seconds of your recording where no one is speaking, but the room noise is audible.
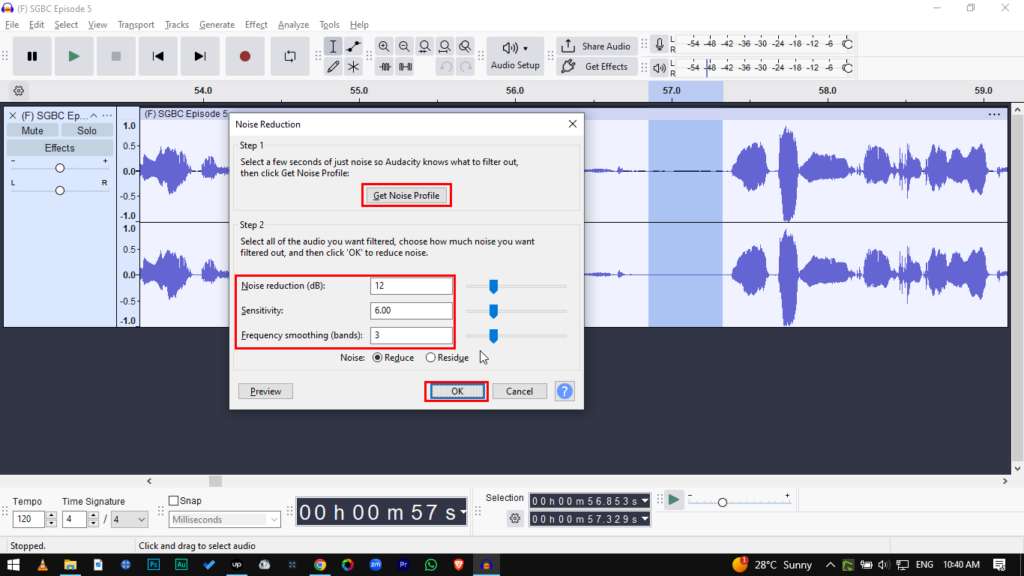
- Get the Profile: Go to Effect > Noise Removal and Repair > Noise Reduction. Click the Get Noise Profile button. The window will close—this is normal. Audacity has now “learned” what your room sounds like.
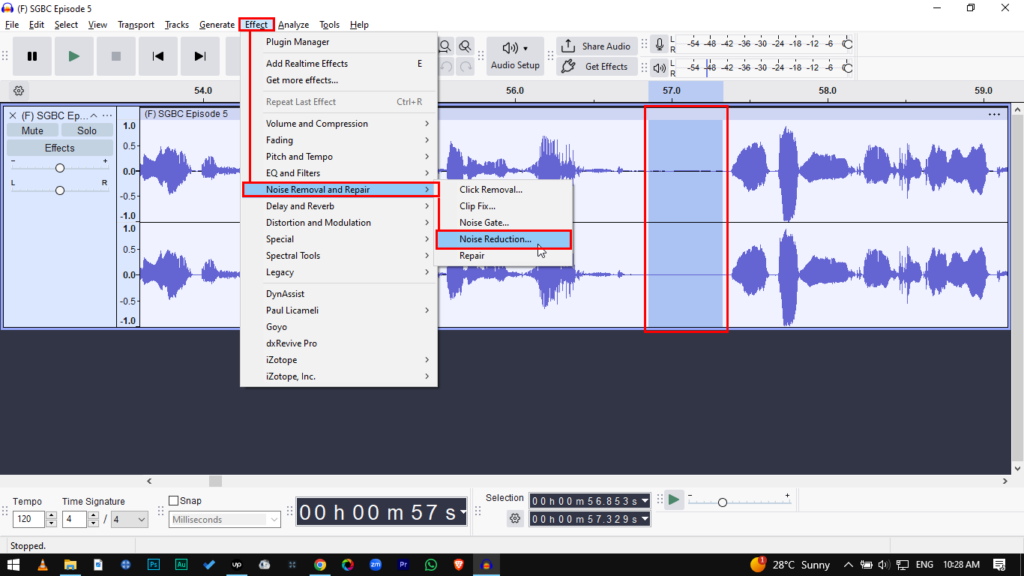
- Apply the Effect: Select your entire track (Ctrl+A / Cmd+A). Go back to Effect >Noise Removal and Repair > Noise Reduction.
- Adjust Settings:
- Noise Reduction (dB): Keep this low (between 6 to 12 dB). Going higher often causes “robotic” artifacts.
- Sensitivity: Set to 6.00.
- Frequency Smoothing: Set to 3.
- Click OK.
Step 2: Cut the “Mud” with a High-Pass Filter
Reverb in untreated rooms often accumulates in the lower frequencies, creating a “boomy” or “hollow” sound. A High-Pass Filter tells Audacity to let high frequencies pass through while cutting the low-end rumble.
- Select your entire track.
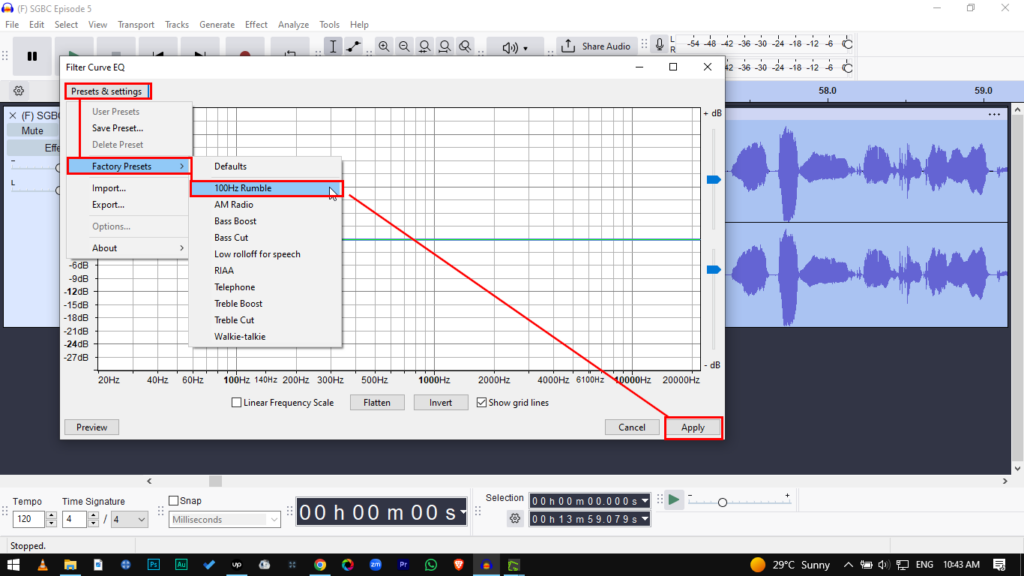
- Go to Effect > EQ and Filters > Filter Curve EQ.
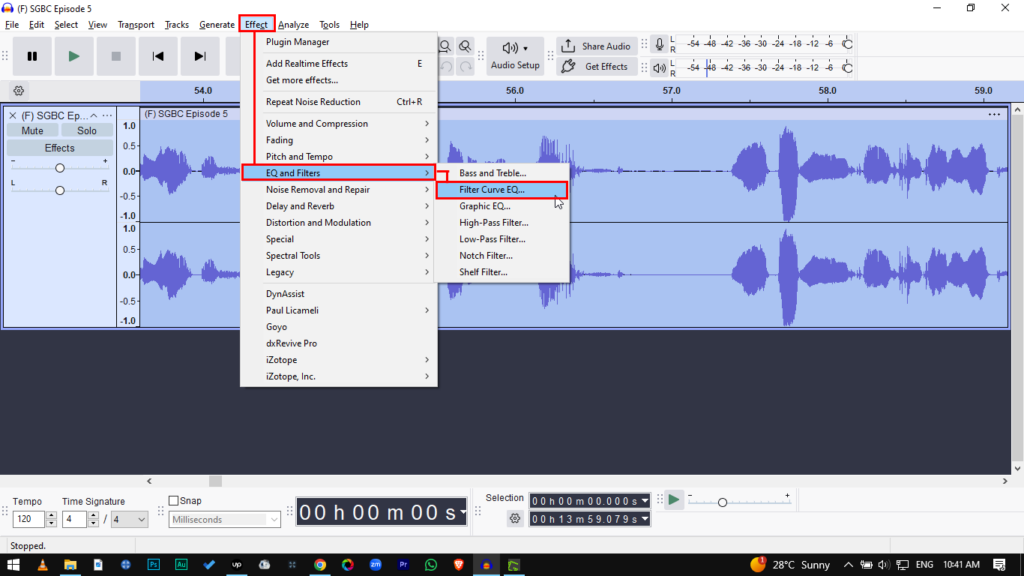
- On the left side of the graph, drag the line downward to cut frequencies below 100Hz.
- Alternatively, use a preset: Click Presets & Settings > Factory Presets > 100Hz Rumble.
- Click Apply.
By removing these low frequencies, you remove the energy from the “boom” of the room without affecting the clarity of the human voice.
Method 3: Using Free VST Plugins (The “Secret Weapon”)
While Audacity is an incredible free tool, its native effects can be a bit crude. The native Noise Reduction tool is designed primarily for constant background hiss, not the complex, bouncing frequencies of room echo.
If the native tools aren’t giving you a clean result, you need VST (Virtual Studio Technology) plugins. These are third-party audio effects that plug directly into Audacity to provide professional-grade processing.
Why You Need a Dedicated Plugin
Specialized VST plugins—specifically advanced Noise Gates or De-Verberators—use smarter algorithms. They can distinguish between the human voice and the “tail” of the reverb more accurately, cutting the echo without chopping off the ends of your words.
Recommended Free VST: GGate
For a free solution, GGate (by GVS) is widely considered superior to Audacity’s default gate. It offers smoother “Attack” and “Release” curves, meaning the transition between silence and speech sounds much more natural.
- What it does: It acts as a highly sensitive bouncer, silencing the audio track the instant you stop speaking, killing the room echo before it becomes noticeable.
- Best Setting: Start with the Threshold low and slowly raise it until the background room noise disappears, but your voice remains unaffected.
How to Install VST Plugins in Audacity
Installing a plugin is a simple drag-and-drop process.
- Download the Plugin: Find the .dll file (Windows) or .vst file (Mac) for the plugin you want to use.
- Locate the Plug-Ins Folder: Navigate to the folder where Audacity is installed on your computer (usually C:\Program Files\Audacity\Plug-Ins on Windows).
- Move the File: Drag your downloaded plugin file into this folder.
- Enable in Audacity:
- Open Audacity.
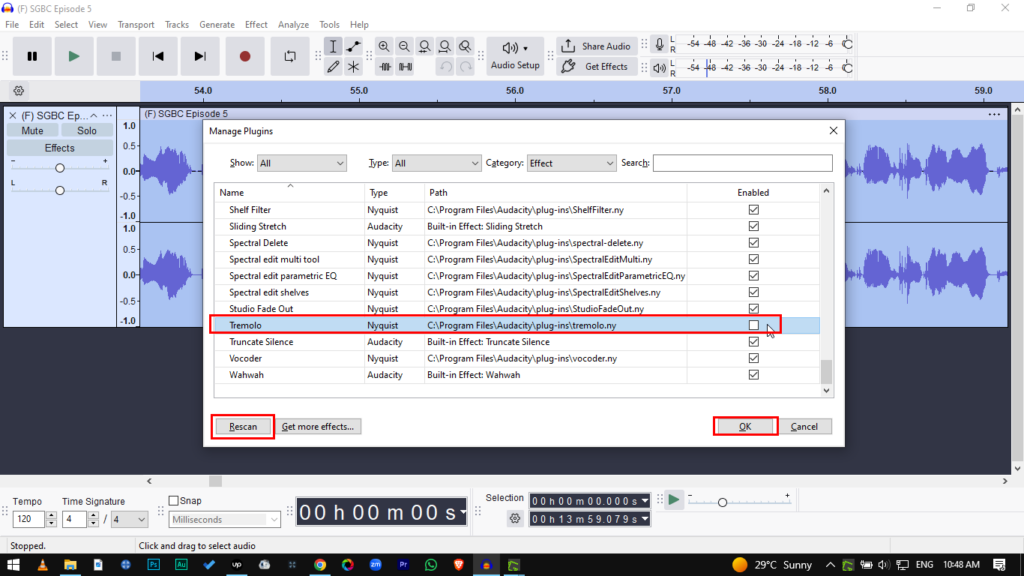
- Go to Effect > Plugin Manager (or Add / Remove Plugins).
- Click Rescan or find your new plugin in the list.
- Select the plugin and click Enable.
The “Permanent Fix”: Stop Echo Before It Happens
The harsh reality of audio engineering is that if echo is baked into the raw file, software can only hide it, not remove it. Every time you apply a Noise Gate or aggressive EQ, you strip away parts of the natural voice frequency, often leaving your audio sounding thin.
The number one cause of “bathroom audio” is simple physics: Microphone placement. When your mic is too far from your mouth, it captures more of the room’s reflections than your direct voice. To permanently solve this, you need to close that distance and isolate the signal.
The Gear Solution: Hollyland LARK MAX 2
If you find yourself constantly fixing echo in post-production, your recording gear is likely the bottleneck. For professional results without the headache of acoustic treatment, you need a microphone that isolates your voice from the room immediately.
We recommend the Hollyland LARK MAX 2 as a preventative solution. Because it is a wireless lavalier system, the microphone sits inches from the speaker’s mouth, naturally overpowering room reflections with direct signal volume.

Hollyland LARK MAX 2 - Premium Wireless Microphone System
A premium wireless microphone for videographers, podcasters, and content creators to capture broadcast-quality sound.
Key Features: Wireless Audio Monitoring | 32-bit Float | Timecode
Here is why this specific tool eliminates the need for Audacity rescue missions:
- Professional ENC (Environmental Noise Cancellation): Unlike standard noise reduction that ruins audio quality, the LARK MAX 2 uses advanced algorithms to actively filter out background ambiance and room reverb before the file is even written. You get a dry, studio-clean track instantly.
- Studio Quality Specs: With 48kHz/24-bit audio capture, the microphone preserves the rich, deep tones of the human voice. This high-resolution data gives your audio “presence,” making it sound close and intimate rather than distant and hollow.
- 32-bit Float Recording: This is a safety net for creators. 32-bit float captures such a massive dynamic range that it is virtually impossible to distort. Whether you whisper (where echo usually hides) or scream, the audio remains clean and usable.
- Real-Time Wireless Monitoring: The system includes new OWS (Open Wearable Stereo) earphones. This allows you to hear exactly what the mic is hearing in real-time. Instead of discovering the echo after you finish recording, you can catch it instantly and adjust your setup on the fly.
Frequently Asked Questions (FAQ)
Can I remove echo from a song in Audacity?
It depends on the file type. If you are working with a mixed stereo track (where vocals and instruments are combined into one file), removing echo is nearly impossible without ruining the music. The echo is “baked” into the mix. However, if you have an isolated vocal track, you can significantly reduce the reverb using the Noise Gate or EQ methods outlined above.
Is there a one-click “Remove Echo” button in Audacity?
No. Audacity is a powerful manual editor, but it lacks the AI-driven “magic buttons” found in expensive paid software. To fix echo in Audacity, you must manually chain effects together—specifically Noise Gate, Noise Reduction, and Filter Curve EQ.
Why does my voice sound robotic after removing echo?
If your voice sounds “underwater,” metallic, or robotic, you have over-processed the audio. This happens when the Noise Reduction settings are too aggressive or the Noise Gate cuts off too much of the natural voice frequency. Audio repair is always a trade-off; it is often better to leave a tiny bit of room ambience than to push the settings so hard that the voice loses its human quality.
Conclusion
Removing echo in post-production is a bit like trying to take the salt out of a soup—you can mask the taste, but the ingredients are already mixed. While Audacity’s Noise Gate and EQ settings can significantly tighten up a roomy recording, they are ultimately “band-aids.”
If you are currently stuck with a reverb-heavy file, start with Method 1 (The Noise Gate). It is the safest way to remove the “tails” of the echo between words without destroying the natural tone of your voice.
However, if you want to stop wasting hours fixing audio in post-production, the real solution is prevention. Upgrading to a dedicated system like the Hollyland LARK MAX 2 solves the problem at the source. By combining a professional wireless lavalier that sits close to your mouth with advanced Noise Cancellation, you eliminate room reflections before they ever hit your timeline.