.png)
If you have ever tried to edit a podcast where two people are talking over each other on the same audio track, you know the nightmare. You can’t fix one voice without ruining the other. Learning how to set up multitrack recording in Audacity changes that completely.
Instead of merging everything into one flat file, multitracking lets you capture each microphone or instrument on its own separate lane. This gives you total control to adjust volume, mute coughs, or apply effects to just one person at a time.
Here is how to configure Audacity for professional multitrack recording, whether you are layering vocals over a beat or recording a two-person interview.
What is Multitrack Recording? (And Why You Need It)
At its core, multitrack recording involves capturing different audio sources onto separate, independent tracks within Audacity.
For most users, this workflow falls into two specific categories:
- Simultaneous Recording: Capturing two or more voices at the exact same time using different microphones. This is standard for podcast interviews where you want the host on Track 1 and the guest on Track 2.
- Overdubbing (Layering): Recording a new track while listening to an existing one. This is essential for musicians (recording vocals over a guitar track) or solo podcasters adding an intro over background music.
The Power of Non-Destructive Editing
The main reason to use this method is control. If you record two people into a single track (a “mixed-down” file), their voices are permanently fused together. You cannot change the volume of one person without changing the other.
Multitracking gives you non-destructive editing. Because the audio files remain separate, you can:
- Isolate issues: Mute a guest’s cough or sneeze without deleting the host’s question.
- Balance levels: Boost a quiet speaker without making the loud speaker distort.
- Apply effects individually: Add compression to a voice track without ruining the background music.
Essential Gear for Multitrack Recording
Audacity is powerful software, but it is limited by the hardware you connect to it. You cannot record multiple independent tracks if your hardware only sends a single signal.
For simple voiceovers, a standard USB microphone works fine. However, if you are attempting to record an interview with two people, you need hardware capable of sending distinct input channels to your computer simultaneously.
To record two people without a complex mixer or expensive XLR interface, the most efficient solution is a dual-channel wireless system.
Recommended Solution: Hollyland LARK MAX 2
For creators who need a “plug-and-play” setup, the Hollyland LARK MAX 2 is a standout choice. It solves the biggest headache Audacity users face: getting two distinct voices into the computer through a single USB connection.


Here is why this system works well for Audacity:
- Dual-Channel Recording: The receiver connects directly to your PC or Mac via USB. By setting the receiver to “Stereo Mode,” it sends the host’s audio to the Left channel and the guest’s audio to the Right channel. This allows you to split them into two separate tracks in Audacity later.
- 32-bit Float Recording: This is a safety net for your audio. If your guest suddenly laughs loudly or screams, standard microphones will “clip” (distort), ruining the take. The LARK MAX 2’s 32-bit float internal recording captures such a high dynamic range that you can lower the volume in post-production without any distortion.
- Studio Quality: The system records at 48kHz/24-bit, ensuring your source audio meets professional broadcast standards before you even hit the record button.
By using a system like this, you bypass the need for complicated driver installations often required to make traditional audio interfaces work with Audacity.
Method 1: How to Setup “Overdubbing” (Layering Tracks)
Overdubbing is the standard method for musicians recording vocals over a beat or podcasters adding an intro over background music. In this mode, you listen to an existing track (playback) while recording a new one separately.
Follow these steps to configure Audacity for layering:
- Open Preferences: Navigate to Edit > Preferences (or Audacity > Preferences on macOS) and select the Recording tab.

- Enable Overdub: Check the box labeled “Hear other tracks while recording (overdub).” This ensures you can hear your backing track while you speak or sing.
- Disable Software Playthrough: Uncheck the box for “Audible Input monitoring”
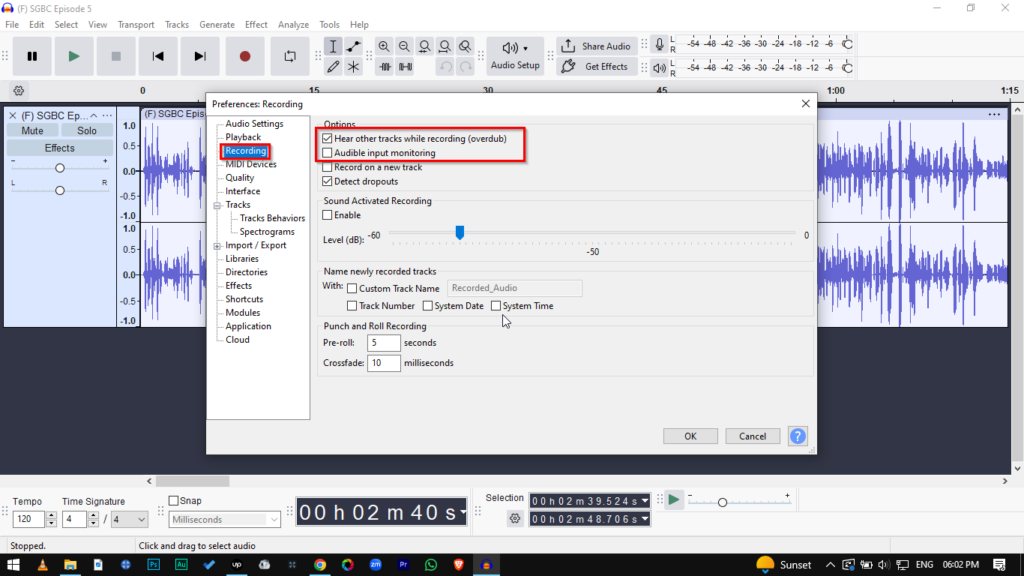
- Why? Leaving this on causes a distracting echo where you hear your own voice with a slight delay. You should rely on your hardware for direct monitoring.
- Import Your Base Audio: Go to File > Import > Audio and select your backing track or beat.
- Start Recording: Press Shift + R (or click the Record button). Audacity will automatically create a new track below your existing audio, allowing you to record in sync with the beat.
Pro Tip: If your vocals sound slightly out of time with the beat after you finish recording, you are experiencing latency. You can fix this in the Preferences menu by adjusting “Latency Compensation.”
Method 2: Simultaneous Recording (2 Microphones at Once)
If you are hosting a podcast interview, you need to record two voices simultaneously. However, you likely ran into a common roadblock: Audacity does not natively support recording from two separate USB microphones at the same time.
Windows audio drivers generally recognize only one input device at a time. Trying to trick the system with software aggregators often leads to crashes.
The most reliable solution is the “Stereo Split” Trick. This method uses a dual-channel receiver or audio interface to send two distinct signals through a single USB connection—one on the Left channel, and one on the Right.
How to Execute the “Stereo Split” Workflow
Follow these steps to trick Audacity into recording two tracks at once using a single input source.
1. Hardware Setup
Connect your dual-channel hardware to your computer.
- For Audio Interfaces: Plug two XLR microphones into Input 1 and Input 2.
- For Wireless Systems (Recommended): Connect the receiver of a system like the Hollyland LARK MAX 2 to your computer via USB-C. This acts as a single device while managing two transmitters.
2. Configure Device Settings
You must ensure your hardware is sending distinct signals.
- On the Hollyland LARK MAX 2 receiver, swipe to the settings menu and select “Stereo Mode.”
- Why this matters: This setting hard-pans Transmitter 1 to the Left Channel and Transmitter 2 to the Right Channel. If you leave it in “Mono,” both voices will be mixed together permanently before they even reach Audacity.
3. Configure Audacity Inputs
Open Audacity and go to the Audio Setup toolbar (or Edit > Preferences > Devices).
- Recording Device: Select your interface or “Hollyland LARK MAX.”
- Recording Channels: You MUST select “2 (Stereo) Recording Channels.”
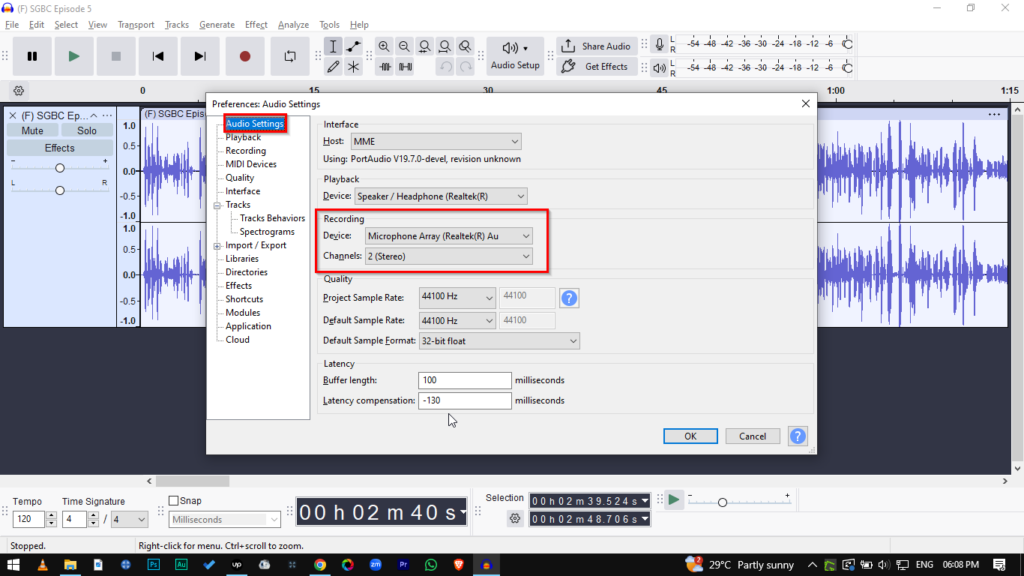
- Note: Do not select Mono here, or Audacity will mix the left and right channels together immediately.
4. Record Your Session
Press Record (R). You will see a single track appear with two different waveforms—top (Left/Mic 1) and bottom (Right/Mic 2). Don’t worry if they look different; they are currently locked together in one stereo file.
5. The Fix: Split Stereo to Mono
Once you finish recording, you need to separate the voices so you can edit them individually.
- Click the Track Name dropdown arrow (located on the left control panel of the track).
- Select “Split Stereo to Mono.”

Result: Audacity will separate the file into two distinct mono tracks. You can now rename the top track “Host” and the bottom track “Guest.”
Solving the Latency Issue (Hearing Yourself with Delay)
Nothing ruins a recording session faster than latency. If you are monitoring your audio through Audacity and hear your voice echo back to you half a second later, it creates a “speech-jamming” effect. Your brain struggles to process the delay, causing you to stutter.
This delay happens because the signal has to travel from your microphone, through the computer, into Audacity, and back out to your headphones. While you can’t eliminate latency entirely via software, you can manage it using two specific methods.
The Software Fix: Adjusting Latency Compensation
If you are overdubbing, the new track might not align perfectly with the backing track due to processing delay. Audacity allows you to shift the recording backward automatically to sync it up.
How to calibrate Latency Compensation:
- Perform a Loopback Test: Connect a cable from your computer’s audio output to its input (or place your microphone right next to your headphones).
- Record a Click: Generate a “Rhythm Track” or click track in Audacity and record it onto a new track.
- Measure the Gap: Zoom in closely on the waveforms. You will see the new recording starts slightly later than the original click.
- Calculate the Difference: Use the selection tool to measure the time gap (e.g., 100 milliseconds).
- Apply the Fix: Go to Edit > Preferences > Recording. In the “Latency compensation” box, enter that number as a negative value (e.g., -100).
This ensures that when you hit stop, Audacity automatically shifts your new vocal track backward to sit “in the pocket” of the beat.
The Hardware Fix: Direct Monitoring (The Zero-Lag Solution)
Software compensation fixes the recording alignment, but it doesn’t fix what you hear while you are performing. To solve the echo in your ears during the actual take, you need Direct Hardware Monitoring.
This method bypasses the computer entirely. The microphone sends audio directly to your headphones before it even reaches the software, resulting in zero perceptible delay.
The Hollyland Advantage
Most USB microphones require you to be tethered to the mic via a wired headphone jack to get zero-latency monitoring. This restricts your movement and creates cable clutter.
The Hollyland LARK MAX 2 solves this with Wireless Audio Monitoring. Because the system supports connection with OWS (Open Wearable Stereo) earphones, you can monitor your audio in real-time without being plugged into the receiver or the computer.
- Zero Computer Lag: You hear exactly what the mic captures the instant you speak.
- Total Freedom: You can stand up, move around, or interview a guest without taking off your headphones.
Troubleshooting Common Audacity Multitrack Errors
Multitrack recording introduces more variables than a simple voice memo, often leading to specific driver conflicts. Generally, if Audacity acts up, the issue lies in the communication between your hardware sample rates and the software settings.
Here is how to resolve the most frequent technical roadblocks quickly.
| Problem | The Fix |
|---|---|
| “Error opening sound device” | This usually happens when your hardware and software are trying to run at different speeds. Ensure your Project Sample Rate (bottom left in Audacity) matches your Windows/Mac sound settings. Set both to 48,000 Hz (48kHz). |
| Tracks are flat or silent | If the recording head moves but no waveform appears, check your signal path. Go to Audio Setup > Recording Device and confirm the correct microphone is selected (not “Microsoft Sound Mapper”). Also, ensure the recording volume slider in the toolbar is turned up. |
| Audio is Clipping (Red Bars) | If your waveform hits the top and bottom edges (turning red), your audio is distorted. Lower the gain immediately. Note: If you use the Hollyland LARK MAX 2, its internal 32-bit float recording creates a backup file that cannot clip, allowing you to save the audio even if it distorted in Audacity. |
| “Latency Correction” drift | If your overdub track gradually drifts out of sync with the backing track, your computer is struggling to process the audio in real-time. Close background apps (Chrome/Spotify) to free up CPU, or increase the Buffer Size in your audio driver settings. |
Frequently Asked Questions (FAQ)
Can I record 4 separate USB microphones in Audacity?
Generally, no. This is a common misconception. Audacity (and Windows) typically recognizes a USB microphone as its own separate “Sound Card.” By default, Audacity can only record from one input device at a time.
To record four USB mics simultaneously, you would need to use a “Virtual Mixer” like Voicemeeter Banana (on Windows) or create an Aggregate Device (on macOS). However, this is often unstable and prone to “clock drift” (where mics go out of sync). For reliable 4-person recording, it is much safer to use an XLR Audio Interface or a portable recorder.
Why can I only hear audio in one ear?
This happens because you are recording a mono signal (one microphone) onto a stereo track. If you are using a dual-channel receiver, channel 1 is often sent to the “Left” side and channel 2 to the “Right.”
The Fix:
- Click the dropdown arrow next to the Track Name.
- Select Split Stereo to Mono.

- This separates the Left and Right channels into two individual tracks.
- Delete the silent track (if any) and your audio will now play through both speakers (Center panned).
Does Audacity support ASIO drivers?
Not natively. ASIO is a driver protocol that allows for low latency and stable multitrack recording, but it is proprietary technology. Because Audacity is open-source, it cannot legally include ASIO support “out of the box.” Most users should stick to Windows WASAPI in the Audio Setup settings for the best balance of compatibility and latency.
Conclusion & Next Steps
Mastering multitrack recording in Audacity is the single most effective way to improve your production value. Whether you are layering vocals over a beat using Overdubbing or capturing a dynamic interview via the Stereo-Split method, separating your audio sources gives you total control during the edit.
However, even the perfect software settings cannot fix hardware limitations. If you rely on multiple USB microphones or unstable drivers, you will likely encounter sync issues and glitches.
Ready to simplify your setup?
If you want to record studio-quality interviews without the headache of complex mixers, check out the Hollyland LARK MAX 2. It streamlines the dual-microphone process by feeding distinct channels directly into your computer. Most importantly, its 32-bit float recording acts as a safety net, ensuring your audio never clips or distorts—even during loud laughter or heated debates.
Get your settings right, trust your gear, and hit record with confidence.