


.png)
Learning how to trim audio clips in Audacity is the first step to producing professional-sounding podcasts and voiceovers. Whether you need to remove a cough, shorten a long pause, or isolate a specific sound bite, Audacity offers several ways to clean up your tracks.
However, this free software uses specific terminology that can be confusing for beginners. If you don’t know the difference between “Cutting” and “Trimming,” you might accidentally delete the wrong part of your recording.
This guide covers the four fastest methods to edit your audio, starting with the essential tools you need to know.
Understanding Audacity’s Editing Tools (Read Before You Start)
Before you make your first edit, you need to understand one critical distinction. Audacity defines “Trimming” differently than most video editors. If you mix these commands up, you will get the opposite result of what you expect.
Here is how Audacity separates the commands:
- Cut / Delete: This removes the selected section and shifts the remaining audio together to close the gap. Use this to remove mistakes in the middle of a track.
- Trim: This keeps the selected section and deletes everything else. Use this to save a specific clip and discard the rest.
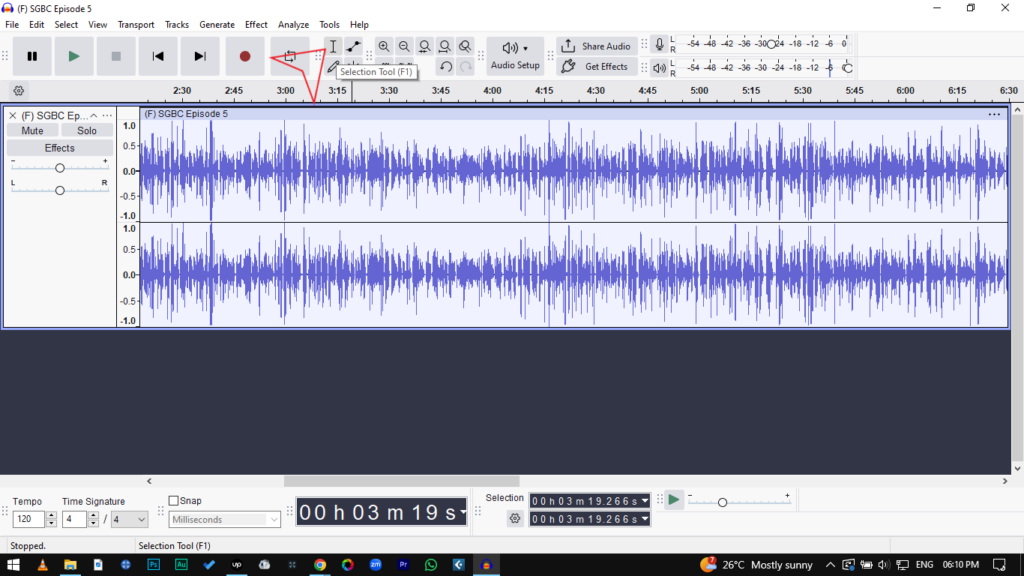
The One Tool You Need: The Selection Tool (F1)
You cannot perform any edits in Audacity without first telling the software what to edit. For 90% of your work, you will use the Selection Tool.
- Icon: It looks like a capital “I” (often called the I-Beam).
- Shortcut: Press F1 on your keyboard.
- How it works: This tool functions exactly like highlighting text in a Word document. Click on the waveform and drag left or right to highlight the audio you want to modify.
Once your audio is highlighted, you are ready to apply one of the methods below.
Method 1: How to Cut Out Unwanted Audio (The Standard Way)
This is the most common action for creators. If you have a cough, a long pause, or a mistake in the middle of your recording, you want to remove that section and have the remaining audio snap together seamlessly.
In Audacity, this is technically called a Delete or Cut.
Step-by-Step Instructions
- Select the Selection Tool: Click the I-Beam icon in the top toolbar (or press F1).
- Highlight the Audio: Click and drag your mouse across the waveform to highlight the bad section. The background of the selected area will turn light.
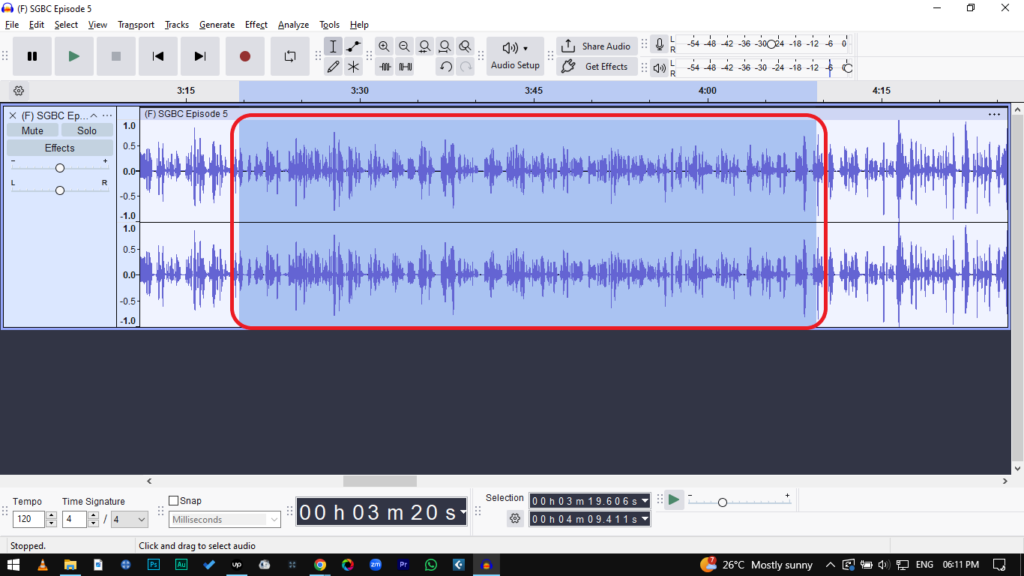
- Delete the Section: Press Delete or Backspace on your keyboard. You can also use the shortcut Ctrl + K (Windows) or Cmd + K (Mac).
- Check the Edit: The audio to the right of your cut will automatically shift left to fill the gap. Listen to the transition to ensure it sounds natural.
Pro Tip: Preview Before You Cut
Before you press delete, press the “C” key. This triggers the “Cut Preview” feature. Audacity will play the audio immediately before and after your selection, skipping the part you highlighted. This lets you hear exactly what the edit will sound like without modifying the file first.
Method 2: Using the “Trim Audio” Command (Isolating a Clip)
While the Delete key removes what you highlight, the Trim Audio command does the exact opposite: it deletes everything except your selection.
This is the fastest workflow when you need to extract a specific sound bite from a long recording, such as isolating a single quote from an hour-long interview. Instead of deleting the beginning and then deleting the end manually, you can strip away the excess in one move.
How to Trim Audio in Audacity:
- Select the Selection Tool (I-Beam icon).
- Click and drag across the waveform to highlight the specific section you want to keep.
- Go to Edit > Remove Special > Trim Audio.
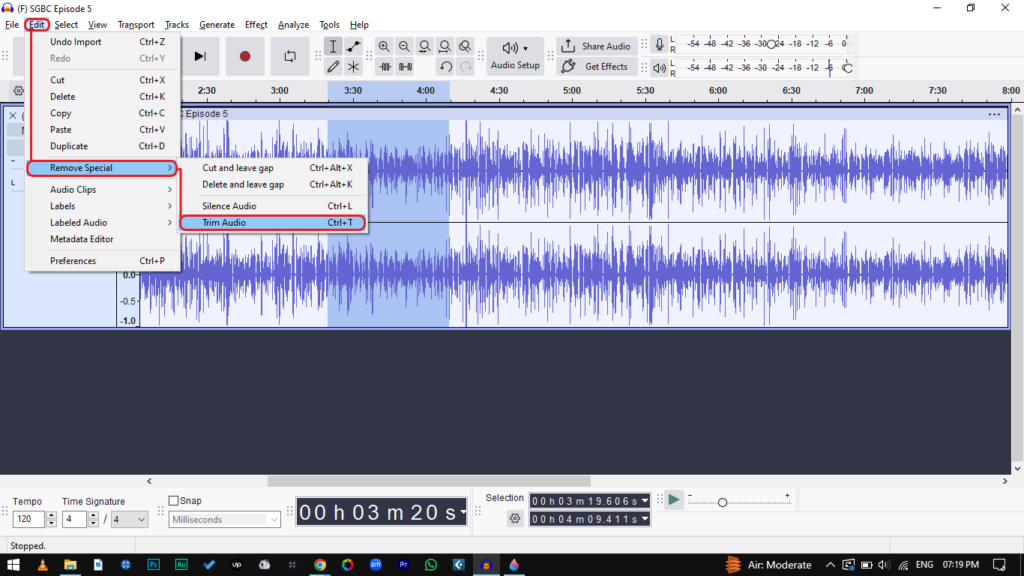
- Shortcut: Press Ctrl + T (Windows) or Cmd + T (Mac).
The Result:
Everything outside your highlighted selection disappears. Note that the remaining clip stays in its original position on the timeline. To move it to the start, simply drag it using the Clip Handle.
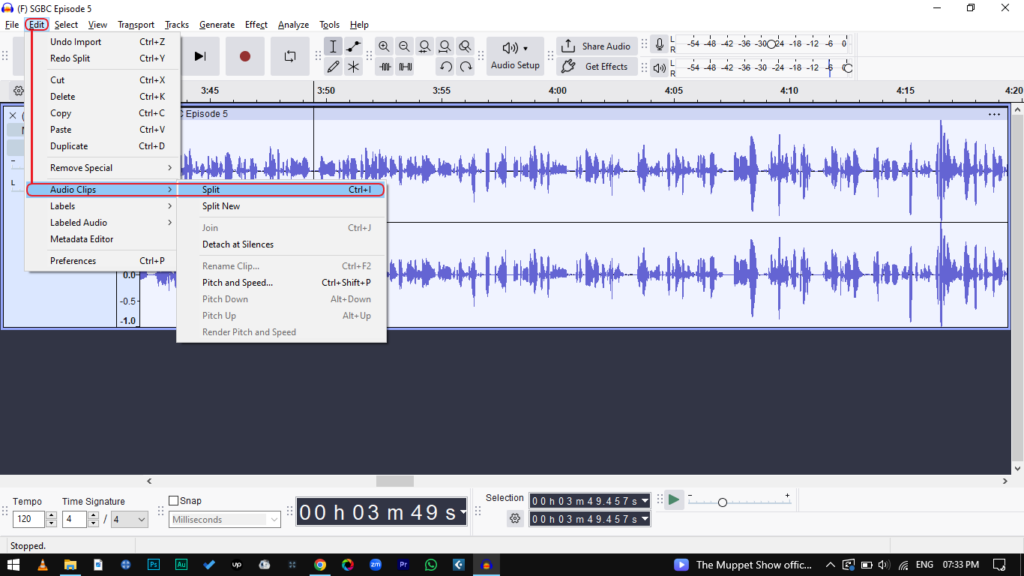
Method 3: Splitting Clips (Non-Destructive Trimming)
Sometimes you don’t want to delete audio; you simply need to create a gap or move a section to a different spot. This is where Splitting comes in. Unlike the “Delete” method, splitting breaks a continuous waveform into two separate clips that can be moved independently.
This is essential if you need to insert a pause, rearrange the order of sentences, or make space for a sound effect.
How to Split a Track
- Select the Selection Tool (F1).
- Click the exact point on the waveform where you want to make the split.
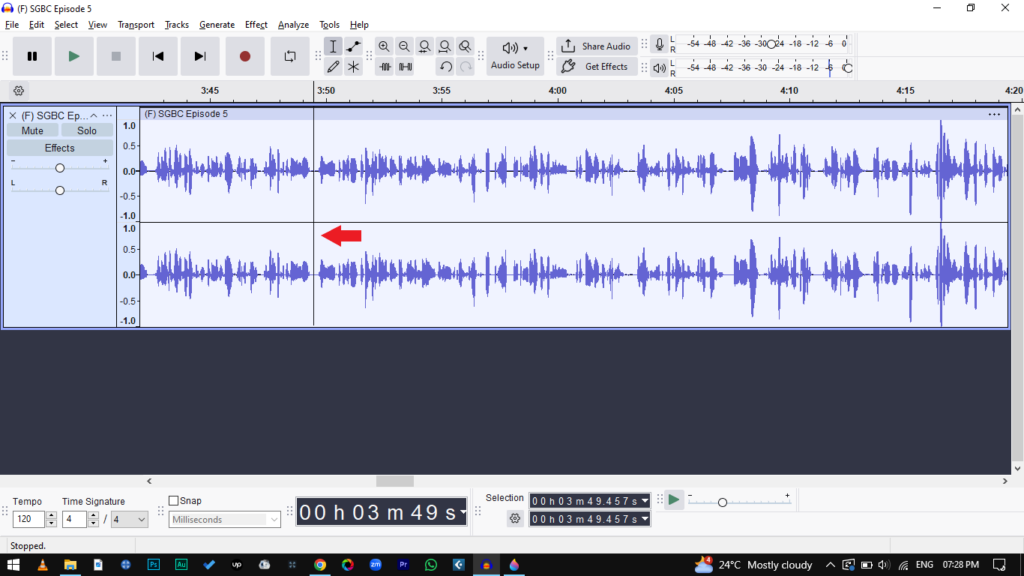
- Press Ctrl + I (Windows) or Cmd + I (Mac). You can also go to Edit > Audio Clips > Split.
- A thick vertical line will appear, indicating the track is now two distinct clips.
How to Move Separated Clips
Once your audio is split, you can move the pieces to adjust timing.
- In Modern Audacity (v3.1+): Hover your mouse over the Clip Handle (the name bar at the top of the waveform). Your cursor will turn into a hand icon. Click and drag the clip left or right.
- In Older Audacity (v3.0 and below): You must manually select the Time Shift Tool (double arrow icon) or press F5 before dragging.
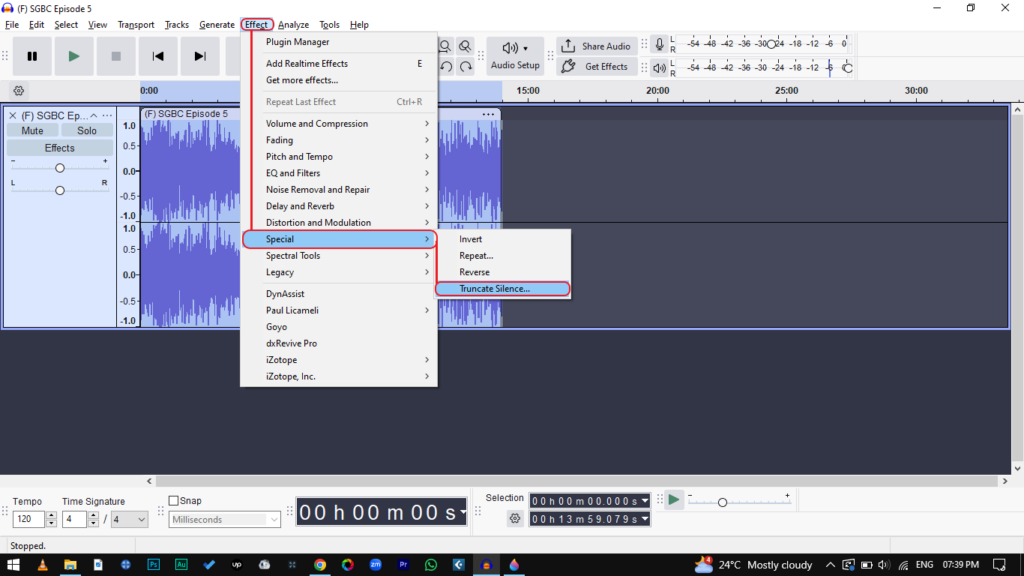
Method 4: How to Automatically Trim Silence (For Podcasters)
If you are editing a podcast or a long voiceover, manually searching for every awkward pause is tedious. Audacity’s Truncate Silence effect automates this, tightening up your dialogue in seconds without altering the pacing of the actual speech.
Here is how to remove long pauses automatically:
- Select Your Track: Press Ctrl + A (Windows) or Cmd + A (Mac) to select the entire recording.
- Open the Effect: Go to Effect > Special > Truncate Silence.
- Configure Settings: Adjust the parameters (see below) to fit your room noise.
- Apply: Click OK. Audacity will scan the track and shorten any silence that exceeds your limit.
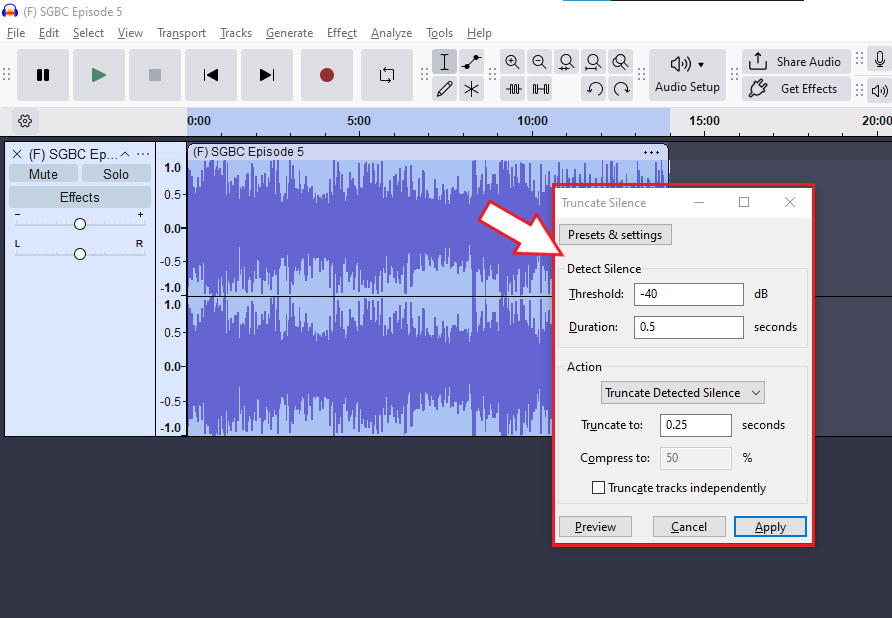
Recommended Settings
To avoid cutting off quiet breaths or the ends of sentences, use these conservative settings:
- Threshold: -40dB. This tells Audacity what counts as “silence.” If set too high (e.g., -20dB), you might cut off soft words.
- Duration: 0.5 seconds. Any silence shorter than this is ignored.
- Truncate to: 0.25 seconds. This ensures the dialogue flows naturally rather than sounding robotic or rushed.
Pro Tips for Professional-Sounding Edits
Trimming audio is easy, but making those cuts sound invisible requires finesse. If you just delete a section and export, you might hear a digital “click” or an abrupt change in room tone. Here is how to polish your cuts so the listener never knows they happened.
1. Eliminate Clicks with “Zero Crossings”
A “click” or “pop” usually happens when you cut a waveform while it is at a peak or valley. To fix this, you need to cut exactly where the waveform crosses the center line (silence).
Audacity can do this automatically:
- Highlight the audio you want to cut.
- Press Z on your keyboard (or go to Select > At Zero Crossings).

- Perform your Cut (Ctrl+K) or Trim (Ctrl+T).
The selection edges will shift slightly to the nearest “zero” point, ensuring a seamless transition.
2. Smooth Transitions with Micro-Fades
Even with zero crossings, cutting out background noise can leave the remaining audio sounding unnatural. If a sentence ends abruptly, apply a tiny fade to soften the edge.
- Highlight a very small section (milliseconds) at the end of your clip.
- Go to Effect > Fading > Fade Out.
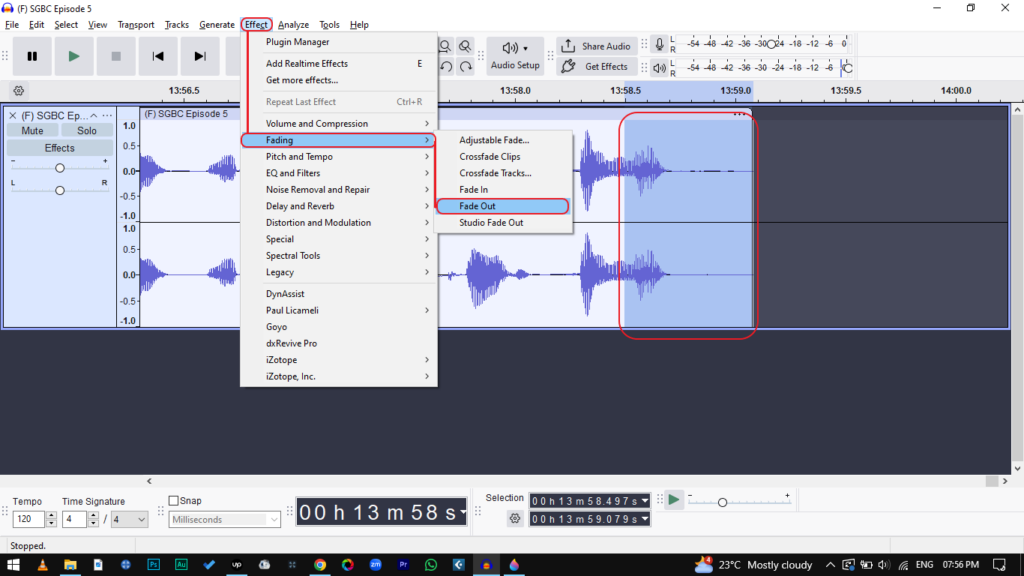
- Repeat for the beginning of the next clip using Fade In.
3. The Best Edit is the One You Don’t Have to Make
The most time-consuming part of editing isn’t trimming content—it’s fixing bad audio. If you are constantly trimming out distortion, heavy background hiss, or “peaking” (where the audio gets too loud and sounds crunchy), your recording gear is likely holding you back.
To drastically reduce your editing time, focus on capturing a clean source. We recommend the Hollyland LARK MAX 2 for creators who want “edit-ready” audio.


- Never Clip Again: The LARK MAX 2 features 32-bit Float Recording. This technology captures such a wide dynamic range that it is virtually impossible to distort the audio. If a guest screams or laughs loudly, the waveform won’t “clip”—you can simply lower the volume in Audacity, and the detail remains perfect.
- Studio Quality Capture: With a 48kHz/24-bit sampling rate, the LARK MAX 2 delivers rich, professional sound right out of the receiver.
When your raw waveform is clean, you stop spending hours “fixing” audio and spend minutes simply trimming the best parts.
Summary: Which Method Should You Use?
Using the wrong tool can accidentally desync your audio or delete parts of the track you intended to keep. Use this quick reference guide to match your goal with the correct command.
| Goal | Method | Shortcut (Windows / Mac) |
|---|---|---|
| Remove a mistake in the middle | Delete / Cut | Delete or Ctrl + K / Cmd + K |
| Keep only one section | Trim Audio | Ctrl + T / Cmd + T |
| Move sections apart | Split Clip | Ctrl + I / Cmd + I |
| Remove long pauses automatically | Truncate Silence | Effect > Special > Truncate Silence |
Frequently Asked Questions (FAQ)
Can I undo a trim in Audacity?
Yes. Audacity allows for unlimited undo/redo steps within your current session. If you accidentally delete the wrong section, press Ctrl + Z (Windows) or Cmd + Z (Mac) to reverse it.
How do I trim audio in Audacity without moving the other tracks?
When you delete a section in one track, the remaining audio shifts left, which can de-sync it from background music or other mics. To prevent this, enable Sync-Lock Tracks by going to Tracks > Sync-Lock Tracks. Now, when you delete a section, Audacity removes the corresponding timespan in all synced tracks, keeping everything aligned.
Why does my audio click after trimming?
A click occurs because the cut was made where the waveform was above or below the zero line, causing a sudden jump in voltage. To fix this, press Z (At Zero Crossings) before making your cut, or add a tiny Fade In at the start of the new clip.
Conclusion
Mastering the Delete, Trim (Ctrl+T), and Split commands in Audacity allows you to turn a raw recording into a polished track quickly. Whether you are removing a cough from a podcast or isolating a sound bite, these four methods give you complete control over your timeline.
However, the most efficient workflow starts before you even open the software. If you find yourself spending hours trimming out background hiss, the problem isn’t your editing skills—it’s your capture source. By using a quality wireless microphone system like the Hollyland LARK MAX 2, you ensure your raw audio is clean, crisp, and distortion-free, letting you focus on the story rather than technical repairs.


