.png)
If you have ever plugged a microphone into your computer, hit record, and felt confused because you couldn’t hear your own voice in your headphones, you aren’t alone. Learning how to monitor audio while recording in Audacity is one of the first hurdles new creators face.
By default, Audacity keeps your headphones silent to prevent feedback loops. While this protects your ears, it makes it hard to know if you are speaking too loudly or if there is background noise ruining your take.
Fortunately, there are two ways to fix this: a quick setting toggle inside Audacity (which can introduce a slight echo) and a professional hardware method that offers zero delay. Here is how to set them up.
The Basics: Why Can’t I Hear Myself?
The silence in your headphones is intentional, not a glitch. Audacity disables live monitoring by default to prevent audio feedback.
If you were using speakers, the sound from the computer would re-enter the microphone, amplify, and create a screeching noise that could damage your equipment. To hear yourself, you have to manually bypass this safety setting.
Before you start clicking buttons, you need to know the difference between Audacity’s two monitoring modes:
- Software Playthrough: This lets you hear your live voice while recording. This is the setting you are looking for.
- Overdub: This lets you hear other tracks (like a backing beat) while you record a new one. You need this for music or podcast intros, but it won’t help you hear your own microphone.
Method 1: Enabling “Software Playthrough” (The Built-in Setting)
If you are using a standard USB microphone and want to hear your voice through your computer’s headphone jack, you need to turn on Software Playthrough.
This tells Audacity to take the signal from your mic, process it, and send it back to your headphones.
How to Toggle Playthrough Quickly
The fastest way to turn this on is via the Transport menu:
- Connect your microphone and headphones.
- Go to Transport in the top menu bar.
- Hover over Transport Options.
- Click Enable audible input monitoring (on/off) so a checkmark appears.

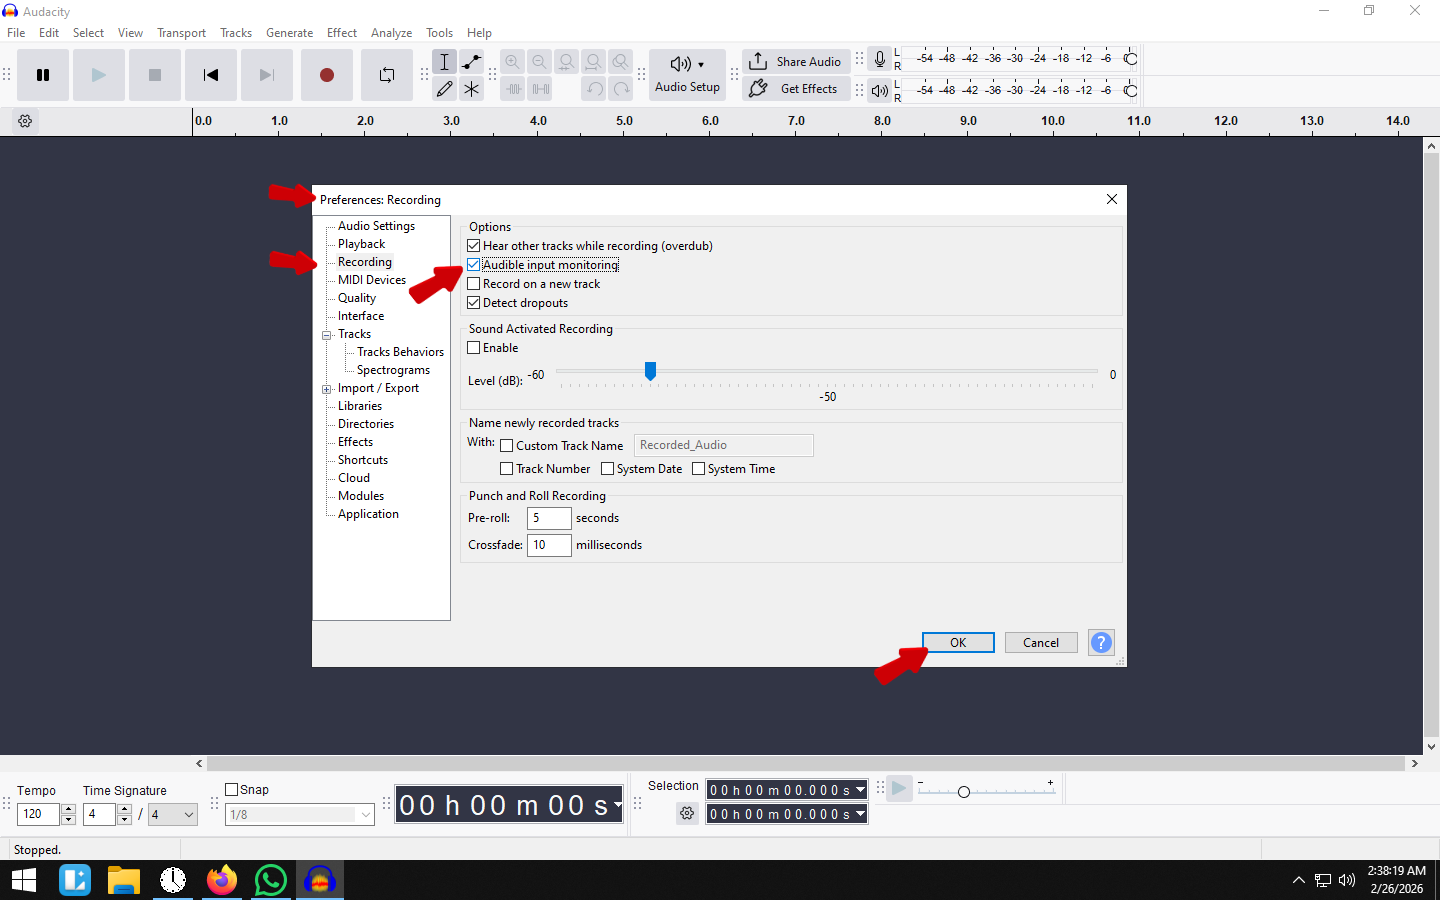
The Permanent Method (Preferences)
If you want Audacity to remember this setting every time you open the app:
- Go to Edit > Preferences (Windows) or Audacity > Preferences (Mac).

- Select Recording from the sidebar.
- Check the box labeled Audible input monitoring.
- Click OK.

⚠️ Warning: The “Echo” Effect
Software Playthrough is convenient, but it comes with a catch: Latency.
Because the audio has to travel into the computer, through the software, and back out to your ears, there is often a slight delay. You might hear your voice a split-second after you speak. This “speech jammer” effect can be distracting and make it difficult to talk naturally.
Method 2: Hardware Direct Monitoring (The Professional Solution)
If the echo from Method 1 is throwing off your timing, the professional fix is Hardware Direct Monitoring.
Unlike software monitoring, which relies on your computer’s processing power, Direct Monitoring lets you hear the audio signal before it enters the computer. This creates a zero-latency experience where you hear yourself exactly as you sound, in real-time.
To use this method:
- Turn OFF “Audible input monitoring” in Audacity (to avoid hearing a double echo).
- Plug your headphones directly into the 3.5mm jack on your USB microphone or Audio Interface (not your computer).
- Turn up the “Monitor” or “Direct” knob on your device.
The Wireless Solution: Hollyland LARK MAX 2
Achieving zero-latency monitoring is easy when you are sitting at a desk, but it gets complicated if you need to move around. Traditional wireless mics often force you to monitor through the camera or computer, bringing that distracting lag back.
The Hollyland LARK MAX 2 solves this with a dedicated Wireless Audio Monitoring feature.

Hollyland LARK MAX 2 - Premium Wireless Microphone System
A premium wireless microphone for videographers, podcasters, and content creators to capture broadcast-quality sound.
Key Features: Wireless Audio Monitoring | 32-bit Float | Timecode
By pairing the system with Hollyland’s new OWS (Open Wearable Stereo) earphones, you can monitor your audio directly from the receiver. This bypasses the computer entirely, allowing you to:
- Monitor in Real-Time: Hear your voice exactly as it happens, with zero delay.
- Check Levels Instantly: Catch background noise or interference before it ruins the take.
- Secure Your Audio: The LARK MAX 2 also features 32-bit Float recording. Think of this as a safety net; even if your audio peaks (distorts), 32-bit float allows you to recover the audio in post-production without quality loss.
Troubleshooting Common Monitoring Issues
Even with the right settings, Audacity can be finicky. Here is how to fix the three most common monitoring headaches.
1. Why is there an echo?
If you hear your voice repeating a split-second after you speak, you are experiencing latency caused by Software Playthrough.
How to fix it:
- The Adjustment: Go to Edit > Preferences > Audio Settings or Audacity > Preferences > Audio Settings. Lower the “Buffer length” to 100 milliseconds or lower.


- The Trade-off: If you go too low, the audio will start stuttering or clicking.
- The Real Fix: Switch to Hardware Direct Monitoring (Method 2) to eliminate the computer processing entirely.
2. Why is “Software Playthrough” greyed out?
If you can’t click the option, your Audio Host settings might be incompatible.
How to fix it:
- Change the Host: On the main toolbar, switch the “Audio Setup” from MME to Windows WASAPI (Windows) or Core Audio (Mac). WASAPI is generally faster and more stable.


- Rescan Devices: Go to Transport > Rescan Audio Devices to refresh the connection if your mic was unplugged.

3. Feedback Loops (Loud Screeching Noise)
If you enable monitoring and immediately hear a painful screech, your microphone is picking up the sound from your speakers and amplifying it infinitely.
The Fix:
- Never use speakers with Software Playthrough enabled.
- Always use headphones, preferably closed-back ones that prevent sound from leaking out and bleeding back into the mic.
Advanced Tip: Reducing Latency in Audacity
If you must use Software Playthrough (perhaps your mic doesn’t have a headphone jack), you can try to minimize the delay by tweaking your buffer settings.
- Go to Edit > Preferences > Latency or Audacity > Preferences > Audio Settings.

- Look at Buffer length. The default is usually 100 milliseconds.
- Lower the value: Try changing this to 50ms.

- Test it: Record a short clip. If the audio is clear, try going lower. If you hear static or clicking, raise the number slightly.
Pro Tip: Close background apps like Chrome or video editors. High CPU usage increases latency.
Frequently Asked Questions (FAQ)
Can I monitor audio in Audacity without headphones?
No. If you use speakers, the microphone will pick up the sound, creating a feedback loop (a loud screeching noise). Always use headphones.
Does Audacity have real-time effects monitoring?
Generally, no. Audacity applies effects (like reverb) after the recording is finished. When monitoring, you will hear the raw, “dry” signal from your microphone. To hear effects live, you generally need an external audio interface or mixer.
How do I record over a backing track?
To hear a music track while recording your voice, enable Overdub in Transport > Transport Options. You can have both Overdub (hear the music) and Software Playthrough (hear yourself) enabled at the same time.
Conclusion
Monitoring your audio in real-time is the best way to catch mistakes before they become permanent, but the method you choose matters.
Software Playthrough is the quick, free fix already built into Audacity, but it often comes with distracting lag. If you find yourself stumbling over your words because of the echo, it’s time to switch to Hardware Direct Monitoring.
Whether you plug headphones directly into your USB mic or upgrade to a wireless system like the Hollyland LARK MAX 2 for zero-latency freedom, the goal is the same: hear exactly what you are recording, the moment it happens.