.png)
For years, if you asked how to use voice isolation and enhancer in Audacity, the answer was disappointing. You were stuck with clumsy EQ cuts or destructive noise reduction tools that often left your audio sounding robotic or “underwater.”
That has changed. While the standard version of Audacity is still a traditional wave editor, the recent integration of Intel OpenVINO plugins has completely overhauled the software. These free extensions give you access to AI-powered features that used to require expensive subscriptions to Adobe Audition or iZotope RX.
Voice Isolation in Audacity uses these AI algorithms to separate vocal frequencies from everything else—whether that’s traffic noise, room echo, or a full music track.
Unlike standard noise reduction, which simply lowers the volume of a static “hiss,” these AI tools analyze the audio to figure out what is a human voice and what isn’t. This allows you to achieve two main goals:
- Dialogue Enhancement: stripping away background noise to make a podcast host sound like they are in a studio.
- Music Separation: Splitting a song into individual tracks (stems), separating Vocals from Drums and Bass.
However, these tools are not installed by default. To get these results, you have to move beyond the native “Noise Reduction” effect and set up the specific AI modules first.
Method 1: Installing the OpenVINO AI Effects (Required)
Stop looking for a “Voice Isolation” button in your standard effects menu—it isn’t there.
To actually isolate a voice from music or heavy background noise, you need the Intel OpenVINO plugin suite. This free add-on runs AI models locally on your computer to process the audio.
How to Install and Enable OpenVINO
Follow these exact steps to get the AI features running:
- Download the Plugin: Go to the official Audacity AI Plugins download page (https://www.audacityteam.org/download/openvino). Find the latest release and download the installer file (usually an .exe for Windows and .pkg for MacOS).

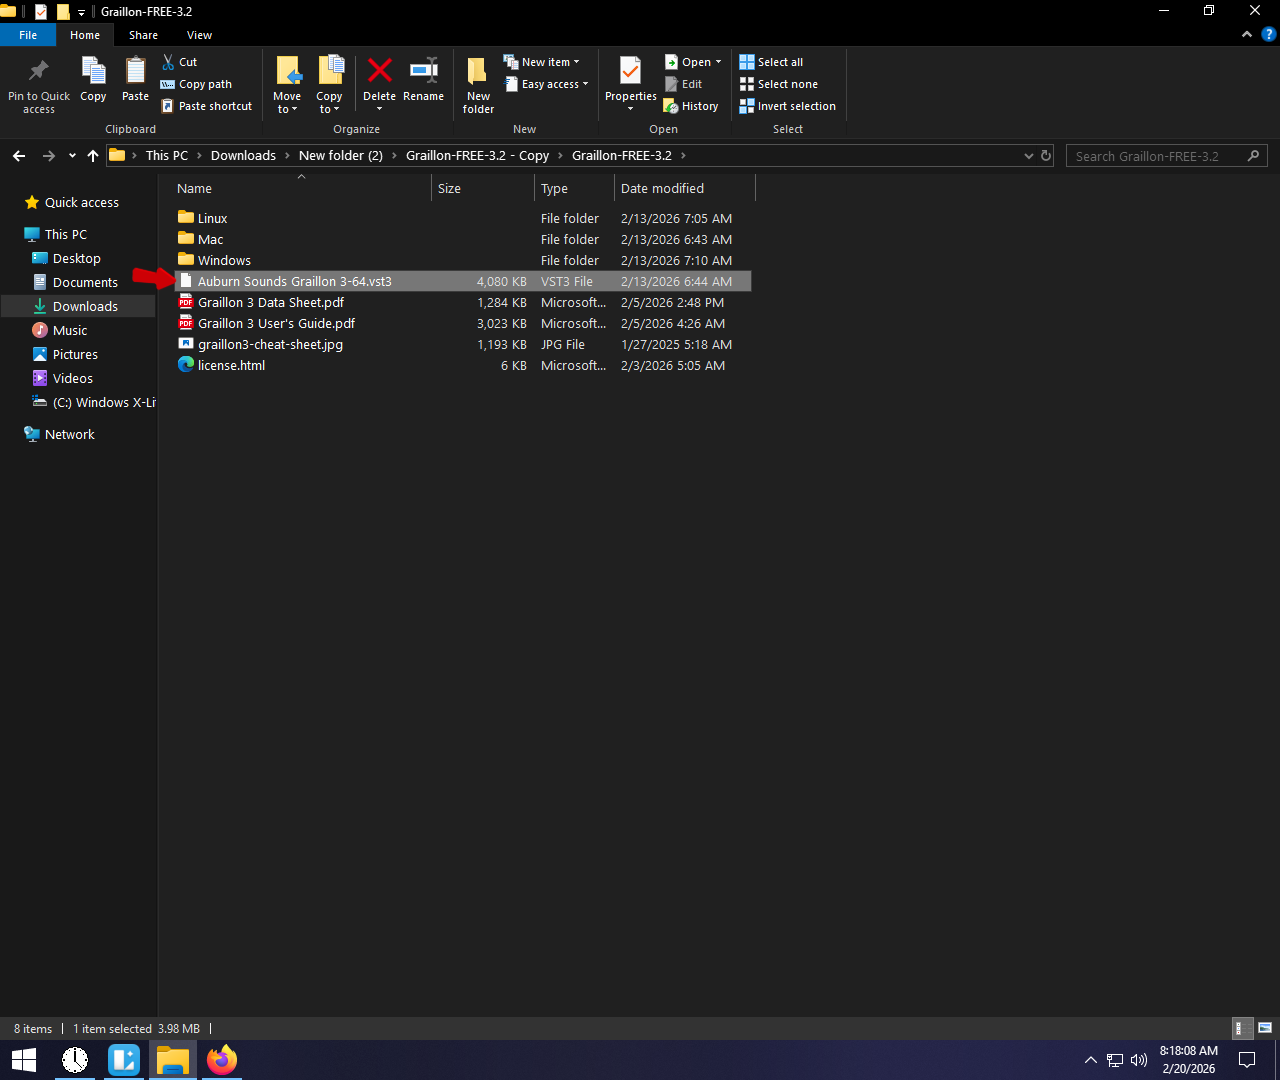
- Run the Installer: Close Audacity completely before you start. Run the installer and follow the prompts. This puts the necessary AI models into your plugin folder.


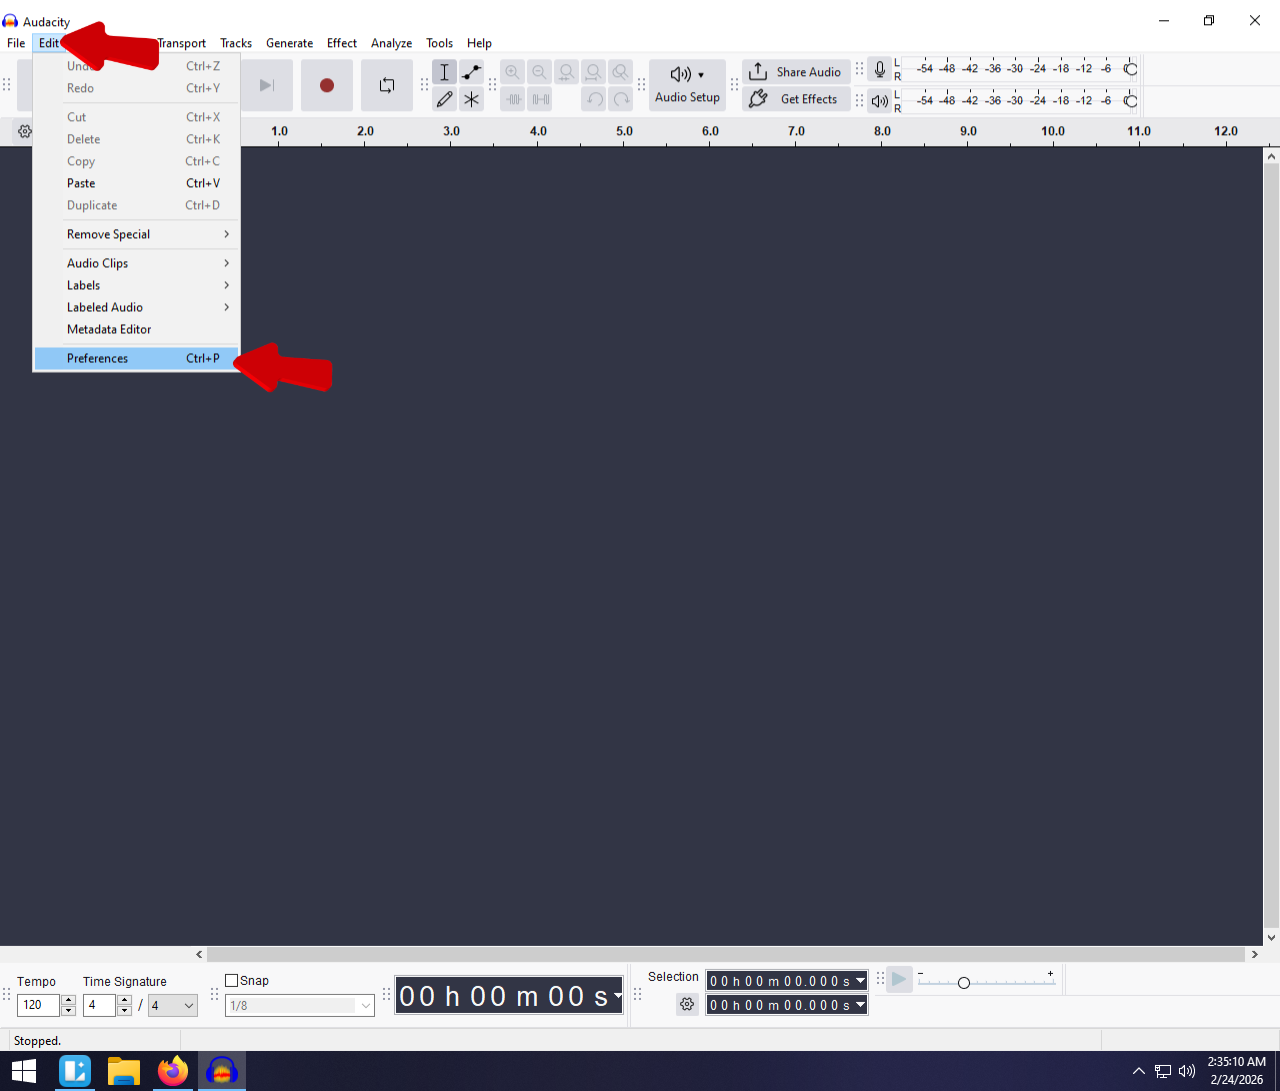
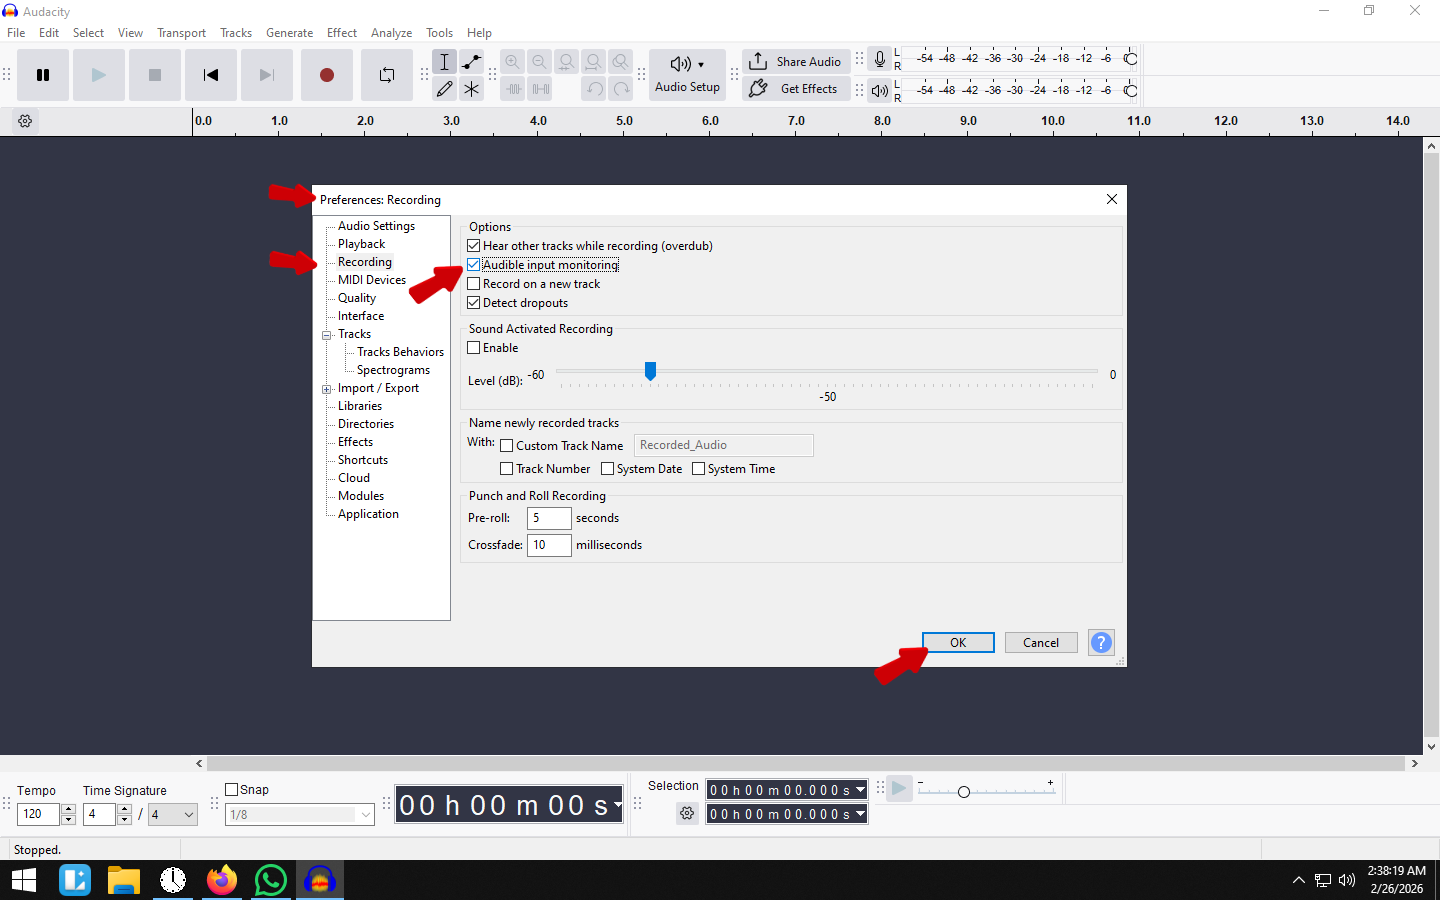
- Enable the Modules: Open Audacity. Go to the menu bar and click on Audacity > Preferences > Modules. Look for mod-openvino in the list. Change the status from New or Disabled to Enabled.


- Restart Audacity: Click OK, then close and reopen Audacity. Check your Effect menu. You should now see a new category for OpenVINO or AI Effects.

Method 2: Using AI Noise Suppression for Voice Isolation
Once the plugins are installed, you can skip the tedious, old-school method of noise profiling. The AI Noise Suppression tool uses deep learning to automatically distinguish between human speech and unwanted background noise.
This is the most effective way to save a voice track recorded in a noisy environment.
Step-by-Step Guide
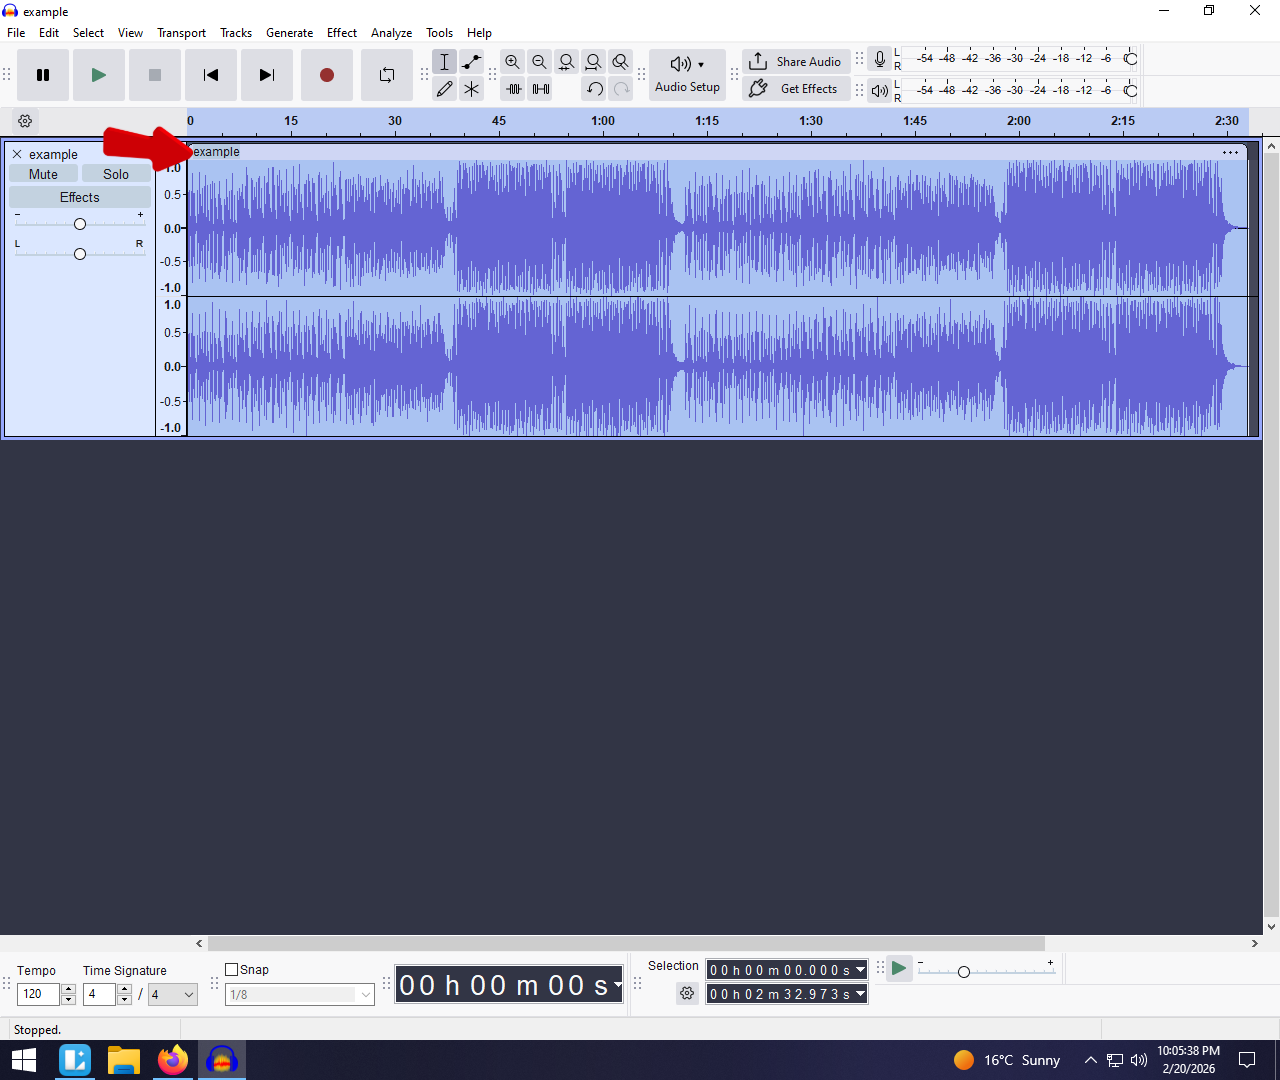
- Select Your Track: Click the track header (the panel on the left) to highlight the waveform.

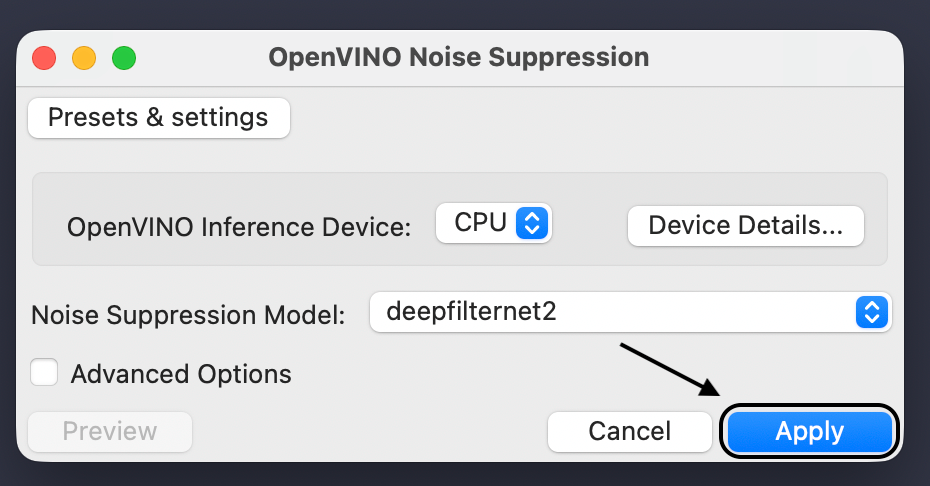
- Open the Effect: Go to the top menu bar and click Effect. Look for the OpenVINO AI Effects folder or scroll down to OpenVINO Noise Suppression.

- Apply the Effect: A dialog window will appear. You don’t need to capture a noise print first. Simply click Apply.
Note: AI processing is heavy on your computer. It might take a moment to finish depending on the length of your recording and your CPU speed.
Why This Beats the “Old” Noise Reduction Tool
Long-time Audacity users are familiar with the standard Noise Reduction effect. While useful, it has a major flaw: it requires a Noise Profile. You have to find a section of silence, tell Audacity “this is noise,” and hope that noise stays the same throughout the recording.
AI Noise Suppression is better because:
- It handles dynamic noise: If a car drives by or a dog barks, the standard tool fails because that sound wasn’t in the “profile.” The AI tool recognizes it as “not a voice” and removes it.
- Fewer Artifacts: Standard reduction often leaves “tinkling” digital noises when pushed too hard. The AI model usually leaves the voice sounding more natural.
Method 3: Using Music Separation to Isolate Vocals
Creating a karaoke track or extracting an acapella used to be a nightmare in Audacity. The old “Vocal Reduction” effect relied on stereo cancellation, which often deleted the drums and bass along with the singer, leaving you with a hollow mess.
With the OpenVINO Music Separation tool, Audacity can now perform professional stem separation. The AI analyzes the file and physically splits the song into distinct tracks.
How to Split Tracks
- Import Your Audio: Drag your song (MP3 or WAV) into the timeline.
- Select the Track: Click the header to highlight the waveform.

- Open the Effect: Go to Effect > AI Audio > Music Separation.

- Choose Your Mode: Select 4 Stem for the most control. This will separate the audio into:
- Vocals
- Drums
- Bass
- Other (Guitar, Synths, etc.)
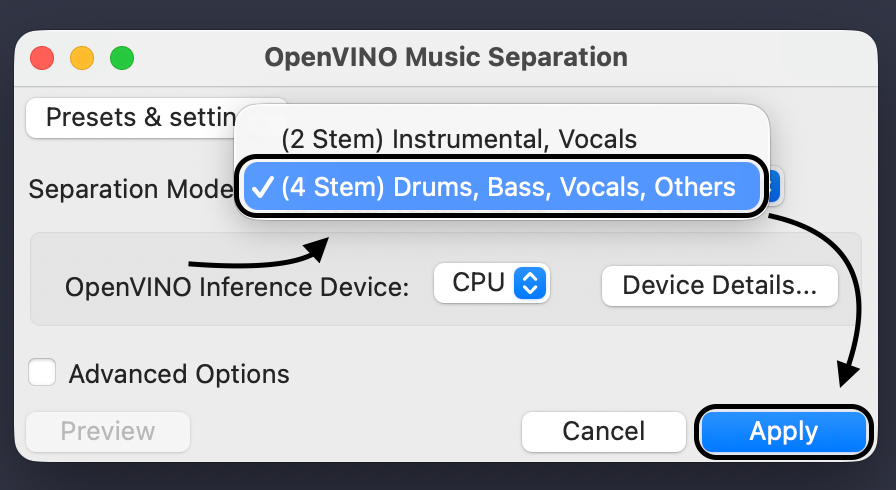
- Apply: Click Apply. This creates four new mono tracks below your original file.
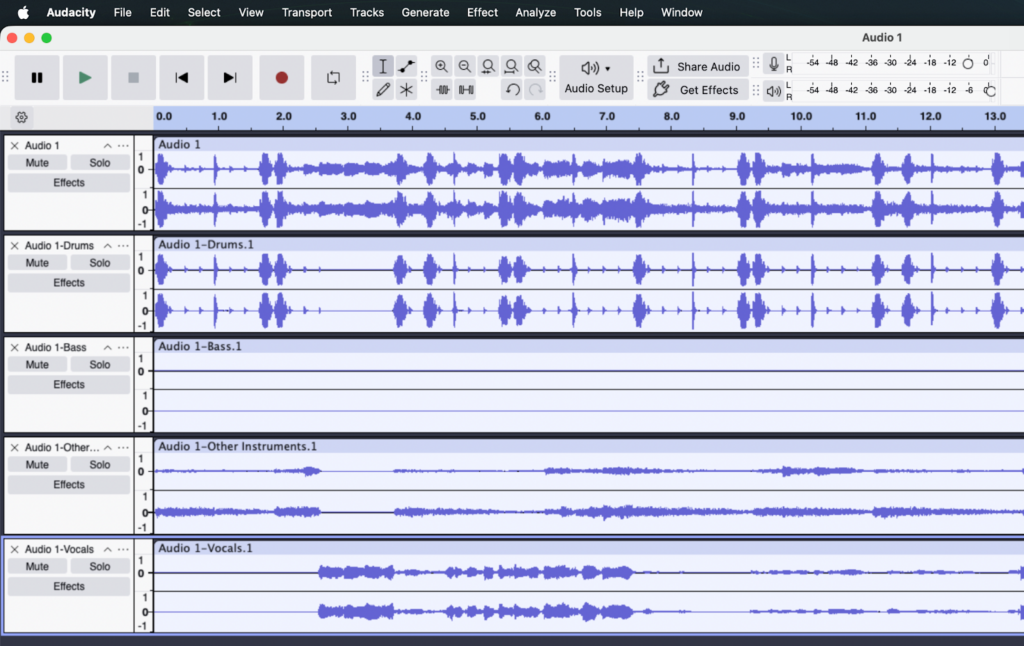
Managing Your Separated Stems
Once the processing is done, Audacity will mute your original track. Now you can use the Mute and Solo buttons on the new tracks to get what you need:
- For Karaoke: Click Mute on the Vocals track. You are left with a clean instrumental.
- For Acapellas: Click Solo on the Vocals track. This isolates the voice completely so you can use it for a remix.
Pro Tip: High-quality WAV or FLAC files will always give you cleaner isolated vocals than MP3s. MP3 compression can add “swirly” digital artifacts to the isolated voice.
Method 4: The “Enhancer” Chain (Making the Voice Sound Pro)
Isolating your voice is only half the battle. While AI noise suppression removes background noise, it can sometimes leave your audio sounding thin. To get that rich, authoritative “radio voice,” you need to run your audio through a standard processing chain.
In professional audio, this is often called the Broadcast Chain. Here is how to build it in Audacity using three native effects.
Step 1: Filter Curve EQ (Shape the Tone)
The Equalizer (EQ) lets you cut frequencies that sound bad and boost the ones that add clarity.
- Select your vocal track.
- Go to Effect > EQ and Filters > Filter Curve EQ.

- Cut the Mud: Drag the line on the far left all the way down for everything below 80Hz. This removes low-end rumble (like A/C hum) that makes audio sound muddy.
- Boost the Presence: Create a small upward bump (about +3dB) in the 3kHz to 5kHz range. This makes words easier to understand on phone speakers.

Step 2: Compressor (Even Out Volume)
Untreated recordings have high dynamic range—you might whisper one sentence and laugh loudly in the next. A Compressor automatically lowers the loud parts and boosts the quiet parts so your listeners don’t have to ride the volume knob.
- Go to Effect > Volume and Compression > Compressor.

- Use these settings for spoken word:
- Threshold: -15dB to -20dB
- Ratio: 3:1
- Make Up Gain: 0db

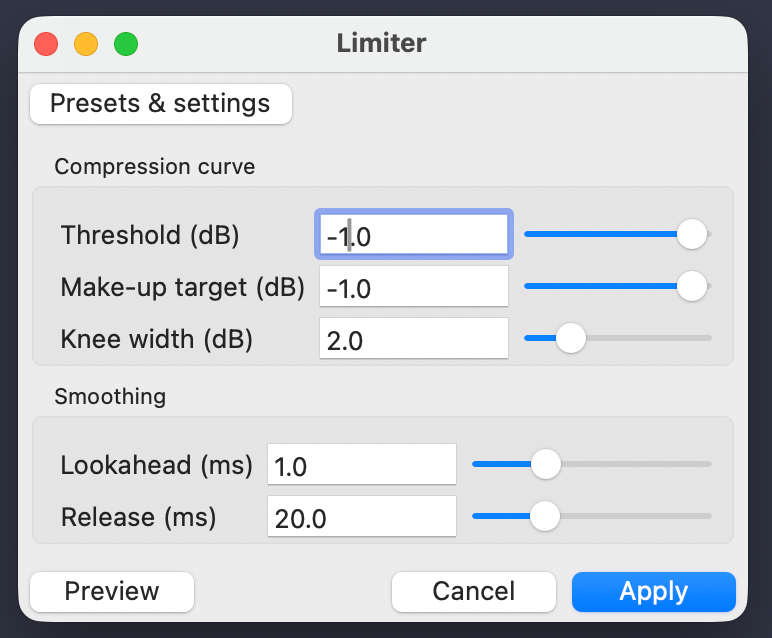
Step 3: Limiter (The Safety Net)
After EQ and Compression, your audio might be loud enough to “clip” (distort). The Limiter acts as a brick wall, ensuring your audio is loud but never distorted.
- Go to Effect > Volume and Compression > Limiter.

- Set Limit to (dB) to -1.0 dB.
- Apply the effect.
The “Hardware Cheat Code”: Skip the Editing with Hollyland
While Audacity’s OpenVINO plugins are impressive, they come with a trade-off. Aggressive software isolation often leaves digital artifacts, making your voice sound robotic. This happens because the software is deleting frequencies it thinks are noise.
The most efficient workflow isn’t fixing bad audio—it’s preventing it. If you capture a clean, isolated signal at the source, you can skip the complex repair chains entirely.
This is where the Hollyland LARK MAX 2 acts as a production cheat code. It shifts the workload from your computer processor to the microphone itself.
Here is why hardware isolation beats software repair:
- Professional ENC (Environmental Noise Cancellation): Unlike Audacity’s noise reduction, which guesses what to remove after the fact, the LARK MAX 2 identifies and cancels background noise (traffic, wind) before it records. You get a natural, isolated voice track immediately.
- 32-bit Float Recording: One of the hardest things to fix in Audacity is audio that is distorted or too quiet. The LARK MAX 2 features 32-bit float recording, which captures such a massive dynamic range that it is mathematically impossible to clip the audio. You can scream or whisper, and the audio remains perfectly usable without any repair tools.
- Real-Time Monitoring: You don’t have to guess if your isolation is working. The system includes OWS earphones, letting you hear exactly what the mic is capturing in real-time.
By upgrading your input source, you aren’t just getting better sound; you are buying back the hours you would otherwise spend tweaking EQ curves.
Common Pitfalls When Using Voice Isolation
Audacity’s new AI tools are not magic wands. Relying too heavily on software to fix bad audio often introduces new problems. Here are three mistakes to avoid.
1. The “Underwater” Artifact Effect
If you apply aggressive noise suppression, the software begins to attack the frequencies of your voice along with the noise. This results in a bubbly, robotic, or “underwater” sound.
The Fix: Always start with the effect strength at 50% or lower. It is better to have a tiny amount of background hiss with a natural-sounding voice than a perfectly silent background with a robotic voice.
2. High Latency on Older Computers
Audacity’s OpenVINO plugins run locally on your computer, not in the cloud. This requires significant processing power. If you are using an older laptop, Audacity may freeze while analyzing the track, or playback might stutter.
Pro Tip: If your computer struggles, apply the effect to short, 10-second selections first to test the results before processing the entire episode.
3. Destructive Editing
Audacity performs “destructive” editing. When you apply an effect like Music Separation directly to the waveform, that change is permanent once you save and close the project.
Always follow the “Safety Duplicate” rule:
- Select your original audio track.
- Press Ctrl + D (Cmd + D on Mac) to duplicate it.
- Mute the original track and apply your AI effects only to the duplicate.

Frequently Asked Questions (FAQ)
Is Audacity voice isolation free?
Yes. Audacity is open-source, and the Intel OpenVINO AI plugins are also free. Unlike paid alternatives like iZotope RX, you do not need a subscription. However, you must download and install the plugins separately from the main Audacity installer.
Can I remove vocals from a song in Audacity?
Yes. The OpenVINO Music Separation effect uses deep learning to cleanly split a track. It separates a mixed song into up to four stems: Vocals, Drums, Bass, and Other Instruments, allowing you to mute the vocals entirely.
Why does my voice sound robotic after noise reduction?
This is called “digital artifacts.” It happens when you set the “Sensitivity” or reduction levels too high. The software struggles to distinguish between the noise and your voice, effectively deleting parts of your speech. Try running the effect with lower settings or switching to AI Noise Suppression.
What is the best mic setting to avoid background noise?
The best setting is a Low Cut (or High-Pass) Filter. This cuts out low-frequency rumble before it ruins the recording. For even better results, use a microphone with ENC (Environmental Noise Cancellation) like the Hollyland LARK MAX 2, which isolates your voice from the environment before it ever reaches your computer.
Conclusion
Audacity has come a long way from simple noise reduction. With the Intel OpenVINO AI plugins, you now have access to studio-grade voice isolation and music separation tools for free. Whether you are salvaging a noisy podcast or remixing a song, these tools bridge the gap between amateur and professional editing.
However, “fixing it in post” should always be your backup plan. Relying heavily on AI isolation can lead to robotic audio and long render times.
If you want to skip the hours of tweaking and waiting for AI processing, the real solution lies in your hardware. Tools like the Hollyland LARK MAX 2 solve these problems at the source. By using Professional ENC and 32-bit Float recording, you capture broadcast-ready audio that requires zero “rescue” work.
Your next steps:
- Download the OpenVINO plugins if you have existing footage that needs saving.
- Upgrade your input chain with the LARK MAX 2 to future-proof your recordings and reclaim your editing time.