.png)
You have finished recording, editing, and polishing your audio. You hit “Save,” attach the file to an email, and send it off. Ten minutes later, you get a reply: “I can’t open this file.”
This is the most common frustration for new Audacity users. The issue isn’t your audio; it’s the file format. You likely sent an Audacity Project file (.aup3) instead of a playable audio file.
In this guide, we will cover exactly how to export Audacity files to MP3, the difference between saving and exporting, and which bitrate settings you need to ensure your audio sounds professional on every device.
The Golden Rule: Save Project vs. Export Audio
Before we get to the buttons, you need to understand the difference between Saving and Exporting.
- Saving (File > Save Project) creates an .aup3 file. This is a project file. It contains your separate tracks, active effects, and undo history. Think of this like a Photoshop project (.PSD) or a Word document draft. Only Audacity can open this file. You cannot play an .aup3 file in iTunes, Spotify, or on your smartphone.
- Exporting (File > Export Audio) creates an audio file like .mp3 or .wav. This process takes all your tracks and mixes them down into a single, playable file. This is the final product you upload to a podcast host or send to a client.
Quick Comparison: Project File vs. Audio File
| Feature | Project File (.aup3) | Audio File (.mp3 / .wav) |
|---|---|---|
| Purpose | Editing and archiving | Listening and sharing |
| Compatibility | Opens only in Audacity | Plays on any device (Phone, PC, Car) |
| Content | Separate tracks, effects, undo history | Single “flattened” track |
| When to use | While you are still working on the edit | When you are finished and ready to publish |
The Bottom Line: Always Save your project first so you can go back and fix mistakes later. But you must Export if you want anyone else to actually hear your recording.
How to Export to MP3 in Audacity (Standard Method)
If you are using a modern version of Audacity (version 3.0 or later), the process is simple. Unlike older versions that required you to hunt down and install a separate “LAME” encoder, the MP3 functionality is now built directly into the software.
Here is the standard workflow to turn your project into a shareable MP3 file.
Step-by-Step Export Guide
- Click File in the top menu bar.
- Hover over and select Export Audio. (Do not select “Save Project”).
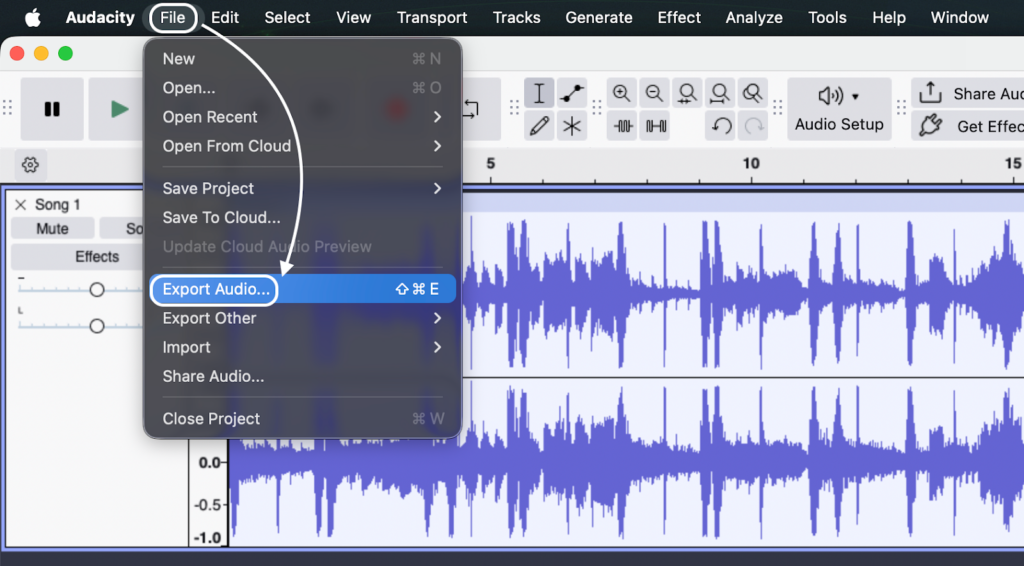
- Name your file and choose a destination folder on your computer.
- Adjust Format Options at the bottom of the window. Ensure “Quality” is set to your desired standard (usually “Standard, 170-210 kbps” or higher).
- Click Export.
Once the progress bar finishes, your file is ready to be uploaded to your podcast host, attached to an email, or played on any standard media player.
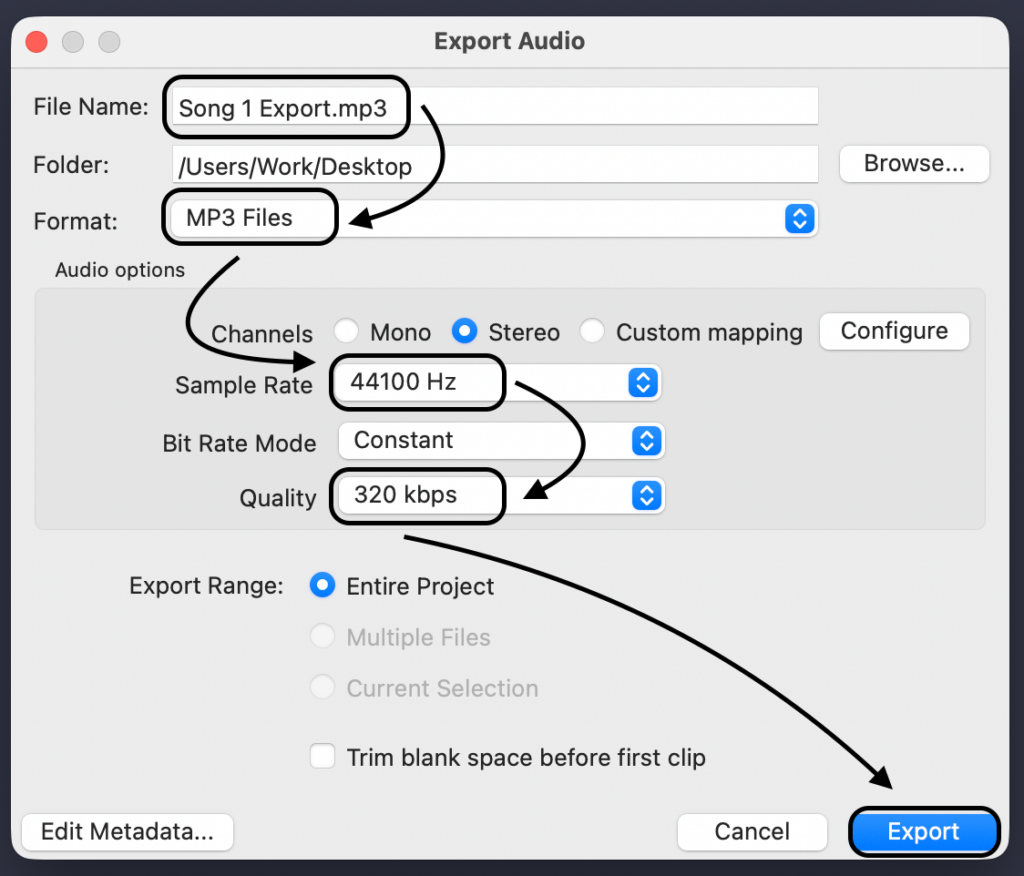
A Note on the “Format Options” Panel
When the export window opens, you will see a section at the bottom labeled Format Options. This is where you determine the file size versus audio quality.
- Bitrate Mode: Defaults to Preset.
- Quality: Defaults to Standard.
For most voice-overs and podcasts, the default settings work fine. However, if you need broadcast quality, you will need to tweak the bitrate. We cover exactly which numbers to choose in the next section.
Best MP3 Quality Settings Explained (Bitrate & Mode)
The Format Options section is where many users get stuck. The settings you choose here determine the balance between your file size and audio fidelity.
If you choose the wrong settings, your professional podcast might sound “crunchy” or “underwater,” or your file might be too massive to email. Here is how to configure these options correctly.
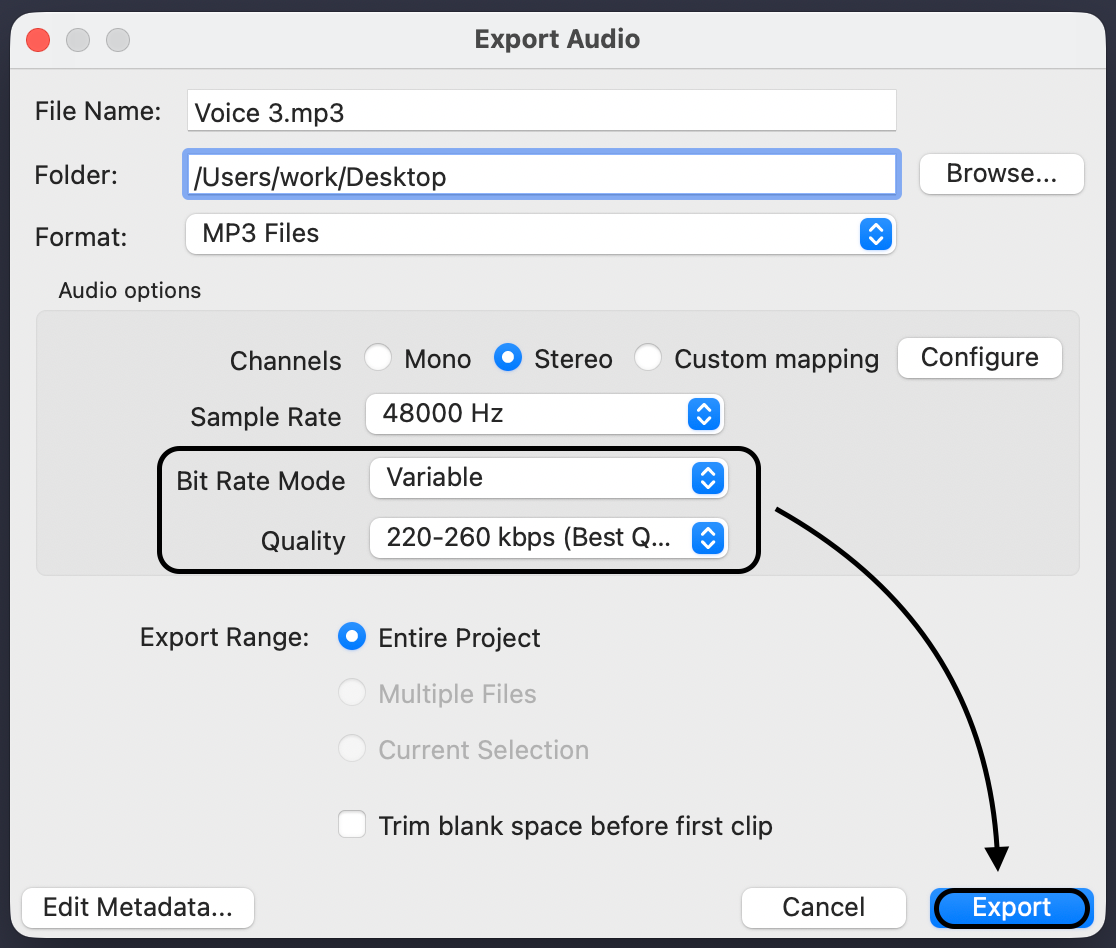
Bitrate Mode: Variable vs. Constant
Audacity gives you a few ways to encode your MP3, usually found under the Bitrate Mode dropdown:
- Preset (Variable Bitrate / VBR): This is the “smart” option. The encoder analyzes your audio and uses more data for complex sounds (like music) and less for simple sounds (like silence or a single voice). This creates a smaller file size but can occasionally cause playback glitches on older devices.
- Constant (Constant Bitrate / CBR): This forces the encoder to use the exact same amount of data for every second of audio. It creates a larger file, but it is the industry standard for broadcasting and podcasting because it ensures maximum compatibility across all players (Spotify, Apple Podcasts, car stereos).
The Verdict: Which Settings Should You Choose?
Don’t guess. Use these recommended settings based on your project type:
| Project Type | Recommended Mode | Bitrate / Quality | Why? |
|---|---|---|---|
| Podcasts & Music | Constant (CBR) | 320 kbps | This ensures “Studio Quality.” It prevents audio artifacts and ensures your file plays correctly on all streaming platforms. |
| Voice Over Demos | Constant (CBR) | 192 kbps | A good balance. High enough quality to sound professional, but the file size is small enough to email to clients. |
| Class Lectures / Memos | Preset (VBR) | Standard | Saves hard drive space. Quality is perfectly fine for speech where fidelity isn’t critical. |
Pro Tip: If you are uploading to a podcast host, always use Constant Bitrate (CBR). Many hosting platforms will automatically re-encode VBR files, which can degrade your audio quality twice.
Pro Tip: Ensuring Studio-Quality Source Audio
You can select “Insane” quality and a 320kbps bitrate during the export process, but if your original recording is noisy or distorted, your final MP3 will still sound bad. In audio engineering, the rule is absolute: “Garbage In, Garbage Out.”
The most common issue Audacity users face is clipping. This happens when the input volume is too high, causing the waveform to hit the top and bottom edges of the track (often shown as red lines). Once standard digital audio clips, that data is lost forever. No amount of editing in Audacity can fully fix a distorted voice.
To ensure your source audio is clean before you even hit “Record,” your hardware choice matters.
The 32-Bit Float Advantage
For creators who want to stop worrying about setting perfect gain levels, we recommend the Hollyland LARK MAX 2.

Hollyland LARK MAX 2 - Premium Wireless Microphone System
A premium wireless microphone for videographers, podcasters, and content creators to capture broadcast-quality sound.
Key Features: Wireless Audio Monitoring | 32-bit Float | Timecode
While most microphones will distort if you speak too loudly, the LARK MAX 2 uses 32-bit float recording. This technology captures such a massive dynamic range that it is virtually impossible to distort the audio.
- How it helps Audacity users: If you accidentally scream into the mic or laugh too loudly, the audio won’t clip. When you import the file into Audacity, you can simply lower the volume (normalize) to bring the peaks down, and the audio will remain crystal clear with zero distortion.
Real-Time Monitoring
Catching issues early is better than trying to fix them during the export. The LARK MAX 2 allows for wireless audio monitoring. By connecting OWS earphones to the receiver, you can hear exactly what is being captured in real-time. This ensures that when you sit down to export your project, you are polishing a masterpiece rather than trying to salvage a damaged recording.
How to “Export Multiple” Files (For Podcasters)
If you are recording a podcast, an album, or an audiobook, you likely have one long track that needs to be chopped into separate files (e.g., “Intro,” “Episode,” “Outro”).
Manually cutting, pasting into a new project, and exporting each section individually is a waste of time. Instead, use Audacity’s Export Multiple feature to automate this process using Labels.
Here is how to batch export your audio into separate MP3s:
1. Mark Your Sections with Labels
Before exporting, you must tell Audacity where one track ends and the next begins.
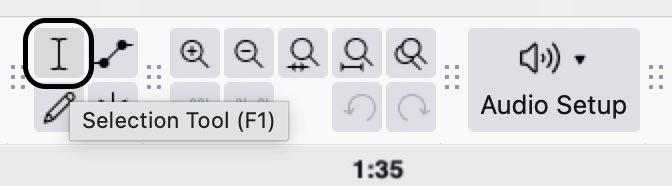
- Select the Selection Tool (I-beam icon) or press F1.
- Click on the timeline at the point where you want the section to begin. You can also click and drag to the position exactly where you need it.
- Press Ctrl + B (Windows) or Cmd + B (Mac) to create a label.
- Type the name of the section (e.g., “01_Intro”) and press Enter.

- Repeat this for every section you want to export as a standalone file.
2. Open the Export Multiple Menu
Once your timeline is labeled:
- Click File in the top menu bar.
- Select Export Audio.

- Select Export Multiple… (This adds more options than the standard export).

3. Configure Export Settings
In the “Export Multiple” window, ensure the following settings are correct to prevent file errors:
- Folder: Choose where all your new files will be saved.
- Format: Select MP3 Files (and adjust your bitrate/quality settings here if needed).
- Split files based on: Select Labels. This is the most important step; it tells Audacity to cut the files at the markers you created in Step 1.
- Name files: Select Using Label/Track Name. This ensures your files are automatically named “01_Intro.mp3,” “02_Interview.mp3,” etc., saving you from renaming them later.
4. Finalize the Batch
Click Export. Audacity will pop up a metadata editor window for each individual file. You can quickly add specific track titles here or simply click OK through them to finish. Your destination folder will now contain perfectly split MP3 files ready for upload.

Troubleshooting: “LAME Encoder Missing” Errors
If you see an error message stating “Audacity does not export MP3 files directly, but instead uses the LAME library,” or complaining about a missing lame_enc.dll file, you are likely using an outdated version of the software.
Historically, Audacity could not bundle the MP3 encoder due to software patents. However, those patents have expired, and the workflow has changed completely.
The Easy Fix: Update Audacity (Recommended)
The best way to solve this error is to stop looking for external files and simply update the software.
Audacity versions 2.3.2 and later (including the current 3.x series) include the LAME MP3 encoder natively. You do not need to download or install anything extra.
- Go to Help > Check for Updates (or Audacity > Check for Updates on macOS).

- Download the latest version from the official Audacity website.
- Install the update.
- Try exporting your MP3 again—it should work immediately.
The Legacy Fix
If you are strictly tied to an older version of Audacity (e.g., v2.x) due to legacy hardware or an old Operating System (like Windows XP), you must install the encoder manually. You can find the legacy LAME library on the official Audacity support site, though upgrading your software is far safer and easier.
Adding Metadata (ID3 Tags) Before Export
You’ve recorded great audio and selected the perfect bitrate, but your job isn’t finished yet. Before the file leaves Audacity, you need to add Metadata (also known as ID3 Tags).
Metadata is the text information embedded inside your MP3 file. Without it, your podcast or song will show up as “Unknown Artist” or “Track 01” in media players like iTunes, Spotify, or confusingly in your listener’s car stereo. Proper tagging is essential for organization and maintaining a professional brand image.
The “Edit Metadata Tags” Window
Before you click Export after selecting your MP3 settings, you will have to click the Edit Metadata Tags dialog box. This is your final chance to label your content correctly.
Here is a breakdown of the essential fields you should fill out:
| Tag Name | What to Enter (Podcast Example) | What to Enter (Music Example) |
|---|---|---|
| Artist Name | The Host’s Name or Podcast Network | Band or Artist Name |
| Track Title | Specific Episode Title (e.g., “Ep 4: How to Edit”) | Song Name |
| Album Title | Name of the Podcast Series | Album Name |
| Track Number | Episode Number | Track position on the album |
| Genre | Podcast / Talk / Interview | Rock / Pop / Jazz |
Frequently Asked Questions (FAQ)
Why is the “Export as MP3” option grayed out?
This is one of the most common frustrations for new Audacity users. If the Export menu is grayed out, it is almost always because your audio is Paused, not Stopped.
Audacity locks most editing and file functions while a track is paused. Look at the transport toolbar in the top left corner. Click the Stop button (the yellow square) or press the Spacebar on your keyboard. Once the track is fully stopped, the Export menu will become active again.
Is WAV better than MP3?
Technically, yes, but it depends on your goal.
- WAV is an uncompressed, lossless format. It retains 100% of the audio quality but creates massive file sizes. Use WAV for your “Master” archive or when sending files to a professional engineer for mixing.
- MP3 is a compressed, lossy format. It discards data the human ear barely notices to drastically reduce file size. Use MP3 for uploading to podcast hosts, streaming platforms, or emailing to clients.
Rule of Thumb: Record and edit in WAV. Export the final product as MP3.
Can I convert M4A to MP3 in Audacity?
Yes, but Audacity cannot open M4A files (common on iPhones/Macs) right out of the box. You need to install the optional FFmpeg library.
- Go to Edit > Preferences > Libraries.


- Click the Download button next to “FFmpeg Import/Export Library.”, it will open up your browser to https://support.audacityteam.org/basics/installing-ffmpeg.

- Follow the instructions to install the package.
- Once installed, restart Audacity. You can now drag and drop M4A files into the timeline and export them as MP3s using the standard method.
Conclusion
Mastering Audacity comes down to understanding the difference between your workbench and your finished product. If you take away just one thing from this guide, let it be this: Save Project creates an .aup3 file for you to edit later, while Export creates the .mp3 file for the world to hear.
Always double-check your bitrate settings—sticking to CBR at 320kbps ensures your hard work sounds professional on every device.
However, keep in mind that even the highest quality export settings cannot fix bad source audio. If your recording is distorted or clipped, no amount of editing in Audacity will make it sound pristine. To ensure your exports are studio-quality every time, consider upgrading your input chain to the Hollyland LARK MAX 2. Its 32-bit float recording technology captures such a wide dynamic range that clipping is virtually impossible, allowing you to spend less time fixing errors and more time creating content.