Whether you’re a professional or an enthusiast, adding audio to your Canva designs is crucial for your project. In addition to adding music, Canva offers recording voiceovers or including sound effects. Integrating audio will transform how your audience interacts with businesses or individuals.
Canva offers a straightforward approach to adding and customizing the audio without affecting the quality. Therefore, this guide provides a seamless process of precision adding audio to your Canva designs.
How to add Audio to Canva?
Using audio in your Canva designs will enhance engagement and provide an unforgettable experience. Therefore, hereunder is the step-by-step guide to seamlessly integrating or setting the audio to Canva.
Step 1- Open or Create Canva Project
- From the search engine, navigate to Canva.com, sign up, or sign in to your Canva account.
- Click to create a new design by selecting the desired templates or open an existing project by going to the account dashboard.
Step 2- Access the Audio Library

- After opening the project, go to the left editor side panel and click the “More” option.
- Then click the “Audio” option from the popup window to open the Canvas audio library.
Step 3- Browse or Search for the Audio
- Browse the Audio
- Browse through the available audio tracks categorized under themes like “pop,” “happy,” or “instrumental,” etc.

- Alternatively, click the “Apps” icon from the left editor side panel and scroll down to click the “Music” button.
- Click “See All” to browse all available options, or click on the search bar to search for a specific audio track.
- Upload the Audio

- If you have already created audio files, click the “Uploads” from the left-side menu and select “Audio.”
- It will allow you to drag the media from social media, Google Drive, or click “Upload files” to browse your computer.
Note: When uploading the media from your computer, ensure that Canva supports the high-quality audio type. Canva supports mp3, WAV, and m4A audio files.
Step 4- Previewing the Audio

- Before adding the audio, you can preview it by hovering over any audio track and clicking the “play” icon to preview it.
- Listen to different audio tracks to find the right audio that suits your designs.
Step 5- Adding audio to your project
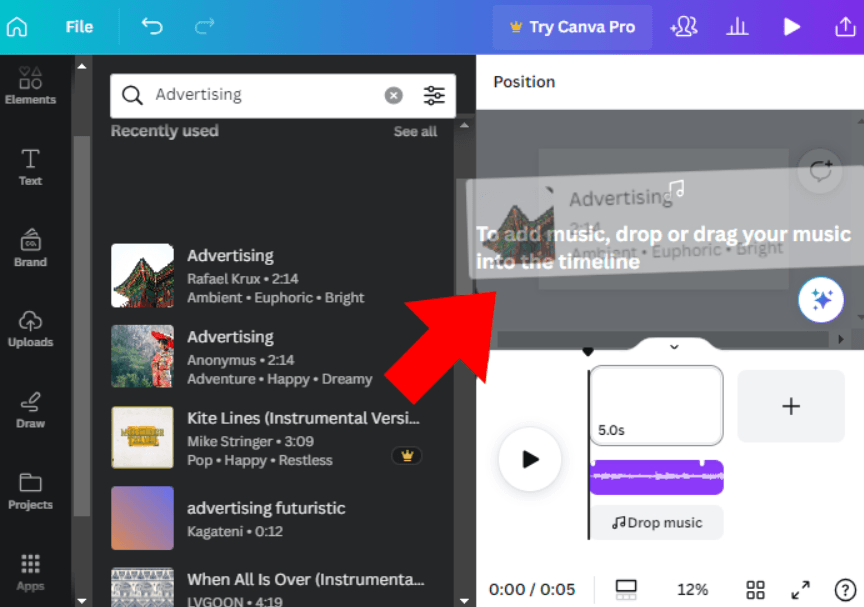
- Select the “Add to Project” button on your desired audio track.
- After selecting the audio file, Canva will upload and add it to your audio library.
- Drag and drop the audio file to your project. The audio will be added to the project timeline at the bottom of the screen.
- Then, drag the audio to position it perfectly in the timeline where you want to start in the project.
Note: Canva supports file sizes of up to 250MB, and you must compress the audio files before adding them to the timeline.
Step 6- Add a Voice Recording
- Select Uploads tab

- If you want to record audio to include on your Canva project, go to the “Uploads” tab in the main left-side toolbar.
- Record the Audio
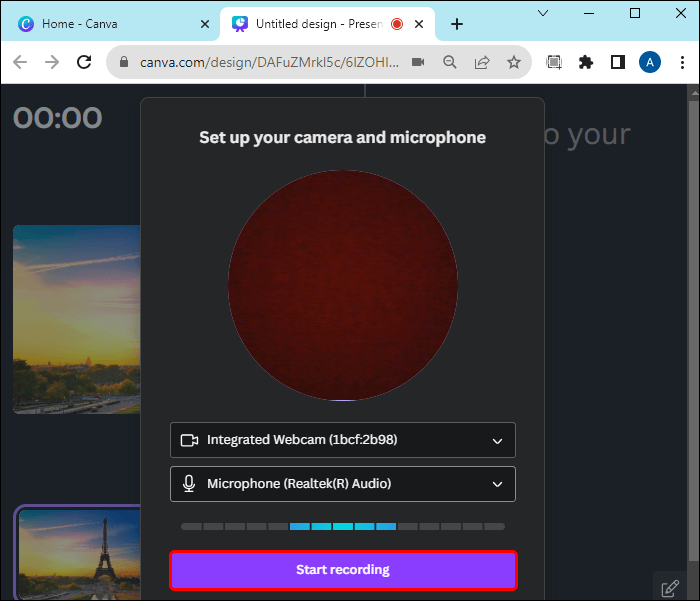
- Then select “Record Yourself,” and a popup will appear asking permission to use the microphone.
- Click “allow” to approve the use of a microphone and start recording audio clips to include in your audio library.
- Present and Record
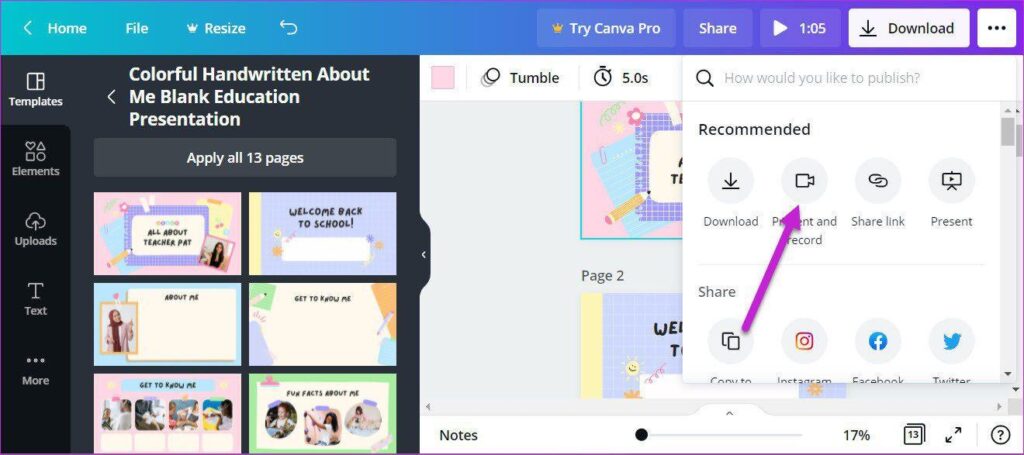
- Alternatively, go to the “Share” button from the top-right and click “More” from the next window.
- Select “Present and Record,” then go to the recording studio to record the audio.
Step 7- Audio Effects

- Select the inserted audio track, and the additional tab “Audio Effects” will appear at the top-left of the screen.
- Then select to change the time of audio “fade in” and “fade out” to enable smooth transitions.
- It’s essential when using multiple audio tracks for your project.
Step 8- Adjust Audio Length and Volume
- Adjust the Audio
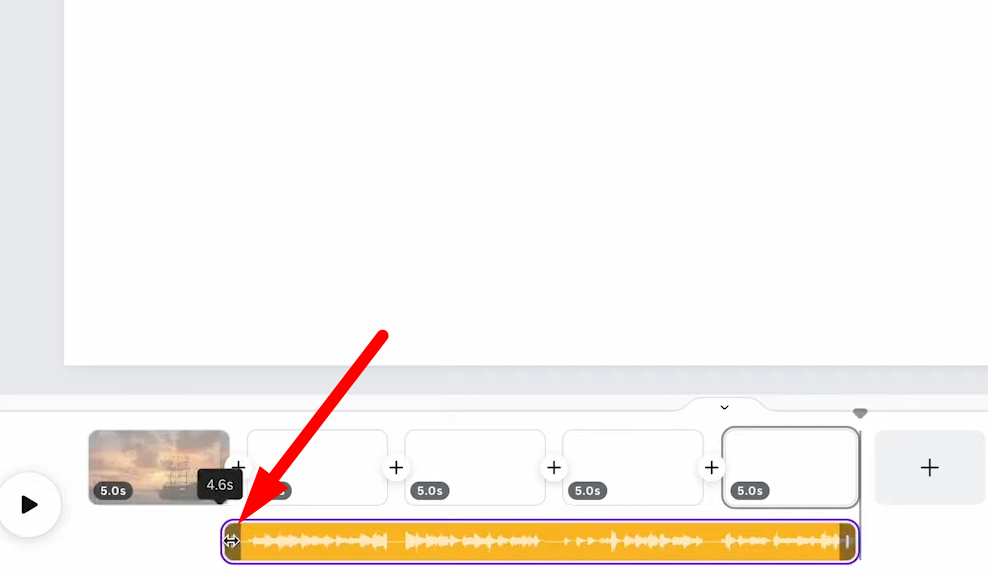
- Once added, your project and audio will appear parallel. The audio will be added where your timestamp or “playhead” is on your timeline.
- Click to select the audio in the Canva timeline. Editing handles will appear on both sides of the audio track. You can drag and adjust the audio length in the timeline.
- Adjust the Volume
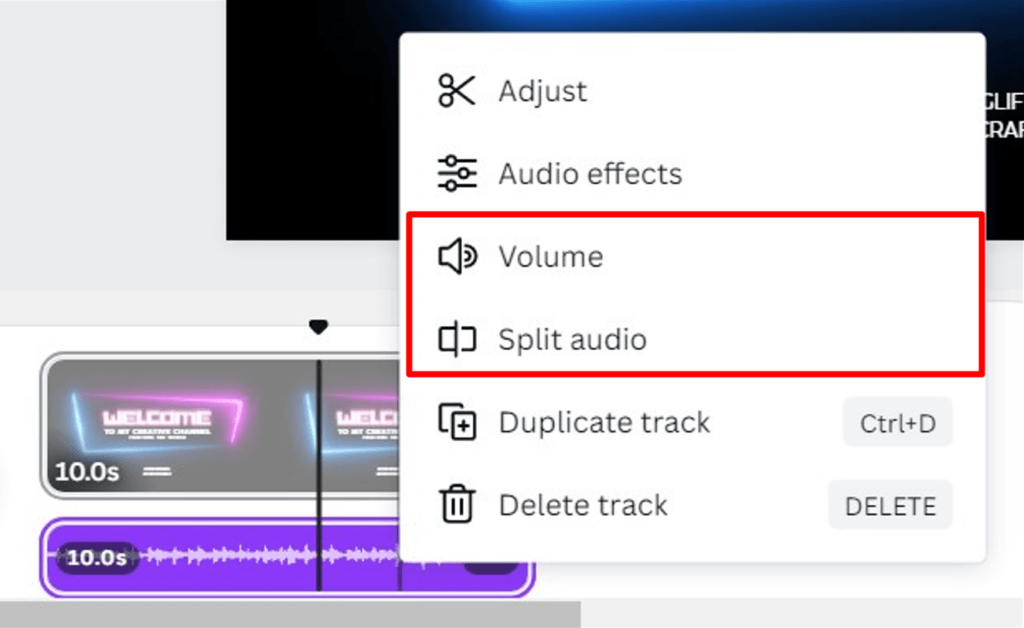
- Click on the audio track, tap the “three-dot” icon, and select “Volume” from the popup window.
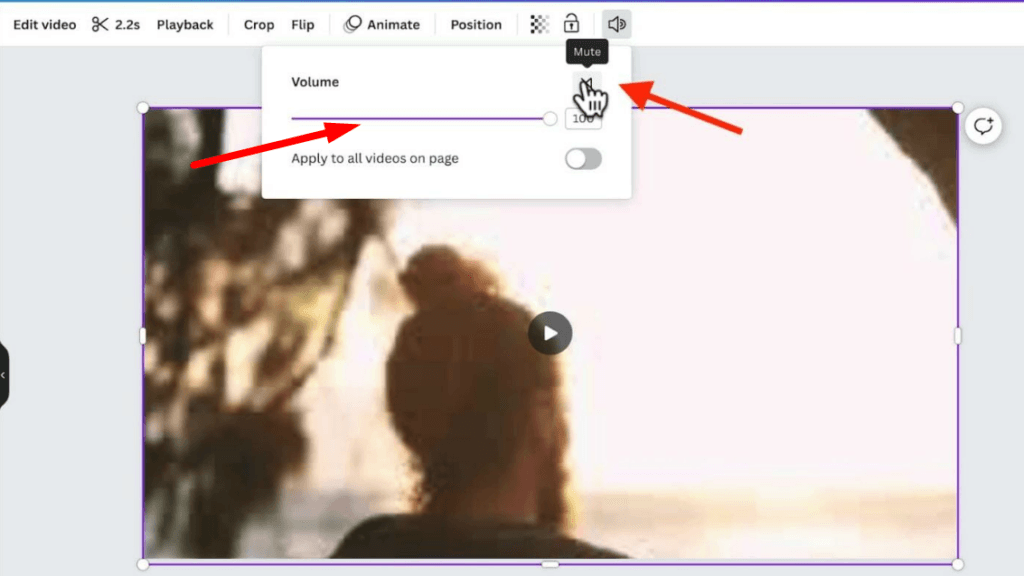
- Alternatively, select “sound icon” from the top of the timeline and move the slider to adjust the audio track’s volume.
Step 9- Duplicate or Split the Audio
- To sync different audio tracks or audio with the video, select the audio and move the playhead to the desired point.
- Click the “three-dot” icon and select “Split audio” from the popup window.
- Also, to duplicate the audio track, select the track, then click on the duplicate icon or click the “three-dot” icon and select “Duplicate.”
- Then, you can delete the audio track from there if it does not meet your expectations.
Step 10- Saving the Project
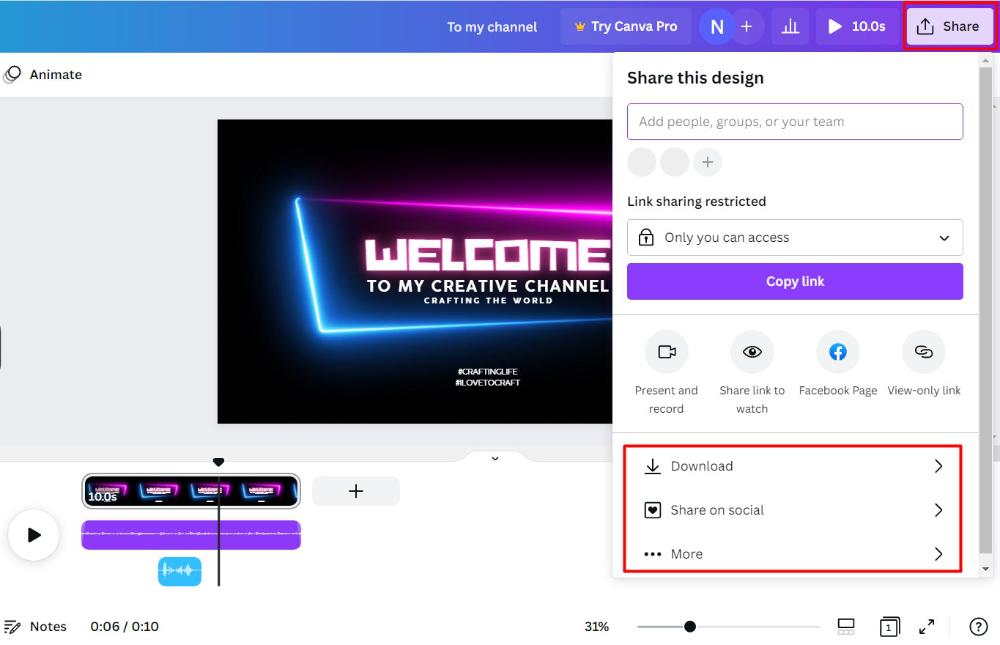
- After adjusting and previewing your audio, ensure to save your audio project.
- Canva automatically saves the changes, or you can do it manually by clicking on the “File” menu from the top-left screen.
- Click the “Save” button before downloading your project.
- Go to the “Share” button from the top-right corner of the project screen and select the “File Type.”
- Then click “Download” to save the project on your device.
To ensure your Canva audio sounds professional, clear voice recording is essential. A wireless lavalier microphone offers effortless convenience and studio-quality audio, making it the ideal choice when creating content that truly engages your audience.
Frequently Asked Questions
Can I upload my audio to Canva?
Yes, Canva allows you to upload and customize your audio files to create an immersive design. To do this, go to the “Uploads” tab from the left-side toolbar menu and select “Audio” from the next window. Select “upload files,” then browse the audio files to add to your audio library.
What audio formats does Canva support?
Canva supports versatile audio formats, ensuring compatibility with diverse audio files for seamless integration. Hereunder are the formats that Canva supports:
- M4A
- MP3
- OGG
- WAV
- MP4 audio
- MPEG
- WEBM file format
When inserting the audio from apps, the maximum file size must be at most 250Mb or 50Mb.
How long can the audio track be in my Canva project?
The length of the audio track depends on the content you create. For presentations and social media projects, Canva has an audio track limit of 10 minutes because the audio plays as per the slide viewed.
For video projects, Canva allows you to match the video length when syncing the audio with the video. It offers versatility to layer up to 50 audio tracks of different audio lengths for seamless integration of the audio files.
Is it possible to add multiple audio tracks to one project?
Yes, adding up to 50 audio tracks to your design is possible. If your project has more tracks, duplicate your design or delete some pages. Canva allows the addition of multiple audio tracks by layering the audio or trimming the audio to adjust their volume.
Can I edit the audio within Canva?
Yes, Canva provides specialized editing features to tailor your audio to the project’s needs. After adding the audio, editing the audio tracks depends on the type of design.
Click on the audio track in the Canva timeline and select the three-dot icon at the end of the track. Choose audio effects and volume from the popup window, trim audio handles, and adjust audio tracks.
Are there any copyright restrictions on Canva’s audio library?
Yes, copyright restrictions exist to be aware of when using audio from the Canva audio library. Canva provides audio from different resources, each with its licensing agreement. Also, it offers free stock audio with diverse free and premium audio clips. Reviewing specific licensing to ensure it aligns with the Canvas guidelines is essential.
How do I remove audio from my Canva project?
Removing audio from your project is essential if the audio is of poor quality. Whether you want to replace or remove audio from your Canva design, follow the hereunder process:
- Open your Canva project and select the desired audio track.
- Click the “three-dot” icon and choose “delete track” from the popup window.
- If you want to remove the video’s audio, click to open the file in the timeline.
- Then select the “Volume” icon from the top-right and drag the slider to “0” to remove the audio from your video.
Can audio be added to any Canva design?
Adding audio doesn’t apply to all Canva designs, such as static images or posters, because these designs lack playback functionality. Therefore, audio can be added to specific Canva designs such as videos, social media posts, or presentations. After understanding the type of design, adding audio is a straightforward drag-and-drop process.
What is the best way to sync audio with my video in Canva?
Syncing audio with video requires careful placement and ensuring sound matches the visuals. The “Beat Sync” on Canva automatically matches the audiovisuals to achieve perfect synchronization.
- Open your video project in the timeline and drag the audio track from the Canva audio library or browse the device.
- Drag the video and audio clips to your timeline and adjust the length of the audio.
- Then, adjust and edit the video and audio to apply effects or trim using the toolbar.
- Right-click on your audio track and select “Beat Sync” from the popup window.
- Click and enable the toggle of “Display beat makers” and “Sync Now.”
- Then click “Play” to preview the synced audio and video.
Can I share a Canva project with audio directly to social media?
Yes, Canva allows you to share your custom designs directly, such as videos or social media posts, on versatile social media platforms. Here’s how you can share your design:
·Once your project is complete, click the “share” button on the top-right corner of the project screen.
- Click “Share on Social” and select the app you want to use or search for the application.
- Add a caption or message depending on the app type.
- Then, publish or schedule your posts and monitor the performance.


.png)
.png) Français
Français .png) Deutsch
Deutsch .png) Italiano
Italiano .png) 日本語
日本語 .png) Português
Português  Español

