.png)
If you ask the majority what browser they use to surf the Internet, most will name Chrome. Statistical data also reveals that Chrome had a global market share of around 65.16% as of 2024.
That means this web browser is widely utilized for video conferencing, online classes, streaming, and remote work. However, the problem may arise when you switch the microphones. Chrome may not recognize your newly bought headset, an external microphone, or multiple mics attached to your system.
This article will help you change the microphone on the Chrome browser on Windows, MacOS, Android phones, and ChromeOS.
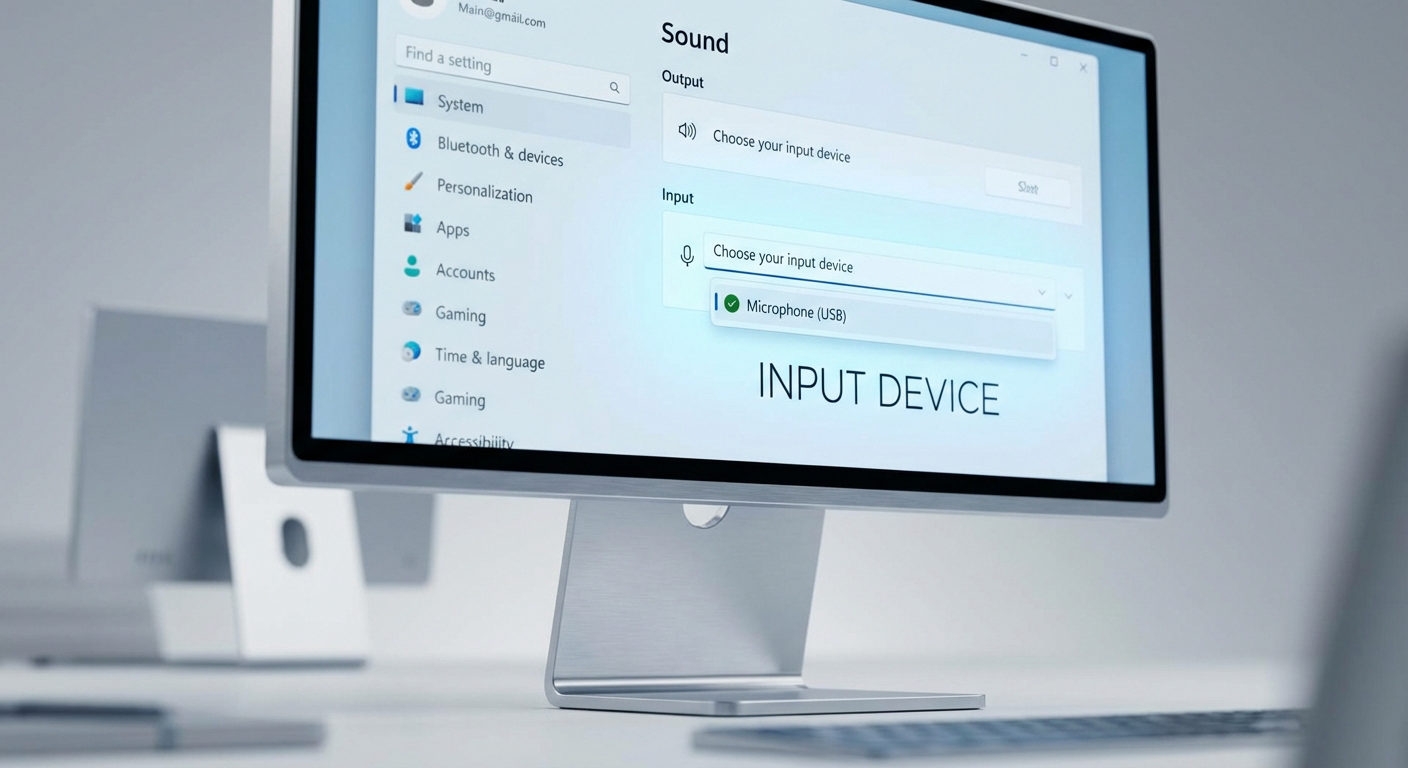
How Microphone Works on Chrome?
Google Chrome ensures centralized permissions to manage access to the microphone and camera. This system provides you with great control over websites’ microphone utilization.
You can allow individual websites to have access to your microphone. Similarly, you can set a default microphone for the browser for all the sites. Moreover, you can also block microphone access from Chrome for every website by turning off the option.
What happens is that when you first visit a site, it requests access to your microphone. Then, Chrome shows a permission prompt. Once you grant the permission, that website keeps adding to the list of “allowed” websites.
Likewise, you can refuse to grant permission if you’re not comfortable with a particular site to use your microphone, and it will be included in the blocked list.
Why Should You Consider Changing Your Microphone in Chrome?
By now, you should have grasped the idea of how Chrome uses your microphone and its working principles. But you may wonder what’s the need for changing the mic in the first place. Well! Here are a few reasons.
You’re Using a Multi-Microphone Setup
Let’s start with the basics. If you have multiple microphones connected to your laptop or desktop computer, Chrome may default to a device that may not be to your liking. For example, you wanted to use a wireless microphone kit, but the browser connected you to a desktop mic because it was set to default.
For the Sake of High-Quality Audio
This reason is a biggie!
Switching to a high-quality microphone in Chrome can improve audio clarity during online conferences, webinars, and video calls. When you upgrade to a premium microphone, it captures clean and crisp audio, which is essential for professional and effective communication.
However, “premium” doesn’t always mean to buy an expensive microphone. You can find several brands at affordable pricing that can improve your audio experience when used with Chrome.
To Enjoy the Latest Features
Technology seems to be ever-changing, which also calls for using advanced microphones in Chrome. Newer microphones offer the latest features, which enhance your browsing experience. Whereas outdated microphones not only lack new features but may also cause compatibility issues with Chrome.
For example, using the Hollyland Lark M2S in Chrome helps overcome background noise issues during streaming sessions and virtual meetings since it features dual-level noise cancellation. Similarly, you can communicate with this mic wirelessly up to 1000ft. Plus, this microphone has universal compatibility and can work with almost all devices and popular web apps you use in Chrome. And most importantly, it has a unique logo-free design and titanium clip-on, making it fit for professional, academic, and casual use.

Hollyland LARK M2S - Wireless Hidden Microphone
An ultra-discreet wireless microphone featuring a clip-on transmitter for an “invisible” fit.
Key Features: No-Logo Fit | Ti+ Design | 48 kHz/24-bit
Part 1: How to Change Microphone on Chrome on Windows and MacOS?
In this section, you will learn how to change a microphone on a Chrome browser. Let’s suppose you have more than one mic attached to your desktop or laptop. So, whenever you use a website, the browser doesn’t show any input device as a microphone. Or, it’s using the built-in microphone or the one that you don’t prefer.
So, here’s how to switch to another microphone.
- Step 1: Launch Chrome on your computer (Windows or Mac). Open a “New Tab” by clicking the “+” icon above the search bar or by pressing “Cmd/Ctrl + N”

- Step 2: Move your cursor to the three dotted lines and click on it to open the browser menu

- Step 3: Doing so will open a list of options. So click “Settings”
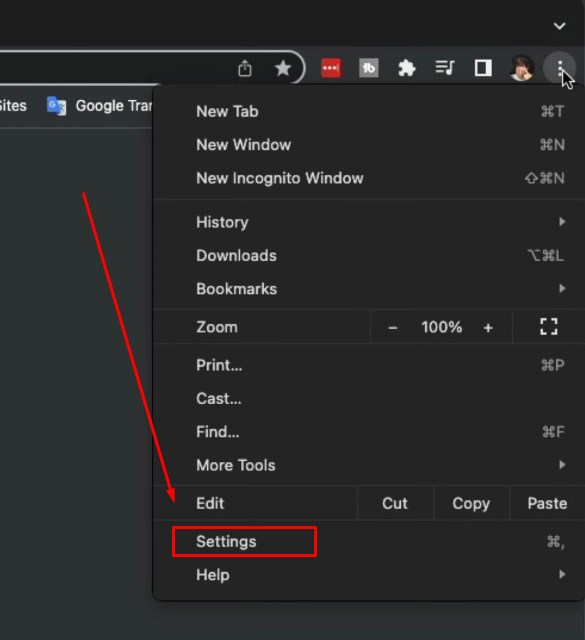
This will take you to the main settings page in Chrome

- Step 4: Now, look for the “Site Settings” option in the left panel. In case you’re using a different version of Chrome, you will need to look for the option manually. So, click on the “Search settings” bar and type “Site Settings” to let the browser locate and show the option, and then click on it.

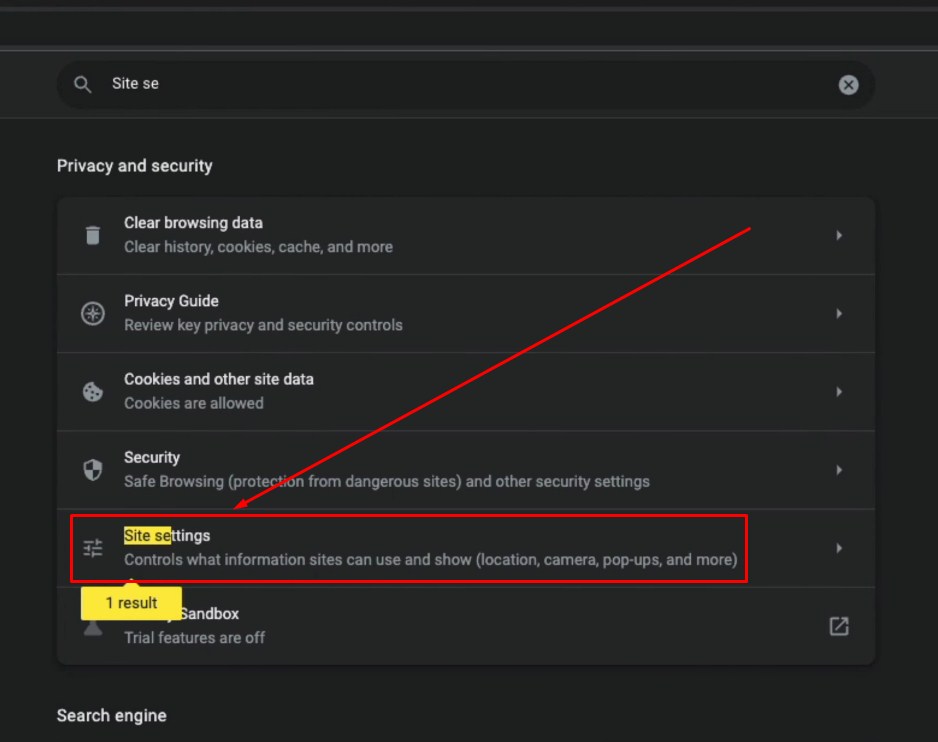
- Step 5: In “Site Settings,” you will see different options. Scroll down to the “Permissions” section and click on the “Microphone” option to view microphone settings

- Step 6: You have to make sure that your Chrome browser has permission to access the microphone. To do that, put a checkmark on the “Sites can ask to use your microphone” option under the “Default behavior” section on the microphone settings page

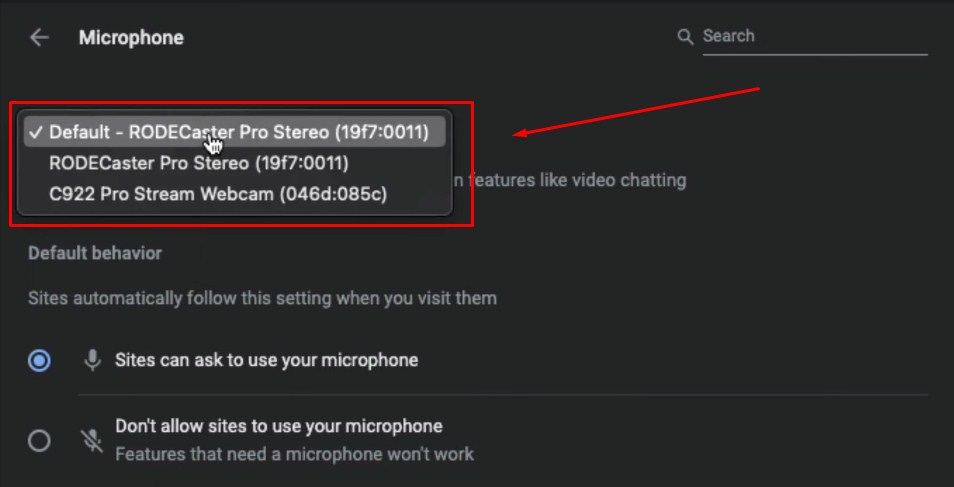
- Step 7: Next, look above the default behavior tab to locate the dropdown menu. Here, you will see the default microphone with its name. For instance, if it shows “Default – RODECaster Pro” (it can be any other brand in your case), that means Chrome will use only that microphone on the sites, and other mics may not work
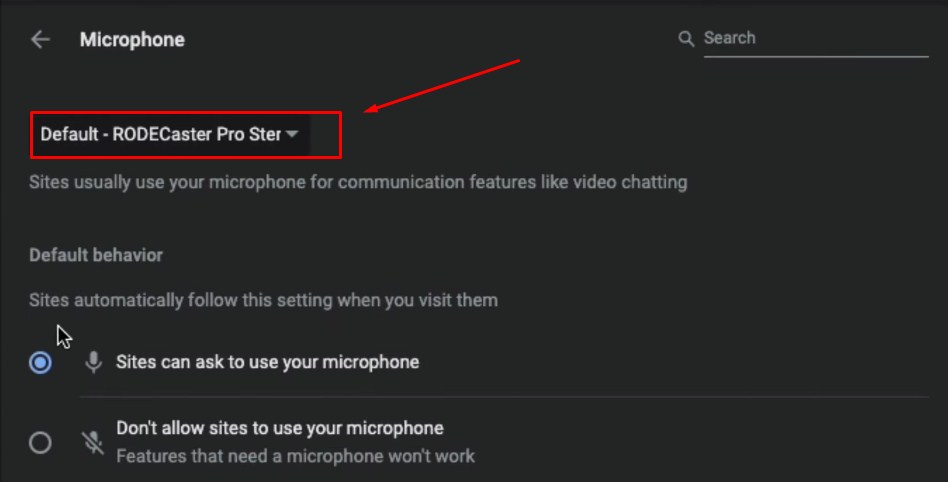
- Step 8: To change it, click on the default microphone to open the dropdown menu in Chrome. You will see all the names of the microphones attached to your computer, so select the one you want Chrome browser to use as default
Part 2: How to Change Microphone on Chrome on Android Phone? (Possible or Impossible)
Unlike the Chrome browser on Windows or Mac computers, you may not be able to change the microphone by picking its name from the site settings.
Chrome in your phone uses the device’s onboard microphone. And when you connect an external mic to your mobile, the Chrome browser automatically detects it, and uses it instead of the internal mic.
But there’s good news for you if your sole purpose of changing the microphone on the Chrome mobile app is that it doesn’t capture your voice despite trying both internal and external microphones. In most cases, users don’t give permission to Chrome to access the mic.
Therefore, simply allowing the browser to use the microphone can resolve this issue. So, here’s what you need to do.
- Step 1: Open the Chrome browser app on your mobile

- Step 2: Open a new tab and click on the three vertical dots to open the menu

- Step 3: Tap on the “Settings” option from the list

- Step 4: This will take you to the “Site settings” page. So, scroll down to “Microphone” and check if it is labeled as “Blocked”

If that’s what you see, it means Chrome has no permission to access the microphone.
- Step 5: Tap on the “Microphone” option. Then, tap on the toggle to enable the sites to ask for your permission when using the mic

- Step 6: Next, tap on the “Android Settings” option

- Step 7: The previous step will take you to the “App info” page of Chrome. So tap on the “App permissions” option

- Step 8: You may notice that the “Microphone” is under the “NOT ALLOWED” section. So, tap on the “Microphone” option

- Step 9: In the next screen, you will notice three different options – Allow only while using the app, Ask every time, Don’t allow. In this scenario, the “Don’t allow” option will be selected

- Step 10: Tap on the first option (Allow only while using the app)

Then, go back to the “Site settings” (See Step 1 to Step 4), and the “Microphone” should now be labeled as “Ask First” instead of “Blocked.”

Part 3: How to Change Microphone on Chrome Browser when You Have a Chromebook?
If you want to swap the default microphone on Chrome on Chrome OS, here’s how it is done.
- Step 1: First, you should change the default microphone in the Chrome OS. To do that, click on the systems tray in the bottom right corner of the screen

- Step 2: A new window will appear with an audio adjustment level and a small arrow icon. So click the icon

- Step 3: This will open the audio settings with two sections – Output and Input. Under the “Input” tab, select the microphone as default. Also, make sure that the internal microphone is unchecked

- Step 4: Launch your Chrome and test the microphone on your desired site.
NOTE: If the microphone is still unchanged on Chrome, it is possible that it has no permission or the default microphone on Chrome is still set to the built-in microphone. So, follow the steps in part 1 to grant permission to the microphone of your choice in the browser and to select the preferred microphone from the dropdown menu in Chrome’s site settings.
Common Issues You May Face when Changing the Microphone on Chrome (How to Troubleshoot Them?)
It is possible that even after following the instructions, you may not be able to change the microphone on Chrome. So, here are the common problems and steps to solve them.
Chrome is Still Using the Wrong Microphone on Windows Computer
Sometimes, after giving microphone permission in Chrome, the browser still uses the wrong device by default. It is because the default microphone on your Windows PC might conflict with Chrome’s settings. So, here’s what you should do.
- Step 1: Go to the audio settings in Windows by choosing the “Sound settings” option after right-clicking the speaker symbol in the system tray
- Step 2: Ensure that the same microphone you set in Chrome as default is also selected as the default input device in your computer
- Step 3: Disable the incorrect microphones and restart Chrome
Can’t Change the Default Microphone on Chrome Because the Dropdown is Grayed Out
Some users also reported that the dropdown menu for choosing the default mic in Chrome is grayed out or disabled. So, if that happens to you, you won’t be able to change the microphone. So, try these tips to resolve this issue.
Tip 1: Upgrade Chrome to the Latest Version
Make sure you have the latest version of Chrome. If not, it is time to update it because older versions may not support the new audio settings and features.
Tip 2: Consult Your IT Department
If you are trying to change the mic in Chrome from school or any other place that has restricted access, you need to discuss the matter with the IT department.
Distortion in Audio after Changing the Microphone on Chrome
A user reported a problem with microphone distortion when using the Chrome browser. This may happen after choosing a different microphone in Site settings.
While it could be a hardware problem of the microphone itself, you can try these quick solutions and check if the problem still exists.
- Update your audio drivers on Mac and Windows
- Test the mic on different websites and audio recording software. If the problem persists on all platforms, it means the issues lie in the system settings, or it’s a faulty device
Conclusion
Sooner or later, you will realize that you need to switch your microphone for better performance and the latest features. However, if you encounter no sound when using the mic on the Chrome browser, it can be due to incorrect settings.
The bright side is that everyone can change a microphone on Chrome regardless of the operating system and device or whether they prefer an internal or external microphone. All you need to do is give the desired microphone access to be used online when browsing. Also, ensure that you have made the microphone a default input audio source on Chrome.
Looking to achieve clear, professional-quality audio on Chrome-based apps and video calls? Consider upgrading your audio setup with a wireless lavalier microphone, providing excellent sound clarity and convenience across multiple devices.
Frequently Asked Questions about Changing Microphone on Chrome
Q1. How to identify which microphone Chrome is using?
To check which mic is set as default on Chrome, open the browser and click on the three vertical dots in the top right corner. Choose “Settings” then “Privacy and Security” options. Next, click on the “Site settings” and select the “Microphone” option. The name of the default microphone will appear in the dropdown menu.
Q2. How do I change my Google microphone?
Go to voice.google.com. Then, click Headset on the top right side of the screen. Next, select the settings you want to change.
Q3. How do I check if the correct microphone is active?
One of the quickest ways to know if the microphone is working after you have changed it on Chrome is by testing it online. There are several free websites you can use, such as mictests.com and onlinemictest.com, to verify if the selected mic is capturing audio correctly.