.png)
When creating great videos, sound is an essential element that can greatly impact the overall quality. Whether you are a content creator or looking to enhance your projects, adding music can make a significant difference. Many different programs for editing videos are available, but one of the best choices for both beginners and experts is DaVinci Resolve.
In this article, we will address a common issue faced by users, difficulty importing MP3 files, by providing solutions to overcome this hurdle. So, let’s get started and learn all about DaVinci Resolve for creating captivating videos with impressive soundtracks.
Does DaVinci Resolve Support MP3?
DaVinci Resolve does support the MP3 file format. You can easily import an MP3 audio file into the software and use it in video projects. Just like WAV files, you can easily add an MP3 file to the timeline in DaVinci Resolve by dragging and dropping it. However, it’s good to remember that DaVinci Resolve works better with MP3 files that have a consistent bit rate.
A constant bit rate means the audio data is encoded consistently throughout the file. This contrasts variable bit rate (VBR) MP3 files, where the bit rate can vary throughout the audio. While DaVinci Resolve can handle VBR MP3 files to some extent, using constant bit-rate MP3 files ensures better compatibility and smoother processing within the software.
Why Won’t DaVinci Resolve Import MP3?
There can be several reasons why DaVinci Resolve might encounter difficulties when importing MP3 files. We have covered some of the main points below to guide users better:
- Constant Bit Rate Requirement: DaVinci Resolve requires MP3 files to have a CBR for smooth importing and playback. If you have an MP3 file with a VBR, commonly generated by smartphones or online recording tools such as OBS Studio, you may experience import failures or playback issues in Resolve.
- Unsupported Sample Rates: It has specific requirements for sample rates. If your MP3 file has a sample rate not supported by DaVinci Resolve, it may result in import problems. Ensure your MP3 file has a sample rate within the supported range, typically 44.1kHz or 48kHz.
- Corrupted or Damaged Files: If your MP3 file is corrupted or damaged, DaVinci Resolve may have difficulty importing it. It is recommended to use a reliable audio repair tool to fix any issues with the file before attempting to import it into Resolve.
- DRM Protection: MP3 files protected by DRM may not be compatible with DaVinci Resolve. DRM is designed to restrict unauthorized access to copyrighted material, and certain protected MP3 files may have limitations on their usage in third-party software.
- File Path Issues: Ensure that the file path to your MP3 file does not contain any special characters, symbols, or excessively long file names. DaVinci Resolve may struggle to recognize or import files with such naming conventions or paths.
- Outdated Software Version: Using an outdated version of DaVinci Resolve might lead to compatibility issues with certain file formats, including MP3. Ensure you are using the latest software version, as updates often include bug fixes and improvements related to file import and compatibility.
6 Ways to Fix MP3 Importing Issue in DaVinci Resolve
When facing difficulties with importing MP3 files in DaVinci Resolve, there are several effective solutions to resolve the issue. Following the four ways outlined below, you can overcome the MP3 importing problem and seamlessly import MP3 into your video projects.
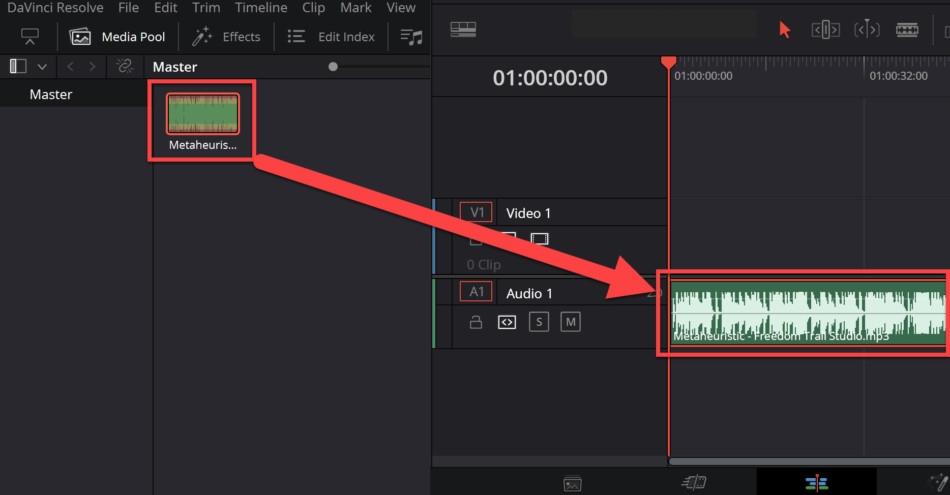
Fix 1. Insert the Correct MP3 File into a Desired Audio Track
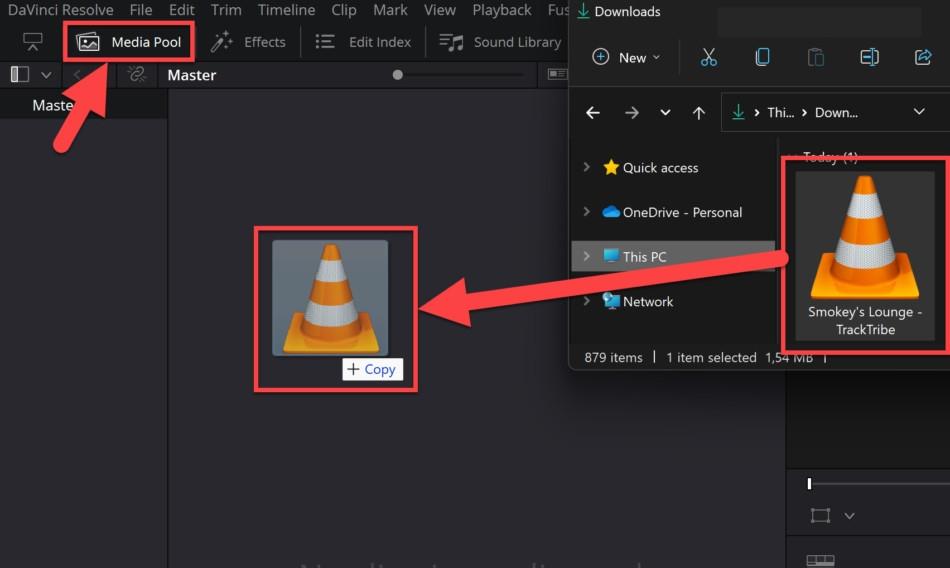
When you want to use the MP3 file in your video, drag it from the “Media Pool” to the timeline. Be careful to keep it in the right place. The right spot to drop it is in the lower part of the timeline. Before you release the file, you should see “Audio 1” appearing on the timeline along with your MP3 clip. That’s when you can safely drop it in the correct area.
Fix 2. Convert the MP3 to an MP4 File
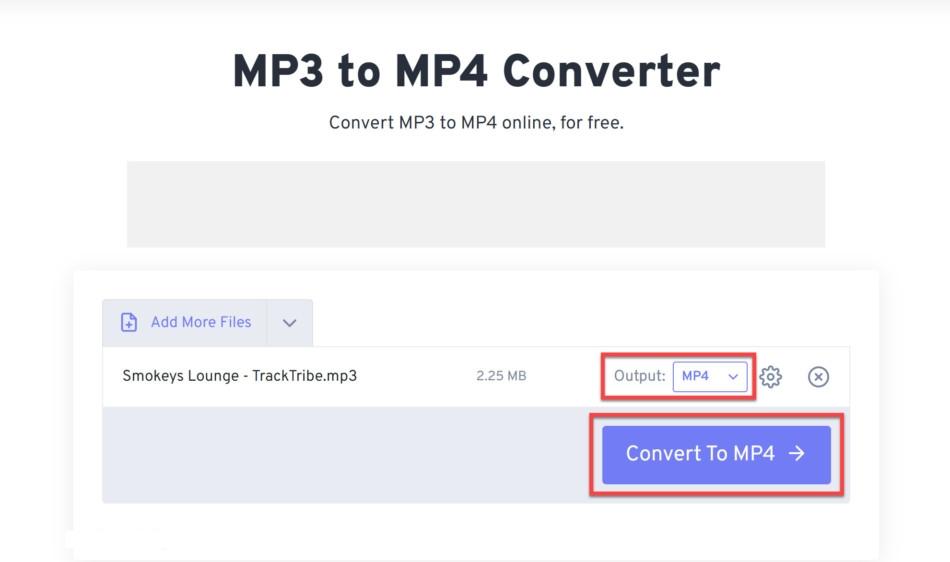
In simple terms, an MP4 is a file format that holds both video and audio content. However, converting an MP3 file into an MP4 file will only contain audio and will be treated as an audio file within a software called Resolve. To convert your MP3 file into an MP4 file, we will use a tool called FreeConvert. Keep a check on the step-by-step instructions below:
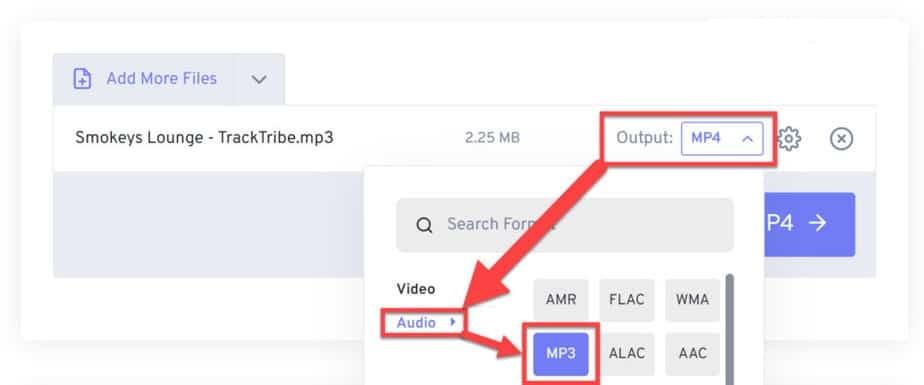
Step 1: Find the MP3 file on your computer in the appropriate folder. Then, drag the MP3 file into the converter tool. Also, ensure the “Output” format is set to MP4. Next, tap the “Convert To MP4” button to activate the process of converting.
Step 2: Afterward, once the file has finished converting, download it. By default, you can find the downloaded MP4 file in your computer’s “Downloads” folder. Now, open DaVinci Resolve and locate the “Media Pool” section.
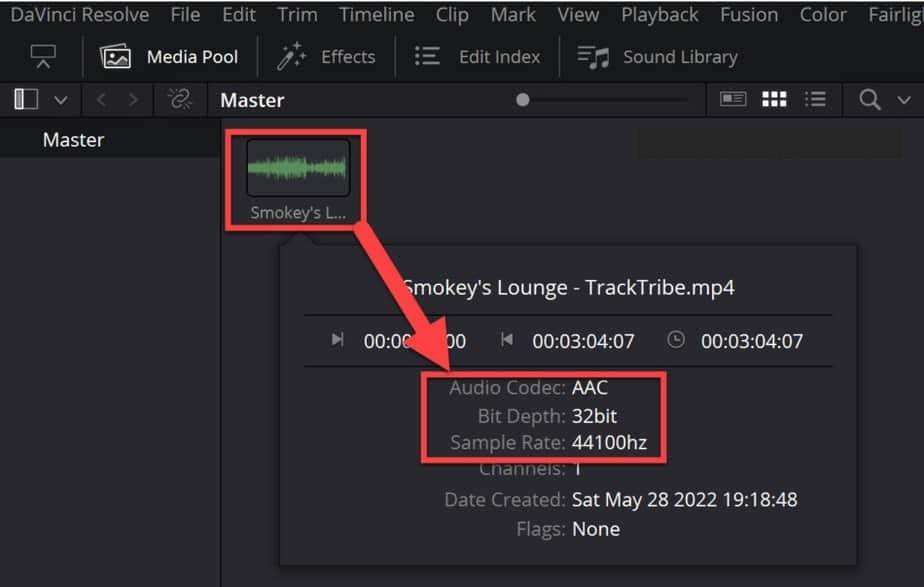
Step 3: Next, drag the converted MP4 file into the “Media Pool” of DaVinci Resolve. However, if you successfully imported the MP3 file, you could add it to the timeline and start editing. To view the properties of the file, click on the three dots located in the lower right corner of the file within the “Media Pool” section.
Step 4: There, you will notice that the file’s codec has changed from “MP3” to “AAC.” This change in codec does not significantly affect the file size, but AAC is considered to have slightly better audio quality than MP3. If you need the file to be in MP3 format, export it from DaVinci Resolve as an MP3 file.
Fix 3. Converting Variable Bit Rate to Constant Bit Rate
This fix is for people with an MP3 file with a variable bit rate (VBR), which is not supported by DaVinci Resolve. However, there is a simple fix that we will explain in the following steps.
3.1 Checking if Your MP3 File Has a Constant or Variable Bit Rate
To determine the bit rate mode of your MP3 file, you need to download free software called MediaInfo. Comparatively, this tool is easy to use and does not require any process for signing up.
Step 1: First, visit the MediaInfo website and click the “Download MediaInfo” button. Continuing this, expand the drop-down menu by pressing the arrow on the right-hand side. Next, choose the version of MediaInfo that is recommended for your operating system.
- Mac users should download it from the “Mac App Store.”
- Users with Windows are recommended to get the “Universal Installer.”

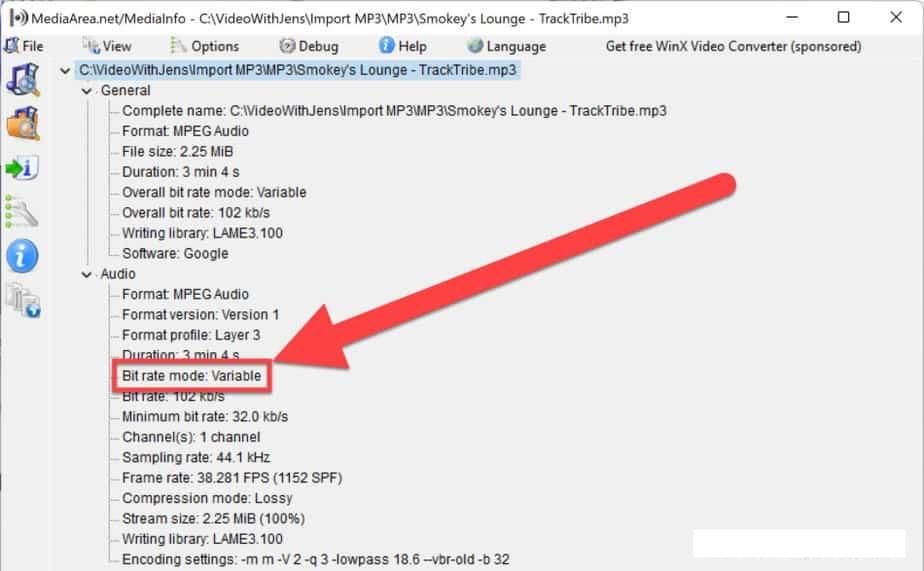
Step 2: Now that you have MediaInfo installed, you can easily check whether your MP3 file has a constant or variable bit rate. Following this, open MediaInfo and tap on “File” in the top left corner, then select “Open” and “File.” Afterward, locate the MP3 file in your system folders and click “Open.”
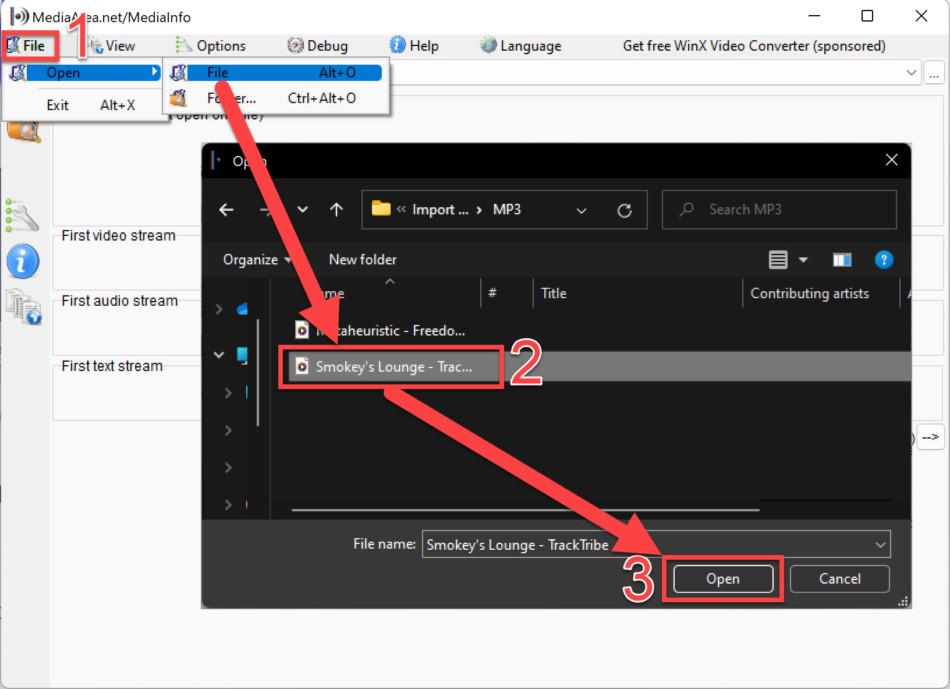
Step 3: Moving on, hit “View” and choose “Tree.” Then, under the “General” tab, navigate to “Audio” and look for the “Bit rate mode” information. It will be either “Variable” or “Constant,” indicating the bit rate mode of your MP3 file.
3.2 Converting VBR to CBR
Now, let’s move on to converting the bit rate mode from VBR to CBR using an online tool called FreeConvert.
Step 1: Starting with head to the FreeConvert website. Locate the MP3 file in your system folders and drag it into the file converter on the website. Now, set the “Output” format to “MP3” and click the “Gear” icon to access the settings.
Step 2: In the “Advanced Option” tab, adjust the following settings:
- Set “Audio Codec” to MP3.
- Choose “Constant bit rate (CBR)” for “Audio Rate Control.”
- Choose “High (320 kbps)” as the “Audio Bit Rate” option for the best possible quality.
- Set “Audio Sample Rate” to 48000 Hz.
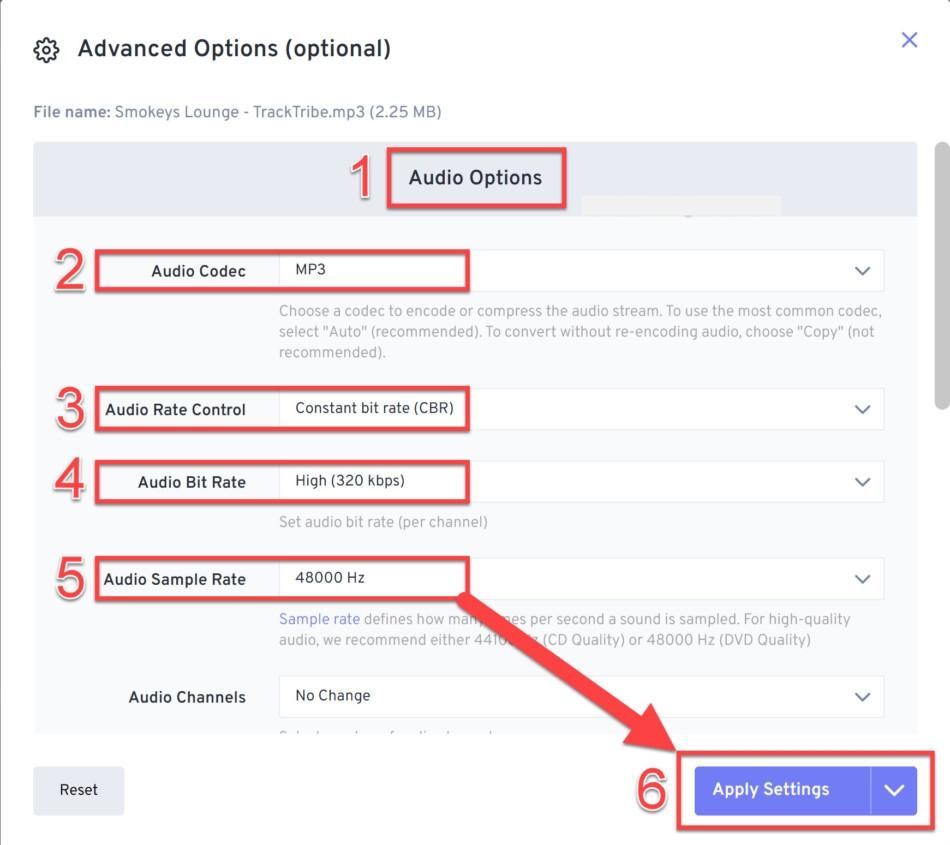
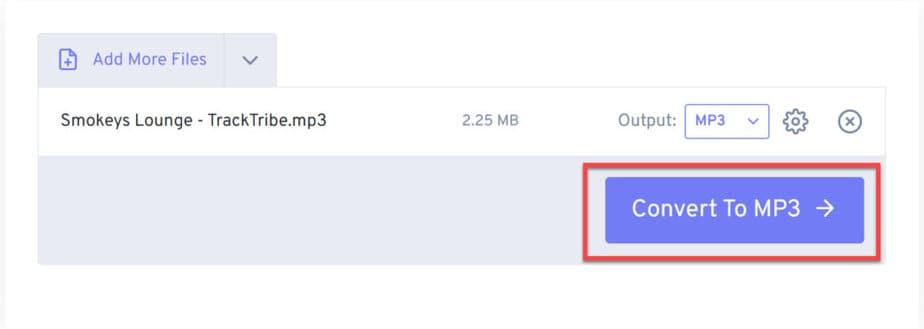
Step 3: Finally, tap on “Apply Settings” and click on the “Convert To MP3” option. When the conversion is completed, download the converted file, and import it into DaVinci Resolve.
Fix 4. Convert MP3 File to WAV
However, if both the CBR and MP4 conversion methods have failed to work, the next step we recommend is attempting to convert the file to a WAV file. Converting to WAV is a common approach employed by professionals as it provides a smoother audio experience compared to MP3 files, which are highly compressed.
Step 1: To begin the process, use the FreeConvert online tool. Start by locating the MP3 file within your system folders and dragging it into the converter interface. Once the MP3 file is loaded, specify the output format as WAV. Look for the option labeled “Output” and select “WAV.”
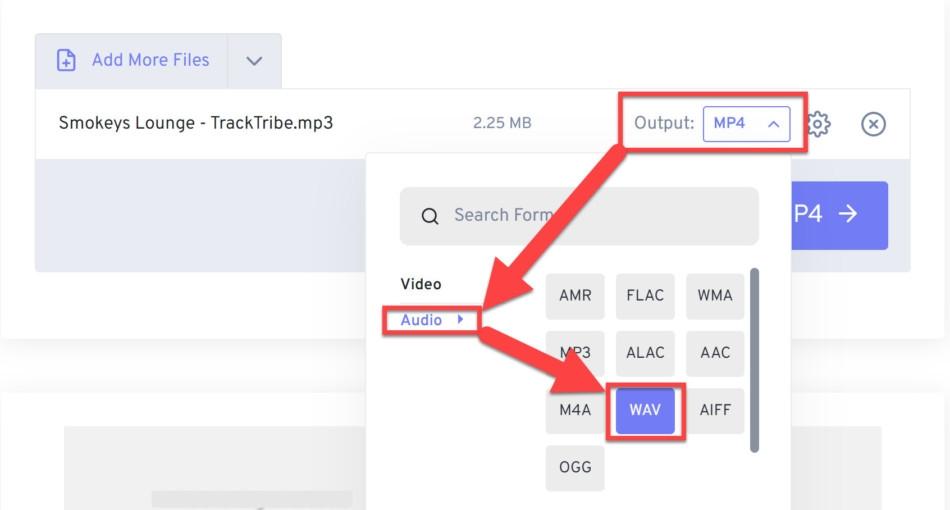
Step 2: For additional customization options, click the gear icon to access the “Advanced Options” menu. Within the “Advanced Options” menu, navigate to the section labeled “Audio Options” and make the following adjustments:
- Choose “PCM_S32LE (32-bit, Uncompressed)” as the dedicated option for “Audio Codec.”
- Adjust the “Audio Sample Rate” to 48000Hz or any other preferred value.
Step 3: After applying the chosen settings, click “Apply Settings” to confirm the changes. Finally, initiate the conversion process by clicking the “Convert to WAV” button.

Step 4: Once the conversion is complete, you can download the WAV file. Now that you have the converted MP3/WAV file, you can attempt to import it into DaVinci Resolve or the desired software/application for further use or editing.
But here’s an easy way out.
You can also import a voiceover or any recorded file in WAV format on DaVinci Resolve without using an MP3 to WAV converter. All you need to do is find a microphone that supports WAV by default, like the Hollyland Lark Max. This wireless microphone’s transmitter also acts as an HD sound recorder. It lets you capture audio of up to 14 hours in 48Khz WAV format and saves it in the internal 8GB backup memory. You can download the WAV file on your PC or laptop to import on DaVinci Resolve without sweat.


Fix 5. Converting MP3 Files to Different Formats (AAC, MP4, MOV) Using FFMPEG
If you have trouble playing an MP3 file in Resolve, you can try converting it to multiple formats using FFMPEG. This will give you different file versions, such as AAC, MP4, MOV, and more. Once you have these files, import them into DaVinci Resolve and see which format plays back correctly. Here’s how you can do it:
Step 1: Proceed to the folder where your audio file is saved. In the address bar, type the following command:
ffmpeg -i <your variable bit rate mp3 filename>.mp3 -vn -ar 48000 -ac 2 -b:a 320k <output 1 in mp4>.mp4 <output 2 in aac>.aac <output 3 in mov>.mov
Step 2: Then press Enter and wait for a few seconds. The files will be generated. Now you can import the converted files into DaVinci Resolve and use them in your timeline.
Step 3: However, if you encounter issues when running FFMPEG from the address bar, you can try the following alternative method using the command prompt.
Step 4: Press the “Windows” key and “R” simultaneously to open the “Run” dialog box. Type “cmd” and click “OK.” The command prompt will open. Take note of the path displayed in the command prompt. This is where FFMPEG will search for your WAV file.
Step 5: Copy your wav file to the path shown in the command prompt. Copy your FFMPEG command, for example:
ffmpeg -i <your filename with extension> -ar 48000 -ac 2 -b:a 320k <any name>
Step 6: Next, right-click in the command prompt and select Paste to enter the code. Press Enter to execute the command. Your file will now be converted.
Fix 6: Inappropriate File Name
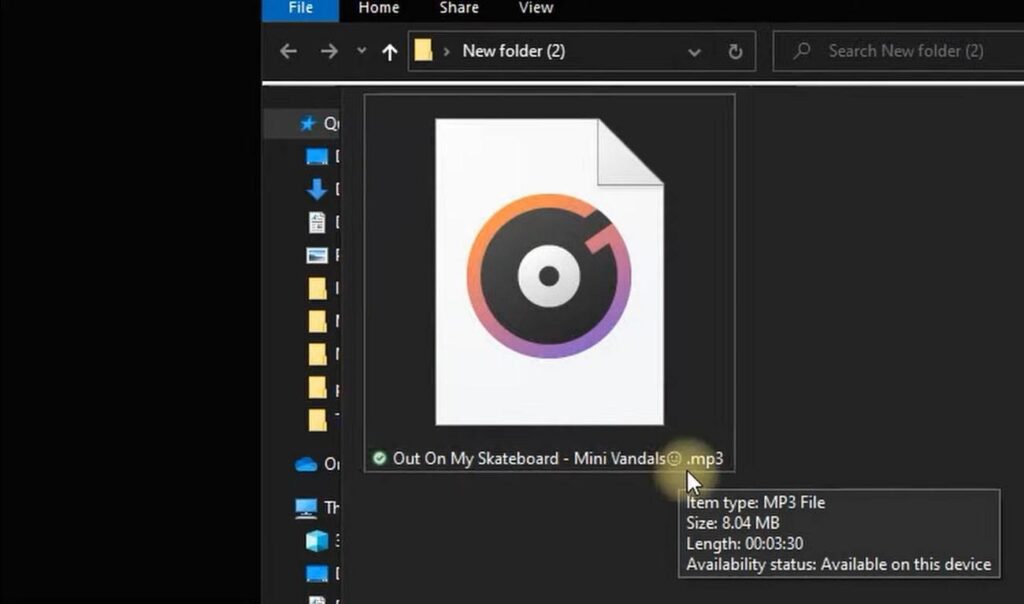
In case you are still facing any difficulty when importing an MP3 file in Davinci Resolve, it might be due to some error in the name of the file. The most common cases include containing emoji in the name of the file. To resolve this, right-click your MP3 file and select “Rename.” Now, remove the emoji from the file and save it again. This will make you able to import files without a hitch.
Conclusion
In the end, we have outlined six easy fixes in this guide to help you with importing MP3 files into Davinci Resolve. We have explained each step-by-step detail to ensure you can follow them without problems. By trying these fixes, such as converting the MP3 file to different formats using FFMPEG and FreeConvert tool, you can increase the chances of successfully importing your MP3 files into Davinci Resolve.
Frequently Asked Questions
1. Why is DaVinci Resolve not importing media?
An outdated or corrupted file is a common cause of DaVinci Resolve’s video import errors. To check if the file is the issue, try playing it in another program. If the file is not playing, it may be corrupt.
2. What media does DaVinci Resolve to accept?
Davinci Resolve is compatible with various video formats such as ARI, MTS, MXF, AVI, CIN, DNG, DPX, CDX, MP4, MXF, EXR, and MOV. However, it does not fully support WMV, MPEG, FLV, MKV, WEBM, 3GP, TS, M4V, and ASF formats.
4. What is the best codec for DaVinci Resolve?
Among the various codecs, we discovered that the DNxHR codec offers exceptional quality. Well, it is important to note that DNxHR files come with significantly larger file sizes compared to H.264 and H.265. In fact, DNxHR files can be approximately 8 to 10 times larger in size.