.png)
Audio fading in video editing is considered a vital element in optimizing the quality of your videos in iMovie. It is essentially a strategy that helps gradually enhance the volume of your audio or any sound clip, starting it with a degree of silence and then editing it to increase to its original volume. This can be especially useful if you’re planning on using quality external microphones such as the Lark M1 by Hollyland.


The methodology is typically implemented at the very start of a video clip to streamline the impact of a scene by introducing different audio clips, music, or sound bites, mixing it with any dialogue to make everything sound natural so that the audience does not get abruptly startled.
Importance of Audio Fading in Video Editing
One of the most vital aspects of using fading techniques to edit your video is that it can allow you to create a smooth and impactful conclusion to your video.
By reducing or increasing your volume carefully, you can steer clear of distorted or ambiguous audio endings that will only serve to reduce the overall quality of the video.
In addition, fading can also develop a feeling of closure, enabling your production to end the video more gracefully, and eliminating any chances of abrupt and/or annoying interruptions.
For example, if your video has narrative story elements, fading the audio could help smoothly highlight the start of a chapter or scene, or signal the end of one. It helps create a more pleasant and inspiring transition to the other parts of the video.
It doesn’t matter whether you’re attempting to create your first-ever video or have been doing so for a while, it is important to become skilled and fading audio when editing your project to provide your audience with a more unique and captivating experience.
Understanding Types of Audio Fades: Fade In vs. Fade Out
Audio fading essentially functions as a technique to introduce transitions in a video. There are two types of fading methods that you can use, fade-ins and fade-outs.
Fading is a calculated enhancement or decrease in the total output of the audio signal, which is going to help you subtly add more build-up to the production, making important transitions within the video more impactful and seamless.
In an audio fade-in, you can begin a sound clip or any music with a gentle volume, increasing the volume of the audio gradually or over 2-3 seconds until achieving the desired volume output.
On the other hand, fading-out audio decreases the volume of the sound bite or music as a scene ends.
Preparing Your Project in iMovie
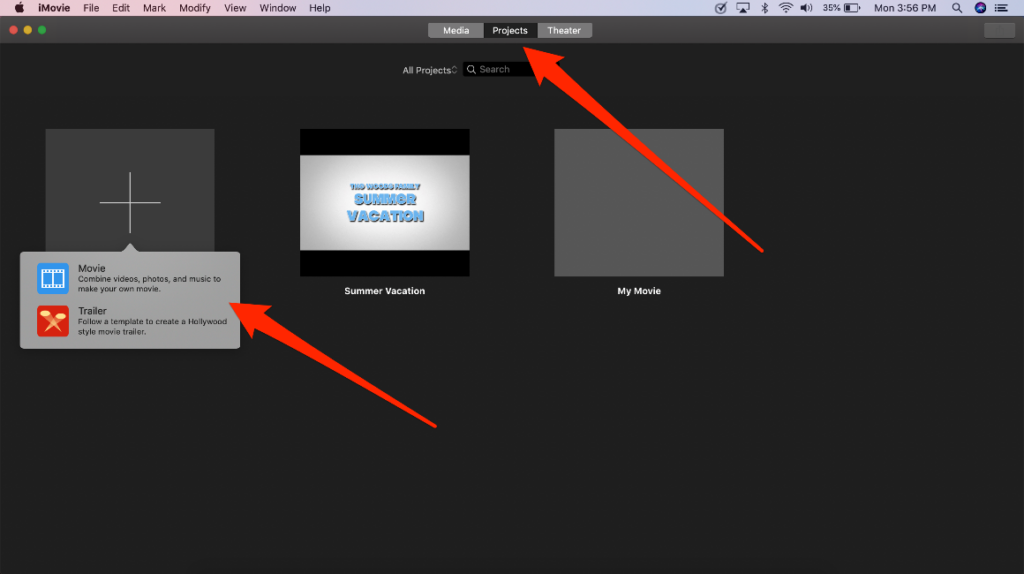
Opening or Starting a New Project in iMovie
If you’re creating a project in iMovie from scratch, you can start by:
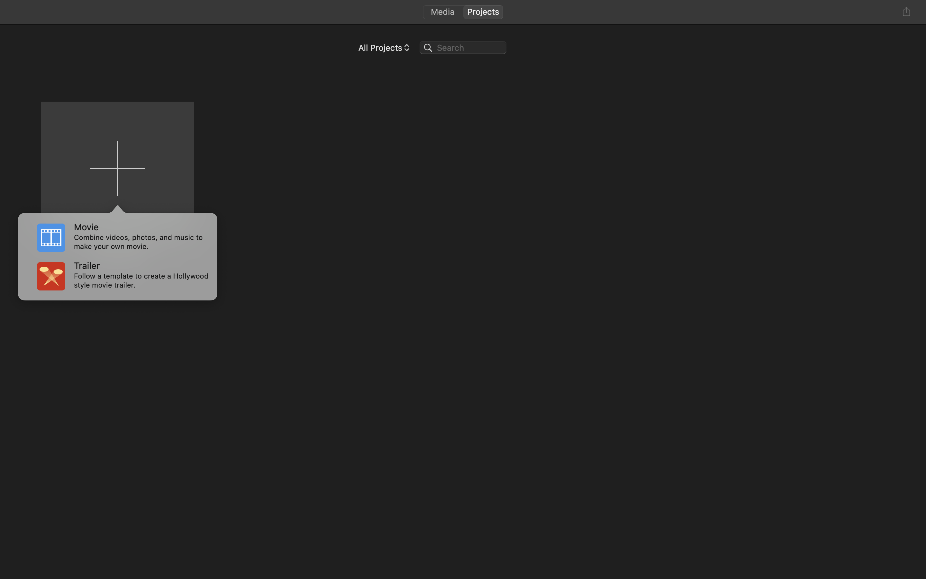
Step 1: Open iMovie and click on “Select Project”
Step 2: Find and click on the “+” sign and then click on “Movie”.
Importing Audio and Video Files
If you want to import or upload a video file on iMovie, do this:
Step 1: Start iMovie.
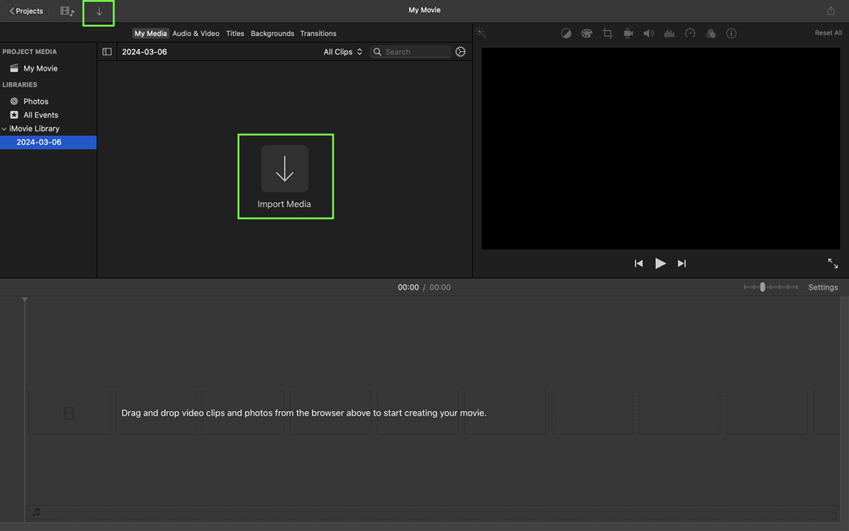
Step 2: Click on “Select File”, then on the drop-down menu, click on “Import Media”.
Adding Audio Files to Your Timeline
If you are making a movie know that you can also import songs and various other types of audio files saved on your computer. To do this:
Step 1: With your video open in iMovie, click on the “Add Media” button.

Step 2: In the drop-down menu, click on “Audio” and then “My Music” and then click on your audio files to import on iMovie.
Basic Steps to Fade Out Audio in iMovie
Selecting the Audio Clip in the Timeline
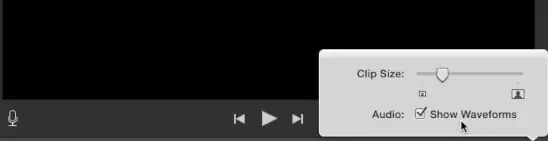
Step 1: To choose the audio clip and edit it, you will need to turn on the audio waveform. You can do this by opening the project and finding and clicking on “Show Waveforms”. It is going to be below the Project window.
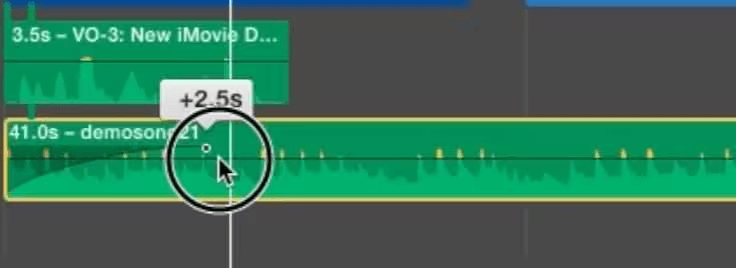
Step 2: Next, you will need to strafe the pointer to make different fade-out changes. Click and hold the pointer (it is going to be a gray handle) on the clip and drag it backward or forward to achieve the desired effect. Moving the clip on the right side of the waveform will result in an audio fade-out.
Step 3: After making the desired changes, play the video on the waveform to check whether the fade-out adjustments are to your liking.

Accessing the Audio Inspector
There is also another way you can manually adjust your fade-out editing in iMovie, it is called the “Audio Inspector”. You can access it by:
Step 1: Select and open your video file or clip on iMovie and double-click on the video, on the drop-down menu, click on “Clip Adjustments”. This is going to open the “Audio Inspector” menu.
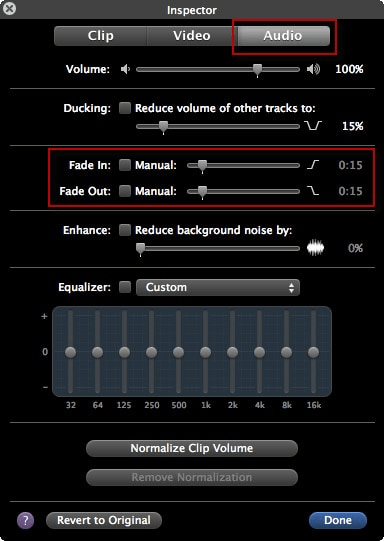
Step 2: On the menu, you can manually change the fade-in and fade-out settings by adjusting the slider.
Step 3: After making the desired changes and testing the playback, click on “Done”, which is going to save the changes you made.

Using Fade Handles to Adjust the Fade Out Duration
If you want to maximize the fade-out duration, you can do this by clicking and holding the gray pointer over your chosen part of the clip you want to fade out and dragging it to the right for however long you want the effect to last in the video.
Advanced Audio Fading Techniques
Adjusting Fade Duration Precisely with the Audio Inspector
When editing an audio clip to add it to the video, simply click on the audio file that you have added to the timeline to open iMovie’s “Inspector” tool. Click on “Audio” on the menu and then click on “Fade”. Doing so will reveal two handles, one for Fade-In and the other for Fade-Out. You can manually and precisely drag the Fade-Out handle to the right side for the desired effect.
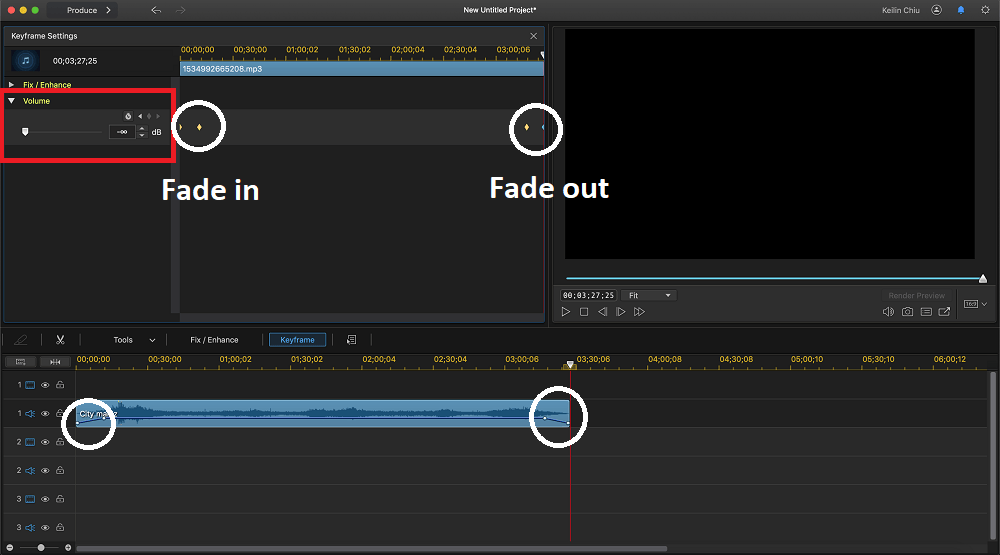
Creating Custom Fade Effects Using Keyframes
Another great way to implement custom fade effects is to use iMovie keyframes. Here is how you can do that:
Step 1: Select your sound clip or the audio file you have added to the timeline and in the drop-down menu, click on “Keyframe” and then on “Volume’ controls.

Step 2: Customize the keyframe for fade-out or fade-in by zeroing the volume completely. Then, drag the bar to achieve your desired fade-in or fade-out setting to a volume you want. This is going to automatically create fade-in and fade-out keyframes.
Utilizing Audio Effects to Enhance Fade Out
Step 1: After you have imported, selected, and implemented a fade-out effect on the timeline, click on the “Volume” button for more volume options.

Step 2: Select and click on the “Action” button. What this option does is help automatically apply the best audio enhancements after you are done editing the file.

Tips for Effective Audio Fading
Matching Audio Fade Out with Video Transitions
One of the best things about iMovie is that it lets users separately edit the audio by detaching it from the video file in the timeline. This is how you can do that:

Step 1: Select or import the audio file you wish to edit.
Step 2: Tap on the audio file you have imported, right-click on it, and select “Detach Audio” to export the file.
Step 3: You will see that your audio file will be detached from the timeline. From there you can start editing the file, apply the necessary fading effects, and then click on “Time to Selection”, which is going to automatically set the audio in line with the video.
Step 4: Finalize the editing process then click on the audio file and save the changes.
Using Fade Out to Smoothly End Scenes
While fade-out effects can be used creatively to streamline the conclusion of a video or transition to a new chapter in the video, it can also be used to edit videos that have an abrupt ending. By carefully dragging and lengthening the fade-out handle, you can conclude your video production more amicably.
Balancing Audio Levels Before Fading Out
Before fading out audio, it is very important to balance or level the volume of the audio clip you are using. This going to help bring a high degree of cohesiveness to the final production. It involves adjusting different sounds and music to achieve relative loudness that matches the scene. It is going to help ensure that no aspect of the audio is abrupt and unnecessarily loud or annoying.
Troubleshooting Common Audio Fading Issues in iMovie
Audio Clip Not Fading Out Properly
At times, iMovie may not fade out your audio clips adequately. If this is a recurring issue, you can resolve it by clicking on “Setting”, located at the top right-hand corner of your timeline, and turn off “Automatic Content” by deselecting it.
Fade Handles Not Appearing on Audio Clips
It is important to understand that you will not be able to see the fade handles by default. You will need to hover the cursor over the timeline, specifically on the audio display. Doing so will reveal the fade-in and fade-out handles.
Saving and Exporting Your Project
Reviewing the Final Fade Out Effect
After you make the final fade-out changes by dragging the fade-out handle in the “Audio Inspector” settings, you should check the sound quality of the effect through playback of the audio and video in the timeline. If everything is as per your requirements, you can exit the audio inspector by saving the final changes.
Saving Your iMovie Project
Step 1: With iMovie open, click on “Projects”.
Step 2: Find and tap on the “Three Dots” that will be highlighted at the right of the name of your project and click on “Share Project” from the menu.
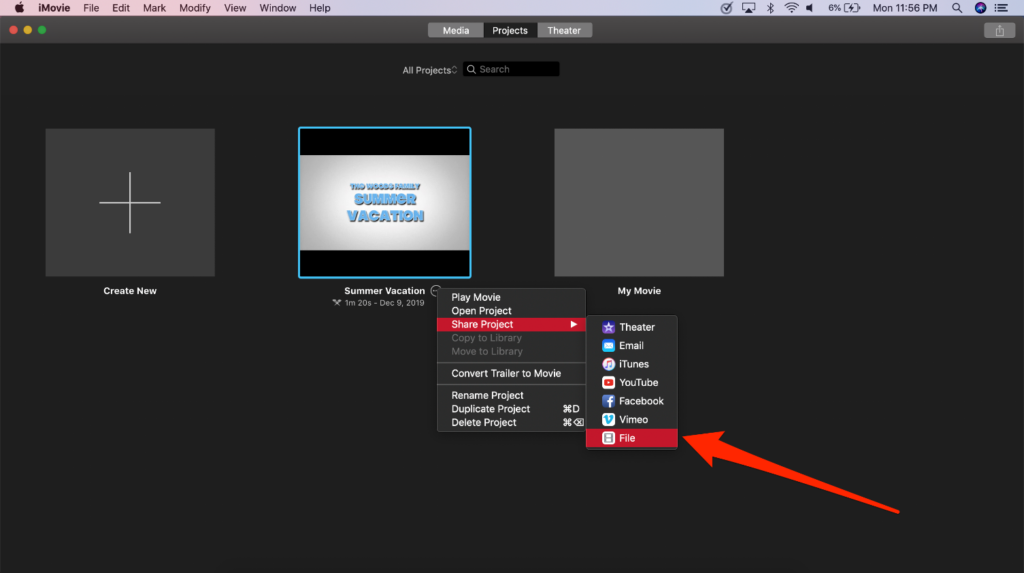
Step 3: Click on “File”. By sharing your project on “File”, you will be able to save the project on your Mac or any other device.
While mastering audio transitions is crucial for smooth videos, capturing clear audio beforehand can simplify editing significantly. Using a wireless lavalier microphone ensures crisp, clean audio straight from the start, making editing in iMovie much easier and professional-sounding.
Frequently Asked Questions Related to Fading Out Audio in iMovie
- Can You Fade Out Audio on Both Mac and iOS Versions of iMovie?
Yes, you can fade out audio on other iOS devices such as the iPad by clicking on the “Audio” button and tapping on the “Fade” button to highlight the fade handles.
- How Do You Fade Out Audio That Is Part of a Video Clip?
To fade out audio in a video clip, you will need to open the video file first on the timeline and then click on the “Inspector” tab. Choose “Audio” and manually make changes to the fade-out bar by dragging it to the right.
- Why Can’t I Find the Fade Handles on My Audio Clip?
If you can’t see the fade handles, you will need to tap on the audio display on the timeline.
- Can I Fade Out Music and Dialogue Separately in the Same Clip?
To do this, you will need to detach the audio clip from the video clip to independently make changes or edits.