.png)
Recording audio on OBS might seem simple at first, but getting it right can be tricky. Maybe your mic isn’t working or your game sounds are missing. Don’t worry. Whether you’re recording a podcast, gameplay, or a tutorial, this guide walks you through exactly how to set up and fix audio issues in OBS.
We’re skipping the fluff and diving straight into the methods and solutions that actually work. If you’ve ever hit record and ended up with silence or static, you’re in the right place. Let’s fix your audio setup step by step.
How to Record Audio on OBS with Windows
If you’re using Windows, recording audio on OBS is pretty straightforward once you know where to look. OBS gives you full control over what your audience hears, whether it’s your voice, your system sounds, or both.
In this section, we’ll break down the exact steps to get your audio working perfectly. From installing OBS to setting up your mic and choosing the right output format, here’s how to do it right from the start.
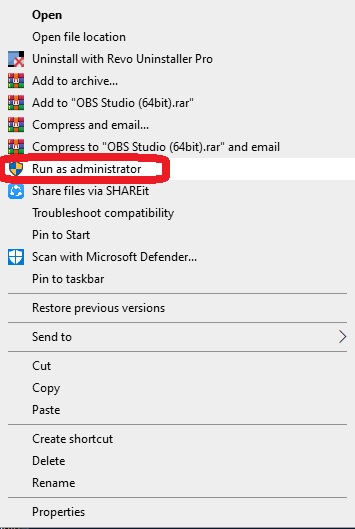
Step 1. Download, install, and launch the OBS Windows version.
Getting started with OBS on Windows only takes a few minutes. Here’s how to download and set it up so you can start recording audio right away:
- Go to the official OBS website and download the Windows version.
- Once the installer finishes downloading, open it and follow the setup instructions.
- After installation, launch OBS and let the auto-configuration wizard run.
- When prompted, choose “Optimize just for recording” to focus on audio and screen capture.

That’s it. OBS is now ready to be customized for audio recording.
Step 2. Set Up Audio Output Devices.
Now that OBS is installed, it’s time to set up your audio sources. This is where you tell OBS what sounds to record from your system and microphone. Follow these steps to get it right:
- Navigate to the bottom-right corner of OBS, click on “Settings” and go to the “Audio” tab.
- Under the “Global Audio Devices“ section, select “Desktop Audio” to capture your internal system sound.
- If you want to record your voice, also choose your microphone under “Mic/Auxiliary Audio”.
- Click “Apply”, and then “OK” to save your settings.

Your audio devices are now connected and ready to capture sound.
Step 3. Adjust an Audio-Only Output Format.
If you only want to record audio without video, OBS can do that too. You just need to tweak a few output settings. Here’s how to set it up for audio-only recording:
- Go to “Settings” and click on the “Output” tab.
- Change the “Output Mode” from “Simple” to “Advanced”.
- Click on the “Recording” tab that appears.
- Scroll to “FFmpeg Settings” and find “Container Format”.
- Choose “mp3” or another audio format you prefer.
- Click “Apply”, and then “OK” to save the changes.

Now, OBS will record just the audio, giving you a clean sound file to work with.
Step 4. Check Audio Levels in the Mixer Panel
Before you press record, it’s important to check if your audio levels are balanced. OBS makes this easy with its built-in Audio Mixer. This panel shows real-time activity for each audio source. Here’s how to use it effectively:
- Look at the Audio Mixer section at the bottom of the OBS window. You’ll see volume bars for each active audio source.
- As you speak or play audio, watch the color bar move.
- Green means your volume is clear and safe.
- Yellow means it’s getting louder but still fine.
- Red means your audio is too loud and may cause distortion.
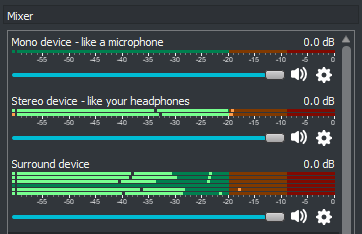
- If your volume is too low or too high, adjust it using the sliders next to each source.
- For more control, click the gear icon next to the source and go to Filters. Add a Gain filter to boost or reduce volume precisely.
This step ensures your audio sounds clean and professional in every recording.
Step 5. Configure Audio Quality Settings
To get crisp and clear audio, you need to fine-tune your quality settings in OBS. This step makes a big difference, especially if you’re recording music, voiceovers, or podcasts. Here’s how to set it up:
- Go to Settings, then click on the Output tab and select Recording.
- Scroll down to the Audio section. Choose a bitrate between 160kbps (good) and 320kbps (best quality).

- Now go to the Audio tab in Settings. Set the Sample Rate to either 44.1kHz or 48kHz.
- 44.1kHz is standard for music.
- 48kHz is common for video.

- To avoid sync issues, make sure your system’s audio settings match this sample rate. You can check this in your sound settings on Windows.
These tweaks help your recordings sound sharp and professional right from the source.
Step 6. Start Recording Audio on OBS.
You’re all set up, and now it’s time to start recording. Even without a video source, OBS can easily capture just your audio. Here’s how to begin:
- Click the “Start Recording” button in the main OBS window.
- A popup may appear. Click “Yes” to confirm. The session will start right away.

Since you’re recording audio only, there won’t be a live preview. It’s a good idea to do a short test recording first, especially for longer sessions. If anything sounds off, tweak your audio levels or bitrate settings. Once everything’s ready, play the audio you want to capture and speak into your mic if needed.
That’s it—OBS is now recording your audio cleanly and smoothly.
Step 7. Stop and Access the Recording When Done.
Once you’re done recording, it’s time to wrap things up and check your audio. Stopping and accessing your file is simple. Here’s what to do:
- Click the “Stop Recording” button in OBS to end the session.

- By default, your audio file (like an .mp3) will be saved in C:\Users\admin\Videos.

- Open this folder to preview your recording and make sure everything sounds right.
- If you want to save your files somewhere else, navigate to “File” > “Settings” > “Output” > “Recording” and change the recording path.
Now you have your audio, ready to use or edit as needed.
How to Record Audio on OBS with Mac
Recording audio on OBS with a Mac takes a few extra steps compared to Windows. That’s because macOS doesn’t let OBS capture desktop audio on its own. To fix this, you need a second program like iShowU Audio Capture. Here’s the quick setup to get your Mac ready for audio recording on OBS:
- Install OBS Studio and iShowU Audio Capture, then open both apps. In Audio MIDI Setup, click the + button at the bottom left.
- Select your main devices and create a Multi-Output Device that includes iShowU Audio Capture.
- Go to System Preferences > Sound and set your output to the Multi-Output Device.
- Open OBS, go to Settings > Audio, disable Desktop Audio, and set Mic/Auxiliary Audio to iShowU Audio Capture.
Now you’re ready to record desktop audio on your Mac with OBS.
Conclusion
Getting your audio set up on OBS is easier than you might think. Just follow the steps, and you’ll have clean, high-quality recordings in no time. Remember, the key is to check your settings and test before you go live. Whether you’re on Windows or Mac, OBS gives you the tools to capture exactly what you need. Now, go ahead and make your recordings sound their best!
FAQs
How do I record my screen with audio on OBS?
Recording your screen with audio on OBS is straightforward once you know where to look. Start by opening the Settings from the Controls section. Switch the Output Mode to Advanced to unlock more options. Then, under the Recording tab, select the format you want to save your video in. Make sure to enable all the audio tracks you want to capture during your recording. This way, OBS will record both your screen and audio sources clearly and separately, giving you more control when editing later.
Does OBS record external audio?
Yes, OBS can record external audio. Simply add an Audio Input Capture source for your mic or other devices. For system sounds, add an Audio Output Capture source. Renaming these sources helps keep things organized, like “Mic” or “Game Audio.” This way, OBS captures all the audio you need clearly.
Why is OBS recording no sound?
If OBS isn’t recording sound, a common reason is that the wrong audio device is set as the default playback. This happens when another device takes priority over your main speakers or headphones. To fix it, right-click the speaker icon on your taskbar and select Sounds. Go to the Playback tab, choose your preferred audio device, and click Set Default. Finally, hit Apply to save the change. This quick adjustment usually solves the no-sound problem in OBS.