.png)
If you want to start a podcast and you’ve got a Mac or Windows PC, GarageBand offers you an excellent way to get started. It lets you record your voice, arrange different audio parts, and allows you to do edits all in one place. You just need to set it up once, and you’re ready to go.
In this tutorial, you’ll know the full process of how to record a Podcast in GarageBand and edit it afterward using simple steps that are easy to follow.
How to Record a Podcast In GarageBand In 9 Easy Steps
While recording your podcast in GarageBand, you don’t need to be tech-savvy. You’re just using your voice and maybe a few audio clips. GarageBand has everything lined up for that, once you know where to look and what to click.
Let’s begin with the instructions:
Step 1. Start a New Project
Open GarageBand and choose Empty Project. Don’t pick Voice, Hip Hop, or anything else from the music presets. You’re not plugging in instruments or building beats here. After selecting Empty Project, click Create. A new window pops up asking where the audio will come from.

Since you’re recording your podcast, select the microphone as the input source. You’ll see a dropdown labeled Input. Choose your mic here, like the ATR USB microphone, and make sure it’s set to Input 1.

If you’re using something like the ATR USB mic, choose that from the list and double-check that it shows up under Input 1. You can select Input 1 + 2 if you want to do an interview with another person. Then click Create.

In case you don’t see it right away, click the arrow to open preferences and pick the right audio input from there. Once everything looks good, the mic is set, the input is correct, and the output is selected, click Create, and the project will open up.

Step 2. Use the Right Input Setting
Inside GarageBand, you’ll see your first audio track show up automatically. Talk into your mic and watch for visual movement in the track. You’ll notice the bar reacting with color and motion. That’s what you want. It shows that GarageBand is picking up your voice.

If there’s no movement at all, that usually means the mic isn’t connected, selected, or turned on. Double-check by going back to GarageBand Preferences, and make sure your ATR USB mic or whatever mic you’re using is selected as the input.

You can also set the mic from within the track controls. In the Track section, there’s another Input option that should show the mic name.
Make sure the input icon still shows the single solid circle. If you accidentally select stereo (the double circle), you’ll see two bars instead of one, and the recording may sound unbalanced. Therefore, select Mono.

Also, check your mic’s power. For example, you may show a blue light when it has power, but that doesn’t mean it’s fully on. Flip the switch on if needed.
Step 3. Remove Music Settings You Don’t Need
By default, GarageBand shows settings for musicians, like Compressor, EQ, Tempo, Bar, Beat, Key, and Time Signature. You don’t need any of that for podcasting. To simplify the screen, look for the dropdown near the top where it shows bars or tempo. Change it to display Time. That gives you a timestamp instead of beats and bars.

Furthermore, disable the Count-in. That feature plays four beats before the recording starts, but you’re not syncing to a rhythm here. Turn off the Metronome as well. You don’t need clicks in the background since you’re just recording your voice.

Once those are off, GarageBand becomes easier to navigate. Now, the focus stays on time and voice only.
Step 4. Check Input Volume and Avoid Clipping
Next, talk into your mic again while watching the volume bar for your audio track. The bar should hit yellow during regular speaking. That’s where your voice sits comfortably. If the bar spikes into red too often, that’s called clipping. Because of this, your listeners will hear distortion, and it’s not pleasant.

To fix this, use the Input Volume slider to bring things down if the audio’s too strong. You can find this control under the track name. Every line in GarageBand is called a Track. These can be layered, shifted, and edited individually. Start with a main track for your voice. That’s the default one you just tested.
You can add more tracks for things like intro music or interview clips, and they show up as separate audio. To import music or an interview, just drag the MP3 file from your desktop into GarageBand. It automatically creates a new track. Once imported, you’ll see the waveform appear.
Every individual track here—one, two, three, four—has its own unique volume control. You can raise and lower the volume for that entire track as a whole. If you adjust this up, the entire track becomes louder. If you lower it, the track becomes softer.
That’s helpful, for example, if you have an interview that comes in and it’s very soft. If you’re listening and wish that it was louder, you can adjust that here. What’s also nice is that you don’t have to be perfect. Try to get it as close as possible to your ear. The software, both GarageBand and one that you’ll see later, will help you normalize it, meaning it’ll match all the levels properly for the entire file.

With your main voice, you would just record that directly. Your intro is something you just add in once, and it’ll be automatically in your master templates, so you don’t need to worry about it. Again, the whole purpose of this is to make it easy for your production to go down the road.
Step 5. Use Mute and Solo Tools to Focus on One Track
There are a few more controls worth paying attention to. You need to make sure the left and right pans are centered. You don’t need to adjust this at all. Panning shifts sound between the left and right speakers, and since you’re doing podcasting, just leave it at zero.

Below that, you’ll see the Mute button. If you’ve got a bunch of tracks and want to turn one off really quickly, you can press that, and it silences the track.

If you want to listen to one solo track, hit the headphone symbol. That automatically mutes everything else.

Let’s say you just want to hear one part clearly without anything else playing over it. Just click Solo, and GarageBand will isolate it for you so you can focus on that one track.
Step 6. Do a Test Recording and Listen Back
Now it’s time to do a quick test recording. You don’t need to overthink it. Just hit Record and talk about something. Then stop the recording.

You’ll see the waveform appear as you speak.
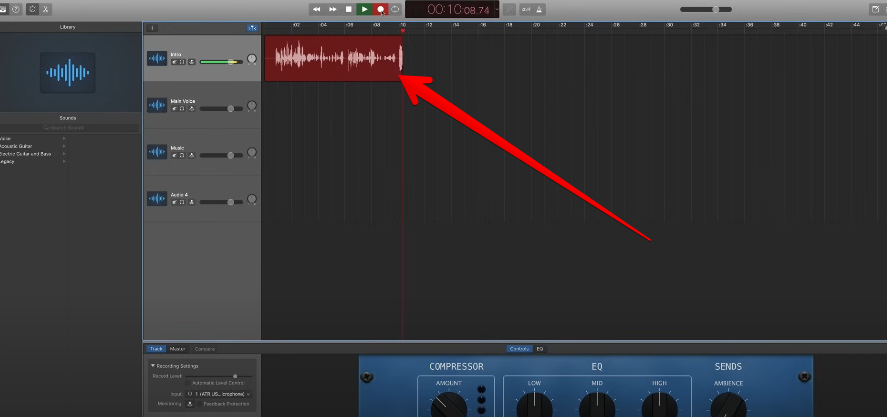
Some areas might be louder, others softer. Places with no sound are usually pauses. The important thing to check is whether anything was clipped. That happens when the audio gets too loud, and the waveform crosses the outer limits of the display. You don’t want that.
Once the recording looks good, you can click the back button to go back to the beginning and hit play.

Listen to the test and see how it sounds. If you want to change the ending, you can move the playhead to the right spot, click Edit, and select Split Regions at Playhead.

Now you’ve got two sections. You can move the second part away or even drop it into a new track.

If you stack two voice clips on top of each other, it’ll sound strange with both playing at once. If that happens and it sounds weird, just highlight the part you don’t want and hit Delete.
Step 7. Add Another Track and Test Volume Adjustments
GarageBand allows you to record or import multiple tracks. Go back to the beginning, click the music track, and this time just hum something for fun. After recording, hit play and listen.

If the voice track is still active while you’re humming, it can get distracting. To fix that, go back, undo the last action, then mute the intro track. Now hum again and record.

Then hit play and hear how that sounds by itself.

Once you’re happy with the recording, unmute everything and play both tracks together. If the music feels too loud, this is where adjustments come in.
Step 8. Add a Fade Using Automation Controls
Select the music track and go to Mix > Show Automation.

You’ll see a faded yellow line appear across the track. That’s your automation control for volume.

Click the yellow line once where you want the fade to begin. Then click again where you want the music to drop out. Two points will appear. Drag the second point downward to lower the volume smoothly.

You’ll now see that the track starts at zero decibels and gradually fades down. Click Solo and hit play to hear how the fade sounds by itself.

Once that sounds good, unsolo everything and hit play again to hear the full result.
If you want to turn automation off, click the automation button again. It might not show up until you enable it the first time, but once it’s there, you can toggle it easily.

Step 9. Final Review and Handling Cycle Playback
After everything is edited and lined up, your next step is to create a test recording and play around with the software a bit more. Try cutting sections, moving clips, splitting tracks, and deleting pieces—just get comfortable with how GarageBand behaves.
There’s one thing to watch out for here. In the latest version of GarageBand, the Playhead can be affected by clicking in the space just above it. This activates something called Cycle.

If you click and drag in that top area, it highlights a region in orange. When you press play, only that section loops over and over again.
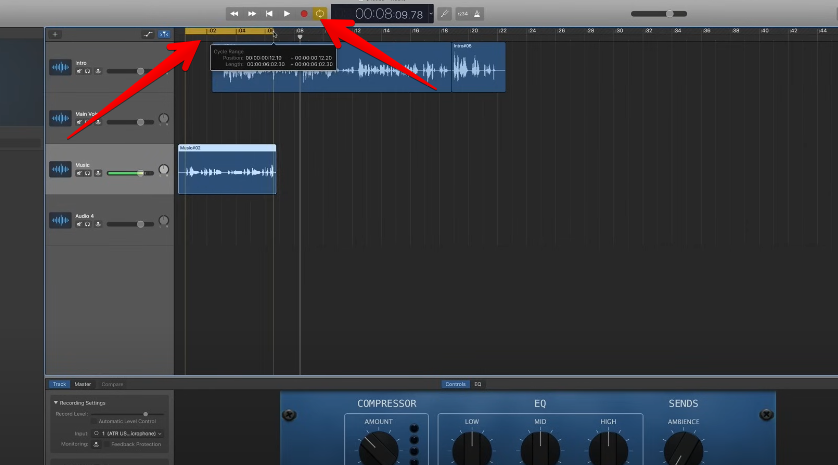
That feature is meant for music production when someone wants to hear a loop repeatedly. For podcasting, it’s not helpful. If that ever happens to you by accident, don’t worry. Just press the C key to turn Cycle off. Then grab the playhead and drop it anywhere you want.
Tip: Don’t overthink your voice. What matters most is audio quality, and that’s what you’re setting up right now.
That’s about it. Now, you can record a whole podcast episode, export it, and share it.
Conclusion
In this guide, you’ve explored how to record a podcast in GarageBand software for Windows and Mac computers. Take these instructions as a starting point and experiment with the features to create something that your audience will actually enjoy listening to.
FAQs
Can I use GarageBand to record a podcast?
Yes, you can definitely use GarageBand to record a podcast. It gives you multiple tracks, volume controls, and automation tools that help organize your voice, music, and interviews. You just need to set up the input, add tracks as needed, and export once you’re done editing. It’s all built-in.
Is GarageBand good for audio recording?
GarageBand is great for audio recording, especially for podcasting. It lets you control volume levels, record multiple tracks, and clean things up without needing other software. Everything from voice to intro music can be layered and edited easily. It’s more than enough to create a clean, solid podcast episode.
How to save GarageBand as MP3?
To save your GarageBand project as an MP3, go to Share > Export Song to Disk. From the options, select MP3 as the file format. You can name the file, choose the quality, and hit Export. That creates a standard MP3 file ready to upload or share anywhere you want.