.png)
Adobe Audition is a leading audio editing software that offers a comprehensive toolkit for recording, mixing, editing, and mastering Podcast audio, suitable for both beginners and experienced podcasters.
Pair it with a professional wireless lavalier mic like Hollayland LARK MAX with MaxTimbre technology, 48kHz/24-bit resolution, and advanced noise cancellation. And you’ll have a podcast with a clear voice and studio-quality sound in any environment. Here’s how to edit your podcast audio in Adobe Audition, step by step.


1. Prepare Your Audio Assets
To streamline the editing process, gather all your recordings in one location before starting. This includes conversation audio, co-host/guest audio, theme music, intro/outro, and ad reads. This organization is especially helpful when managing numerous episodes.
2. Select The Editor in Adobe Audition
Adobe Audition offers two editing modes:
Waveform Editor (Destructive): Permanently alters audio files, ideal for mastering, batch processing, or format conversions.

Multitrack Editor (Non-Destructive): Preserves originals, allowing for flexible edits in music/audio projects.

It is recommended to use the multitrack editor for editing a podcast. However, you can switch between editors by double-clicking a multitrack clip to edit destructively in Waveform. Unsaved destructive edits can be undone. You can also combine both methods for efficient workflows.
3. Import Your Audio File
- Import your pre-recorded audio files (interviews, intros, music, sound effects) by going to File > Import > Choose your audio file > Open.

- Drag and drop these files onto separate tracks within your multitrack session for easier management.
- You can use the bar at the top of editing area to zoom out and zoom in the audio track.

4. Clip the Unwanted Audio
- Select the Razor tool (razor blade icon).

- Make cuts by clicking on the track before and after the section you want to delete.

- Switch to the Move tool (left of the Razor tool).

- Select the unwanted clip and press Delete.


- Drag the remaining clip to close the gap.

5. Clean Up Background Noise
The Noise Reduction effect in Adobe Audition is the most effective way to remove broadband background noise, such as hiss, hum, or constant background sounds. It works by analyzing a noise sample and then reducing that noise throughout the audio file.
- Select a silent section (room tone) where only noise is present.
- Go to Effects > Noise Reduction/Restoration > Capture Noise Print (Shift+P).

- Press Ctrl+A (Cmd+A on Mac) to select the entire track.
- Go to Effects > Noise Reduction/Restoration > Noise Reduction (Process).
- Adjust sliders (Noise Reduction, Reduce By, and Frequency Smoothing) until noise is minimized without distorting the voice.

Tip: The Lark MAX’s ENC technology reduces ambient noise during recording, making post-production easier.
6. Normalize Audio Levels
- Select the entire track (Ctrl+A).
- Go to Effects > Amplitude and Compression > Normalize (Process).

- Select dB in the pop-up window.
- Set Normalize to: -3dB for headroom (prevents clipping).
- Click Apply.

7. Remove Mouth Clicks & Pops
There are multiple ways to remove mouth clicks and pops in Adobe Audition. You can use the Click/Pop Eliminator, Declicker, or Automatic Click Remover effects. Alternatively, manually highlight and delete them. Although Declicker is the most efficient way. Here’s how to use it:
- Double-click the track to open it in Waveform view
- Select an area on your track with click sounds to analyze the Decklicker effect

- Go to Effects > Diagnostics > DeClicker (Process)

- Under the diagnostic section, select Declicker Effect, and a Custom Preset as per your requirement (Heavy Reduction, Light Reduction, or Medium Reduction)

- Click the Scan button to scan the whole audio for all clicking sounds.
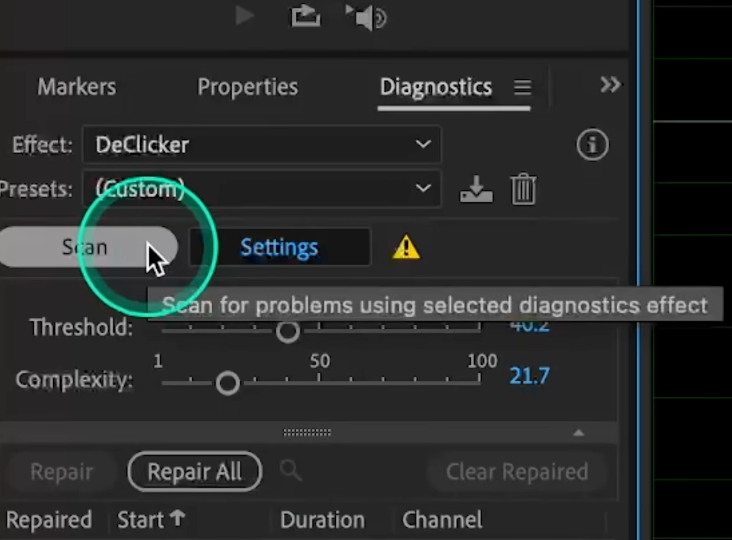
- Click Repair All to remove the clicking sounds automatically.

- You can repeat the same process to scan and repair if you need to remove the clicks again.
8. Apply EQ for Clarity
Equalization (EQ) is a powerful tool in Adobe Audition for enhancing vocal clarity and overall sound quality. To apply EQ effectively, you need to be familiar with the key frequency ranges associated with different vocal characteristics:
- Low End (80-200 Hz): Fullness and warmth, but too much can lead to muddiness.
- Low Mids (200-500 Hz): Body of the voice, but too much can make it sound boxy.
- High Mids (2-4 kHz): Clarity and presence, crucial for vocal intelligibility.
- Highs (5 kHz and up): Air and brightness.
Steps to Apply EQ
- Go to Effects > Filter and EQ > Parametric Equalizer.
- Use a High-Pass Filter (80Hz) to remove rumble.
- Boost 2-5kHz slightly for vocal presence.
- Cut 200-500Hz if the voice sounds muddy.
- Click Apply after selecting your preferred EQ level.

9. Compression for Consistent Volume
To achieve consistent volume, you can apply compression and control the dynamic range. It makes the quiet parts louder and the loud parts quieter, resulting in a more even sound. LED and gain reduction meters provide an overview of audio signal processing.
Go to Effects > Amplitude and Compression > Dynamics Processing, and set the following parameters under Dynamic Effects

- Auto Gate: Cuts noise below a set threshold (LED: green = audio passing, red = silence, yellow = transition phases).
- Compressor: Tames peaks using Threshold and Ratio. Monitor reduction via the Gain Reduction meter.
- Expander: Increases dynamic range by reducing quiet sounds below the Threshold.
- Limiter: Prevents clipping by capping peaks (LED lights when active).
Gate first to clean noise, then compress, and finally limit to ensure loudness compliance. Use the meters to visualize adjustments in real time.
10. Add Fade-Ins & Fade-Outs
You can apply Fade-ins (gradual volume increase at the beginning) and Fade-outs (gradual decrease at the end) to smooth audio transitions. There are three ways to apply them in Adobe Audition:
Quick Fades
- Drag the fade handles (small squares) at clip edges in the Editor.
- Horizontal dragging adjusts length; vertical dragging changes curve shape (linear/logarithmic).


Precision Fades
- Use Effects > Amplitude and Compression > Fade Envelope for preset curves (e.g., smooth, logarithmic) or custom shapes.

Advanced Control
- Apply a Gain Envelope (same menu) to keyframe volume changes at specific points.

11. Mastering and Exporting
Mastering (Optional)
You can apply mastering effects for a polished sound, such as using the “Subtle Clarity” preset in the Mastering effect (Effects > Special > Mastering).
Exporting
- Navigate to File > Export > Multitrack Mixdown > Entire Session
- Select your preferred format:
- MP3 (recommended for distribution)
- WAV (recommended for archival/master copies)
- Configure audio settings:
- Sample rate: 44.1kHz (standard) or 48kHz (higher quality)
- Bit depth: 16-bit (standard) or 24-bit (higher dynamic range)
- For MP3 files:
- Set bitrate to 128kbps (stereo) or 64kbps (mono voice)
- Click Export to save your final podcast file
Conclusion
To achieve professional-quality podcast audio in Adobe Audition, experiment with settings and effects to optimize your sound. Consistent audio levels, noise reduction, EQ, compression, and proper exporting are essential for polished, engaging episodes. For superior raw audio, the Hollayland LARK MAX microphone offers studio-grade clarity with ENC noise cancellation and backup recording, streamlining post-production.
FAQs
Q1: Can I edit a podcast recorded on multiple mics in Adobe Audition?
Yes, Adobe Audition’s multitrack mode allows you to import, arrange, and edit audio from different sources, including multiple microphones, simultaneously. You can combine these tracks, apply effects, and mix them to create a polished podcast episode.
Q2: How can I make my podcast vocals sound warmer in Adobe Audition?
To warm up podcast vocals, boost low frequencies (300Hz-1kHz range with a parametric EQ), add tube or transformer saturation, and apply parallel upward compression to the lows. Reduce background noise and use a noise gate to minimize breath prominence.
Q3: What’s the best EQ setting for podcast vocals?
A good starting EQ for podcast vocals includes a high-pass filter around 80-100Hz to remove low-end rumble and a presence boost in the 1-4kHz range for clarity. Adjustments in the mid-range may be needed to address muddiness or nasality. However, optimal settings depend on the specific recording and vocal characteristics, so critical listening and customized adjustments are essential.