.png)
Nothing ruins a great video faster than background noise. Whether it’s wind, traffic, or chatter, unwanted sounds can make your content hard to watch. The best fix is to stop the noise before it starts. That’s where the Hollyland LARK M2S shines. Its logo-free design keeps your setup clean and professional, while the titanium clip-on makes it easy to attach and forget.


But if you’re already stuck with noisy audio, don’t worry! This guide will walk you through simple and effective ways to remove background audio from any video. Let’s clean up your sound and save your content.
Method 1: Use Audio Editing Software
One of the most reliable ways to clean up background noise is by using audio editing software. These tools give you full control over what stays and what goes. If you’re working with consistent sounds like a low hum or fan noise, this method works exceptionally well. Let’s start with Audacity, a free and powerful option that’s perfect for beginners.
How to Remove Background Audio with Audacity
- Open your video’s audio in Audacity.
- Find a quiet part in the track where only the background noise is present. Select that section.
- Select Effects > Noise Reduction and click Get Noise Profile. This tells Audacity what to filter out.


- Now select the entire audio clip.
- Go back to Effects > Noise Reduction. You’ll now be able to adjust how much noise to remove.

- Use the Residue option to hear what will be taken out. This helps you fine-tune the settings.
- Once it sounds right, press OK to apply the changes.
Be careful with sensitivity. If it’s too low or the noise sample isn’t accurate, it can leave weird tones or artifacts in your audio. Take your time and experiment until it sounds clean.
Method 2: Use AI-Powered Online Tools
If you’re looking for a fast and easy fix without downloading heavy software, AI tools can do the job for you. These platforms are built to clean up audio automatically using intelligent algorithms. You just upload your video, and the tool does the rest. No editing skills needed. Two of the most popular options are Veed.io and Descript. Here’s how to use them.
How to Remove Background Audio with Veed.io
- Go to Veed.io and upload your video. You can also record one directly using their webcam recorder.

- Click on the video in the timeline, then select Clean Audio. The AI will scan your file and remove background noise automatically.

- Once the audio is cleaned up, export your video or audio file, and it’s ready to share.

How to Remove Background Audio with Descript
- Create an account on Descript and start a new project. Drag and drop your video into the project workspace.

- Descript will generate a transcript of your video automatically.
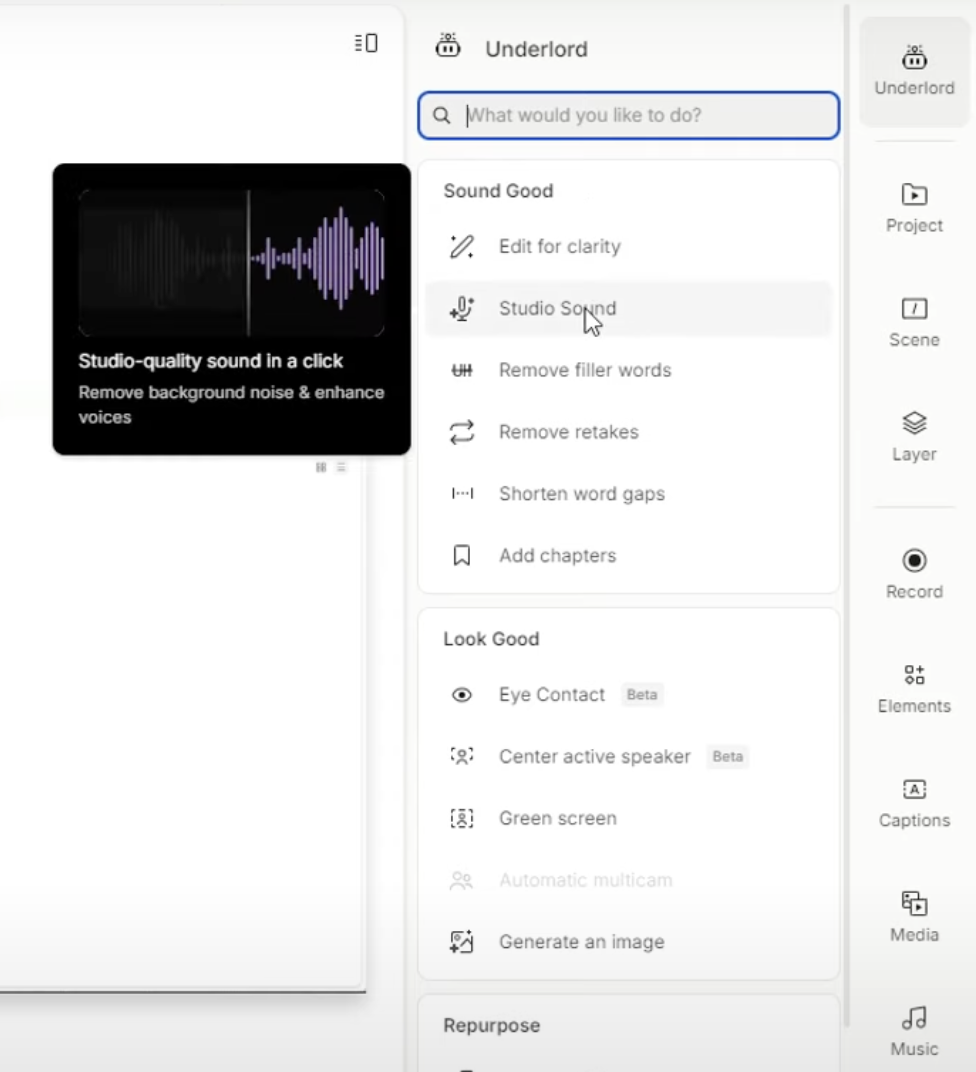
- Go to Underlord and click on Sound Good. This tool removes unwanted background noise and improves audio clarity.

- Choose Studio Sound to make your audio cleaner and clearer.
- Make any edits if needed, then hit Publish.
- Choose Export, pick your file format, set your preferences, and click Export to save your cleaned video.
Method 3: Use Video Editing Software with Built-In Audio Tools
If you’re already editing your video, why not fix the audio while you’re at it? Many professional editing programs include powerful audio tools that let you clean up background noise without switching apps. These features are built right into the software and are designed to be quick and effective. Whether you’re using Adobe Premiere Pro or Final Cut Pro, here’s how to improve your audio directly inside your editor:
How to Remove Background Audio with Adobe Premiere Pro
- Open your project in Premiere Pro. Then go to Window > Effects.
- Select your video clip in the timeline. In the Effects panel, find Audio Effects > Noise Reduction/Restoration > DeNoise, and double-click it to apply.

- Click Edit to open the Effect Controls. Adjust the Reduction knob until it reads around -10 dB to reduce the background noise.


- Hit Play to preview the changes and tweak further if needed.
How to Remove Background Audio with Final Cut Pro
- Import your video and drag it into the timeline. Identify the parts with unwanted noise.
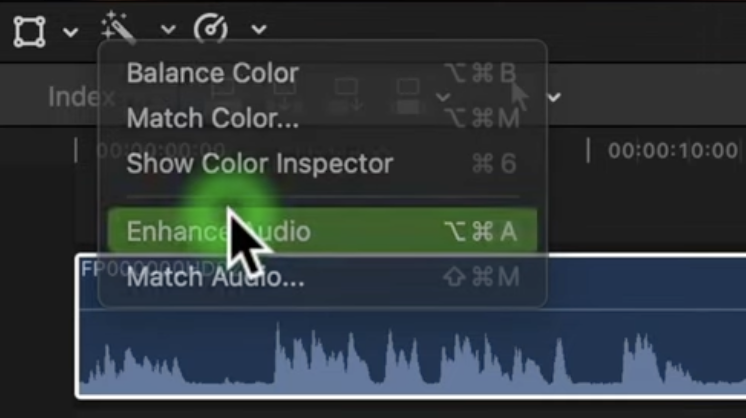
- Click the audio clip, then open the Inspector panel by clicking the Inspector icon (the magic wand). Select Enhance Audio.
- Switch to the Audio tab (speaker icon).
- Under Audio Enhancements, turn on Noise Removal.
- If your clip has a hum, enable Hum Removal and choose between 50Hz or 60Hz, depending on your region.

- Use the slider to fine-tune the results.
- For more control, go to the EQ section in the Audio Inspector. Choose a preset like Voice Enhance or manually adjust the bands to remove specific noise.
- Play through your clip with headphones. If any noise remains, return to the Audio Inspector and refine the settings.
Method 4: Use a Voice Enhancer Tool
Sometimes, the best way to fix background noise is to stop it in real time. Voice enhancer tools like Krisp use smart noise cancellation to clean up your audio as you speak. They’re especially useful for meetings, voiceovers, or recordings where you want clear sound without editing later. Here’s how you can get started:
How to Remove Background Audio with Krisp
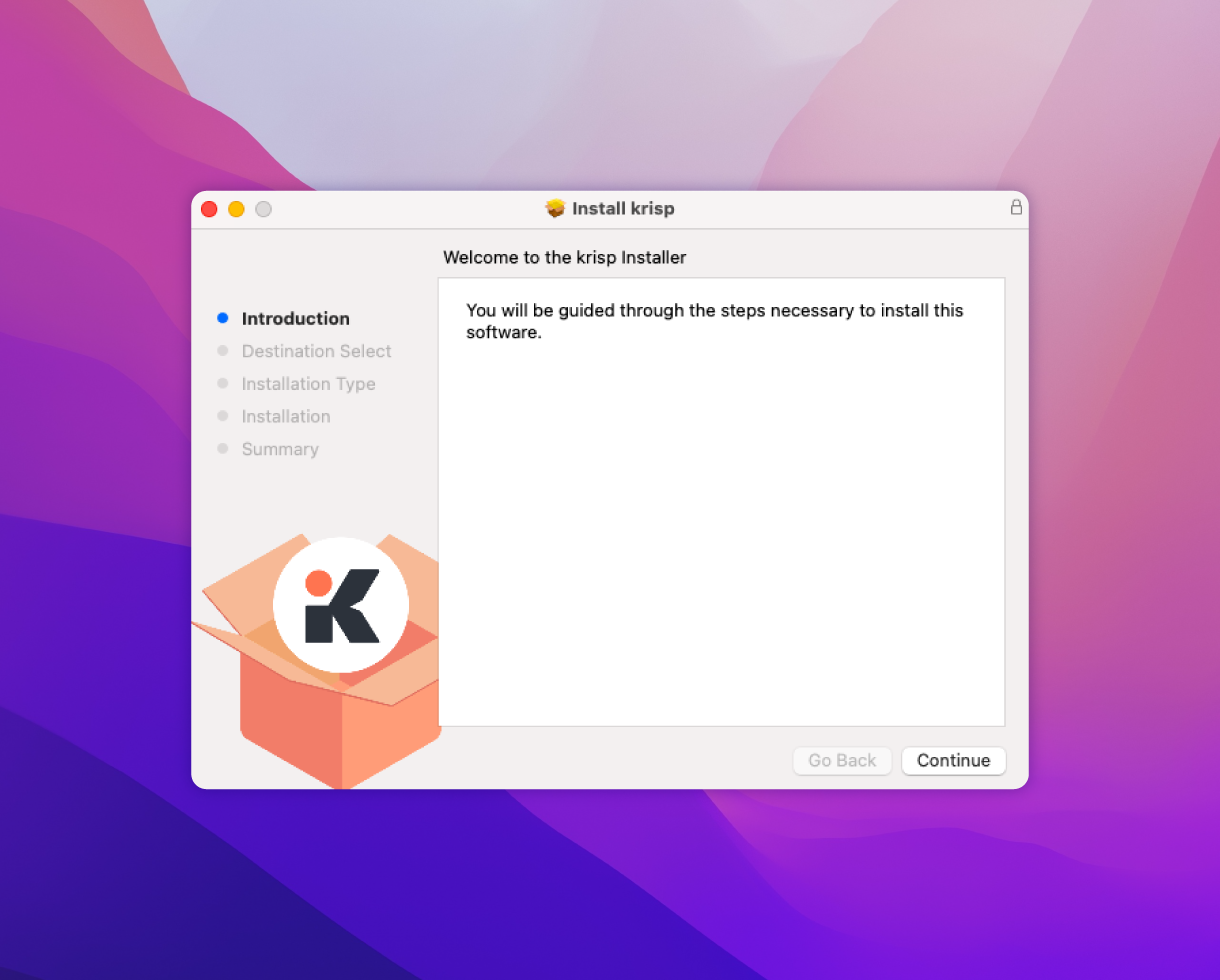
- Go to the Krisp website and download the version that works for your operating system.
- Install the app by following the on-screen steps.
- Once installed, open Krisp on your computer.
- In the app, select your actual microphone and speaker as the input and output devices.
- Turn on the Remove Noise toggle for both the mic and speaker.
- Open your communication app, such as Zoom.
- In its audio settings, set your mic and speaker to Krisp Microphone and Krisp Speaker.
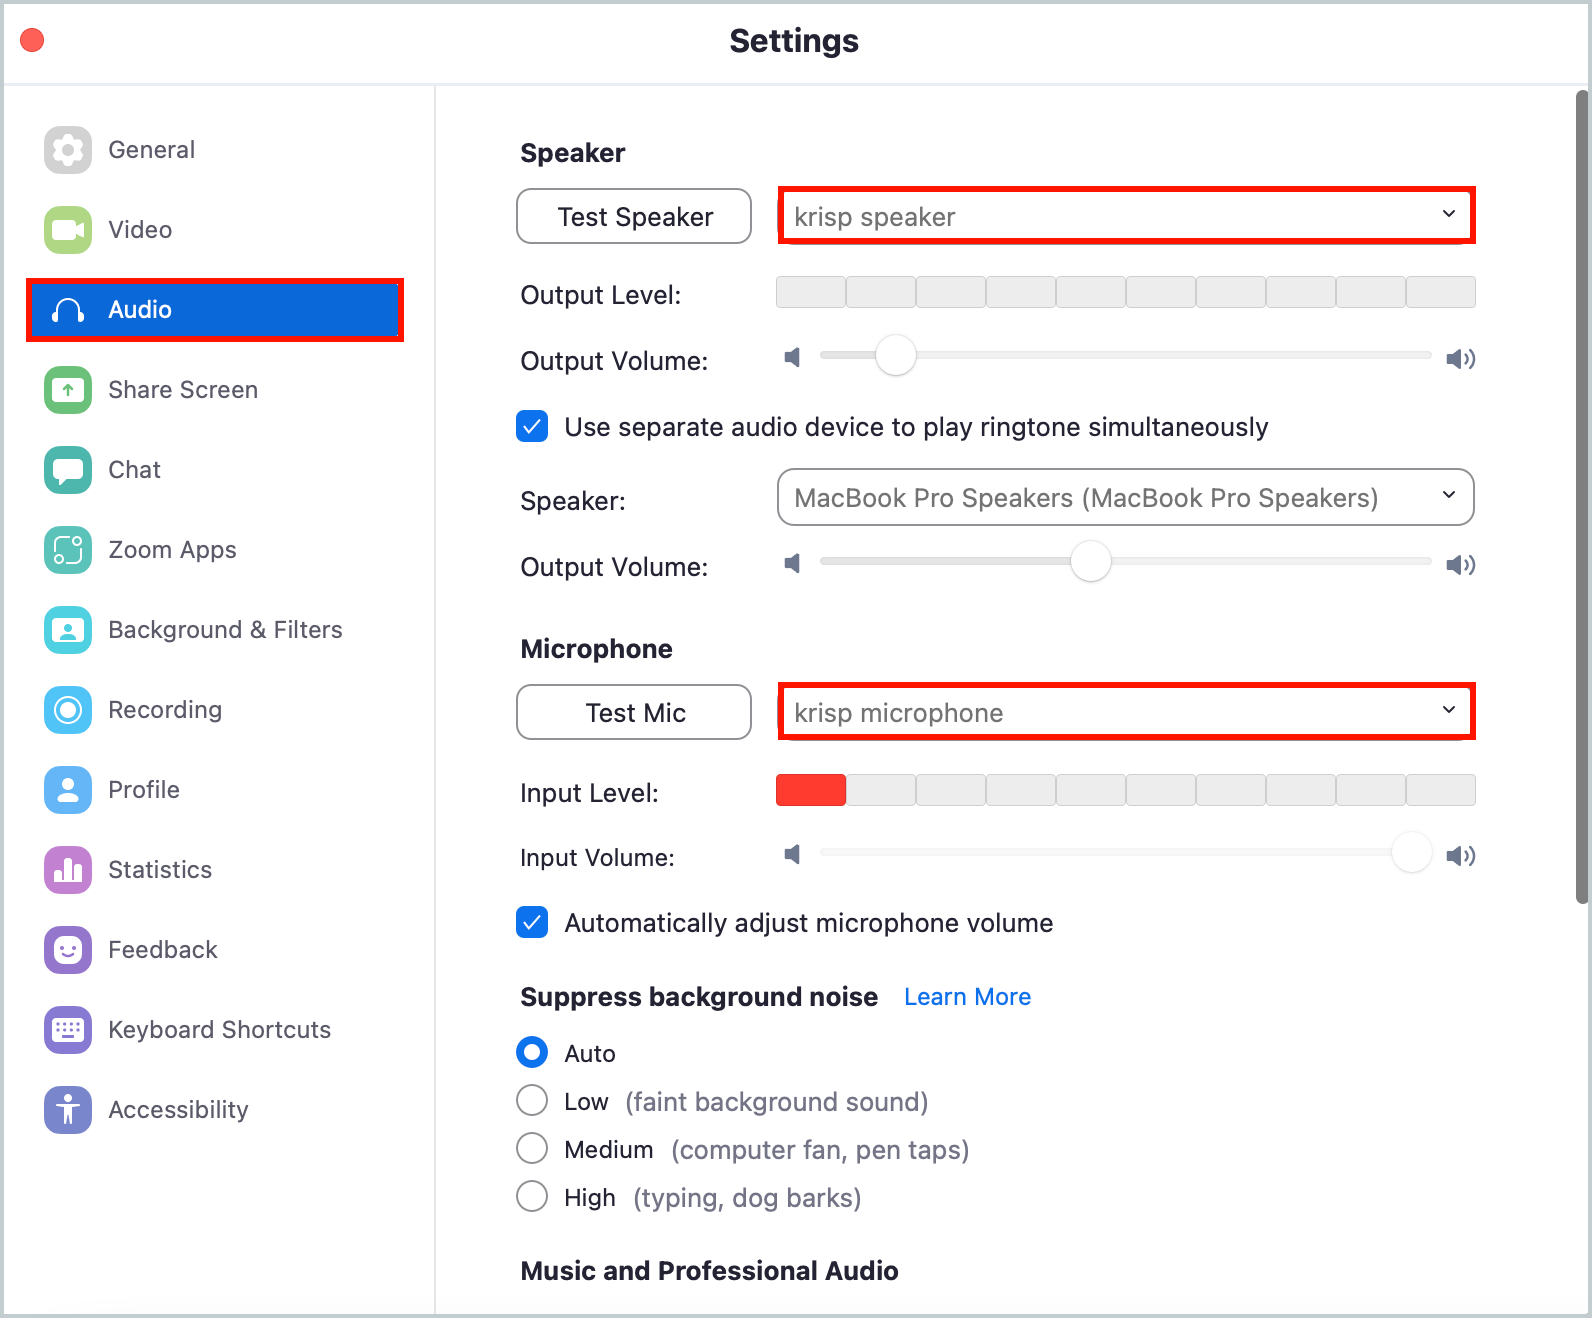
- Run a test call or use Krisp’s built-in testing feature to make sure everything sounds clean.
Conclusion
Bad audio is distracting, but it doesn’t have to ruin your work. With the right tools, even messy recordings can sound clean and clear. From quick online fixes to pro-level editing, you have options. It all comes down to choosing the method that works best for you. And once you find your go-to solution, cleaning up background noise becomes second nature.
FAQs
How to clean up audio?
Cleaning up audio starts with a quiet recording space. Use noise reduction only when needed to avoid harming voice quality. Tackle echoes with EQ or reverb reduction. Fix distortion carefully and remove unwanted sounds like clicks or coughs. Keep volume levels even, and always test your audio before finalizing.
How to remove background noise from video using Canva?
Canva makes it easy to improve your video’s audio without needing complex tools. Start by opening Canva and uploading your video to the editing canvas or timeline. Click on your video, then tap the volume icon in the top toolbar. Turn on the “Enhance voice” option to reduce background noise and make your voice clearer. Once it sounds right, download your video in high-quality MP4 format or share it directly from Canva.
Can I edit audio in CapCut?
Yes, you can edit audio in CapCut. It lets you upload audio files directly into your project. Once added to the timeline, you can trim clips, adjust the volume, and apply effects. You can also layer sounds or mix them with your video to achieve the desired effect.