.png)
If you are looking for how to install and use Audacity without Muse Hub, you aren’t alone. Many long-time users were surprised recently when the simple, lightweight audio editor they loved started bundling a separate “helper” application during installation.
For many creators, this extra software feels unnecessary. You want a fast, privacy-focused tool to edit your audio, not a background launcher managing plugins you didn’t ask for.
The good news is that Audacity itself remains open-source and safe. You just need to know where to find the “standalone” version. This guide covers three ways to get a clean install of Audacity and how to set it up for professional results.
Why Skip Muse Hub? Understanding the Controversy
If you download Audacity via the big blue button on their main website, you likely get the Muse Hub installer. Muse Hub is a launcher designed to manage sound effects, loops, and plugins for Muse Group products.
While convenient for some, it has sparked backlash among the “purist” community. Here is why many intermediate and professional users explicitly avoid it:
- Background Processes: Unlike Audacity, which only runs when you open it, Muse Hub operates as a background service. It sits in your system tray, using up your CPU and RAM even when you aren’t working on audio.
- Privacy Concerns: After Muse Group acquired Audacity, they updated the privacy policy to allow data collection for crash reporting and updates. While this is standard for commercial software, it upset the open-source community who viewed it as “telemetry” or tracking.
- Installation Friction: It acts as a gatekeeper. Instead of just launching your editor, you are encouraged to manage it through a secondary interface, similar to the Adobe Creative Cloud launcher.
Is Audacity Still Safe?
Yes. Despite the noise surrounding the launcher, the core Audacity application remains safe and powerful. If you want a strictly offline, high-performance environment, the best practice is to install the standalone binary. This gives you the audio engine you trust without the background services you don’t need.
Method 1: The GitHub Approach (Safest & Most Direct)
For the cleanest experience, downloading directly from the source code repository is the best method. By going to GitHub, you bypass the marketing website entirely and grab the raw files.
This guarantees you get the exact version you want without any hidden “wrapper” software.

How to Download the Standalone Installer
- Go to the Source: Navigate to the official Audacity GitHub “Releases” page.
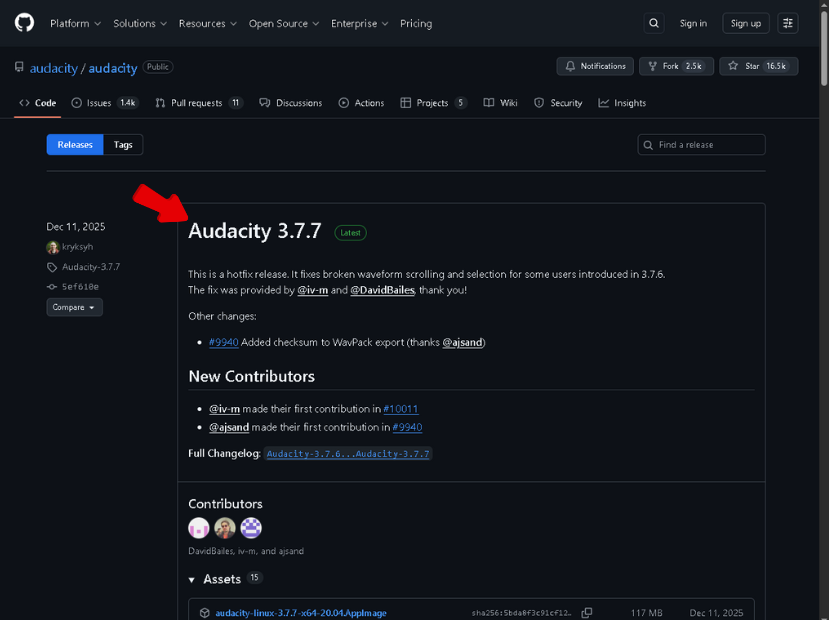
- Find the Latest Version: The newest stable release is usually tagged as “Latest” in green at the top. Scroll down past the long list of bug fixes until you see a section labeled Assets.
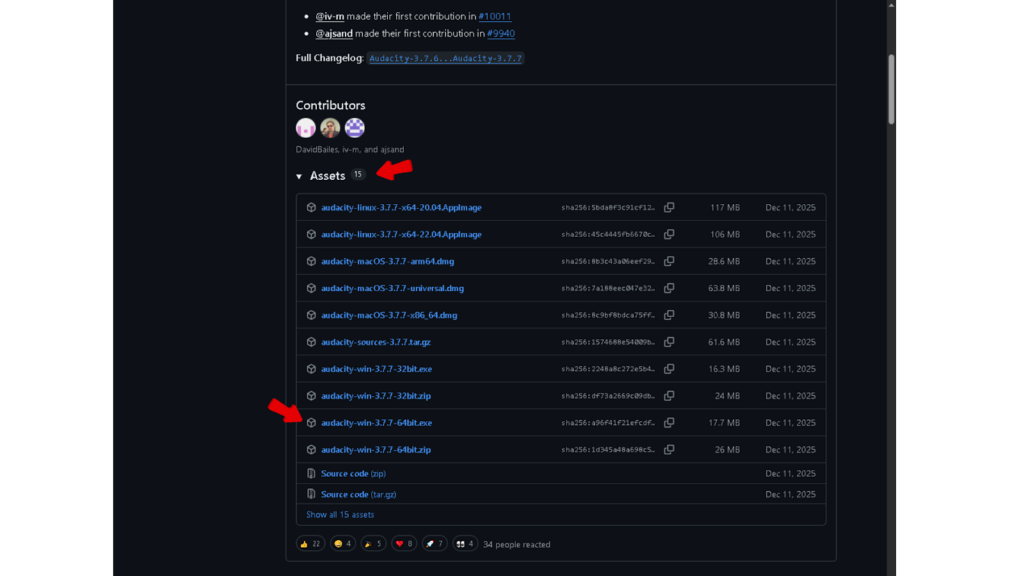
- Expand the List: If you don’t see file links, click the small arrow next to the word Assets.
- Pick the Right File:
- Windows: Download the file ending in .exe (e.g., audacity-win-3.6.1-64bit.exe). Do not click files labeled “Universal” or “Web Installer,” as these often trigger the bundle prompt.
- macOS: Download the .dmg file.
- Linux: Look for the .AppImage file.

Install: Run the file. Since this is the standalone version, the wizard should look like a standard prompt. If you see a checkbox asking to “Install Muse Hub” (rare with this method), simply uncheck it.


Method 2: The FossHub “Old School” Download
If GitHub looks a bit too technical, FossHub is your best alternative. As Audacity’s official partner, FossHub hosts the raw file directory without the confusing download buttons found on the main website.
This method is great if you want a standard installer but want to visually confirm you are downloading the application only.
How to Find the Clean Link
The main Audacity website often pushes a “Universal” button that hides what you are actually downloading. On FossHub, the files are listed individually.
- Go to the Audacity page on FossHub.

- Scroll down to the “Download Links” section.
- Ignore any link labeled “Muse Hub” or “Manager.”
- Click the specific installer for your OS (e.g., Audacity Windows Installer or Audacity macOS DMG).

The Visual Check
When the download starts, check the file name and size:
- Correct File: It should look like audacity-win-3.6.x-64bit.exe and be around 15MB – 20MB.
- Incorrect File: If the file is named Muse_Hub_Installer.exe or is very small (because it needs to download more files later), you have the wrong one.
Once downloaded, run the installer. It will create a desktop shortcut without installing any background services.

Method 3: The Portable ZIP Method (Zero Installation)
If you want to ensure absolutely no background services ever touch your system, you can bypass the installation process entirely using the Portable ZIP method.
This allows you to run Audacity from a folder—or even a USB stick—without modifying your Windows Registry.
How to Set Up the Portable Version
- Find the ZIP: Go to the GitHub Releases page or FossHub (as detailed above).
- Download the Archive: Instead of the .exe, look for the file ending in .zip.
- Example: audacity-win-3.6.1-64bit.zip

- Extract: Right-click the downloaded ZIP folder and select Extract All. Move this folder wherever you like (e.g., your Desktop).

- Run: Open the folder and double-click Audacity.exe. The program will launch immediately.

Pros and Cons of Going Portable
| Feature | The Portable Advantage | The Trade-Off |
|---|---|---|
| System Impact | Zero. No registry keys or background services. | No File Associations. Double-clicking an .mp3 won’t automatically open Audacity. You have to open the software first, then drag the file in. |
| Mobility | High. Run it from a flash drive on any PC. | Manual Updates. You won’t get automatic update prompts; you’ll need to download a new ZIP to upgrade. |
| Permissions | None. Does not require Administrator rights. | Plugin Paths. You may need to manually point Audacity to your VST plugin folders. |
Pro Tip: Right-click Audacity.exe in your folder and select “Send to > Desktop (create shortcut)” for easy access.


Optimizing Your “Clean” Audacity Setup
Now that you have a clean version of Audacity installed, you need to make sure your settings are right for high-quality audio. A clean install won’t help if your recording settings are wrong.
- Set the Project Rate: Go to Audio Setup > Audio Settings. Set Project Rate to 48000 Hz (video standard) or 44100 Hz (music standard).


- Enable 32-Bit Float: Under Quality, ensure Default Sample Format is set to 32-bit float. This provides a massive dynamic range, making it nearly impossible to “clip” or distort your audio digitally during editing.

Matching Hardware to Software
Audacity is one of the few free editors that supports 32-bit float, but this feature works best if your hardware supports it too. If your microphone distorts while recording, the software can’t fix it later.
To get the most out of Audacity’s capabilities, consider using the Hollyland LARK MAX 2.


This wireless microphone system pairs perfectly with a clean Audacity setup because of two key features:
- 32-Bit Float Recording: The LARK MAX 2 records 32-bit float audio internally. This means you can capture sudden screams or whispers without touching a gain knob. When you drop these files into Audacity, you can normalize the volume perfectly without distortion.
- Wireless Monitoring: Before you hit record in Audacity, you can use the LARK MAX 2’s wireless monitoring via earphones to check your levels. This ensures your source audio is clean before it even reaches your computer.
How to Install VST Plugins Without Muse Hub
Muse Hub creates a “drag and drop” experience for plugins, but you don’t need it. You can install VST3 plugins manually to keep your system clean.
1. Download Manually
Go to the plugin developer’s website (like Valhalla or Voxengo)

and download the standalone installer or .zip file. Always choose the 64-bit VST3 version if available,

as it is more stable than older formats.

2. Place Files in the Right Folder
Move your .vst3 files to the system folder where Audacity looks for them:


- Windows: C:\Program Files\Common Files\VST3


- macOS: /Library/Audio/Plug-Ins/VST3
3. Enable in Audacity
- Open Audacity.
- Go to Effect -> Plugin Manager.

- Click Rescan. Audacity will find the new files.

- Select your plugin from the list and click Enable.

- Press OK.

Your plugin will now appear in the Effect menu, completely bypassing the need for a hub.
Frequently Asked Questions (FAQ)
Is Audacity considered “spyware” without Muse Hub?
No. The “spyware” concerns came from a 2021 policy update regarding data collection for crash reports. If you install the standalone version (without Muse Hub), this data collection is minimal. You can make it even stricter by going to Preferences > Application and disabling “Check for updates.” This stops the software from connecting to the internet entirely.
Can I use MuseFX plugins without Muse Hub?
Generally, no. The MuseFX suite (Audacity’s own effects) relies on the Muse Hub background service to run. If you want a clean install, you will lose access to MuseFX. However, you can easily replace them with free, high-quality VST3 plugins from other developers that don’t require a background launcher.
What is the difference between Audacity and Tenacity?
Tenacity is a version (fork) of Audacity created by developers who wanted to remove all tracking code and networking features. While Tenacity is great for privacy, it often gets updates slower than Audacity. For most users, the official Audacity standalone installer is the best balance of performance and privacy.
Summary
Taking control of your audio workstation doesn’t mean you have to sacrifice power. By skipping Muse Hub and using the direct GitHub or FossHub installers, you get a lean, fast version of Audacity that respects your system resources.
Now that your software is optimized, make sure your input audio is just as clean. Pairing your standalone Audacity setup with a 32-bit float microphone like the Hollyland LARK MAX 2 ensures you capture professional-grade audio that is ready for editing the moment you hit stop.