.png)
Whether you are producing a fictional podcast, a retro commercial, or a dramatic voiceover, learning how to create a radio voice effect in Audacity is an essential skill. It transforms a clean, modern recording into something gritty, nostalgic, and commanding.
The best part? You don’t need expensive plugins. You can achieve this classic broadcast sound using Audacity’s built-in tools. This guide will walk you through the physics of the sound, the specific settings you need, and how to avoid making your audio unintelligible.
What defines the “Radio Voice” Effect?
Before you start turning knobs in Audacity, it is crucial to understand why a radio voice sounds the way it does. The “Radio,” “Telephone,” or “Walkie-Talkie” effect is defined not by what you add to the audio, but by what you remove.
Technically, this is known as limiting bandwidth.
The Frequency Spectrum
The human ear can hear frequencies ranging from roughly 20Hz (deep bass) to 20kHz (piercing highs). Modern recording equipment captures this entire range to make voices sound rich, full, and “present.”
However, old analog radios, landline telephones, and military comms were designed for efficiency, not audio quality. They only needed to transmit enough data to make speech understandable. To save power, these devices physically cut off the outer edges of the sound spectrum.
The “Mid-Range” Focus
To simulate this effect digitally, you must replicate those hardware limitations by manipulating the Equalization (EQ):
- Cut the Lows (High-Pass Filter): Remove frequencies below 400Hz. This kills the “body” and “warmth” of the voice, making it sound thin.
- Cut the Highs (Low-Pass Filter): Remove frequencies above 4kHz. This kills the “air” and “crispness,” making the audio sound muffled or boxed in.
By isolating the mid-range frequencies (400Hz – 4kHz), you force the listener to focus strictly on the words, mimicking the distinct, nasal sound of a vintage broadcast.
Step 0: Recording High-Quality Source Audio
Before applying effects, you must evaluate your source recording. There is a common misconception that adding effects can “hide” poor audio quality. In reality, the “Radio Effect” does the opposite: it highlights flaws.
Creating a radio voice involves heavy Compression and EQ. Compression works by raising the volume of the quietest parts of your signal. If your original recording has a high noise floor (background hiss, fan noise, or preamp buzz), the compressor will amplify that noise, making it sound distracting rather than stylistic.
To get a crisp, professional result, you need a “clean” signal with zero background noise.
Pro Tip: Start with Studio-Grade Input
For the best results, start with a studio-quality source. Heavy post-processing brings out the flaws in cheap microphones. We recommend the Hollyland LARK MAX 2 for this workflow.


- Studio Quality Base: Its 48kHz/24-bit sampling rate provides a pristine, detailed signal that responds beautifully to EQ changes.
- Distortion-Free Recording: The 32-bit Float Recording feature is a lifesaver here. If you are acting out a high-energy “Morning Zoo DJ” script and accidentally shout into the mic, 32-bit float allows you to recover that clipped audio in post-production without any distortion.
By ensuring your raw file is clean, you ensure that when you cut the frequencies in Step 1, you are left with a stylized voice, not stylized static.
Step 1: The “Filter Curve EQ” Technique
The most defining characteristic of a “radio voice” is the lack of bass and treble. To replicate this, we use the Filter Curve EQ to slice off the top and bottom ends of your audio frequency.
Instructions:
- Select Your Audio: Click the track header or press Ctrl + A (Windows) / Cmd + A (Mac) to highlight the audio.

- Open the EQ Tool: Navigate to Effect > EQ and Filters > Filter Curve EQ.

- Choose Your Route:
- The Preset Route (Fastest): Click on Presets & Settings > Factory Presets. Select “AM Radio” for a standard broadcast sound or “Telephone” for a thinner, more distant effect.
- The Manual Route (Best Control): If the presets sound too harsh, manually adjust the line. Drag the curve down on the left side to cut everything below 100Hz and drag the right side down to cut everything above 5kHz.
- Visualize the Curve: Your EQ line should look like a hill or an inverted “V” shape—flat in the middle (mid-range frequencies) and dropping off steeply on both sides.
- Apply: Click Apply to render the effect.

Why Manual is often better: The “Telephone” preset is iconic, but it cuts frequencies so strictly (300Hz–3kHz) that listeners might get “ear fatigue” if they listen for too long. By using the Manual Route, you can widen the bandwidth slightly, maintaining the “retro” vibe while keeping the voice pleasant to listen to.
Step 2: Adding “Grit” with Distortion
If you only apply the EQ in Step 1, your audio will sound “thin,” but it might still sound too digital and clean. To achieve an authentic vintage feel, you need to simulate the imperfections of analog hardware.
Old radio transmitters and vacuum tubes naturally introduced harmonic saturation. This wasn’t a flaw; it was a characteristic of the technology that added warmth and texture. In modern audio editing, we call this Distortion.
Instructions:
- Select Your Track: Highlight the audio.

- Open the Effect: Navigate to Effect > Distortion and Modulation > Distortion.

- Choose Your Type:
- Soft Overdrive: Best for a warm, vintage tube radio sound.
- Leveller: Good for a harsher, “walkie-talkie” or military radio style.
- Adjust the Settings:
- Distortion Amount (Drive): Keep this low, between 10% and 15%. You want texture, not destruction.

- Apply: Click Apply.

Note: If the voice becomes hard to understand, you have applied too much drive. Undo (Ctrl + Z) and try again with a lower amount. The goal is to color the sound, not bury it.
Step 3: Compressing for “Broadcast” Consistency
If you listen to professional radio, you’ll notice the host’s voice never fades out or gets too loud—it sits perfectly “in the pocket.” This is achieved through heavy compression.
After applying the EQ, your audio likely sounds quiet because you’ve cut out so many frequencies. Compression brings the volume back up and “glues” the sound together, ensuring every word has the same commanding presence.
Instructions:
- Select your entire audio track.
- Navigate to Effect > Volume and Compression > Compressor.

- Set the Ratio to 4:1 (or higher): Standard voiceovers use a 2:1 ratio, but for a radio effect, we want it to sound processed and aggressive. A 4:1 ratio ensures that loud peaks are significantly flattened.
- Set the Threshold to roughly -15dB: This tells Audacity to start compressing the audio whenever it gets louder than -15dB.
- Make sure that “Make-up gain for (dB)” is set to “0”: This is critical. Since compression reduces the volume of loud parts, this setting automatically boosts the overall volume back up to a standard listening level.
- Click Apply.

The Result: Your waveform should look much “fatter” and more consistent. The voice will sound louder and more intense, mimicking the signal processing used in AM/FM transmission towers.

Advanced Variation: The “Walkie-Talkie” Effect
If you are producing an audio drama or a police skit, a clean “AM Radio” sound might be too high-quality. Handheld transceivers (Walkie-Talkies) and police scanners are notorious for aggressive frequency cuts and constant background hiss.
To achieve this gritty texture, you need to narrow the EQ further and introduce artificial interference.
1. Apply the “Telephone” EQ
Walkie-talkies transmit very little data. We need to strip away almost all bass and treble.
- Go to Effect > EQ and Filters > Filter Curve EQ.

- Select Presets & Settings > Factory Presets > Telephone.

- Apply. This creates a “tinny” sound (roughly 300Hz to 3kHz).

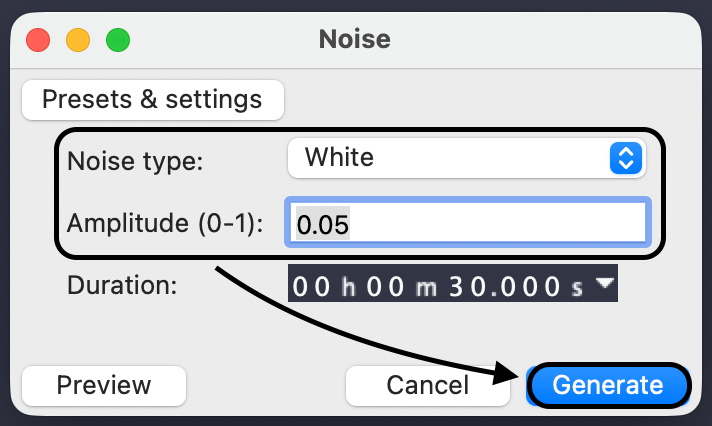
2. Generate Static (White Noise)
A police radio isn’t convincing without the “hiss” of the open channel.
- Go to Tracks > Add New > Mono Track.

- Go to Generate > Noise.

- Set “Noise Type” to White.
- Crucial Setting: Set the Amplitude to 0.05 (very low). The default is usually 0.8, which is deafeningly loud. Always start low.
3. Mix and Simulate “Squelch”
Now, mix the voice and static. To make it sound realistic, the static should only be audible when the person is speaking (simulating the button being held down).
- Trim the Static: Delete the white noise sections where the voice is silent.
- Add “Squelch”: Leave a split second of static before the voice starts and after the voice ends to mimic the “click” of the transmitter button.

Common Mistakes When Creating Radio Effects
Even with the right settings, a few subtle errors can ruin the illusion. Avoid these three common pitfalls.
1. Over-Distortion
It is tempting to crank up the distortion to make the audio sound “gritty.” However, clarity must always come first. If you apply too much hard clipping, the consonants get buried, and your listener won’t understand the words. Use “Soft Overdrive” and keep the drive level below 15%.
2. Ignoring the Noise Floor
As mentioned earlier, compression amplifies background noise. If your original recording has computer fan noise or room echo, the radio effect will make those noises louder.
You must start with a pristine noise floor. Using a microphone like the Hollyland LARK MAX 2 helps significantly here, as its built-in Environmental Noise Cancellation (ENC) removes background hums at the source.
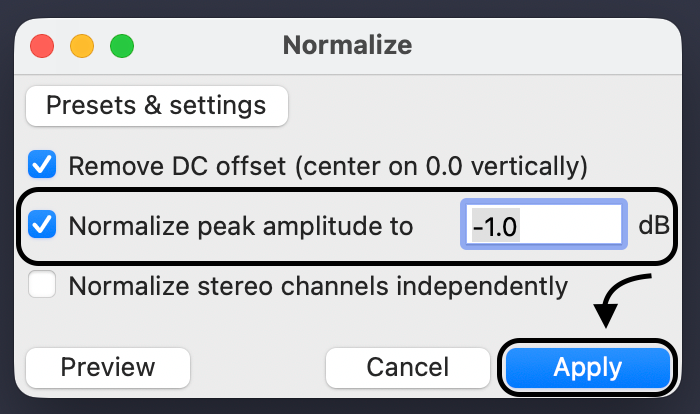
3. Forgetting to Normalize
When you cut the lows and highs with EQ, you remove a lot of acoustic energy. Your audio will sound much quieter than the rest of your project. Always make Normalization your final step.
- Go to Effect > Volume and Compression > Normalize.

- Set the peak amplitude to -1.0 dB.
Frequently Asked Questions (FAQ)
Can I apply this effect in real-time while recording in Audacity?
No. Audacity is a destructive audio editor, meaning it processes files that have already been recorded. It does not function as a live effects processor. For live streaming, use software like OBS Studio or a hardware mixer.
What is the difference between the “Telephone” and “AM Radio” presets?
The difference is bandwidth. The Telephone preset is narrow (300Hz-3kHz), creating a thin, distant sound. The AM Radio preset is wider (100Hz-5kHz), retaining more warmth and body.
How do I save my custom radio settings?
If you tweaked the EQ curve manually, save it for later. Open Filter Curve EQ, click Presets & Settings, select Save Preset…, and name it (e.g., “Vintage Radio 1950”).
Conclusion
Creating a convincing radio voice effect in Audacity is simply a matter of mimicking the limitations of older technology. By stripping away the deep lows and crisp highs using Filter Curve EQ, and flattening the volume with Compression, you simulate the narrow bandwidth of vintage hardware.
Remember the “Secret Sauce” formula:
- Limit the Bandwidth: Cut everything below 100Hz and above 5kHz.
- Even the Volume: Compress heavily (4:1 ratio) so every word is punchy.
- Add Texture: Use Distortion or White Noise to sell the illusion.
However, heavy processing comes with a cost: it amplifies flaws. To get the best results, you need a pristine source file. We recommend upgrading your input to the Hollyland LARK MAX 2. Its 48kHz/24-bit studio quality ensures your raw voiceover is clean enough to withstand heavy editing, and the 32-bit Float Recording lets you perform high-energy scripts without worrying about clipping.
Master the edit, but respect the source. Start with professional audio, and your effects will sound professional every time.