.png)
Sometimes, you do not need crystal-clear, studio-quality sound. Instead, you want that classic “phone call effect.” With just a few smart adjustments, you can transform your audio into something that sounds as if it came straight from a phone speaker.
And if you are starting fresh, some tools can make the process even smoother. The Hollyland LARK MAX 2 offers 32-bit float recording for editing flexibility and OWS Bluetooth monitoring to check your sound in real time, giving you the freedom to shape the phone call effect right at the recording stage.

Hollyland LARK MAX 2 - Premium Wireless Microphone System
A premium wireless microphone for videographers, podcasters, and content creators to capture broadcast-quality sound.
Key Features: Wireless Audio Monitoring | 32-bit Float | Timecode
Steps to Make Your Audio Sound Like a Phone Call
Here is a quick breakdown of the main steps you can follow to transform clean audio into that classic “phone call” style.
Apply Equalization (EQ)
To make a clean audio sound like it is coming through a phone speaker, EQ is your best tool. In Audacity, this is done with the Filter Curve EQ effect using these steps:
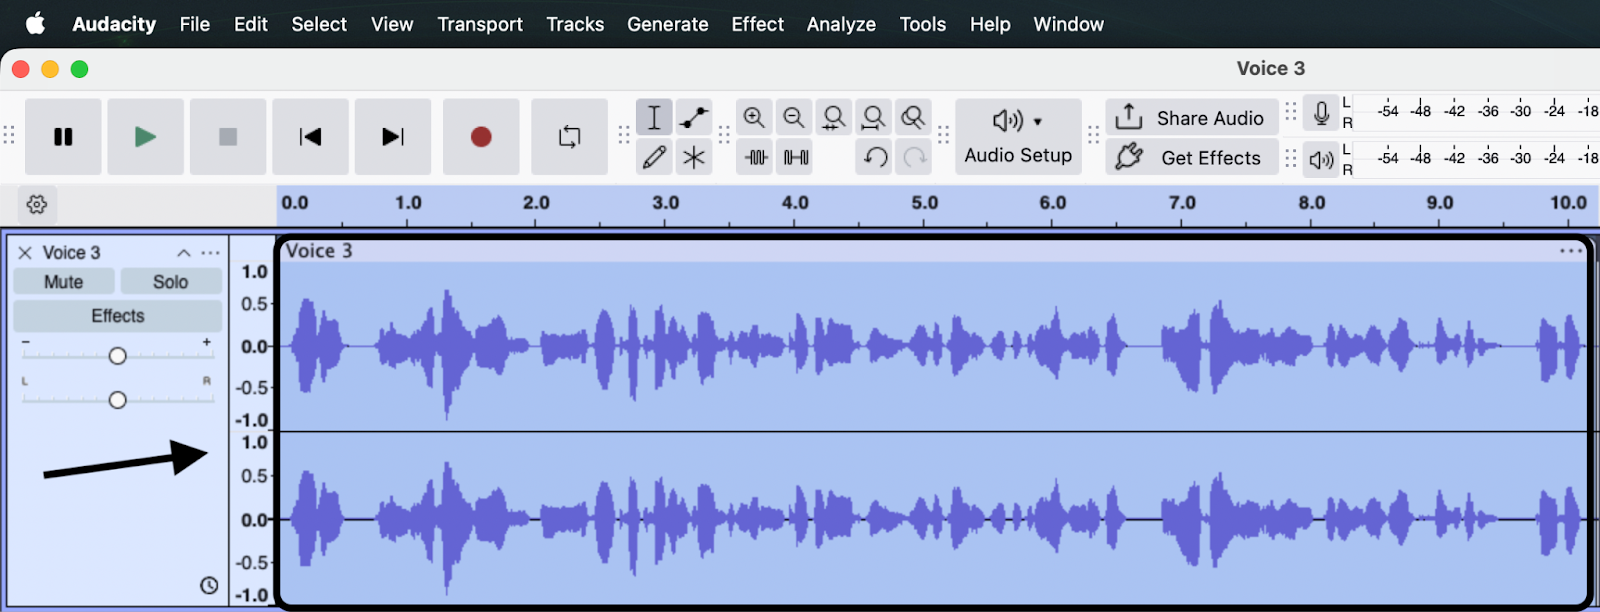
Step 1: Open Audacity and import your audio file into the editor.
Step 2: Open the Open EQ/Filter Curve Tool, go to Effect → Filter Curve EQ.
Here you will be able to shape the frequencies.

This will lead you to the “Filter Curve EQ” tool with a flat line as a default.

Step 3: Cut Low Frequencies (below ~100Hz). This eliminates deep sounds that phones cannot transmit. To do this, drag the curve downward from 100Hz to remove bass tones by;
- Creating a dot just above 100Hz and another a little bit on the left side.

- Dragging down the second dot until it gets to the lowest point on the curve.

Step 4: Boost Key Midrange (around 1–2kHz) by adding a slight boost in this area. This makes speech sound sharper and more intelligible, similar to a phone call.
Step 5: Reduce Boxy Frequencies (~300–500Hz) by dipping this range a little to avoid muffled or “muddy” tones.
Step 6: Listen and Adjust. Play back the audio and adjust the curve until it sounds convincingly like a phone call.
Use a Band-Pass Filter
The best voice frequencies for achieving a classic “phone call effect” usually fall within the range of 300–3,400 Hz. This is because phone speakers and microphones are designed to capture and transmit only this mid-range band, cutting out the very low and high frequencies.
However, for the sake of illustration, let us assume that you are working on a project where you are interested in isolating a specific frequency, such as 440 Hz (the standard tuning note “A” in music).
In that case, you can still use the same band-pass filter technique, just centered around 440 Hz instead of the full voice band.
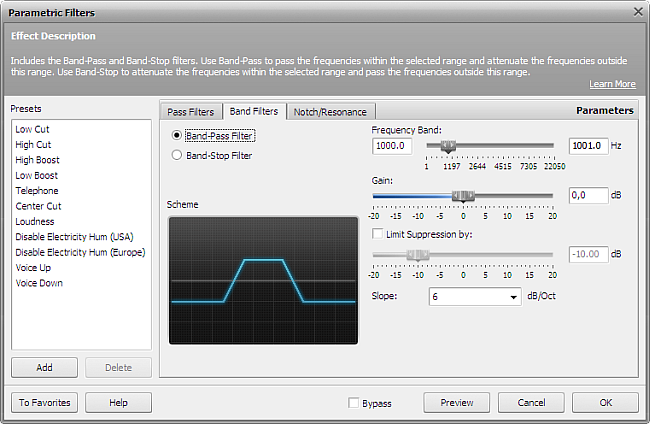
Step 1: Select a band-pass filter from your audio effects menu.
Step 2: Open the FFT Filter Tool by going to Effects -> Filter and EQ -> FFT Filter. This tool shows you a Fourier Transform (FFT) of the signal at that point in time.

Step 3: Create a Band-Pass Filter. You do this in the FFT filter window by clicking and dragging the white control points to shape the curve. Then, allow only a narrow band around 440 Hz to pass through. This essentially “cuts away” all other frequencies.

Step 4: Apply the filter and preview. The output should mainly contain the 440 Hz tone with other noise reduced. The waveform or spectrum now shows only the band-filtered signal, as shown below:

Step 5: Adjust the width if the audio feels too sharp or too dull.
Reduce Bitrate and Sample Rate
Step 1: Go to your project’s export or render settings. When you are done editing/mixing your audio, you need to export it. Every DAW (Audacity, FL Studio, Ableton, Premiere, etc.) has an Export/Render Settings window. This is where you control sample rate, bitrate, and file type.

Step 2: Change the sample rate to 8 kHz. Normal high-quality audio uses 44.1 kHz (CD) or 48 kHz (video). Phone-quality audio uses 8 kHz. This means the highest frequency it can capture is 4 kHz (since Nyquist = half of the sample rate). That is why phone calls sound thin, muffled, and lack deep bass or crisp highs.

Step 3: Lower the bitrate (e.g., 64 kbps or lower).
- Bitrate means how much data is used per second of audio.
- A Lower bitrate = fewer bits = more compression artifacts (warbling, metallic ringing).
- For music: 128–320 kbps is good quality.
- For “phone effect”: 64 kbps or lower makes it sound crushed and narrow.

Step 4: Save/export and listen for that compressed “phone” texture.
Once you export, play it back, and you will hear:
- Muffled highs (from 8 kHz limit)
- Thin body (loss of bass).
- Metallic/crunchy artifacts (from low bitrate).
This combination is what gives the classic telephone/lo-fi sound.
Conclusion
Creating the phone call effect does not require advanced skills. You just have to make the right adjustments with EQ, filters, and bitrate settings. Whether you are editing in Audacity, Adobe Audition, or another DAW, these methods can transform your clean audio into a believable call-style recording.
Frequently Asked Questions
What is the exact frequency range of phone audio?
Traditional phone audio is limited to 300 Hz – 3.4 kHz, cutting out deep bass and high treble. This narrow band creates the iconic “telephone sound.” Modern digital calls may use a slightly wider range, but for the classic effect, filtering within that band is ideal.
Can I apply the effect to existing audio files?
Yes, you can apply the phone call effect to any existing audio file. Simply import it into editing software, apply EQ to cut frequencies outside 300–3.4 kHz, then add distortion or noise. This process works equally well for music, voiceovers, or recorded dialogue.
Is re-recording better than editing?
Re-recording can feel more natural because you can capture performance with the effect in mind, like speaking through a real phone. Editing is faster and more flexible, especially if re-recording is not possible. Both methods work well; your choice depends on convenience, authenticity, and creative control.