


.png)
You are listening to your latest recording, and everything sounds great—until you hear a cough, a loud breath, or a car honking in the background. If you simply delete that section, your entire track shifts, ruining the synchronization with your video or background music.
You need a way to silence the noise without moving the rest of the clip.
Learning how to mute specific parts of a track in Audacity is one of the most essential skills for podcasters and voice-over artists. Whether you need a quick fix for a mistake or a smooth fade-out for a professional finish, this guide covers the three best methods to get the job done.
Why Mute Parts of a Track Instead of Deleting?
If you are new to audio editing, your instinct might be to highlight a mistake and hit the Delete key. However, if you are working on a multi-track project like a podcast or a video voice-over, this is often a critical error.
The difference comes down to how Audacity treats the timeline:
- Deleting (Cut): This removes both the audio and the time it occupied. The rest of the track shifts to the left to fill the gap (often called a ripple edit). If you have background music or a second speaker on a different track, your audio will instantly go out of sync.
- Muting (Silence): This removes the sound but keeps the time intact. It replaces the noisy waveform with a flat line (absolute silence), ensuring the total length of the track stays exactly the same.
Use “Silence” instead of “Delete” when:
- You need to remove a cough while keeping the dialogue synchronized with a video file.
- You are editing a multi-host podcast and need to silence one person while the other is talking.
- You want to remove background hiss during pauses without shortening the song.
In short: If timing matters, mute it, don’t cut it.
Method 1: The “Silence Audio” Tool (The Quickest Way)
If you need to completely remove a sound—like a swear word or a stumble—quickly and permanently, the Silence Audio command is the standard method. It replaces the selected audio with digital silence without moving any other clips on your timeline.
Here is how to do it:
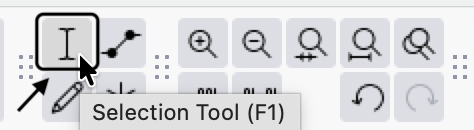
- Select the Selection Tool: Click the I-Beam icon in the top toolbar (or press F1 on your keyboard).
- Highlight the Audio: Click and drag your mouse over the specific part of the waveform you want to mute.

- Apply Silence: Go to the top menu bar and click Generate > Silence..

- Verify: The waveform in that section should now look like a flat line.

Pro Shortcut: You can speed up your workflow significantly by using the keyboard shortcut. After highlighting the audio, simply press Ctrl + L (Windows) or Command + L (Mac).
Method 2: The Envelope Tool (The Pro Way)
While the “Silence Audio” command is fast, it has a major downside: it is destructive. Once you save and close your project, that audio data is gone. It also creates a “cliff” in your audio waveform—going instantly from 100% volume to 0%—which can cause an audible click.
The Envelope Tool is the professional alternative. It allows you to “draw” volume changes on top of the audio. This lowers the volume to zero without actually deleting the original sound, and allows for smooth ramps to avoid clicks.
How to Use the Envelope Tool
- Select the Tool: Click the Envelope Tool icon in the toolbar (it looks like two dots connected by a line, usually between the “I-beam” and “Draw” tools). You can also press F2.

- Create Control Points: Click on the blue horizontal line at the top of your track’s waveform. You will need to click four times to mute a specific section:
- Point 1: Just before the noise starts (anchors the previous audio).
- Point 2: At the start of the noise.
- Point 3: At the end of the noise.
- Point 4: Just after the noise ends (anchors the following audio).

- Silence the Section: Click and drag the inner two points (Point 2 and Point 3) all the way down toward the center of the track.

You will see the waveform visually “shrink” in that section.
Why This Method is Better
- No Clicking: Because the line creates a slope rather than a vertical drop, the audio fades out quickly rather than cutting abruptly. This eliminates the “pop” sound associated with bad edits.
- Adjustable: If you realize later that you cut off the start of a word, you can simply drag the control points left or right to fix it. You don’t have to “Undo” ten times to get back to the mistake.
Method 3: Using “Split New” for Isolated Muting
If you prefer to visually separate the “bad” audio from your good take without deleting it entirely, the Split New method is your best option. This moves the selected audio to a fresh track below your main one, giving you total control over that specific segment.
This is useful if you aren’t sure if you want to cut a section yet and want to toggle the mute on and off to hear the difference.
Here is how to isolate and mute a section:
- Select the Audio: Use the Selection Tool (I-beam icon) to highlight the noise, breath, or unwanted section.

- Split to New Track:
- Go to the top menu bar and select Edit > Audio Clips > Split New

- Mute the New Track: You will see the selected audio move to a new track immediately below. Simply click the Mute button on the control panel of this new track.

Unlike the “Silence Audio” tool, this method keeps the original audio data intact but inactive. If the silence sounds unnatural, you can simply unmute the track or apply a Fade Out to the isolated clip for a smoother transition.
Pro Tip: How to Reduce Editing Time with Better Source Audio
If you find yourself constantly using Ctrl+L to silence background hiss, air conditioner hum, or distorted peaks, the issue might not be your editing skills—it’s likely your hardware.
Manually muting the empty spaces between dialogue is tedious. The most efficient way to handle unwanted noise isn’t to fix it in Audacity, but to prevent it from being recorded in the first place.
This is where upgrading to a professional wireless microphone system like the Hollyland LARK MAX 2 changes your workflow.


Why Hardware Matters for Audacity Users
The Hollyland LARK MAX 2 solves the exact problems that force creators to spend hours “cleaning up” their timeline:
- Studio Quality ENC (Environmental Noise Cancellation): Instead of manually highlighting and silencing the gaps between sentences to hide room tone or traffic noise, the LARK MAX 2 uses advanced ENC technology to detect and minimize background frequencies automatically. This leaves you with clean silence between words right out of the box.
- 32-bit Float Recording: One common reason for muting a section is that the audio “clipped” (distorted) because the speaker laughed or screamed too loudly. With 32-bit float internal recording, the LARK MAX 2 captures such a massive dynamic range that audio never distorts. Instead of muting a blown-out section, you can simply lower the gain in post-production and recover the clear audio.
Capturing 48kHz/24-bit studio-quality audio at the source saves hours of fixing tracks later, allowing you to focus on the creative edit rather than damage control.
Common Pitfalls: Avoiding the “Clicking” Sound
Have you ever silenced a breath or a cough, only to hear a sharp, digital “pop” or “click” at the exact spot where the silence begins? This isn’t a software glitch; it is a result of cutting audio at the wrong moment.
This happens when you cut an audio wave while it is at a high peak (the top or bottom of the wave). If the speaker cone is pushed out to produce sound and is suddenly told to go to “zero” instantly, it snaps back, creating a clicking sound.
To avoid this, you must edit at the Zero Crossing.
What Is a Zero Crossing?
The “Zero Crossing” is the precise point where the audio waveform intersects with the center horizontal line of the track. At this specific millisecond, the volume is naturally at zero. If you start or end your silence here, the transition will be seamless.
How to Fix It Automatically
Audacity has a built-in feature to ensure your edits always land on these safe points. Before you hit the silence shortcut, follow this extra step:
- Highlight the section of audio you want to mute.

- Go to the menu bar and click Select > At Zero Crossings.

- Alternatively, simply press the Z key on your keyboard.
You will see the edges of your selection shift slightly to the nearest safe point. Once adjusted, apply Silence Audio (Ctrl + L). The result will be a clean, click-free silence.

Note: If you still hear a slight artifact even after using Zero Crossings, use the Envelope Tool to create a very fast “fade out” rather than a hard cut. A 10-millisecond fade is usually invisible to the ear but effectively prevents clicking.
Frequently Asked Questions (FAQ)
Can I mute just the vocals and keep the music in Audacity?
Technically, yes, but with limitations. You cannot simply “mute” vocals like a separate track if the audio is already mixed into a single stereo file. However, Audacity offers a “Vocal Reduction and Isolation” effect (found under the Effect menu).
This tool attempts to remove frequencies panned to the center (where vocals usually sit) while keeping the stereo music intact. The results vary depending on the mix; often, you will still hear faint “ghost vocals” or lose some drum elements that were also in the center.
What is the keyboard shortcut to mute a selection in Audacity?
To instantly silence a specific highlighted section, use the shortcut for “Silence Audio”:
- Windows: Ctrl + L
- Mac: Command + L
If you want to mute the entire track during playback without editing the waveform, simply click the Mute button on the Track Control Panel (left side of the waveform).
How do I unmute a specific part of a track?
This depends on how you silenced it:
- If you used “Silence Audio” (Ctrl+L): This is a destructive edit. You must use Undo (Ctrl + Z) immediately. If you have already saved and closed the project, the audio data is permanently replaced with silence and cannot be recovered.
- If you used the Envelope Tool: This is non-destructive. Simply click on the control points (the white dots on the blue line) and drag them back up to restore the volume.
Does muting a track delete the data?
It depends on the method:
- Track Mute Button: No. Clicking the “Mute” button on the left panel simply turns off playback for that track. The data remains untouched.
- Silence Audio Effect: Yes. When you highlight a section and select “Silence Audio,” Audacity technically replaces the audio data with “flat line” data. If you export the file, that audio is gone forever.
- Envelope Tool: No. This only tells Audacity to play that section at 0 volume. The original waveform data is still there, hidden underneath.
Conclusion
Muting specific parts of a track in Audacity prevents your recordings from being ruined by unwanted interruptions like coughs, breaths, or background alarms.
Remember the golden rule of editing: use the Silence Audio command (Ctrl + L) when you need speed and the section is completely dead air. However, for dialogue and music where flow matters, the Envelope Tool is your best friend. It allows you to fade volume out and back in smoothly, preventing the jarring “digital silence” that often signals an amateur edit.
Ultimately, the most efficient workflow is preventing these issues before they hit your timeline. If you find yourself spending hours surgically removing background hiss or fixing distorted peaks, it is time to look at your input chain.
Gear like the Hollyland LARK MAX 2 is a massive productivity booster for creators. By using 32-bit Float Recording to prevent clipping and Studio Quality ENC to kill background noise at the source, you ensure your raw files are clean from the start—letting you spend less time fixing mistakes and more time creating content.


