.png)
For years, the only way to record computer audio was the “analog” method: holding a microphone up to your laptop speakers. The result was always the same—tinny, hollow sound mixed with room echo and keyboard clicks.
If you are wondering how to capture streaming audio with Audacity without that background noise, the solution lies in direct digital capture (often called “loopback”). Instead of recording sound waves after they leave your speakers, Audacity intercepts the digital data directly from your computer’s audio interface. This gives you lossless audio that is bit-for-bit identical to the source stream.
Because Audacity is free and open-source, it remains the industry standard for this task. While expensive software like Pro Tools or Ableton is powerful, it is often overkill for simply recording a browser tab or a Zoom call.
Important: Copyright and Fair Use
With high-fidelity recording comes responsibility. Just because you can record a stream doesn’t mean you have the legal right to distribute it.
- Personal Use: Recording a webinar, meeting, or lecture for your own personal archives is generally acceptable.
- Redistribution: Recording copyrighted music (e.g., from Spotify) or proprietary content and uploading it to your own channel is a violation of copyright law.
The Golden Rule: If you are creating content for public consumption (like a YouTube reaction video), ensure your use falls under Fair Use (commentary, criticism, or parody) to avoid copyright strikes.
Method 1: The “WASAPI Loopback” Method (Best for Windows)
For Windows users, Windows WASAPI (Windows Audio Session API) is the best way to record internal audio. Unlike older methods that relied on analog emulation, WASAPI captures the audio stream digitally.
Here is how to set it up in Audacity to capture crystal-clear audio from YouTube, Spotify, or Zoom.
Step-by-Step Configuration
- Open Audio Setup: Launch Audacity. In the top toolbar, click the Audio Setup button.
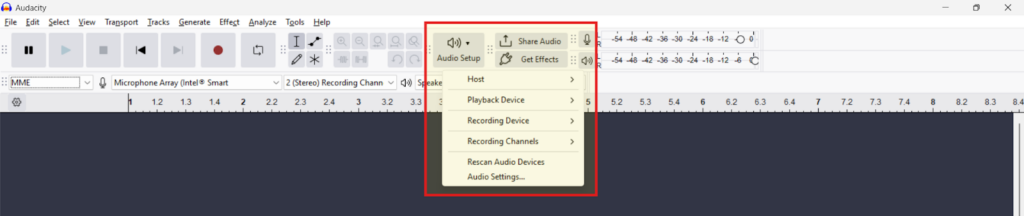
- Select the Audio Host: Change the “Host” setting from the default MME or Windows DirectSound to Windows WASAPI. This driver specifically allows for loopback recording.
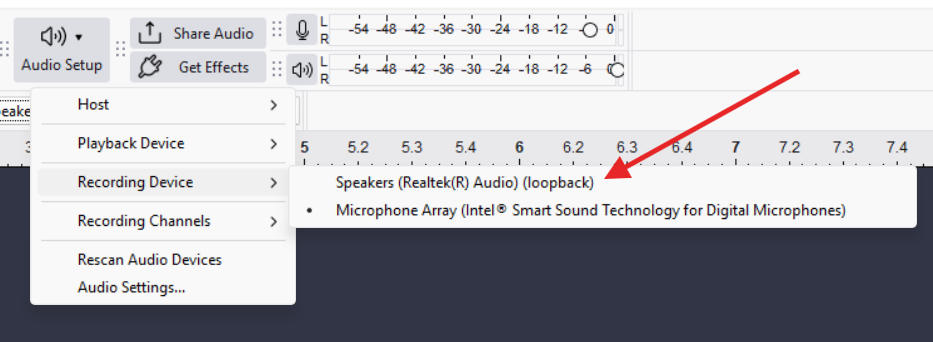
- Choose the Loopback Device: In the “Recording Device” dropdown, select the output device you are currently using to listen to audio, but look for the one with (loopback) at the end.
- Example: If you use speakers, select Speakers (Realtek High Definition Audio) (loopback).
- Note: If you don’t select the “(loopback)” version, Audacity will try to record from a microphone instead.
- Start the Audio Source: Don’t skip this. Before you hit record in Audacity, start playing the video or audio stream you want to capture. WASAPI often needs an active signal to establish a digital “handshake.” If the stream is silent, Audacity might refuse to start.
- Record and Monitor: Click the red Record button. You should see moving waveforms appear on the track immediately. If the line remains flat, stop, ensure the audio is playing, and try again.
Pro Tip: Ensure your “Recording Channels” are set to 2 (Stereo). Most streams are stereo; if you record in Mono, you might lose audio depth or miss sounds panned to the left or right.

Method 2: Recording System Audio on macOS (The Workaround)
While Windows users can simply flip a switch, macOS users face a hurdle. Apple’s Core Audio architecture prevents apps from capturing system audio natively due to strict privacy protections. If you try to record “Built-in Microphone” while playing a video, you will only capture room noise.
To fix this, you need a virtual audio driver. This acts as a digital bridge, routing sound from your browser directly into Audacity. We recommend BlackHole (2-channel version), the modern, open-source successor to Soundflower.
Step-by-Step Setup Guide
Follow these steps precisely. The most common mistake on Mac is setting up the driver but losing the ability to hear the audio yourself while recording.
1. Install the Virtual Driver
Download and install BlackHole (2ch). You may need to restart your Mac or Audacity after installation for the driver to appear.
2. Configure Audio MIDI Setup
To record audio and hear it through your headphones at the same time, you must create a “Multi-Output Device.”
- Open the Audio MIDI Setup app (found in Applications > Utilities).
- Click the + icon in the bottom left corner and select Create Multi-Output Device.
- In the right-hand panel, check the boxes for BlackHole 2ch AND your physical output (e.g., External Headphones or MacBook Pro Speakers).
- Note: Ensure the “Master Device” is set to your headphones so you can still control the volume.
3. Change Mac System Output
- Go to System Settings > Sound > Output.
- Select the Multi-Output Device you just created.
- Warning: You won’t be able to change volume via your keyboard keys while this is active. This is normal.
4. Configure Audacity
- Open Audacity.
- In the Audio Setup toolbar, set the Recording Device to BlackHole 2ch.
- Set the Recording Channels to 2 (Stereo).
- Hit Record and play your audio. You should see the waveforms moving and hear the audio through your headphones.
Pro Tip: Adding Commentary to Your Stream Recording
Capturing the internal audio from a YouTube video or a webinar is often just the first step. If you are creating a “Reaction Video,” a tutorial, or a podcast, you need to layer your own voice over that system audio.
Relying on your laptop’s built-in microphone for this is a mistake. Laptop mics pick up keyboard clicks, fan noise, and room echo. Worse, they often bleed the system sound back into the microphone, creating a nasty feedback loop.
For a professional workflow where your commentary is crisp and distinct from the background stream, we recommend using a dedicated wireless solution like the Hollyland LARK MAX 2.


Why This Upgrade Matters for Creators
Audacity handles the digital stream perfectly, but the LARK MAX 2 handles the “human” element. Here is why this pairing works for reaction content:
- 32-bit Float Recording Saves Your Audio: Reaction videos are unpredictable. You might whisper during a tense scene and then scream during a jump scare. On a standard mic, that scream would distort (clip), ruining the take. The LARK MAX 2 uses 32-bit Float Recording, which captures such a massive dynamic range that your audio will never distort. You can simply lower the volume in post-production, and the scream will remain crystal clear.
- Zero-Latency Monitoring: To react effectively, you need to hear the video stream clearly. However, wearing heavy headphones can make your own voice sound muffled (the occlusion effect). The LARK MAX 2 features Wireless Audio Monitoring via OWS (Open-Ear) earphones. This allows you to hear the system audio stream and your own voice simultaneously without delay, ensuring your commentary is perfectly synced.
Troubleshooting Common Recording Issues
Even with the correct settings, audio drivers can be temperamental. If you hit record and get silence, or if the playback sounds distorted, run through this checklist.
The “Flat Line” (Recording Silence)
Problem: The cursor moves, but the waveform remains a flat line.
Solution: This usually happens because the audio stream hasn’t “shook hands” with Audacity, or the wrong device is targeted.
- Verify Loopback: Double-check that your Recording Device is set to the (loopback) version of your speakers. Standard “Speakers” will not capture internal sound.
- The “Play First” Rule: Sometimes Audacity cannot detect a stream if it isn’t already active. Stop recording, start playing your video/audio first, and then hit Record in Audacity immediately after.
- Check Source Volume: Ensure the volume slider on the video player or app you are recording is turned up. If the source is muted, Audacity hears nothing.
Mono vs. Stereo Quality
Problem: The audio sounds flat, lacks depth, or loses spatial effects (like panning).
Solution: Streaming audio is almost always stereo. If Audacity is set to Mono, it crushes the Left and Right channels into a single track.
- Go to Audio Setup > Recording Channels.
- Select 2 (Stereo) Recording Channels.
Sample Rate Mismatch (Speed & Pitch Glitches)
Problem: The recording sounds “chipmunk-fast,” slowed down, or has clicking noises.
Solution: This is caused by a conflict between your computer’s sample rate and Audacity’s project rate.
- Check your Project Rate (Hz) in the bottom-left corner of Audacity.
- Ensure it matches your system default (usually 44100Hz or 48000Hz).
- Pro Workflow Tip: If you are unsure, standardize on 48000Hz. High-end gear like the Hollyland LARK MAX 2 defaults to studio-quality 48kHz. Setting your Audacity project to 48000Hz ensures that if you combine your system audio with voice commentary later, the tracks will align perfectly.
Alternative Method: Windows Stereo Mix (Legacy)
Before WASAPI Loopback became the standard, Stereo Mix was the primary way to capture computer audio. Today, it serves as a reliable backup method if WASAPI fails or if you are on an older version of Windows.
Note: Unlike the digital capture of WASAPI, Stereo Mix loops your output back into the input. This means it captures everything coming out of your speakers, including email notifications and system beeps. Make sure to mute system sounds before recording.
Step 1: Enable Stereo Mix in Windows
Most modern Windows computers have Stereo Mix disabled—and hidden—by default.
- Right-click the Speaker icon in your system tray (bottom right) and select Sounds (or go to Control Panel > Hardware and Sound > Sound).
- Click the Recording tab.
- Right-click anywhere in the empty white space of the device list and select Show Disabled Devices.

- You should now see Stereo Mix (sometimes labeled “What U Hear”). Right-click it and select Enable.
Step 2: Configure Audacity
- Restart Audacity. (Audacity scans for audio devices only when it opens).
- In the Audio Setup toolbar, set the Audio Host to MME or Windows DirectSound.

- Change the Recording Device to Stereo Mix.

- Press Record and play your audio source.
Frequently Asked Questions (FAQ)
Can Audacity record audio playing on the computer?
Yes. Audacity can record any sound playing through your computer’s sound card—including browser audio, Spotify, webinars, or gameplay. On Windows, use the Windows WASAPI host with the “Loopback” feature. On Mac, use a virtual driver like BlackHole.
Why does Audacity record silence on Windows?
If you see a “flat line,” your Audio Host is likely set incorrectly. By default, Audacity selects “MME,” which looks for a physical microphone. To capture internal sound, change the host to Windows WASAPI, select the recording device labeled (loopback), and ensure audio is playing before you press Record.
Is it legal to record streaming audio?
Generally, recording streaming audio for personal, private use (time-shifting) is acceptable. However, recording copyrighted content—like music or audiobooks—to redistribute, sell, or upload is illegal. Always check the platform’s Terms of Service.
How do I separate my voice from the game/system audio?
If you record your voice and the game audio into the same Audacity track, they are “baked” together and cannot be edited separately. For reaction videos, we recommend recording system audio in Audacity and your voice on a separate device, like the Hollyland LARK MAX 2. This gives you a separate voice track that you can sync and mix perfectly in post-production.
Conclusion
Capturing internal audio doesn’t need to be complicated. Windows users can rely on the stability of the WASAPI loopback method, while Mac users can bypass system limitations using a helper tool like BlackHole.
Before you commit to recording a long session, always do a 10-second test run. Play your audio, hit record, and play it back to ensure the levels are green and the sound is crisp. A few seconds of testing can save you from an hour of silent footage.
Finally, remember that system audio is often just one piece of the puzzle. If you are archiving a webinar or creating a viral reaction video, you need your voice to sound just as clear as the stream. Combining Audacity’s internal capture with the Hollyland LARK MAX 2 for your vocals gives you a complete, professional studio setup.