.png)
You have filmed your content, and it’s ready for editing. But all you’ve got is your phone.
Good news? That’s all you need.
These days, many creators have started to edit videos from their phones. With just the right steps, producing engaging and high-quality videos for short or even long-form content is very easy.
In this article, we’ll talk about how to edit YouTube videos on a phone in detail.
Simple Steps to Create Polished YouTube Videos on Mobile
Here’s a step-by-step guide to creating a YouTube video that looks clean, professional, and ready to impress.
Step 1: Choose and Install a Video Editing App
First, you need to have video editing software. To save you time searching for editing software, we have chosen InShot, which is slightly more convenient to work with. Plus, it’s user-friendly, packed with features, and works well for both beginners and experienced editors.
To download the application, go to the App Store (iPhone) or Google Play Store (Android), type in the app name, and then click on the install button.
Once done, launch the app and grant any permissions required (such as access to your photos and videos) so you can start editing immediately.
Step 2: Import Your Video Clips
- Once you open InShot, tap “Video” on the main screen.

- This will take you to your phone’s gallery.
- From there, just select the clips you want to include in your video.

- Then select the Canvas tab on the interface. Since you are making a YouTube video, you should select “YouTube” with a 16:9 aspect ratio.

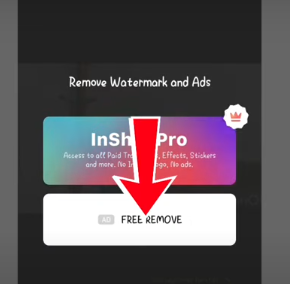
- You might have noticed a watermark on your video right after you uploaded it. However, you may not need any other tool or paid watermark remover application to remove it from the video.

- Instead, you can get a watermark-free video simply by tapping on “Free Remove”.
And that’s all!
Step 3: Trim & Arrange Your Clips
So, now that you have removed the watermark from the video, it’s time to move forward with removing the sections that aren’t needed. These may include awkward pauses or even moments with a shaky camera. Here’s what you need to do:
How to trim:
- Tap on the clip you want to remove. After that, you’ll be directed to a toolbar at the bottom of your screen.
- Move the white playhead (the vertical line) to the start of the section.

- Tap on “Split” on the toolbar to divide your video into two parts.

- Now, move the playhead to the end of the section and tap “Split” again.
- Tap on the unwanted middle section. It should now be its piece in the timeline.

- After that, click on “Delete”.

Use “Precut” (Optional Before Importing)
- If you want to trim before placing the video in your timeline, tap “Precut” right after selecting a clip.
- You’ll get trimming tools to adjust the start and end before adding it to your project.
- Tap the checkmark
Step 4: Add Music or Voiceover
Consider adding background music or a voiceover to make your video more engaging. Here’s how you can do it:
Adding Featured Music:
- Start by clicking on the audio tab in the horizontal menu.

- Now, select the Music+ icon from the list. Scroll the featured list and select the music you want to add to the video.

Adding music from your library
However, if you want to add music from your playlist, you can do that as well.
- Tap on the Audio tab and click on the “My Music” option.

- Since you have already been given access to your library, you can start picking the song you like.
- Afterwards, tap the “Use” button next to the song.

- Drag the music on the video timeline, specifically to the area where you want to start adding music.

- Once the audio and video timelines are set, click on the play button in the center and check how the video sounds.

Adding Voiceover:
On the other hand, if you prefer to add a voiceover to the video, follow these steps:
- Tap on the Record+ option.

- Click the Red button, then start recording your voice.

- You can watch the video play as you speak, which helps you time your narration perfectly.
- When you’re done, tap Stop. The voice recording will appear on the timeline just like a music track.
- Tap on the voice clip to adjust the volume, trim it, or apply fade-in/out effects.
Adjusting the sound:
If you want to adjust the audio levels for the video, click on the volume option and drag the slider. Click on the checkmark.
Step 5: Adding Text
Once you are through with everything above, you can add text and transitions to make your video more refined and smooth.
- Tap the “Text” button from the bottom toolbar.

- Type your message—this could be a title, caption, or highlight.


- Choose your font style, color, and animation (like fade-in or pop-up).

- Drag the text on the screen to place it where you want.
- Adjust the timing by dragging the text bar in the timeline so it appears at the right moment.
- Tap the checkmark to save.
Step 6: Adding Transitions
To prevent abrupt flows and maintain a good flow in the video, you can add effects and transitions as follows:
- After arranging your clips in the timeline, look for the small white square or plus icon (+) between two clips.
- Now, tap on it to open the Transitions menu.
- Browse the available transitions. These may include fade, slide, or even pop up.

- Tap on different transitions to preview them, and afterwards select the one you like.
- Adjust the duration if needed, then finally, tap the checkmark to apply.
Step 6: Export the Edited Video
Preview your final video to make sure everything looks right. Tap “Save” in the top-right corner and export it in high quality—your video is ready to share!

Conclusion
With the steps shared above, you can easily get started with video editing on your phone. The tools may be simple, but the results can look polished and professional with just a little creativity. Whether you’re making full-length YouTube videos or quick Shorts, video editing apps can make the process beginner-friendly and fun.
FAQs
What is the best free video editing app for YouTube on mobile?
InShot, CapCut, and VN are top free apps. They’re easy to use, offer quality tools, and support HD export without complicated setups.
Can I edit YouTube Shorts on my phone the same way as regular videos?
Yes, change the canvas or aspect ratio to 9:16. This vertical format is perfect for Shorts, and most editing apps support it.
How do I add subtitles or captions using a mobile editor?
Use the text tool to type captions manually or try auto-caption features in apps like CapCut. You can adjust timing and font styles.
Why is my exported video blurry or of low quality?
This usually happens when you export at low resolution. Always choose 1080p or higher, and make sure your original clips are high quality.
How can I remove background noise in my phone edits?
Try using apps with noise reduction, like CapCut. Or record in a quiet space and use an external mic for clearer, cleaner audio.