.png)
.png) Français
Français .png) Deutsch
Deutsch .png) Italiano
Italiano .png) 日本語
日本語 .png) Português
Português  Español
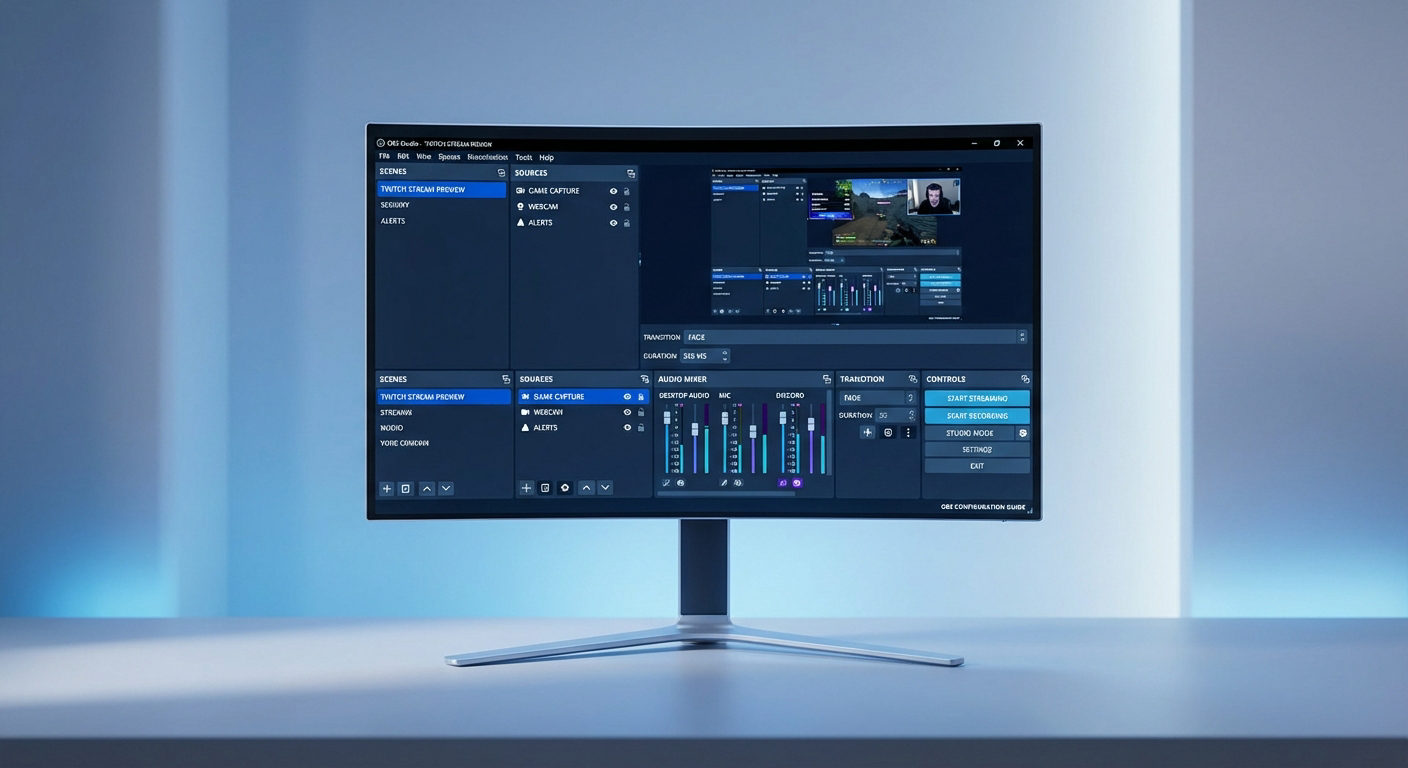
 If you’re a Twitch enthusiast, then you must have heard of OBS (Open Broadcaster Software). We’re talking about a free and open-source tool designed for video recording and live streaming. It’s like a virtual studio that enables streamers, gamers, and content creators to broadcast their content on Twitch, YouTube, and others. With OBS, you can control your mic, camera, and settings from a single interface. You can also enjoy versatile features such as scene composition, audio remixing, and support for various video sources.
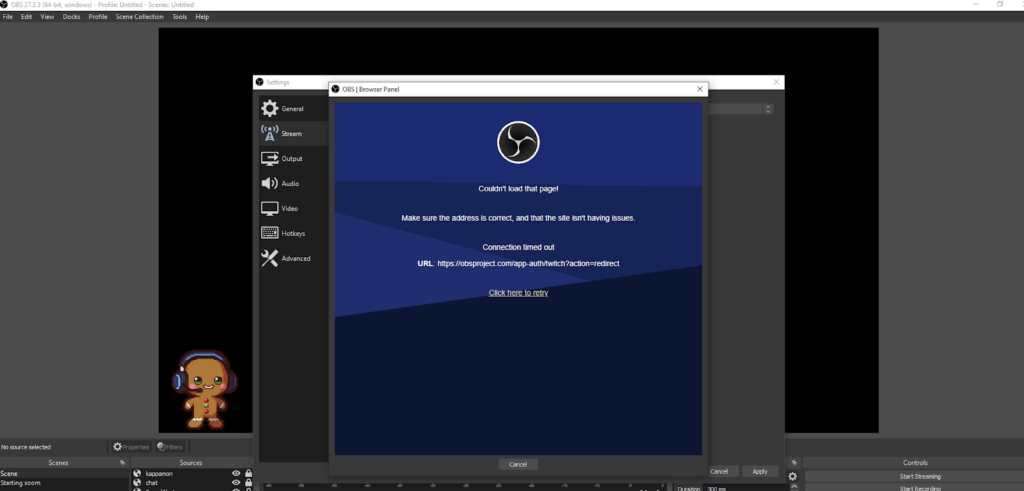
So, when OBS doesn’t connect to Twitch on your device, it’s a cause for concern. Several thoughts will run through your mind. You’ll be wondering what the issue may be. Is it your internet connection? Your OBS settings? The stream key? Does the Twitch server have issues? If you’re experiencing this issue, you’re in the right place. In this article, we’ll explore the likely causes of this problem and how to troubleshoot it. When you’re done reading this, you should be able to connect both platforms seamlessly.
What are the Common Causes of the Problem?
If you’re having trouble connecting OBS to Twitch, the following are the most likely reasons:
Incorrect Stream Key
In most cases, using an incorrect stream key explains why OBS is not connecting to Twitch. For this issue. You should consider two things:
- Invalid/Expired Stream Keys: Twitch stream keys have a validity period for security reasons, so you should check this to confirm if the key is still valid. Secondly, there may be typographical eros in your stream key. Perhaps you mistakenly included extra spaces or characters before or after the key, which invalidates it.
- Capitalizations: Another thing to note is that the stream key is case-sensitive. So, if you tampered with the combinations of uppercase and lowercase, the key won’t work. To confirm if this is the issue, check the stream key you updated on OBS and compare it with what Twitch generated. If it’s not the same, then you have your answer. However, if the keys are the same, then something else is causing the problem you’re experiencing. Let’s find out!
Twitch Server Issues
There are three issues to consider here:
- Server Downtime: When this happens, you won’t be able to connect to OBS or load your streams. You can confirm if there’s a server downtime by checking external websites or the Twitch Status Page.
- High Traffic: This is common during major events or peak periods. If this is the case, you’ll notice that the platform responds slower than it should, and it’s difficult to access streams. You can confirm if there’s massive traffic by using the Twitch Inspector tool.
- Network Connectivity: Sometimes, Twitch has network issues that affect several users and this results in disrupted streams and connection errors. When this happens, the platform sends an update through their official channels.
OBS Settings Issue
If the problem is not from the stream key or Twitch, then you should look at your OBS settings for the following:
- Incorrect Server Selected in OBS Settings: This is more of a user issue than an OBS issue. Selecting the wrong server in your settings can cause high latency, dropped frames, and even disconnections. We advise that you go to the stream tab in your settings and look for the server menu to confirm this.
- Outdated OBS Version: Sometimes, the cause may be something as simple as this. Outdated apps come with missing features, bugs, or compatibility issues.
- If you want to check your OBS version, click the app icon on the Windows menu. If you’re using an Apple PC, click the applications folder.
- Click ‘Help,’ it’s the last tab at the top of the page. It will display a drop-down menu and check for updates
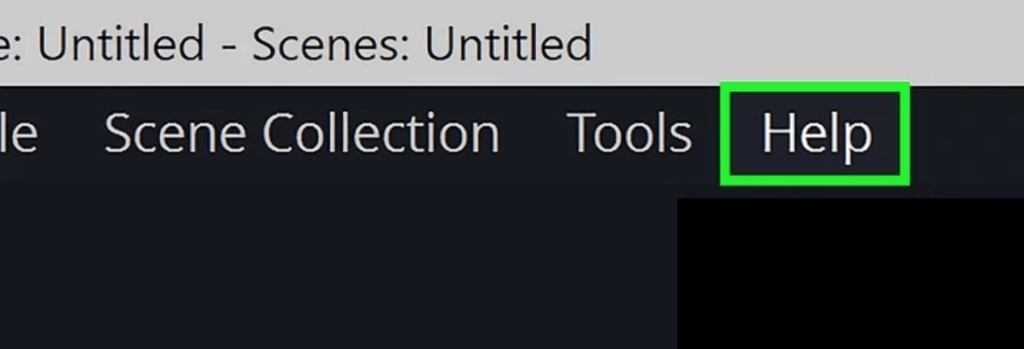
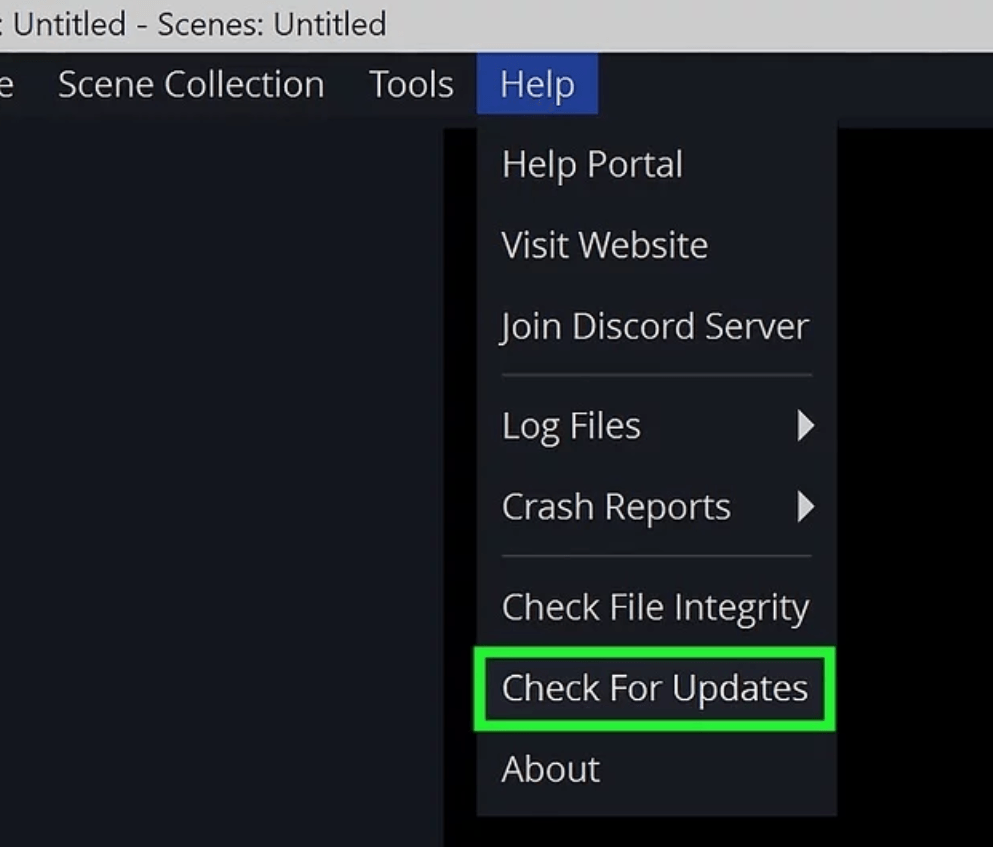
- If it’s out of date, then it may be the cause.
- Firewall or Antivirus Software Blocking OBS’s Connection: If you’ve checked the version or the server and determined that they’re not the problem, then you can consider this. It’s common knowledge that firewalls or antivirus software restricts specific applications to protect our devices. However, we can’t be sure if we don’t confirm it.
- So, head to your firewall settings and check for OBS among the apps that are allowed to access the internet. If OBS is not on the list, add it to the list of allowed applications.

- The same goes for antivirus. Open your settings and add OBS as a trusted application. Alternatively, you can temporarily disable the firewall/antivirus on your device and check if the connection will work. If it does, you’ve diagnosed the problem. However, if it doesn’t work, the search continues.
- Conflicting OBS Plugins: If your OBS plugins are conflicting, it won’t just cause connection issues but crashes and instability. The trick is identifying the particular plugin causing the issue.
- One way is by reviewing the plugins you recently added or updated.
- Another way is to disable the plugins and re-launch OBS temporarily. Then, re-enable the plugins one by one. For each plugin you activate, test OBS to pinpoint the plugin causing this issue.
- Alternatively, check if the plugins are compatible with the OBS version you’re using. You can either visit the OBS forums or the plugin’s developer page to confirm this.
- Another method is to check if you’re using outdated versions of the plugins. You should also clear the plugin cache or uninstall the plugins you don’t need or use.
Internet Connection Issues
- Weak or Unstable Internet Connection: If none of the problems mentioned above are causing your connection issues, we should channel our suspicion to your device. If your internet connection is weak or fluctuating, it will affect your OBS connection to Twitch. You can diagnose this by testing your internet’s upload speed with a speed test tool. If the speed doesn’t meet the requirements, that could be the problem.
- ISP Throttling Bandwidth: Sometimes, the internet connection issue is not from your device but from your internet service provider. Use the speed test tool to assess your upload and download speeds. Then, compare the results with the speeds your ISP promised in the subscription plan. If there’s an obvious difference between them, we can assume that this is what’s causing the issue.
Steps to Troubleshoot the Problem
Verifying Stream Key
- Check for Typos and Ensure the Stream Key is Active.
- Log in to Twitch on your web browser.
- Click on your profile picture at the top right corner, and a drop-down menu will appear.
- Select ‘Creator Dashboard’ from the list.
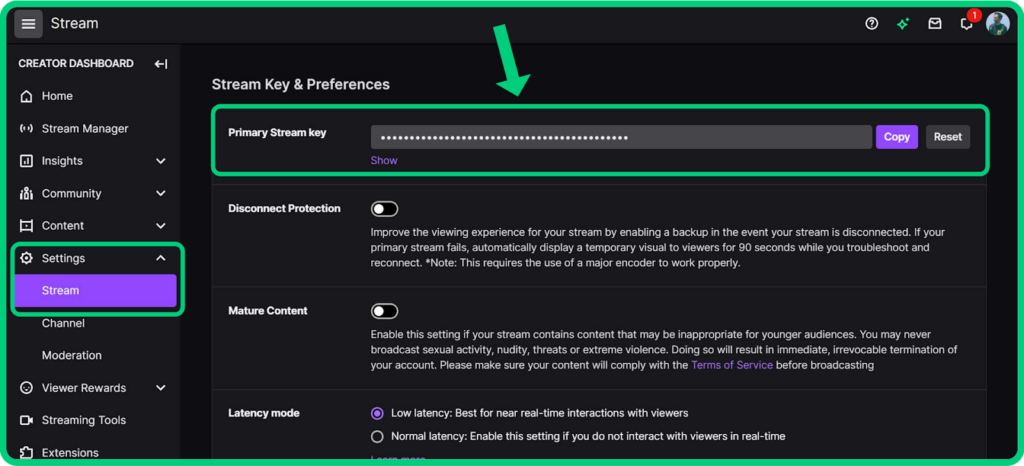
- Find the left sidebar and tap ‘settings.’
- Select ‘Stream’ from the settings menu and scroll till you see ‘Stream Key & Preferences.’
- Click on ‘Show Key’ to reveal your stream key.
- Copy the entire stream key.
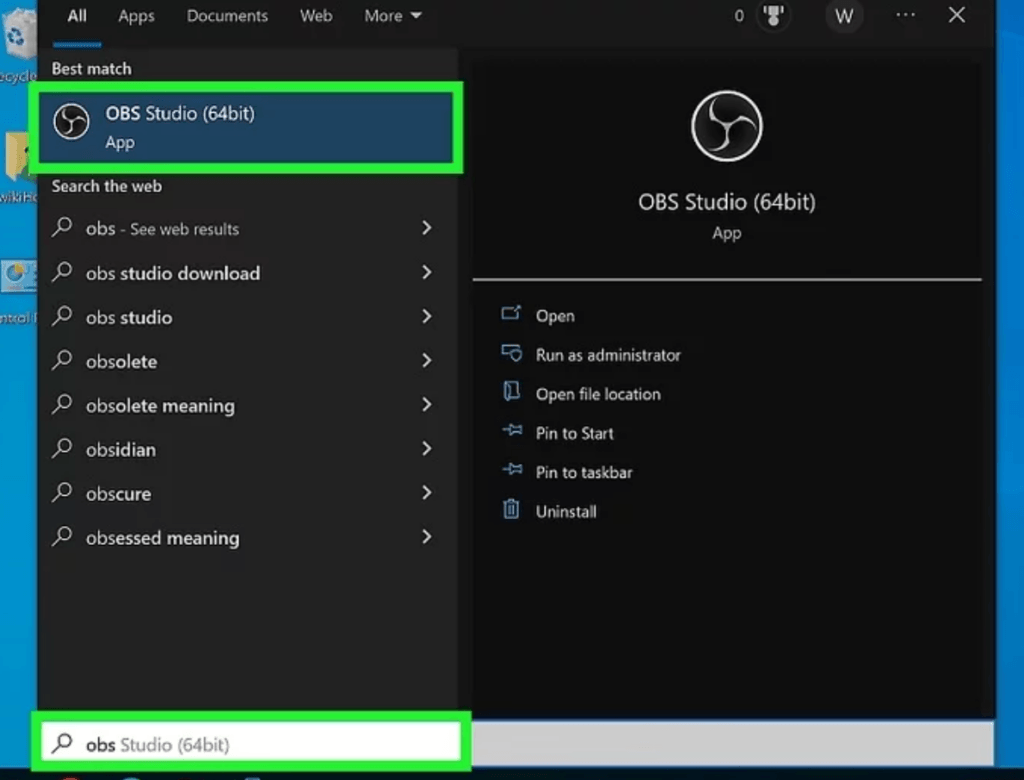
- Launch OBS Studio on your PC.
- Go to settings at the bottom-right corner.
- From the menu, select ‘Stream’ from the left sidebar.
- Paste the stream key you copied from Twitch in the field provided for it.
- Inspect the key to ensure it’s identical to what’s on Twitch.
- Click on ‘Apply’ and then ‘OK’ to save the changes on OBS.
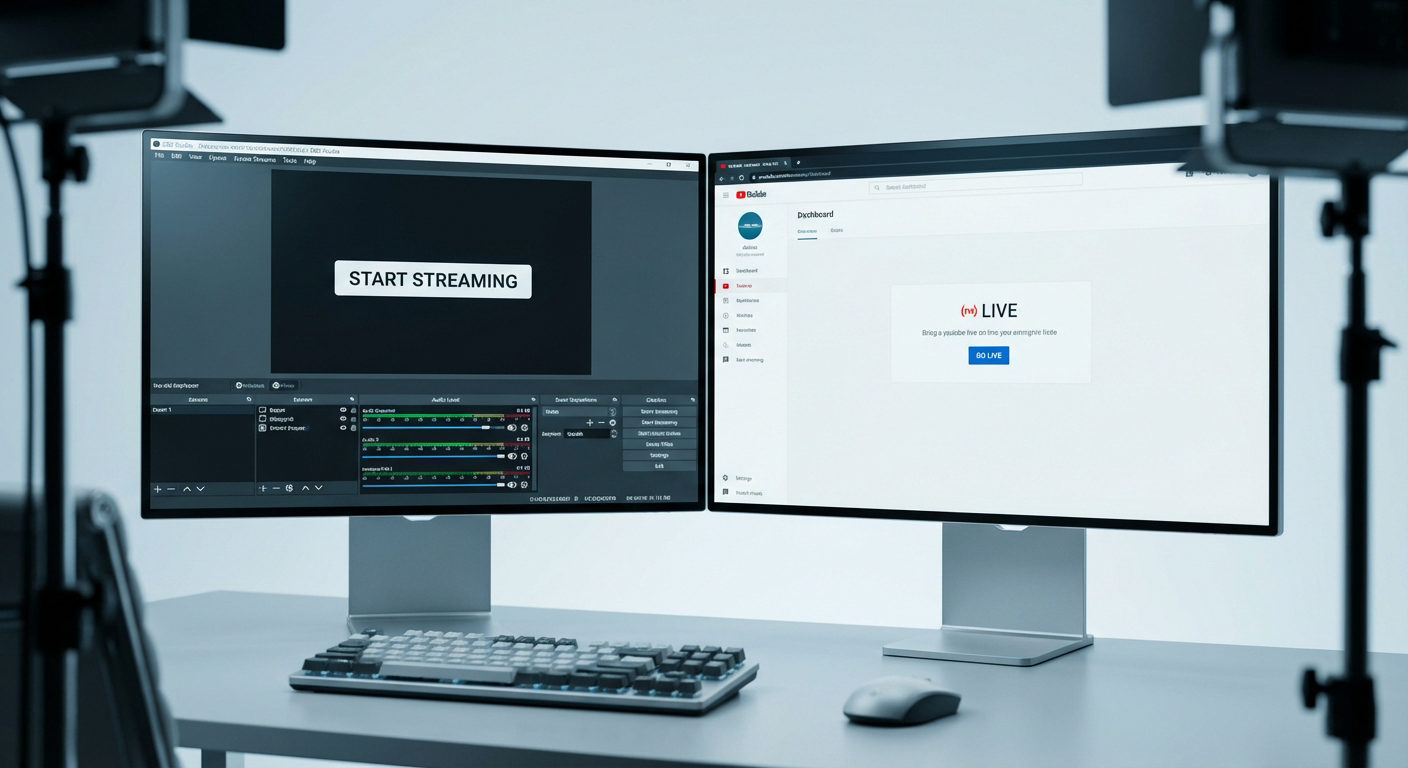
- Then, use the ‘Start Streaming’ button to test your connection and check for errors. At the same time, check your Twitch dashboard to see if your stream is live.
- Generate a New Key
- Repeat steps 1 to 5.
- Look for ‘Primary Stream Key’ and click on ‘Reset’ and then confirm. This will invalidate the previous stream key.
- Repeat steps 6 to 13.
Check Twitch Server Status
- Visit the Twitch Status Page
- Launch your web browser and go to the Twitch Status Page to get information about the operational status of Twitch’s services, such as chat, streaming, etc.
- Check for incident reports to understand what’s going on.
- Look for updates from Twitch’s team. This will reveal when they expect to solve the issue.
- Subscribe to notifications on Twitch for further updates.
- Look for Any Reported Issues
- Visit Twitch Community Forums for information on streaming, technical, or server issues.
- Read the user experiences to see if they’re facing similar problems.
- If you don’t see any comments discussing your problem, initiate one to engage the community and get valuable insights.
- Alternatively, follow Twitch on social media or contact support.
Update OBS and Confirm Settings
- Update to the Latest Version of OBS
- Let’s continue from the steps under the OBS settings issue. Go to the Downloads page, where you’ll see the latest version of your device’s operating system.
- Click on the ‘Downloads’ link to get the latest installer if your app is outdated.
- Run the installer and follow the instructions it displays on the screen.
- Some installation options may pop up; simply choose the one you prefer and finish the process.
- Click on ‘Finish’ to exit the installer.
- Launch OBS Studio.
- Check the bottom-right corner to confirm you’re using the updated version.
- Verify the Selected Server in OBS Settings Matches Twitch’s.
- Go to your settings menu in the lower right corner.
- Select ‘ Stream’ and locate the server menu to check the current server.
- Launch Twitch Inspector on your web browser.
- Click on ‘Run Test’ to analyze your connection to various servers. The results will help you identify the best server.
- Go back to the server menu in OBS and select the recommended option.
- Click on ‘Apply’ and then ‘OK’.
- Test the connection by using the ‘Start Streaming or ‘Start Recording’ button.
Check for Any Unusual OBS Settings That May Be Causing the Issue
- Go to the ‘General’ tab in your settings menu.
- Check for settings such as output resolutions, frame rates, and canvas resolutions. Ensure that they match the recommended specifications for recording/streaming.
- Then, examine the ‘Output’ tab to check if the settings (recording format, streaming bitrate, etc) match the requirements for your streaming platform.
- Do the same with video settings and ensure they match what your device is capable of
- Go to the ‘Audio’ tab and ensure the settings are configured accurately for your mic and other audio sources.
- Next, go to ‘Hotkeys’ and check to see if they conflict with each other.
- Go to ‘Advanced’ and adjust settings based on what your device can handle.
- If you use several scene collections, ensure you’re using the correct one for your current streaming setup.
- If you’ve confirmed that the above settings are in order, save settings and use the ‘Start Streaming’ button. If the connection issue still persists, reset OBS to default settings. Please note that this should be the last resort.
- Go back to ‘General’ and click on ‘Reset.’
- Disable Firewall and Antivirus Software Temporarily to Test
- For the Windows Firewall:
- Open the search bar.
- Type ‘Firewall’ and click on ‘Windows Defender Firewall’
- On the left pane, you’ll see where to enable/disable it. If it’s activated, disable it.
- Click on ‘OK’ to save changes.
- For a third-party firewall:
- Launch the application and go to the settings menu.
- Scroll to where you can enable/disable the firewall and toggle it off.
- For Windows antivirus (version 10 and 11):
- Launch the settings menu.
- Select ‘Privacy & Security’ and click on ‘Windows Security.’
- Click on ‘Virus & Threat Protection’ and select ‘Manage Settings’
- Toggle off ‘Real-time Protection’.
- For third-party antivirus software:
- Open the app and go to settings.
- Look for the option to deactivate the antivirus shield temporarily.
- After testing your connection, you can re-enable your firewall/antivirus.
- Disable Any Unnecessary OBS Plugins
- Go to settings and select the ‘Plugins’ tab. You’ll see a list of installed plugins with checkboxes beside them.
- Uncheck the boxes for the plugins you don’t consider important for your streaming setup. This will disable it. Some plugins have additional settings. We recommend you check for them in their documentation.
- Click ‘Apply’ and ‘OK’ to save changes.
- Restart the app and test the connection. If you can’t pinpoint the defective plugins, it probably means they’re outdated. So, update the plugins and re-test your connection.
Test Internet Connection
- Run a Speed Test and Ensure Sufficient Upload Speed.
- Launch your web browser and visit a speed test website.
- Click on ‘Go’ or whatever option is there to initiate the process.
- When the results display, check that the upload speed matches the requirements for your streaming bitrate. It should be between 3-5 Mbps. The quicker it is, the better. On the other hand, if the speed is slower, adjust your streaming bitrate for stable streaming.
- Contact Your ISP if Experiencing Internet Issues
- Before contacting your ISP, we recommend you note the symptoms, the error messages, and the specific times the issue occurred.
- Also, check your ISP’s website or customer portal for reports on outages in your area. If there are none, find the customer support information and call them.
- Provide the necessary information they request and describe your issue.
- Follow the instructions they give.
- Request for a speed test if you haven’t done it.
- If they can’t solve the problem, ask them to send a technician.
- Follow up with your ISP for updates if the issue persists.
Additional Solutions
- Try Connecting With the Rtmp Address and Key Instead of Stream Key
- Visit your streaming platform (Twitch) to copy the RTMP URL and key. You can find the information in your settings or dashboard.
- Launch OBS Studio on your PC.
- Go to ‘Stream’ in settings and select ‘Server’.
- Click on ‘Custom’ and paste the URL in the space provided for it.
- Then, paste the key in the field for the stream key and test the connection.
- Restart Both OBS and Your Computer
- Close OBS Studio
- Then. exit all applications on your PC.
- Click on the Windows Start Menu button and select ‘Restart.’
- After your system has restarted, launch OBS Studio and test the connection.
- Reinstall OBS as a Last Resort (The final option if all else fails)
- Close OBS Studio if it’s open.
- Press the Windows key + X at the same time to launch your control panel
- Go to ‘Programs’.
- Scroll till you see ‘OBS Studio’ and right-click it.
- Select ‘Uninstall’ and follow the on-screen prompts to finish the process.
- Launch your web browser and go to the ‘Downloads’ page on the OBS official website.
- Select your device’s operating system and download the installer.
- Follow the instructions to finish the process.
- Launch the app and reconfigure the settings to your streaming preferences/requirements. Test the connection.
If you’re looking to level up your OBS streaming experience further and boost your video quality, consider upgrading your setup with a dedicated streaming camera. A reliable streaming camera ensures sharper images and smoother streaming performance, greatly enhancing your Twitch broadcasts.
Frequently Asked Questions
What are some alternative streaming platforms to Twitch?
You can opt for YouTube Gaming, Trovo, Facebook Gaming, Nimo TV, and DLive.
How can I improve the quality of my stream when using OBS?
There are many ways you can enhance your streaming quality with OBS. You can adjust your bitrate, FPS, resolution, encoder settings, and audio settings. You should also test before streaming, enable GPU acceleration, and optimize scenes. Lastly, ensure you have a stable internet connection and regularly update your apps.
What are some best practices for streaming on Twitch?
There are several best practices that we recommend Twitch streamers adopt. Firstly, engage your viewers and maintain a consistent schedule. Secondly, place quality over quantity of videos and promote them on social media. Use catchy titles and use the data from analytics to tailor your content to viewer preferences. Lastly, collaborate with other streamers.