


.png)
FaceTime keeps us connected with our loved ones near and far. Sometimes, a call holds a special moment you’d like to treasure. But then, you might wonder if it is possible to record the audio of a FaceTime conversation.
The answer is yes but with genuine consideration. It’s crucial to obtain explicit consent from everyone involved in the call before recording. Local laws may also have specific regulations regarding call recording, so it’s always wise to check before hitting the record.
Now, let’s explore how to keep a record of that special FaceTime moment with everyone’s okay!
Preparing for the Recording
Before you jump into storing that special FaceTime moment, let’s make sure everything is set technology-wise.
Check Device Compatibility
You will have to understand that not all devices can record FaceTime calls with audio. Here’s how you can do a quick compatibility check:
- iPhones and iPads: When we talk of iPhones or iPads, you’ll need iOS 11 or later. The built-in screen recording feature with audio can only be accessed with that.
- Macs: If you plan to use QuickTime Player for recording, you’ll have to ensure you have macOS Mojave or later installed.

Important Note: Currently, there’s no direct way to record FaceTime calls with audio if someone on the call is using a non-Apple device.
Update to the Latest Version
You are required to keep your software up-to-date. This actually will make sure of the compatibility and provide access to the latest features. These features may include potential improvements to screen recording functions. Here’s how to update your devices:
- iPhone/iPad: You can follow this process with an iPhone or iPad. For this you’ll have to head to Settings > General > Software Update. Your device will scan for available updates and guide you through the installation process if needed.
- Mac: On your Mac, navigate to System Preferences > Software Update. Similar to your iPhone/iPad, your Mac will look for updates and let you install them if available.
Ensure Sufficient Storage Space
You’ll also have to make sure your device has enough room to store the recording. On iPhones/iPads, go to Settings > General > [Device] Storage.
For Macs, You can check the Apple menu > About This Mac > Storage. You should free up space if needed for a smooth recording experience.
Understanding Legal and Ethical Considerations
Before you hit record, it’s heavily important for you to understand the legalities and ethical considerations. Let’s break it down.
Consent Requirement
First and foremost, you’ll need to understand that transparency is key. You are required to inform everyone participating in the FaceTime call that you intend to record the conversation.
To be specific, in many regions, obtaining explicit consent is not just about it being ethically sound. It can be a legal requirement. We have to be aware of the fact that recording a call without consent can have serious repercussions. It is seriously advised to be upfront from the beginning.
Privacy Laws by Region
Every region has its own laws. Laws regarding call recording can vary significantly depending on your location. One thing that you need to note is that the location of the other party on the call is equally important. We should understand that It’s essential to research the specific laws in your area, as well as the area where the other party resides.
There are multiple resources like government websites or legal information portals that you can check to find relevant details.
Setting Up for Recording
Now that we have made sure of all the necessary constraints, let’s dive into the actual recording setup!
On iPhone or iPad
We can employ the built-in screen recording feature. This captures both the video and audio of your FaceTime call.

Adding Screen Recording to Control Center: For this you’ll need to head to Settings > Control Center. Post that, locate Screen Recording, and tap the + sign next to it. It’ll add it to your Control Center for easy access.
On Mac
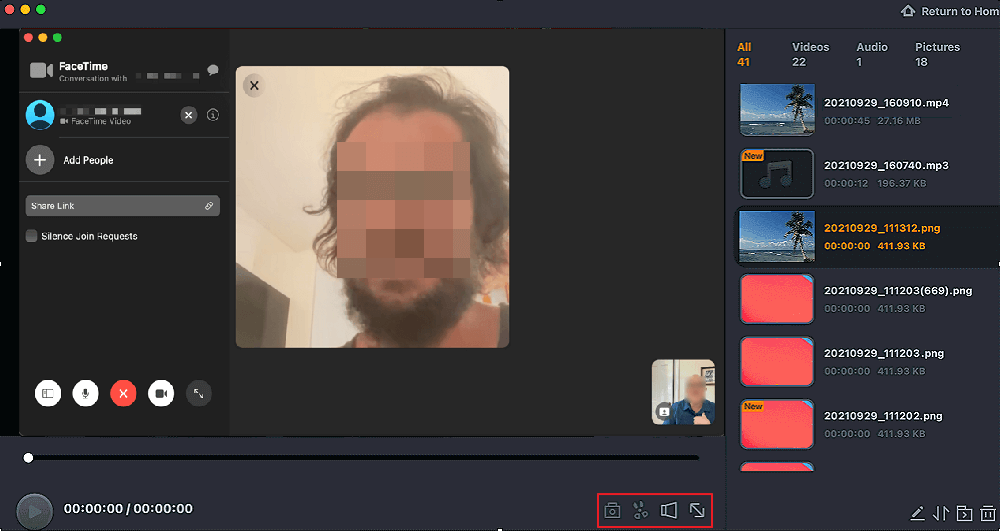
For Mac users, QuickTime Player is what allows you to record your screen and audio.
- Using QuickTime for Recording: Start by opening the QuickTime Player. Post that, go to the menu bar and select File > New Screen Recording.
- Setting Up Audio Input Sources: This step will ensure you capture the conversation audio. To do this, you should click the downward arrow next to the record button (it looks like a red circle). A menu will appear, which will enable you to select the microphone you want to use for recording the call.
Recording the FaceTime Audio
Now that you’re all set up let’s record it!
Steps to Record on iPhone or iPad
- Initiate the FaceTime call: First of all, go ahead and start your FaceTime call as usual.
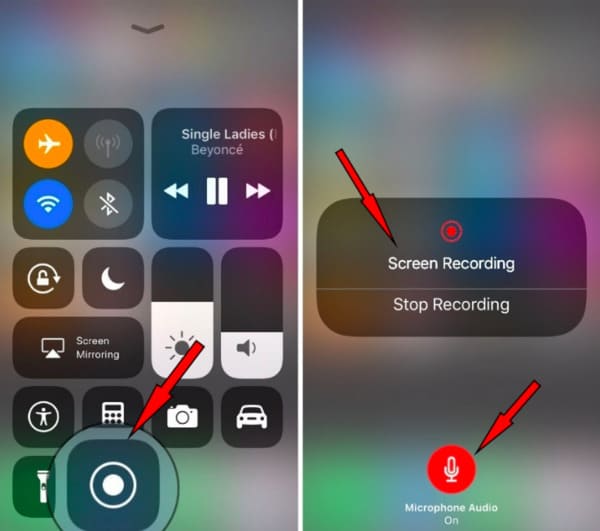
- Activate Screen Recording: Swipe up from the bottom of your screen (or down from the top right corner on iPhone X or later) to open the Control Center. Locate the Screen Recording icon (it looks like two concentric circles) and tap on it.
- Important: Make sure you’ve configured the microphone option in the Control Center. It is highly important to record audio by holding down the Screen Recording icon before tapping it (explained earlier). A short countdown will appear, giving everyone a heads-up before the recording begins.
- Saving the Recording: Once you’ve finished recording the conversation, tap the red recording bar at the top of the screen to stop. Your recording will be stored automatically in the Photos app under the “Screen Recordings” album.
Steps for Mac Recording
- Initiate the FaceTime call: To begin with, start your FaceTime call as you normally would.
- Launching QuickTime for Recording: The next thing you’ll have to do is to open QuickTime Player if it’s not already running.
- Selecting Audio Input and Starting the Recording: Tap on the down arrow next to the red record button in QuickTime. Choose the microphone you want to use to capture the conversation audio from the menu that appears. Once you’re ready, click the red record button to begin recording.
- Saving the Recording: When you’re finished recording, click the red record button again to stop. A window will show up, prompting you to save the recording. For this, you can choose a descriptive filename and select a suitable file format (like MP4 for video and audio).
Editing and Sharing the Recorded Audio
Once you’ve captured your FaceTime conversation, you might want to edit it or share it. This is how you can do that.
Basic Editing Tools
We know that extensive editing features may not be available. Some simple options still exist like you can often trim unwanted parts.
- On iPhone or iPad: The Photos app offers basic editing tools. You should be opening the recording in the Photos app and tap “Edit.” After that, you just use the yellow trimming handles to trim the start and end points.
- On Mac: You can use QuickTime Player for basic trimming. To start with the editing, open the recording in QuickTime. There, you’ll locate the yellow trimming handles at the bottom of the window. Post that, drag them to select the portion you want to keep.
Sharing Options
There are several ways to share your recorded FaceTime call:
- AirDrop: The one feature that most Apple users are proud of. This convenient Apple feature allows you to share files wirelessly between Apple devices in close proximity.
- Email or Messaging Apps: You can attach the recording to an email or send it through your preferred messaging app (iMessage, WhatsApp, etc.).
- Uploading to Cloud Storage: You can employ cloud storage services like iCloud Drive or Google Drive. This can be useful if the file size is large or you want to access it from multiple devices.
Troubleshooting Common Issues
Even with careful preparation, glitches can happen. Here’s how to address some common problems:
No Audio in the Recording
We agree that ensuring smooth recording also involves microphone access. On iPhones/iPads, head to Settings > Privacy > Microphone and enable FaceTime. For Macs, check System Preferences > Security & Privacy > Privacy > Microphone and turn on FaceTime access.
Additionally, verify you’ve selected the right microphone for recording. On iPhones/iPads, confirm the microphone option in the Control Center captures audio (refer to earlier steps). For Macs, ensure the chosen microphone in QuickTime matches your desired recording source.
Recording Stops Unexpectedly
- Storage Space: A full device can disrupt recording. Free up space in Settings > General > [Device] Storage (iPhone/iPad) or About This Mac > Storage (Mac).
- Sleep Mode: If your device enters sleep mode during the call, the recording might be interrupted. Adjust your auto-lock settings to prevent this (Settings > Display & Brightness on iPhone/iPad, System Preferences > Energy Saver on Mac).
Poor Audio Quality
For optimal audio quality:
Minimize Background Noise: You should find a quiet environment with minimal background noise for the call.
Microphone Distance: While recording, you need to speak clearly and hold the device (or microphone) close enough to capture your voice effectively. In this case, usage of Hollyland Lark Max can help you improve the quality exponentially.

Hollyland LARK MAX - Professional Wireless Microphone
A professional wireless microphone system featuring studio-quality audio with advanced noise cancellation.
Key Features: Studio-Quality Audio | Magnetic Attachment | 8GB Internal Recording

FAQs
Is it legal to record FaceTime audio calls?
Legality depends on your location, and obtaining consent from everyone involved is crucial. Always check your local laws.
Can I record FaceTime calls on all Apple devices?
Yes, with iOS 11 or later on iPhones/iPads and macOS Mojave or later on Macs. Recording with non-Apple devices isn’t currently possible.
How can I improve the quality of my FaceTime audio recordings?
Minimize background noise, speak clearly near the microphone, and ensure a stable internet connection.
What should I do if the recorded audio file is too large to share?
Consider using cloud storage services or compressing the file size (be aware of potential quality loss)


