.png)
Screen recording with audio on a Mac opens up a world of possibilities, from creating tutorials and presentations to capturing gameplay or preserving memorable moments. In this comprehensive guide, we’ll walk you through the step-by-step process of screen recording on a Mac, ensuring you can capture both visuals and audio effortlessly.
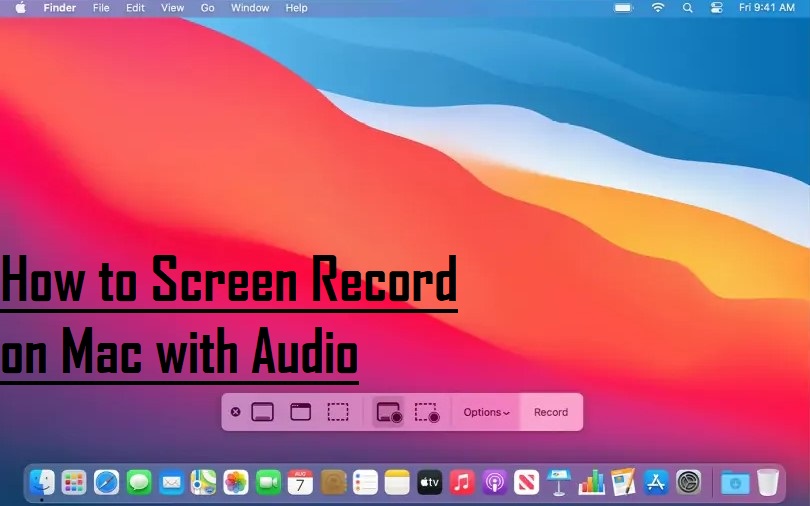
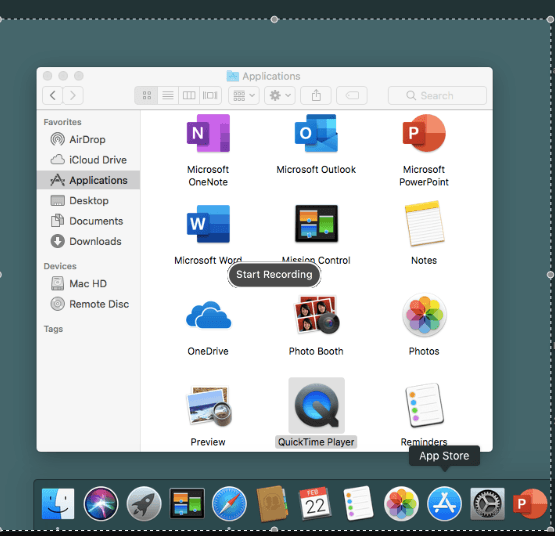
Using the Screenshot Toolbar to Screen Record with Audio
To screen record on a Mac using the built-in Screenshot toolbar, ensure your Mac runs on Mojave OS or a newer macOS version. Before starting, verify that your Mac has sufficient disk space to save the recording. Additionally, it’s wise to check your Mac’s performance to prevent any potential glitches or crashes.
To initiate screen recording using the Screenshot toolbar:
- Open the application or window you wish to record.
- Press and hold Shift + Command + 5 to access the Screenshot toolbar.
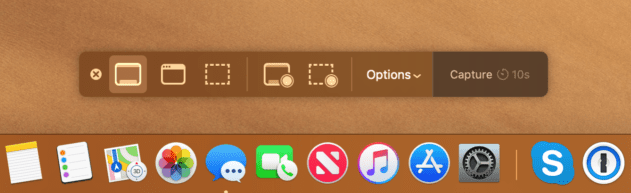
- Choose the screen recording icon on the left to capture the entire screen, or the one on the right to select a specific portion.
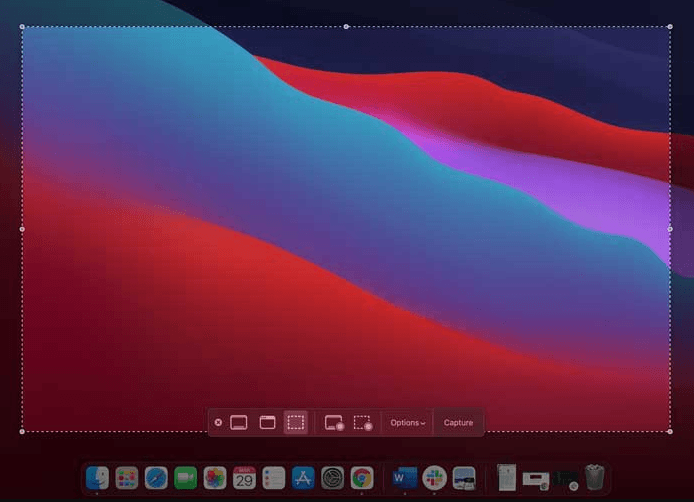
- If recording a portion, drag your cursor to outline the desired area, then click Record.
- To stop the recording, click the Stop button on the menu bar, or press Command + Control + Escape.
Using QuickTime Player for Screen Recording with Audio
To capture your screen with audio on a Mac, utilizing QuickTime Player offers a seamless solution, particularly for presentations or tutorials where audio plays a vital role. QuickTime Player comes pre-installed on Macs, making it a convenient choice for screen recording tasks.
Here’s a step-by-step guide on how to screen record on a Mac with audio using QuickTime Player:
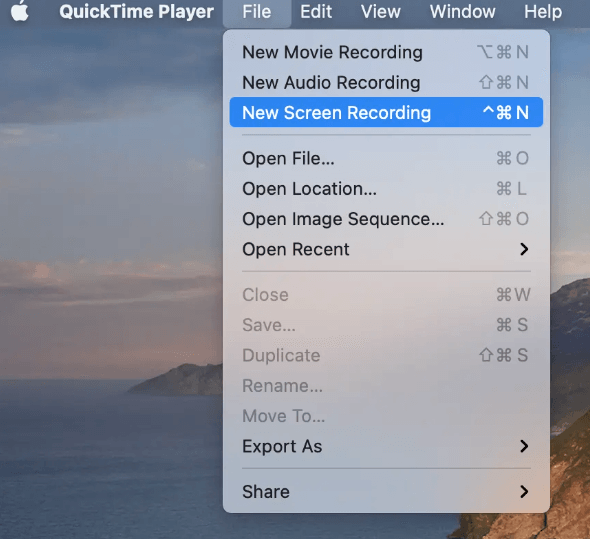
- Launch the QuickTime Player application.
- Navigate to the Menu bar and click on “File,” then select “New Screen Recording.”
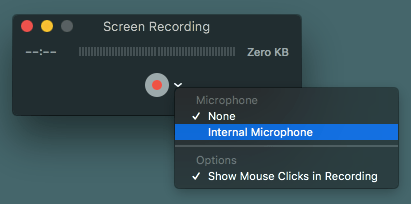
- Click the arrow adjacent to the red Record button to choose your audio input source. Subsequently, click the Record button to configure the screen recording settings.
- If you wish to capture the entire screen, simply click anywhere on the screen to commence recording. Alternatively, if you prefer to record a specific portion of the screen, drag your cursor to select the desired area, then click “Start Recording.”
- To conclude the recording, either click the Stop button located in the menu bar or press and hold Command + Control + Escape.
Third Party Softwares for Screen Recording with Audio
Third-party software offers solutions for screen recording on a Mac, overcoming Apple’s restrictions on recording internal audio or specific applications due to copyright concerns. These tools cater to professional needs by enabling screen recording with internal audio.

Here are some recommended third-party methods for screen recording on Mac with sound:
- OBS Studio: This free and open-source software is capable of recording internal audio on macOS Ventura or newer versions. OBS Studio allows recording from specific applications or windows. However, it has a steep learning curve, demanding system requirements, and lacks advanced editing features.
- Camtasia: While slightly expensive, Camtasia offers the ability to record internal system audio and mix recordings from specific windows, applications, and devices. It boasts powerful editing capabilities, making it a popular choice among professionals.
- VMaker: With an intuitive interface, VMaker enables screen recording with internal audio. It includes a “Record a window” option for capturing specific applications or windows, along with useful editing features. VMaker operates on an affordable subscription model and offers free recording of short videos.
- RogueAmoeba’s Loopback: Loopback creates a virtual device to merge audio from any chosen source. It allows recording internal audio from various devices or applications, such as Zoom, Safari, or an iPhone. Once set up, Loopback appears as an audio option in the Mac’s Screenshot toolbar and QuickTime Player.
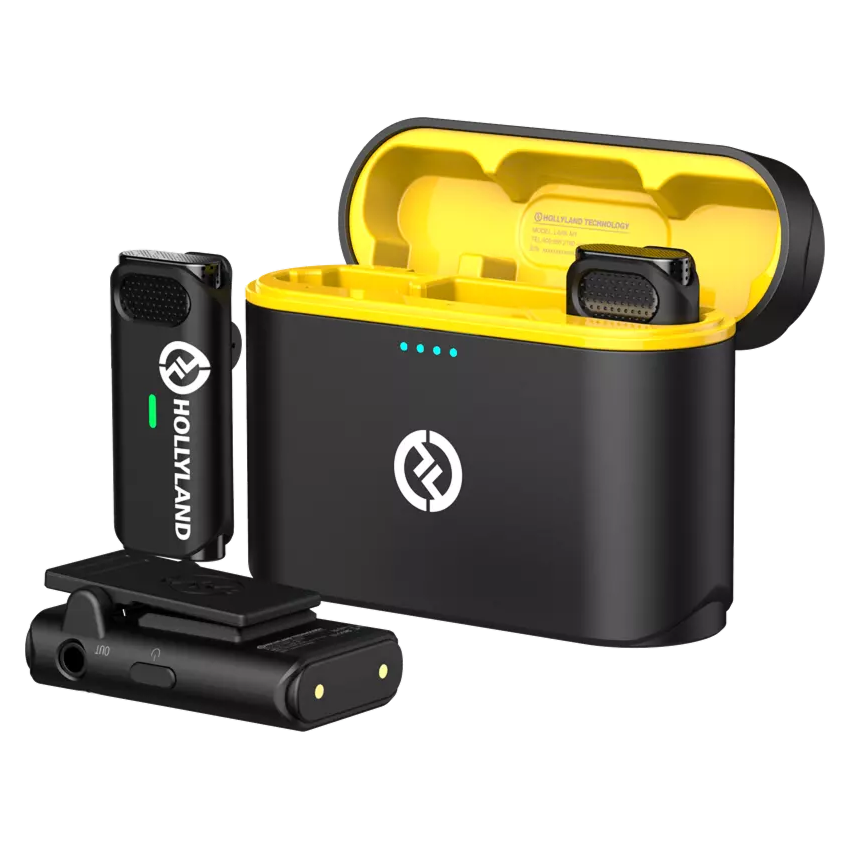
While internal system audio is necessary to capture original audio from games, videos, or other sources. Good quality microphones are also vital for voiceover recordings. This is where Hollyland Lark M1 comes to your service. It provides the means to achieve professional-grade screen recordings on a Mac.

Saving and Editing Screen Recordings
Editing and saving screen recordings with QuickTime Player, although lacking in advanced features compared to third-party software, is still feasible.
Here’s the procedure on how to edit and save screen recordings in QuickTime Player:
- Open the screen recording you wish to edit using QuickTime Player.
- Navigate to the Menu bar and select “Edit,” then choose “Trim.”
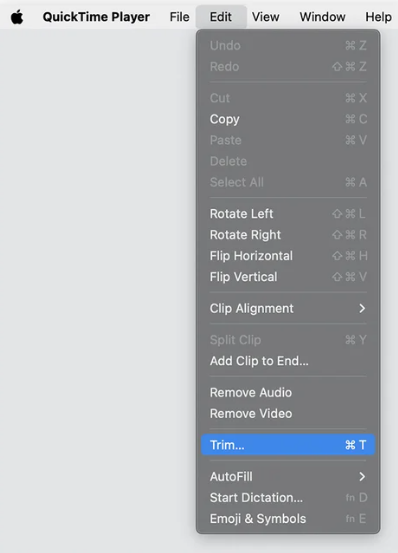
- A trimming interface will appear, allowing you to adjust the length of the video by dragging the handles at either end.
- Once you’ve trimmed the video to your desired length, click “Trim” to confirm the changes.
- Finally, save your edited screen recording to your preferred location.
One common issue encountered when screen recording on a Mac is limited storage space. By editing your recordings and removing unnecessary content, you can optimize storage and ensure you have ample space to save essential recordings.
Troubleshooting Common Issues
Addressing common screen recording issues on Mac can significantly enhance the quality of your recordings. If your Mac is sluggish, taking steps to optimize its performance and free up storage space is essential. Utilizing Mac cleaners can help thoroughly cleanse your system before embarking on a screen recording session.
Here are solutions to other prevalent screen recording issues on Mac:
- Mac won’t permit recording: To enable screen recording, navigate to System Preferences > Security & Privacy on macOS Ventura or later. Under Privacy & Security, select Screen Recording and grant permission to the desired apps.
- Resolution discrepancies: Adjust the resolution of your screen recording in QuickTime Player by selecting File > Export As. Choose from 1080p, 720p, or 480p options, or export audio only if needed.
- Storage constraints: QuickTime’s .MOV format can lead to large file sizes. Use Handbrake, a free Mac app, to convert .MOV files to more compact formats like H.264 or HEVC, reducing file size without compromising quality.
- Overheating concerns: Close unnecessary applications, tabs, and animations to alleviate overheating issues during screen recording. If the problem persists, explore additional methods to address overheating on your Mac.
- Frame rate fluctuations: Adjusting your Mac’s display resolution before exporting in QuickTime can mitigate frame rate lag. Access System Preferences > Displays to modify your Mac’s resolution settings.
- Bitrate adjustments: While Mac native options limit bitrate adjustments, third-party apps offer flexibility. Match the bitrate to your desired resolution: 500 Kbps for 480p, 1 Mbps for 720p, at least 5 Mbps for 1080p, and at least 20 Mbps for 4K.
Maintaining the health of your Mac is crucial for optimal screen recordings, as Macs are susceptible to viruses and malware. Regular maintenance ensures your Mac operates at its best, providing ample space and performance for flawless screen recordings.
For Pro Audio Recording Experience with Screen: Introducing the Hollyland Lark Max Microphone, your perfect companion for enhancing screen recordings with crystal-clear audio on your Mac. Equipped with advanced noise reduction technology, the Lark Max eliminates background noise and delivers pristine audio, allowing your audience to focus on your content without distractions.


Whether you’re a content creator, educator, or gamer, the Hollyland Lark Max Microphone elevates your screen recordings to the next level, ensuring every word is heard with clarity and precision.
Conclusion
Screen recording on a Mac with audio is a powerful tool for various purposes, including education, entertainment, and communication. By following the step-by-step guide outlined above, you can confidently capture your screen activity along with audio, ensuring that your recordings are professional and engaging.
With QuickTime Player’s user-friendly interface and robust features, you’ll be able to create high-quality screen recordings with ease. Whether you’re a teacher, gamer, or business professional, mastering the art of screen recording on a Mac opens up endless possibilities for sharing knowledge, entertainment, and collaboration.
We value your opinion! Have you found this guide helpful in improving your screen recording skills on Mac? Share your thoughts and experiences with us. Did you encounter any challenges along the way, or do you have additional tips to enhance the recording process? Your feedback helps us continually improve and tailor our content to better meet your needs. Leave your comments below and let us know how we can assist you further in your screen recording journey.
Frequently Asked Questions
Can I record system audio and microphone audio simultaneously on a Mac?
Yes, you can record system audio and microphone audio simultaneously on a Mac by using third-party software that supports capturing both audio sources concurrently.
Why is my screen recording not capturing audio?
Possible reasons for screen recording not capturing audio include incorrect audio input source selection, lack of necessary permissions for the recording software to access Mac’s audio input, compatibility issues with Mac’s operating system, and muted system audio or microphone audio volumes.
How do I improve the audio quality of my screen recordings on Mac?
To enhance audio quality in screen recordings on Mac, consider investing in a high-quality microphone, recording in a noise-free environment, adjusting input levels effectively, and utilizing audio editing software during post-production.
Are there any free tools for screen recording with audio on Mac?
Yes, there are free screen recording tools available for Mac that support audio recording, including QuickTime Player, OBS Studio, Loom, and ShareX, each offering different levels of functionality and editing capabilities.
Is it possible to edit audio separately from video in a screen recording on Mac?
Multiple software options for Mac allow separate editing of audio and video in screen recordings, enabling tasks such as trimming, adjusting volume levels, and applying effects independently.
Why does my screen recording have out-of-sync audio and video?
Out-of-sync audio and video in screen recordings may result from software glitches or incompatible recording settings. Troubleshoot by adjusting recording settings, closing unnecessary applications, or restarting your Mac before recording.
Can I record audio from specific applications while screen recording on a Mac?
Certain third-party software enables selective capture of audio from specific applications while screen recording on a Mac, useful for capturing application sound while excluding system or microphone input.
Are there any advanced features or settings in screen recording software that can further enhance audio quality on Mac?
Some screen recording software offers advanced features such as audio ducking, equalization, and noise gating to enhance audio quality on Mac by managing sound levels and reducing background noise effectively.