.png)
If you’ve ever sent an audio message on iPhone’s iMessages, you probably understand how convenient the feature is.
It makes it easy for anyone to send sentimental or sensitive messages as audio files, instead of typing long paragraphs of text that will only bore the receiver.
But for users who upgraded their iPhones after the iOS 12 update, there’s a big problem with audio messages. Once you listen to the message, it quickly disappears, or as Apple puts it, ‘the message expires.’
In this article, we’ll show you how to resolve this problem so that you can finally save your audio messages for as long as you want.
Understanding Audio Messages on iPhone
Audio messages has been one of the standout features on iPhone’s messages app. It not only allows you to record and send an audio, but also provides a transcript of what’s said in the message.
By default, the audio messages (on iOS versions 12 and later) are set to have an auto-delete function of two minutes. This means that the audio message disappears or expires two minutes after you receive it.
Apple designed this feature as a way to save storage space on your phone and enhance your privacy by automatically removing the message.
How to adjust Settings and save audio messages manually
If you receive an audio message that you want to preserve for longer than the default time, here’s how you can go about it:
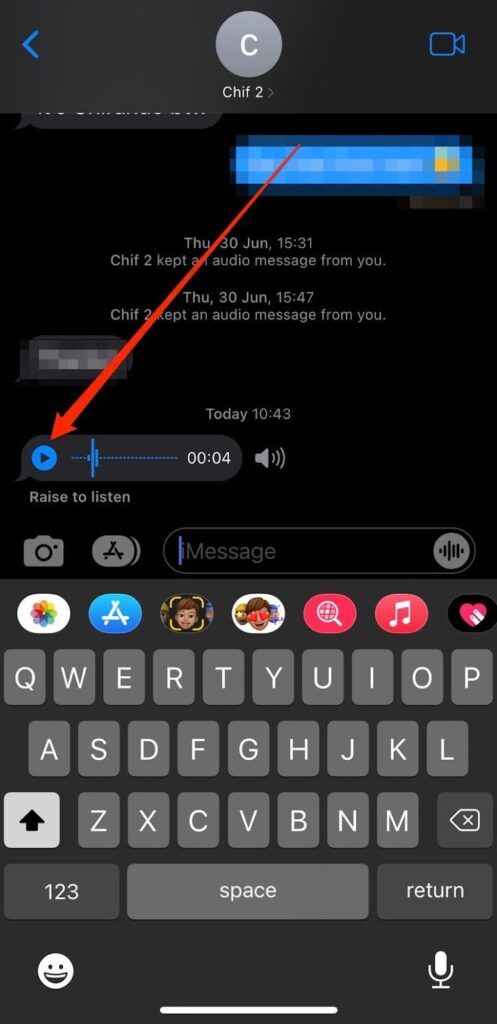
Step 1: Within two minutes of receiving a message, open the conversation with the desired audio message.
Step 2: Tap the ‘Keep’ text that appears in blue just below the message.

Step 3: Scroll through your conversation thread to confirm that the audio message is saved. You should see a play button that you can press to play that message.
How to stop your audio messages from expiring
If you don’t want to keep repeating the above process to save your audio messages, you can choose to turn off the auto-expire feature altogether.
Here’s how:
- Open the Settings app on your iPhone.
- Scroll down and tap “Messages.”
- Under “Audio Messages,” tap “Expire.”
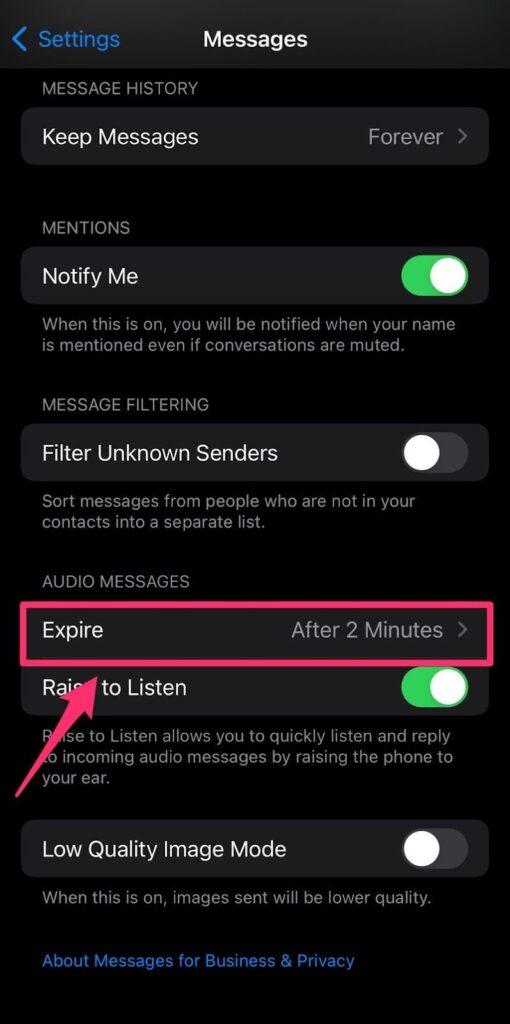
- Choose “Never.”

How to save audio messages on the Voice Memo App
The Voice Memo App is a good alternative for saving your audio messages if your iPhone doesn’t run on the iOS 12 or later version, or you simply want to keep your audio messages separate from the Messages app.
Here’s how to do this:
Step 1: Long press the audio message until a menu appears.
Step 2: Select the ‘Save’ option or ‘Save to Voice Memos’ on iOS 17.
Step 3: Open the voice memo app to confirm that the audio message is available.
You can also do this by copying the audio message and pasting it on another app like Notes or Files. To do this:
- Open the text message containing the audio message
- Tap and hold the message until a menu appears
- Tap ‘Copy.’
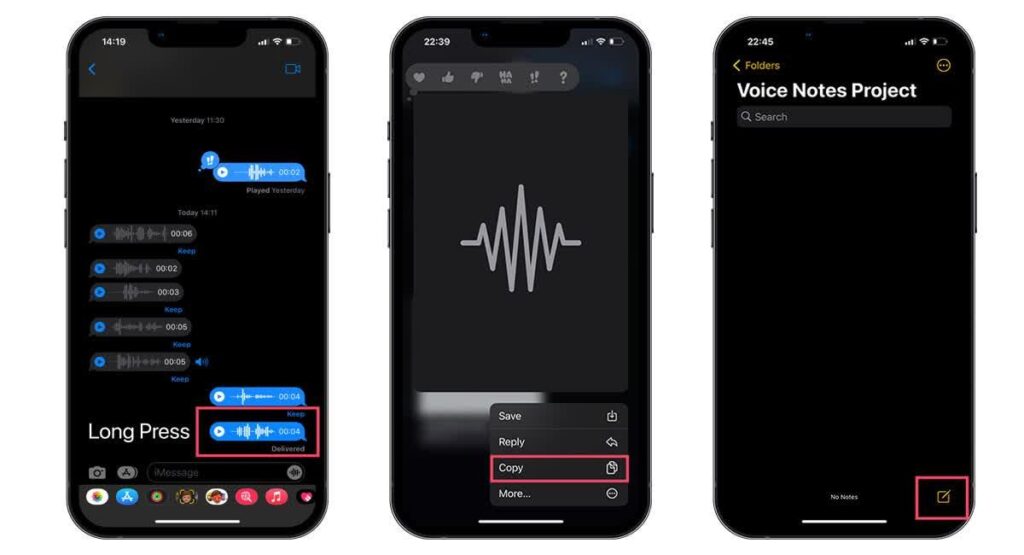
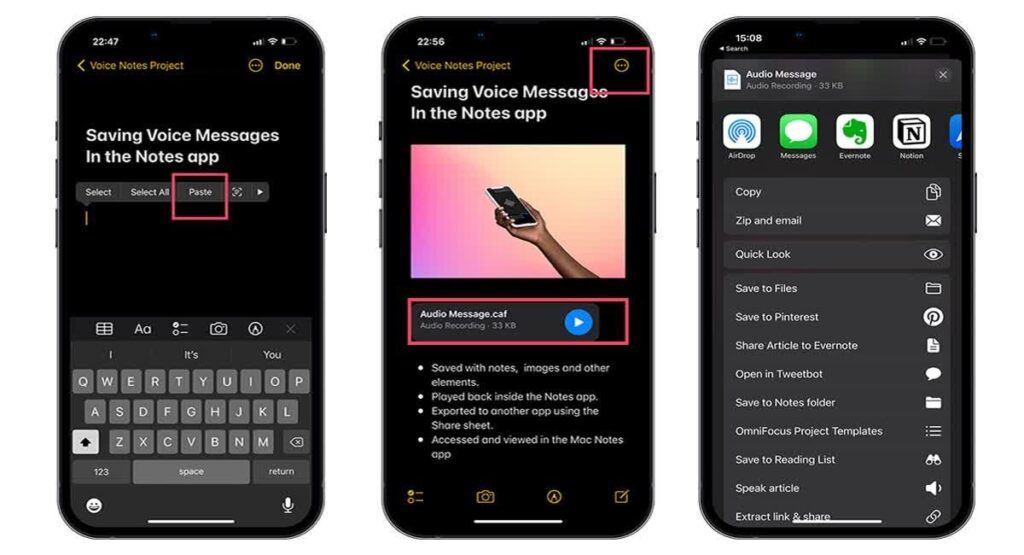
- Open the Notes or Files app then paste it.
How to use Third-Party Apps to Save Audio Messages
If none of these options work for you, there are also multiple third-party apps on the App Store that can help you save and manage your audio messages.
These apps often offer multiple useful features that could entice users to prefer them over the built-in options on Apple.
For instance, many third-party apps enable you to save in higher-quality formats like MP3 and WAV, which capture better microphone quality than the default iPhone audio formats.
These apps also support the use of external microphones like the Hollyland Lark Max to record audio messages in good quality.

Hollyland LARK MAX - Professional Wireless Microphone
A professional wireless microphone system featuring studio-quality audio with advanced noise cancellation.
Key Features: Studio-Quality Audio | Magnetic Attachment | 8GB Internal Recording
Additionally, some users also prefer third-party apps because they offer better transcription and audio editing features than the iMessages or Voice Memos app.
If you’re sold on using a third-party app, here are the general steps you can follow to save your audio messages.
Step 1: Open your messages app and locate the audio message.
Step 2: Long press the audio message until a menu appears.
Step 3: Select the ‘Copy’ option to copy it to the iPhone’s clipboard.
Step 4: Open the third-party app and paste the audio file into a new folder.
Note: Some third-party apps are notorious for sharing and selling sensitive user data that’s in their database, which is a breach of your digital privacy.
So, before saving your sensitive audio messages on a third-party app, make sure it adopts some measures that protect your privacy. Moreover, ensure that you only download apps from the App Store and review the permissions they request carefully.
How to access your saved Audio Messages
If you’ve been saving your audio messages and now want to access them, there are several ways you can do this.
- On the Messages App
All the audio messages you saved should remain intact in your conversation threads. So to find them:
- Open the messages app.
- Locate the chat containing the audio message.
- Scroll through the chat history to find it then press play to listen to the recording.
You can also use the search function on the message app to locate the audio message if you still remember a keyword spoken in the message.
- On the Voice Memos App
If you saved the audio message directly to Voice Memos before iOS 12, open the Voice Memos app. Your saved message will be listed alongside any other voice recordings you’ve made.
But if you’re running on iOS 12 or later, you’ll need to have first manually saved the audio file in the Voice Memos App, to find it listed on the app. The process to do this is stated above.
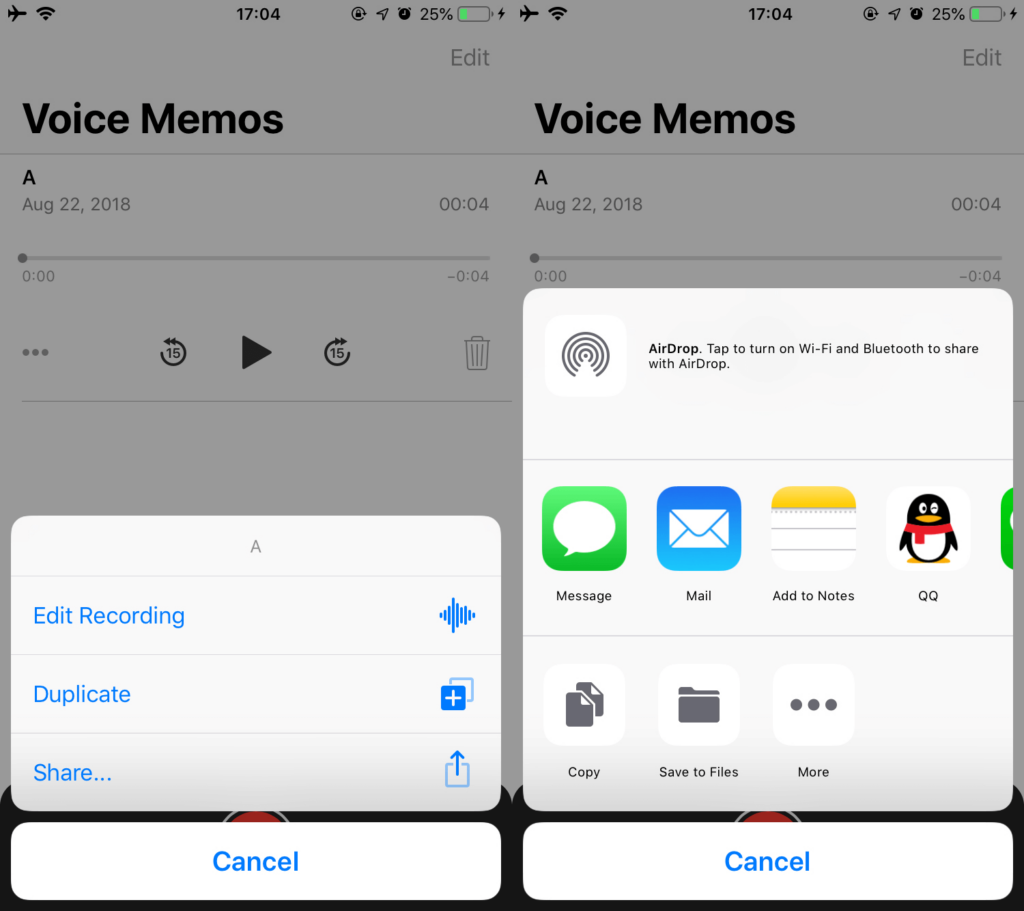
If you want to share the audio message from the Voice Memos App:
- Open the audio message and tap the action button (three dots)
- Tap the ‘Share’ icon.
- Choose a sharing option and select the recipient, then press ‘Done.’
You can do this even when sharing multiple audio messages. Just be sure to first tap ‘Edit’ in the first step to select the audios you want to share.
- On third-party apps
If you saved the audio messages on a third-party app, the process of accessing the message might differ depending on the app. Some general steps you could follow include:
- Open the app
- Look for its folders library
- Scroll around to find the name of your audio message
If you can’t seem to find the app’s folder library, consult its documentation or customer support for guidance.
Backup and Restore Considerations
While saving your audio messages on your iPhone is the fastest way to access them, it’s not always a reliable system. You might lose them if the phone gets damaged, lost, or when you accidentally delete them.
Ultimately, the best way to store your audio messages and other important files for long periods of time is by backing them up to cloud platforms like iCloud or iTunes.
Importance of backing up saved audio messages
Among the top reasons to back up the audio messages on your iPhone include:
- To prevent accidental data loss
There are many ways you can accidentally lose your audio messages.
Your phone can develop hardware issues and corrupt the data, you could might delete the file by mistake, your phone could get lost and the data gets erased, or you could lose the file when upgrading to a new iPhone.
In all these scenarios, your audio files are lost permanently.
But by backing up the audio messages on a cloud account, you’ll be able to easily restore the message if anything goes wrong.
- To save on storage
Audio messages occupy a significant space in your iPhone’s memory, especially when compared to text messages. Backing them up to the cloud frees this space for use by other important files.
- For easier accessibility in Mac and iPad
If you back up your audio messages to the cloud, you can easily access them on all your other Apple devices like your Mac or iPad.
Using iCloud or iTunes for backup
iCloud and iTunes are the two main cloud backup options offered by Apple for your iPhone.
To backup your audio messages on iCloud:
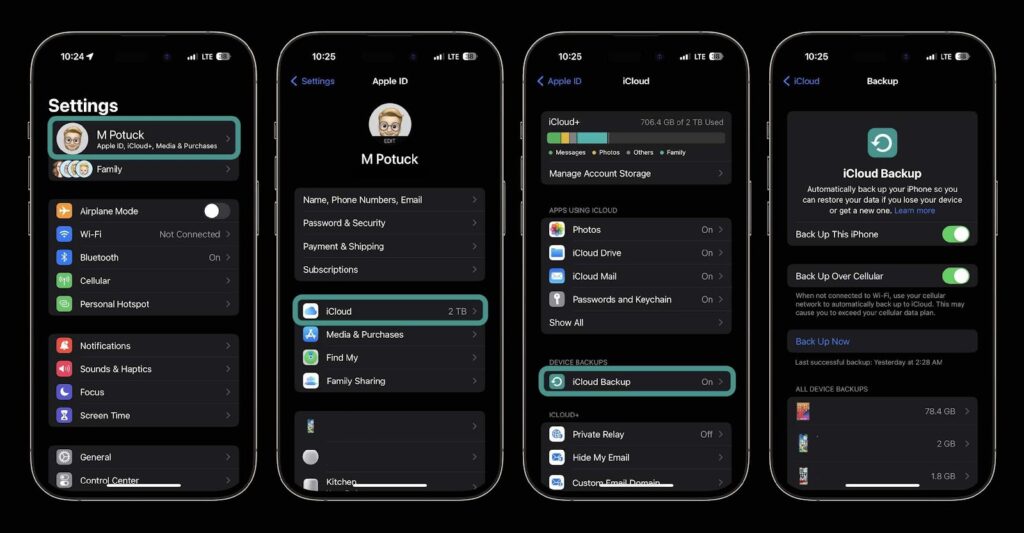
Step 1: Open Settings on your iPhone
Step 2: Tap on your Apple ID at the top of the screen
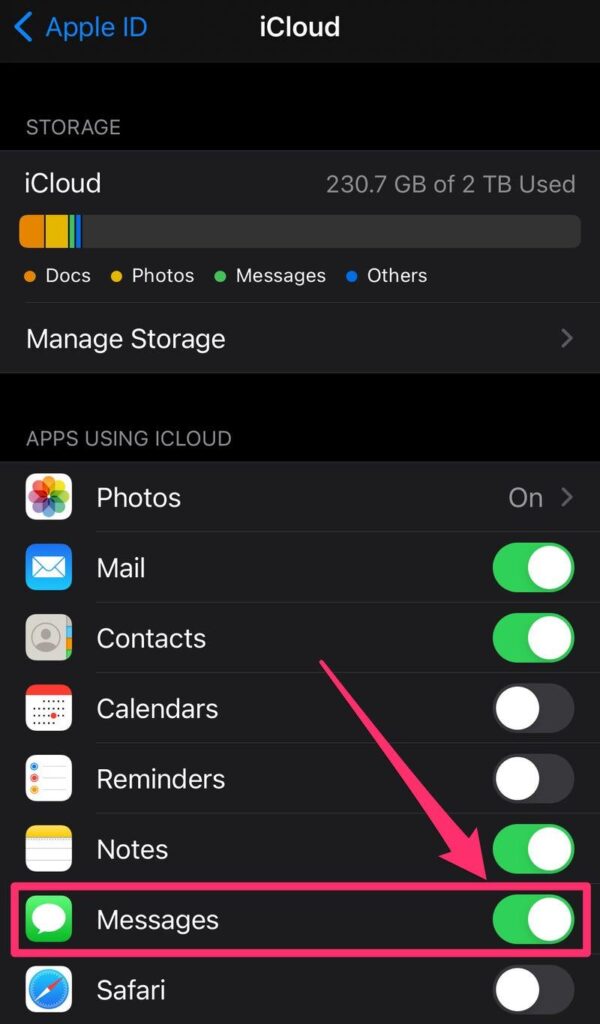
Step 3: Select iCloud>iCloud Backup
Step 4: Toggle on iCloud Backup and ensure the ‘Messages’ app is selected for backup.
If your device is connected to a wi-fi connection or mobile data, it will begin the backup process. You can also manually initiate an iCloud backup by tapping “Back Up Now” in the iCloud Backup settings.
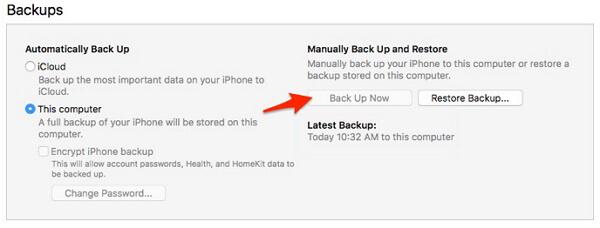
To backup your audio messages on iTunes:
Step 1: Use a USB to connect your iPhone to a computer
Step 2: Open iTunes on the computer
Step 3: Click on your iPhone icon in the iTunes interface
Step 4: Scroll to the Backup section then select ‘This computer.’
Step 5: Click ‘Back Up Now’ to start the backup process
How to restore your audio messages from a cloud backup
If you had stored your audio messages on iCloud or iTunes, restoring the data is very quick and easy.
On iCloud:
- Open the official iCloud website and sign in to your account.
- Go to the Settings section and select the “Advanced” option.
- Look for the “Restore Files” option and click on it.
- Choose the backup containing the audio messages.
- Click ‘Restore’ to initiate the process of restoring your audio messages on your iPhone.
On iTunes:
- Use a USB to connect your iPhone to a computer.
- Launch iTunes app.
- Select your iPhone and choose “Restore Backup” under the Restore section.
- Choose the relevant backup containing your saved audio messages.
- Click ‘Restore’ and wait for the process to finish.

If you’re frequently using audio messages on your iPhone and looking for improved audio quality or hands-free convenience, consider a wireless lavalier microphone. It allows you to record clear audio effortlessly, making your saved audio messages sound professional and crisp.
FAQs
How long do audio messages last on iPhone before they are deleted?
The default time for audio messages on most iPhones (iOS 12 and later) is two minutes, after which they expire or disappear.
Can I change the expiration settings for all audio messages at once?
Yes! You can do this by following these steps. Open your iPhone’s Settings>Messages>Audio Messages>Expire>Never.
Is it possible to save audio messages from iPhone to a computer?
Yes! You can do this by backing up the audio messages to iCloud, iTunes, or other cloud platforms like Gmail – then later restore the files on your Mac or PC. Alternatively, you directly share the audio messages to yourself via email, and download them on a computer.
What happens to saved audio messages if I switch iPhones?
If you had backed them up to a cloud platform like iCloud or iTunes, you can simply restore them to your new iPhone. If you didn’t save the audio messages on your cloud, you’ll have to transfer them manually to your new iPhone. Otherwise, they won’t carry over to your new iPhone.