









.png)
 简体中文
简体中文 
CapCut makes it easy to add reverb to audio clips. Many users miss the setting because it appears elsewhere. This guide explains the exact steps for mobile and desktop. It also shows how to adjust reverb without adding too much. You will find helpful tips for getting better results. The steps match the current CapCut interface and layout. Some labels may change slightly after future app updates.

What Reverb Does to Your Audio in CapCut?
Reverb adds a sense of space and depth to a voice or sound, making it feel as though it was recorded in a physical environment like a small room, a concert hall, or a large open space. It is an audio effect, not a filter, meaning it changes how the sound decays rather than altering its tone or pitch. The strength slider adjusts how noticeable the reverb effect sounds. It can add a slight room feel or a heavy echo.

How to Add Reverb to Audio in CapCut on Mobile (iOS and Android)
On mobile, reverb is located under the Audio Effects section. This method works with imported music and recorded voice-overs. It also works with audio tracks extracted from videos.
- Open your project in CapCut and make sure your audio clip is already on the timeline.
- Tap the audio track you want to edit. This can be a background music clip, a recorded voice-over, or audio extracted from a video clip.

- Tap “Audio effects” in the audio toolbar that appears at the bottom of the screen.

- When a new page with different effects shows up, tap on the search icon. Type “reverb” and search for it.

- Look for the “Reverb” effect and tap on it to apply.

- Once done, you will see the adjustment icon on the applied effect; tap it to control the strength through the slider.


- You can also check other reverb-based effects, like music hall, auditorium, and many more.

- Press the play button to preview the clip and fine-tune the slider before moving on.

How to Add Reverb to Audio in CapCut on PC/Desktop
The desktop version of CapCut follows a similar logic, but the panel layout is different. Controls are spread across a right-side properties panel rather than a bottom toolbar, so the navigation path changes.
- Open your project in CapCut on your PC or Mac.
- Click the audio clip on the timeline to select it. This highlights the clip and loads its properties in the right panel.
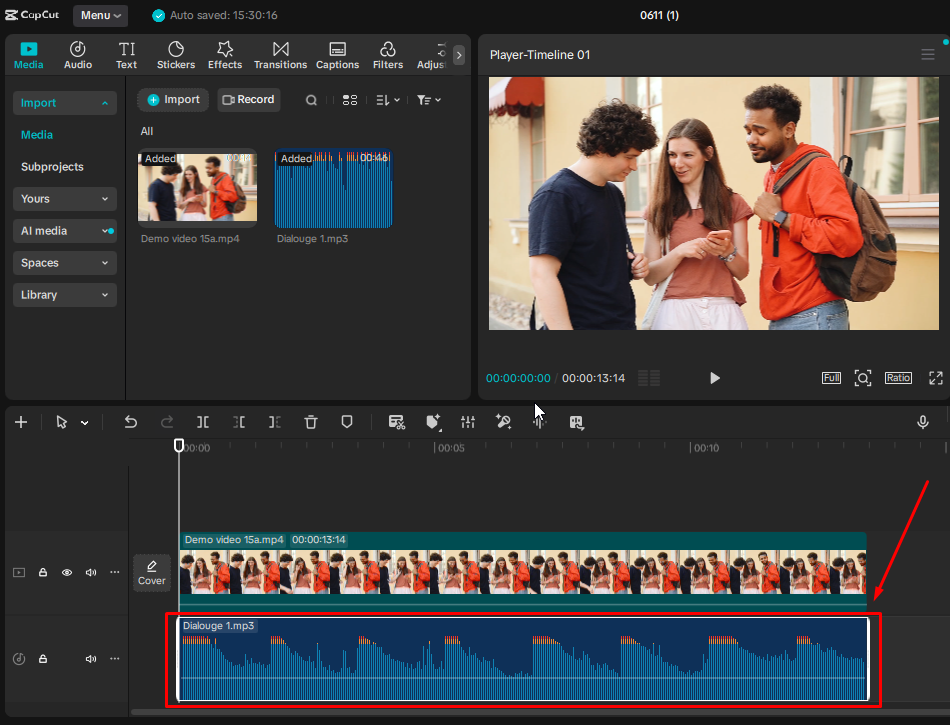
- Look to the right-side panel and click the “Voice Changer” tab, then choose “Voice filters.”
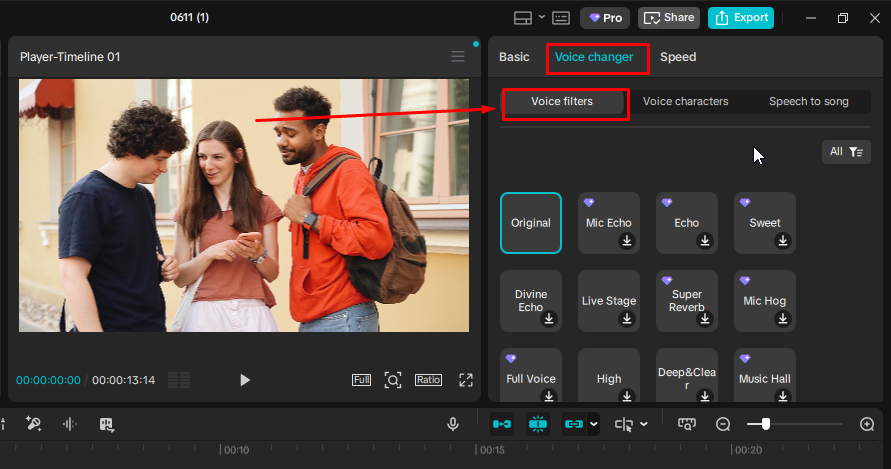
- Scroll through the effects list to locate the Reverb effect.
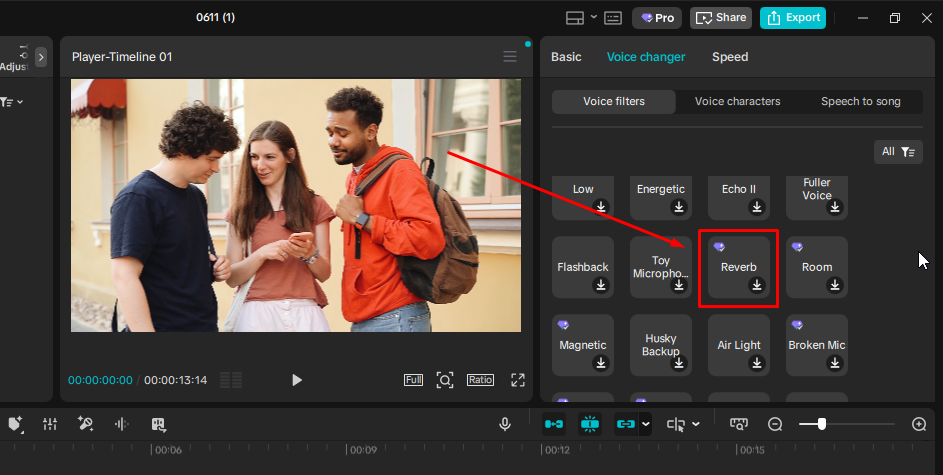
- Click Reverb to apply it to your selected clip. To confirm that the ffect is applied, check the track label on the timeline. It should display the name of the current applied effect.

- Drag the strength slider to your preferred level.
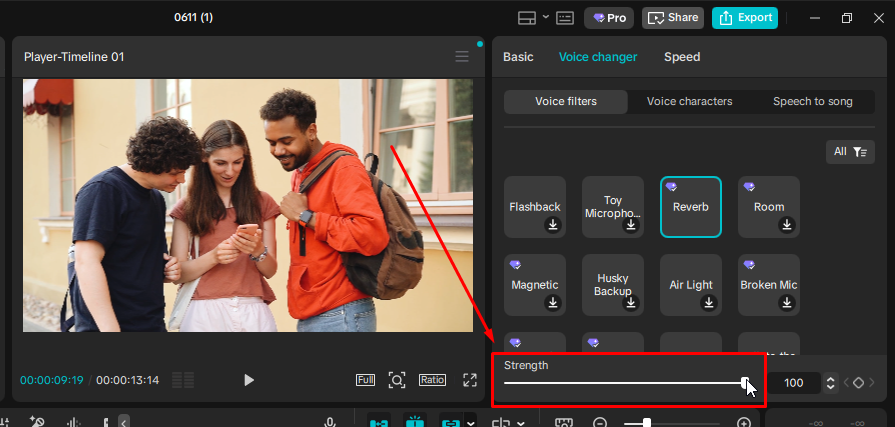
- Play back the clip in the timeline preview to check the result before exporting.

How to Adjust Reverb Intensity and Preview in CapCut
The intensity slider is the main control you will use after choosing a preset. Low values, roughly in the 10 to 30 percent range, add a gentle room presence that makes audio feel less flat without becoming distracting. Higher values, above 60 to 70 percent, push the effect toward a dramatic, washed-out echo that can blur speech and reduce clarity.
A good sign that reverb is set too high is when individual words start to bleed into each other, or the audio sounds like it was recorded inside a large empty building when that was not your intention.
CapCut includes several reverb preset types that affect the character of the effect, not just its depth. Here are some of the popular ones:
- Music Hall: Spacious with a long reverb effect. Ideal for cinematic music, orchestral tracks, and dramatic vocals.
- Auditorium: Open and reflective effect with a bigger-room feel. Works well for speeches, presentations, and narration.
- Bedroom: Close and natural with short reflections. Good pick for vlogs, podcasts, and conversational voiceovers.
- Church: Deep and long-decay; works for dramatic or emotional content but can overwhelm dialogue.
Always play back the full clip before exporting. Small slider adjustments can have a bigger impact on exported audio than they appear in the preview monitor.
Note: Some effects on the CapCut mobile application are free compared to the desktop version.
Tips for Getting Better Reverb Results in CapCut

- Apply noise reduction first: Use CapCut’s built-in noise reduction tool before adding reverb. Reverb amplifies everything in the audio signal, including background hiss and room noise, so cleaning the audio first produces a much cleaner result.
- Keep settings light for voice-over work: If your audio contains dialogue or narration, a subtle reverb setting preserves clarity. Heavy reverb is better suited to music beds and atmospheric audio.
- Match the preset to your content style: A Bedroom preset fits everyday video content; a Music Hall preset works for cinematic edits; Church or large-space presets serve stylized or emotional sequences.
- Export at the highest quality setting available: Compression during export can degrade audio effects, so select the highest bitrate your platform supports.
- Start with cleaner source audio: Recordings with low ambient noise respond better to reverb processing because the effect has a clean signal to work with. If you record voiceovers on the go, a compact wireless microphone like the Hollyland LARK M2 captures cleaner audio in mobile environments, giving reverb effects more to work with and reducing the need to compensate for background noise. Plus, its 9-gram button-sized transmitter feels light on your chest, and the Environmental Noise Cancellation ensures every time you record something comes out crystal-clear.
FAQs
Can I add reverb to a voiceover I recorded in CapCut?
Yes. Tap the recorded voice-over track on your timeline, then select “Effects” from the audio toolbar that appears. Navigate to the Audio Effects panel (on the mobile app) or Voice Filters tab (on the PC app) and apply a reverb preset. The process is identical for in-app recordings and imported audio files.
Where is the reverb option in CapCut? I can’t find it.
The navigation is different in the CapCut mobile and PC apps. On the CapCut mobile app, look for the Reverb and reverb-based presets in the “Audio effects” option. To find reverb in CapCut PC, Voice changer > Voice filters > Reverb. In both cases, you should select the audio clip on the timeline. Otherwise, the navigation may not work, as some options would not show up.
Does CapCut let you remove reverb from audio?
CapCut does not include a dedicated reverb-removal tool. For voice-over or recorded audio that sounds too roomy, the Noise Reduction feature can reduce some of the ambient quality. For pre-recorded music that already contains reverb, you would need a dedicated third-party audio editor to address that separately.
Is the reverb feature available in the free version of CapCut?
Most standard reverb presets are available at no cost. Some premium presets may require a CapCut Pro subscription and are marked with a crown icon inside the effects panel.
Conclusion
Reverb in CapCut is accessible through the Audio Effects panel on the mobile app or the Voice changer tab on desktop and takes less than a minute to apply once you know where to look. You can also explore more forms of reverbs, such as music hall and auditorium, to match the vibe of your audio with the video’s environment.