.png)
Before you start twisting knobs in Audacity, it is critical to understand the mechanical difference between Pitch and Speed. Back in the days of analog tape, these two were tied together—if you wanted a voice to sound deeper, you had to slow the tape down, which dragged out the tempo and ruined the timing.
In digital editing, we can separate them.
- Changing Speed: This links pitch and time together. Faster speed means higher pitch (the “Chipmunk effect”); slower speed means lower pitch.
- Changing Pitch: This isolates the frequency. You can make a voice sound deeper or higher without affecting the playback speed at all.
If you are looking for how to change pitch in Audacity without changing tempo, this guide covers the two best workflows. This ensures your audio track keeps its original timing and stays perfectly synchronized with your video footage or backing music.
The Role of Source Quality
While Audacity is powerful, pitch shifting is “destructive” editing. You are forcing the software to stretch digital data to create new frequencies.
If your original recording is low quality (like a standard MP3 or 16-bit WAV), changing the pitch can quickly create robotic, metallic noise. The cleaner your source audio—specifically the bit-depth—the more natural the pitch shift will sound. A high-quality recording acts as a safety net, allowing you to manipulate the tone heavily in post-production without degrading the clarity of the voice.
Method 1: The Standard “Change Pitch” Tool (Best for Beginners)
For most editing tasks, Audacity’s native Change Pitch effect is the most efficient solution. It alters the frequency of your audio while automatically locking the tempo, so your track doesn’t drift out of sync.
Follow this workflow:
- Select Your Audio: Highlight the specific section you want to edit, or press Ctrl + A (Cmd + A on Mac) to select the entire track.

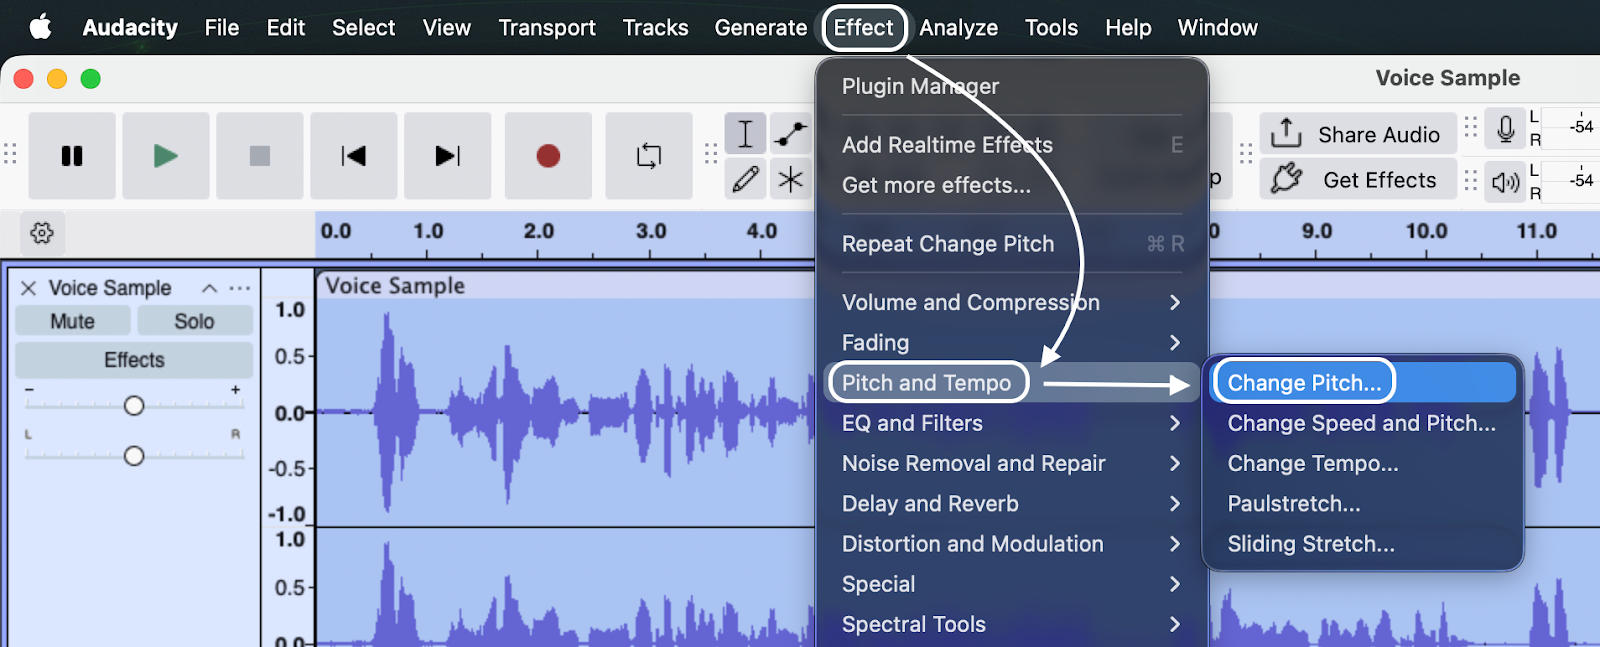
- Open the Effect Menu: Go to the top menu bar and select Effect > Pitch and Tempo > Change Pitch.

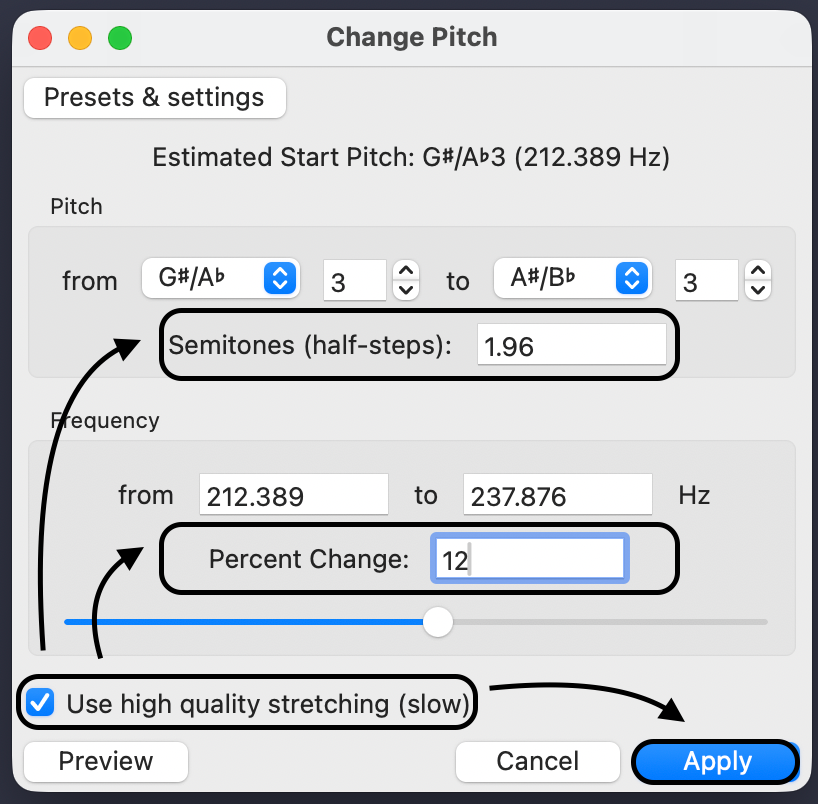
- Enable High Fidelity: Before adjusting any sliders, check the box labeled “Use high-quality stretching (slow).” It takes a few extra seconds to render, but it significantly reduces those metallic artifacts.
- Adjust the Pitch: Choose the input that matches your goal:
- Semitones (Best for Music): Use this to change the musical key. For example, entering -1 drops the pitch by one half-step.
- Percent Change (Best for Speech): If you just want a voice to sound deeper or lighter, use the slider. A range between -10% to -20% is usually enough to deepen a voice naturally.
- Verify Duration: Notice that the “From” and “To” duration fields are greyed out or identical. This confirms that Audacity is isolating the pitch and leaving your timing untouched.
- Preview and Apply: Click Preview to hear a snippet. If it sounds good, click Apply.
Pitch Settings: When to Use Which?
The dialog box gives you several options. Here is how to choose the right one:
- Pitch (from/to): Use this if you know the specific musical notes (e.g., changing a G note to a C note).
- Semitones (half-steps): Ideal for musicians adjusting a backing track to fit a singer’s vocal range.
- Frequency (Hz): Best for audio engineers targeting a specific frequency floor or ceiling.
- Percent Change: The most intuitive option for podcasters and video editors. Drag left to deepen; drag right to heighten.
Method 2: Sliding Time Scale / Pitch Shift (Best for High Quality)
If you tried Method 1 and your voice sounds robotic or “warbly,” you aren’t doing anything wrong—it’s just a limitation of that tool’s algorithm.
For professional results, especially on vocals, use the Sliding Stretch (sometimes labeled Sliding Time Scale / Pitch Shift in older versions). This uses a more complex algorithm (SBSMS) that processes audio intensively to preserve the natural sound.
How to Use Sliding Stretch for Uniform Pitch Shifting
This tool is designed to change pitch over time (like a car engine revving up), but you can easily “hack” it to apply a static, high-quality shift.
- Select Your Audio: Highlight the track you want to edit.

- Open the Effect: Navigate to Effect > Pitch and Tempo > Sliding Stretch.

- Set Initial Pitch Shift: Enter your desired change in the “Initial Pitch Shift” field (e.g., -2 semitones).
- Set Final Pitch Shift: Crucial Step: Enter the exact same value in the “Final Pitch Shift” field.
- Why? If these numbers are different, the audio will slide from one pitch to another. To keep the pitch consistent, both values must match.
- Leave Tempo Alone: Ensure the “Initial Tempo Change” and “Final Tempo Change” are set to 0%.
- Preview and Apply: Click Preview. If it sounds natural, click Apply.

The Trade-Off: Quality vs. Speed
You will notice this method takes longer to process. Because the algorithm reconstructs the waveform with higher precision, rendering a long podcast episode might take a few minutes.
The Verdict: For quick scratch tracks, Method 1 is fine. For YouTube videos, podcasts, or song demos, use Method 2. The wait time is worth the superior audio quality.
Common Use Cases for Pitch Shifting
Understanding why you are shifting pitch determines how much you should shift it.
Voice Correction and Tone Adjustment
Recorded audio often sounds “thinner” or higher-pitched than the speaker’s actual voice due to microphone placement or frequency response.
- The Goal: A warmer, more authoritative “radio voice.”
- The Fix: Apply a subtle downward shift. Usually, a drop of -1 to -2 semitones (or -5% to -10%) adds depth without making the speaker sound like a slow-motion villain.
Disguising Voices for Anonymity
If you are producing content where the subject must remain anonymous (like investigative journalism), pitch shifting is a standard privacy measure.
- The Goal: Make the voice unrecognizable but intelligible.
- The Fix: You need a drastic shift. A drop of -4 to -6 semitones creates a deep disguise. Because you selected “without changing tempo,” the interview remains perfectly synced with the video.
Musical Key Matching
Musicians often need to adjust samples to fit a song’s key. If a vocal sample is in C, but your project is in D, it will sound terrible.
- The Goal: Transpose the clip to fit the key without messing up the beat.
- The Fix: Calculate the exact semitone difference. To go from C to D, shift +2 semitones. The “Preserve Tempo” feature is non-negotiable here; otherwise, the sample will drift off-beat.
Pro Tip: How to Minimize Audio Artifacts (The Source Matters)
When you change the pitch, you are performing destructive editing. You are stretching or compressing the digital waveform to fit a new frequency while mathematically inventing data to keep the speed the same.
If your source file is low quality (like a compressed MP3), Audacity doesn’t have enough data to work with. The result is that dreaded “metallic” sound known as artifacting.
To get professional-grade pitch shifts, you need to capture more data at the source.
The Advantage of 32-bit Float Recording
If you frequently manipulate your voice—whether for character work, anonymity, or pitch correction—your hardware matters more than your software settings.
I recommend using a microphone capable of 32-bit Float Recording, such as the Hollyland LARK MAX 2.

Hollyland LARK MAX 2 - Premium Wireless Microphone System
A premium wireless microphone for videographers, podcasters, and content creators to capture broadcast-quality sound.
Key Features: Wireless Audio Monitoring | 32-bit Float | Timecode
Here is why 32-bit float helps Audacity users:
- Massive Dynamic Range: Unlike standard 16-bit or 24-bit audio, 32-bit float captures an immense amount of data. It is virtually impossible to clip (distort) the audio during recording.
- Post-Production Elasticity: Because the file contains so much data, you can aggressively alter the pitch in Audacity without the audio “breaking apart.” It essentially future-proofs your raw footage for heavy editing.
- Studio Quality Base: The LARK MAX 2 records at 48kHz/24-bit wireless transmission with internal 32-bit float backup. This ensures that before you even touch the “Change Pitch” effect, your base file is crisp, dense, and ready for manipulation.
The Bottom Line: If your pitch-shifted audio sounds artificial, stop trying to fix it with more effects. Instead, upgrade your input to a high-fidelity recorder like the LARK MAX 2 to give Audacity the data it needs to process the sound cleanly.
Troubleshooting Common Issues
Pitch shifting is complex. Even with the best settings, you might run into issues. Here is how to fix the most frequent problems.
Problem: The voice sounds robotic, metallic, or “hollow.”
Solution: This is “artifacting.” The algorithm is struggling to fill in the gaps.
- Switch Methods: Undo the standard Change Pitch effect and try Effect > Sliding Stretch. It renders slower but produces smoother results.
- Reduce the Shift: Extreme changes (more than +/- 2 semitones) will almost always sound processed. Try applying the effect in smaller increments.
Problem: The audio length changed, desyncing my video.
Solution: You likely selected the wrong tool.
- Check Your Effect: Ensure you used Change Pitch, not “Change Speed.”
- The Vinyl Effect: “Change Speed” mimics a turntable—it alters both pitch and tempo simultaneously.
- Verify Duration: Inside the “Change Pitch” dialog box, double-check that the start and end times match your original file length before applying.
Problem: The background noise sounds weird or “swirling.”
Solution: When you shift the voice, you also shift the room tone. High-pitched hiss shifted down can turn into a low, distracting rumble.
- Order of Operations: Always apply Noise Reduction before you change the pitch. Cleaning the audio first ensures the pitch algorithm focuses only on the vocal frequencies.
Frequently Asked Questions (FAQ)
Can I change the pitch of just one part of a song in Audacity?
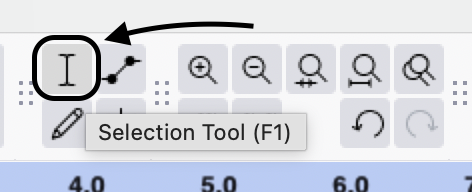
Yes. Audacity effects apply only to the selected audio. Use the Selection Tool (F1) to highlight the specific region (like a single note or bridge) before opening the “Change Pitch” menu.
Tip: If the transition sounds abrupt, apply a short Crossfade to blend the edges.
Does changing pitch affect audio quality?
Yes, extreme shifts will degrade quality. Pitch shifting stretches sound waves.
- Safe Zone: Minor adjustments of +/- 2 semitones usually sound natural.
- Danger Zone: Large shifts (like an entire octave) often introduce digital artifacts. For heavy processing, always start with a high-quality source file (ideally 32-bit float).
How do I change pitch without sounding like a chipmunk?
The “chipmunk effect” happens when you increase the playback speed along with the pitch. To avoid this, do not use the “Change Speed” effect. Strictly use Effect > Pitch and Tempo > Change Pitch, which decouples pitch from time.

Conclusion
Mastering pitch correction in Audacity is a great way to save a vocal take that feels slightly “off” or to fit a sample into a new musical key. You now have two distinct workflows:
- The Standard “Change Pitch” Effect: Good for quick, simple adjustments.
- The Sliding Time Scale / Pitch Shift: The superior choice for high-fidelity results, especially if you notice metallic artifacts in your initial edits.
Remember, digital audio processing has limits. For the most natural results, keep your adjustments subtle.
The Best Edit Starts with the Source
If you find that your audio constantly degrades the moment you apply effects, the bottleneck is likely your recording hardware, not the software. Pitch shifting involves stretching data, and standard files can break apart under pressure.
For content creators serious about post-production, upgrading to a 32-bit float recorder like the Hollyland LARK MAX 2 is a smart move. Because it captures such a wide dynamic range, the files are incredibly resilient, allowing you to manipulate pitch and gain in Audacity with far less risk of noise or distortion.