









.png)
 简体中文
简体中文 
CapCut lets you export professional-quality footage, but reaching 4K resolution requires more than just tapping a button. The option is locked behind a subscription, and the steps differ depending on whether you are editing on your phone or a computer. This guide walks you through the exact settings for both platforms, explains why the 4K option may be grayed out, and covers what to expect when you upload to YouTube, TikTok, or Instagram.

How to Upload 4K Video in CapCut (Mobile & Desktop)
What You Need Before Exporting 4K in CapCut
Before you open the export menu, confirm that you meet both of these requirements. Skipping this check is the most common reason editors get stuck mid-tutorial.
- CapCut Pro subscription: 4K export is a paid feature. The free tier caps output at 1080p. You will need an active Pro plan on the same account you are using to edit.
- 4K source footage: CapCut exports at the resolution of your source clips. If your footage was recorded at 1080p, the export will not exceed 1080p regardless of your plan. Your smartphone or camera must have actually recorded in 4K (3840×2160).
- Updated app: Older versions of CapCut may not display the 4K option even on Pro accounts. Make sure you are running the latest version on iOS, Android, Windows, or Mac.
How to Export 4K Video in CapCut on Mobile (iOS & Android)
The mobile workflow is the same on iOS and Android, though button placement may vary slightly depending on your device screen size.
- Open CapCut and select your project from the home screen.
- Tap the Export arrow icon in the top-right corner of the editor.
- The export settings panel will appear at the bottom of the screen. Tap Resolution.
- Select 4K (3840×2160) from the resolution options. If this option is grayed out, see the troubleshooting section below.
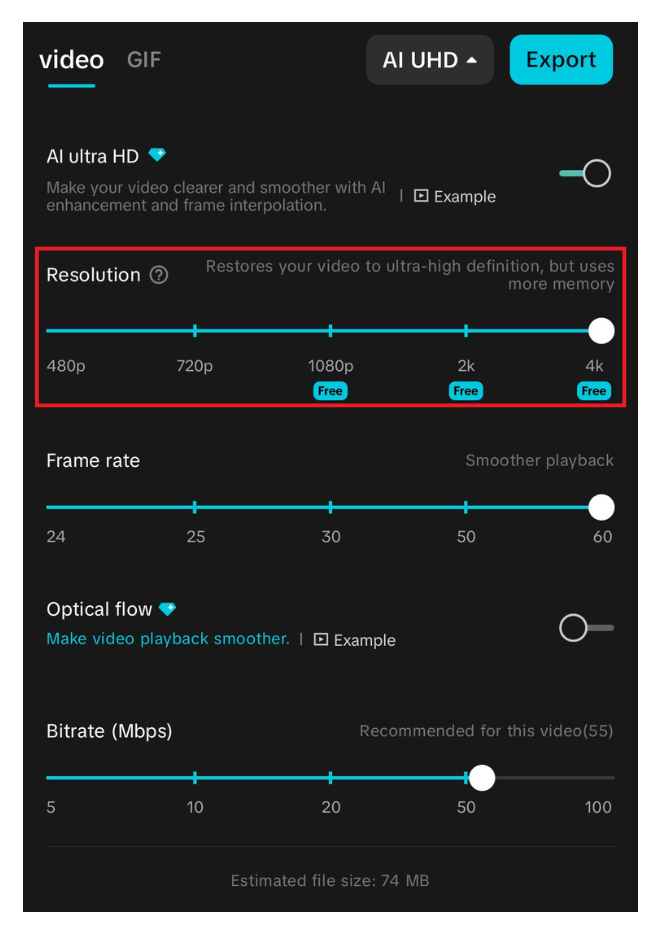
- Tap Frame Rate and choose your preferred rate (see the table guide below).
- Tap Bitrate and set it to Recommended or High. Higher bitrate preserves more detail but increases file size significantly.
- Tap the Export button and wait for rendering to complete. Larger files and more complex edits will take longer.

Note: On some Android devices, the export panel labels may read slightly differently, but the options for Resolution, Frame Rate, and Bitrate appear in the same sequence.
Recommended Export Settings for 4K on Mobile
Use this table as a quick reference before you tap Export.
| Setting | Recommended Value | Notes |
|---|---|---|
| Resolution | 4K (3840×2160) | Requires CapCut Pro |
| Frame Rate | 30fps | Use 60fps for sports or fast-motion content |
| Bitrate | High | Increases file size; use Recommended if storage is limited |
| Codec | H.265 | Smaller file size; use H.264 for broader device compatibility |
How to Export 4K Video in CapCut on Desktop (Windows & Mac)
The desktop app uses a panel-based interface rather than a bottom-sheet menu, so the path to the export settings looks different from mobile even though the underlying options are the same. A CapCut Pro subscription is required on desktop just as it is on mobile.
- Open your project in the CapCut desktop app (Windows or Mac).
- Click the Export button in the top-right corner of the editor window.
- The export dialog box will open. Make sure you are on the Export Video tab.
- Click the Resolution dropdown and select 4K (3840×2160).
- Set your Frame Rate using the adjacent dropdown. 30fps is standard; choose 60fps if your footage contains fast movement.
- Adjust the Bitrate slider or select the preset that corresponds to your quality preference. Higher values produce cleaner output.
- Confirm the Format is set to MP4, which offers the widest platform compatibility.
- Click the blue Export button, choose a save location, and let rendering finish.

Pro Tip: On desktop, you can preview your estimated file size in the export dialog before committing to render. If the projected size is too large for your storage or upload limits, lower the bitrate or switch from H.264 to H.265.
How to Upload Your 4K CapCut Video to Major Platforms
Exporting at 4K does not guarantee 4K playback. Each platform handles uploaded video differently, and understanding that before you publish will save you from unnecessary frustration.
| Platform | Accepts 4K Upload | Playback Resolution |
|---|---|---|
| YouTube | Yes | True 4K (HDR supported) |
| TikTok | Yes | Transcoded to 1080p for most users |
| Instagram Reels | Yes | Capped at 1080p playback |
Export at 4K regardless of the platform. YouTube currently provides the only true 4K playback experience, but uploading a 4K file to TikTok or Instagram still preserves more source data during their compression process, and platform support can improve over time without requiring you to re-export.
Why Is the 4K Option Grayed Out in CapCut? (Troubleshooting)
If the 4K resolution option appears locked or is missing entirely, one of the following causes is almost always responsible.
- You are on the free plan. This is the most common reason. CapCut restricts 4K export to Pro subscribers. Open the CapCut app settings or your account profile to confirm your subscription status and upgrade if needed.
- Your source footage is below 4K. CapCut does not upscale footage to a higher resolution than it was recorded at. If all your clips are 1080p, the export ceiling is 1080p. Check your clip properties inside the editor by tapping or clicking on an individual clip.
- Your app is out of date. An older version of CapCut may not surface the 4K option even on a valid Pro account. Visit the App Store, Google Play, or the CapCut website and install the latest update.

- Your project contains mixed-resolution clips. If you have a combination of 4K and lower-resolution clips in the same timeline, CapCut may default to the lower resolution. Review each clip’s resolution in the editor and remove or replace any that fall below 4K.