.png)
If you want professional-sounding audio, learning exactly how to use the Envelope Tool in Audacity for volume control is a must.
What is the Envelope Tool in Audacity?
The Audacity Envelope Tool (keyboard shortcut: F2) is a built-in feature that gives you precise, manual control over the volume of specific sections of your audio track.
If you usually rely on effects like Amplify or Normalize, you know they apply a static volume change across an entire track or a highlighted selection. The Envelope Tool operates differently. It applies dynamic, smooth volume changes over time by letting you directly manipulate the amplitude envelope—the blue boundary line surrounding your waveform.
By clicking and dragging this boundary line, you can visually shape your audio. This lets you manually fade in, fade out, or dip the volume seamlessly without making abrupt, clunky cuts to your track.
Industry Context: If you ever transition to a professional DAW (Digital Audio Workstation) like Pro Tools, Logic Pro, or Adobe Audition, you will hear this exact process called Volume Automation. Mastering the Envelope Tool in Audacity builds a core post-production skill used by audio engineers worldwide.
Step-by-Step: How to Use the Envelope Tool in Audacity
Follow these exact steps to manually adjust your audio levels and create smooth volume transitions:
- Activate the Tool: Click the Envelope Tool icon (which looks like two white arrows pinching a blue line) in your top toolbar, or simply press F2 on your keyboard.

- Create Control Points: Click anywhere on the thick blue boundary line surrounding your audio waveform. This places a small node, or control point, that anchors the volume at that exact second in your timeline.

- Adjust the Volume: Click and drag your new control point up to increase the volume, or down to decrease it. You will see the waveform visually expand or shrink to reflect the new audio level.
- Create Fades and Transitions: To build a smooth transition, click further down the timeline to add a second control point. Drag this second point up or down to create a sloped line between the two nodes. This creates a seamless fade-in or fade-out effect.
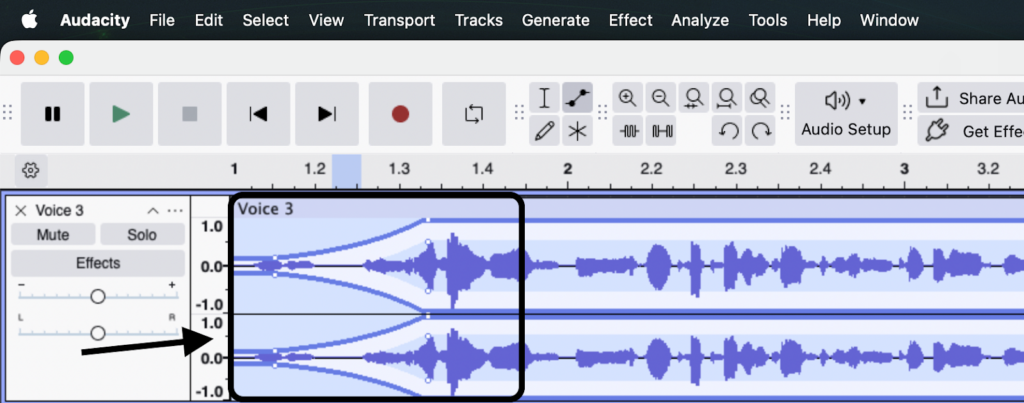
- Remove Unwanted Points: If you make a mistake, click and hold the control point, then drag it completely off the top or bottom of the audio track to delete it.
3 Practical Ways to Use the Envelope Tool for Better Audio
Manual Audio Ducking (Voiceover & Music)
Audio ducking is the secret to professional podcasts and videos. Instead of letting loud background music drown out your voiceover, use the Envelope Tool to manually “duck” (lower) the music exactly when you start speaking.
To do this, create four control points on your music track for every vocal segment. Place the first two points just before the vocals begin, dragging the second point down to lower the music volume. Place the final two points where the vocals end, dragging the last point back up to restore the music to its original volume. This creates a smooth, professional dip in the audio.
Taming Plosives and Harsh Breaths
Heavy breathing and harsh plosives (popping “P” and “B” sounds) can ruin a great vocal take. While you might be tempted to highlight and delete these noises entirely, cutting them out creates an unnatural, vacuum-like silence that distracts listeners.
Instead, zoom in closely on the waveform where the breath or plosive occurs. Use the Envelope Tool to place control points on either side of the noise. Gently pull the center of the envelope down. This reduces the harsh sound, turning a distracting gasp into a natural, quiet breath without ruining the pacing of your track.
Creating Custom Crossfades
A sudden cut between two different songs or audio clips sounds jarring. While Audacity has built-in fade effects, the Envelope Tool lets you draw custom crossfades to blend tracks together with ultimate precision.
Place the two audio clips on separate tracks and overlap them slightly on the timeline. On the top track, use the Envelope Tool to draw a downward slope, creating a smooth fade out. On the bottom track, draw an upward slope over the exact same duration to create a fade in. This manual method lets you dictate the exact speed, length, and curve of the transition for a flawless blend.
Envelope Tool vs. Auto-Ducking: Which Should You Use?
When mixing voiceovers with background music, you have two primary options: manually drawing volume curves with the Envelope Tool or applying the automated Auto Duck effect. Choosing the right method depends entirely on the length of your project and the level of precision you need.
Here is a quick comparison to help you choose the right workflow:
| Feature | Manual Envelope Tool | Auto Duck Effect |
|---|---|---|
| Best For | Short clips, single tracks, and surgical audio repairs. | Long podcasts, interviews, and multi-track sessions. |
| Pros | Offers ultimate precision. You control the exact slope and timing of every volume change. | Fast and automated. Instantly lowers background music whenever a voice is detected. |
| Cons | Highly time-consuming and tedious to apply across a long audio file. | Offers less granular control. Can sound robotic if attack and release times are wrong. |
When to Use the Envelope Tool
Reach for the Envelope Tool when you need absolute control over your audio. It is perfect for short-form content, single-track edits, or fixing precise moments like a harsh breath or a sudden volume spike. Because you place every control point manually, the fades sound exactly how you want them to. However, drawing dozens of nodes across a long audio file quickly becomes tedious.
When to Use Auto-Ducking
If you are editing a long-form podcast or YouTube video with continuous background music, use Audacity’s built-in Auto Duck effect. This tool “listens” to your voiceover track and automatically dips the music volume whenever you speak. It saves hours of manual editing time. Just be careful to test your attack and release times (how fast the volume drops and recovers). If these are too aggressive, the music will “pump” in and out unnaturally.

Pro Tip: Stop Fixing Bad Audio in Post-Production
Spending hours manually drawing envelope points to fix drastic volume spikes—like sudden laughter or yelling—is a symptom of poor recording levels. The Envelope Tool is great for fine-tuning, but it should not be your primary rescue tool for bad audio.
Here is the hard truth about digital audio: if your recording clips (hits the red and distorts) because the input was too loud, the Envelope Tool cannot fix the distortion. Lowering the volume of a clipped waveform just leaves you with quieter, crunchy-sounding audio.
If you constantly fight volume spikes in post-production, it is time to upgrade your source audio. The Hollyland LARK MAX 2 is the ultimate preventative solution for unpredictable volume changes.


Featuring 32-bit Float Recording, the LARK MAX 2 ensures your audio never distorts, even during sudden screaming or explosive laughter. You capture a massive dynamic range, meaning digital clipping is completely eliminated at the hardware level.
Beyond preventing distortion, it delivers studio-quality 48kHz/24-bit audio and features professional ENC (Environmental Noise Cancellation) to keep your tracks clean. You can even monitor your levels wirelessly in real-time using their new OWS earphones.
Capture pristine, distortion-free audio at the source instead. You will drastically cut down your Audacity editing time and stop relying on the Envelope Tool to save ruined takes.
Common Mistakes When Using the Envelope Tool
Even experienced audio editors trip up when manually automating volume. Avoid these three common pitfalls to keep your workflow fast and your audio sounding professional.
1. Pushing Into the Red (Clipping)
The Envelope Tool lets you amplify quiet sections, but there is a hard ceiling. If you drag a control point too high and push the waveform past the top or bottom borders of the track, you will cause digital clipping.
This results in harsh, distorted audio that sounds terrible on playback and cannot be easily fixed. Always keep an eye on your playback meter and ensure your highest volume peaks stay safely in the green (around -6dB to -3dB).
2. Using Too Many Control Points
It’s tempting to micromanage every single syllable or breath by clicking and adding dozens of nodes. However, using too many control points creates a jagged, messy amplitude envelope.
This leads to an unnatural, distracting “pumping” sound where the volume rapidly bounces up and down. For the most natural-sounding transitions, use the absolute fewest points necessary to create smooth, gradual slopes.
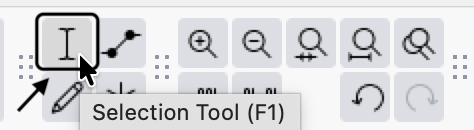
3. Forgetting to Switch Back to the Selection Tool
This is arguably the most common beginner frustration in Audacity. After finishing your volume adjustments, you might try to highlight a section of audio to edit, only to accidentally create a cluster of unwanted envelope points.
This happens because the Envelope Tool remains active until you manually turn it off. Always remember to press F1 (or click the standard cursor icon at the top) to immediately switch back to the Selection Tool the moment you finish shaping your audio.

Frequently Asked Questions (FAQ)
How do I reset or remove all envelope points in Audacity?
Audacity does not currently feature a one-click “clear all” button for volume automation. To remove envelope points, you must click and drag each control point completely off the top or bottom edge of the track until it disappears. If you just made a mistake, you can always press Ctrl + Z (or Cmd + Z on Mac) to undo your most recent clicks.
Why is my Audacity envelope tool not working?
If you are struggling to adjust your audio limits, check these three common culprits:
- You are in the wrong mode: Ensure the Envelope Tool is actually active. Press F2 on your keyboard or click the icon featuring two white arrows pinching a blue line.
- The track is too small: If your track height is minimized, grabbing the blue boundary line is nearly impossible. Hover over the bottom edge of the track header and drag downward to expand it.
- The track is muted: If the track is grayed out, you won’t hear any of your volume adjustments. Make sure the “Mute” button on the left-hand track panel is toggled off.
Can you copy and paste envelope points in Audacity?
No, Audacity has strict limitations regarding copying and pasting automation data. While copying an entire audio clip will bring its attached envelope points along with it, you cannot copy an envelope pattern independently to paste onto a completely different track. If you need identical volume dips across multiple tracks, using the built-in Auto Duck effect is a much more efficient workflow.
Conclusion & Next Steps
The Audacity Envelope Tool is your best friend for precise volume automation. Whether you are manually ducking background music, taming harsh breaths, or creating custom crossfades, it gives you the granular control needed to make dynamic, polished audio without relying on static volume adjustments.
To master this feature, load a test track into Audacity. Practice plotting control points and adjusting the amplitude to see exactly how the waveform responds to your custom fades.
If you want to drastically cut down the time you spend manually fixing volume spikes in post-production, consider upgrading your source audio.
The Hollyland LARK MAX 2 features 32-bit Float Recording, ensuring your audio never distorts or clips—even during sudden loud noises. By capturing perfect levels at the source, you can spend less time drawing envelope points and more time publishing great content.