


.png)
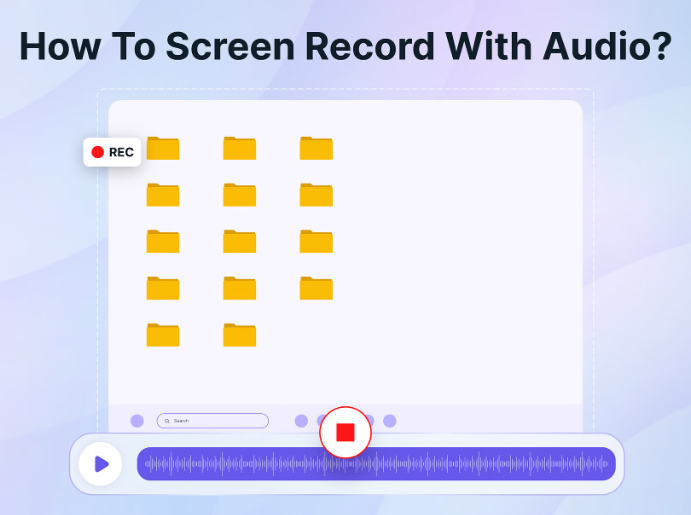
Screen recording with audio has become an essential tool for various purposes, including tutorials, presentations, gaming, and remote collaboration. Whether you’re a content creator, educator, or business professional, knowing how to effectively capture your screen with clear audio is invaluable. In this comprehensive guide, we’ll explore the basics, preparation, step-by-step instructions, tips for success, editing, sharing, and troubleshooting common issues associated with screen recording with audio.
Screen recording with audio allows you to capture everything happening on your screen along with any accompanying audio, whether it’s system sounds, microphone input, or both. This capability is invaluable for various tasks, including creating instructional videos, documenting software bugs, or simply sharing your screen with others. Audio enhances the viewer’s understanding and engagement by providing context, explanations, and instructions alongside visual content. Some of the common uses of screen recordings with audio are
- Creating tutorials and instructional videos
- Demonstrating software usage
- Recording presentations and lectures
- Sharing gameplay or software demonstrations
How to Screen Record with Audio on Windows
Windows 10 provides a built-in screen and audio recorder known as Xbox Game Bar. Originally intended for capturing game clips, this tool is now widely used for recording various activities on your desktop.
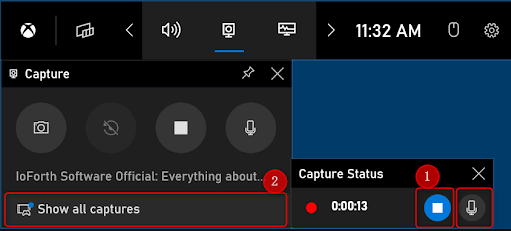
To utilize Xbox Game Bar for screen and audio recording on Windows 10, follow these steps:
- Open Game Bar Settings by clicking on Settings > Gaming. Toggle on the switch to enable the Xbox Game Bar recording feature.
- Press the Windows key + G simultaneously to open the Game Bar. Then, navigate to Settings > Capturing on the recording panel to select your audio recording source: Game, All, or None.
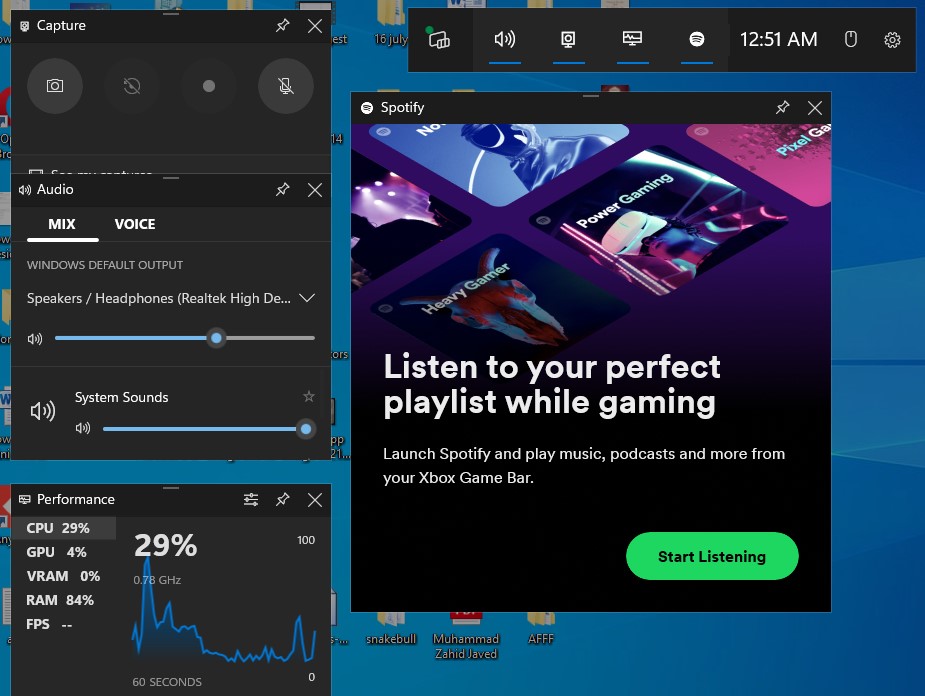
- Click on the Capture button and activate the microphone option if necessary. Once ready, press Windows key + Alt + R to commence recording.
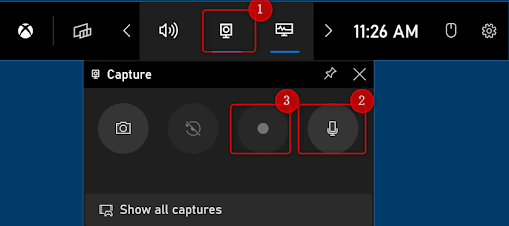
- To access your recordings, simply click on “show all captures.
Using Third-Party Softwares
While built-in tools like Xbox Game Bar offer convenience, third-party software introduces a broader range of functionalities tailored to suit diverse recording needs. Here’s the list of a few third party options for screen recording with audio on windows:
- Camtasia
- iSpring Suite
- OBS Studio
- Loom
- Apowersoft
- ScreenPal
How to Screen Record with Audio on Mac
QuickTime Player, a built-in tool available for free on every macOS version. QuickTime Player not only serves as a reliable media player but also offers screen recording capabilities, simplifying the process of capturing your screen activities.
However, QuickTime Player faces a limitation on macOS, it doesn’t record system audio. Nevertheless, there’s a workaround to overcome this obstacle and record both system audio and microphone sound using QuickTime Player. By leveraging QuickTime Player in conjunction with Soundflower, a free and open-source macOS extension, you can seamlessly pass audio from one application to another.
Here’s a step-by-step guide to screen record on Mac with audio using QuickTime Player and Soundflower:
- Step 1: Download and install Soundflower onto your Mac.
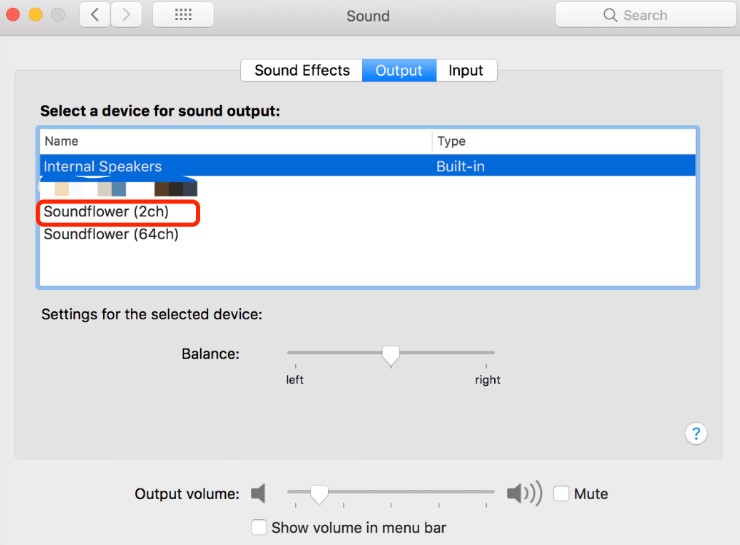
- Step 2: Set Soundflower as your audio output device by navigating to “System Preferences” > “Sound” > “Output” and selecting Soundflower (2ch).
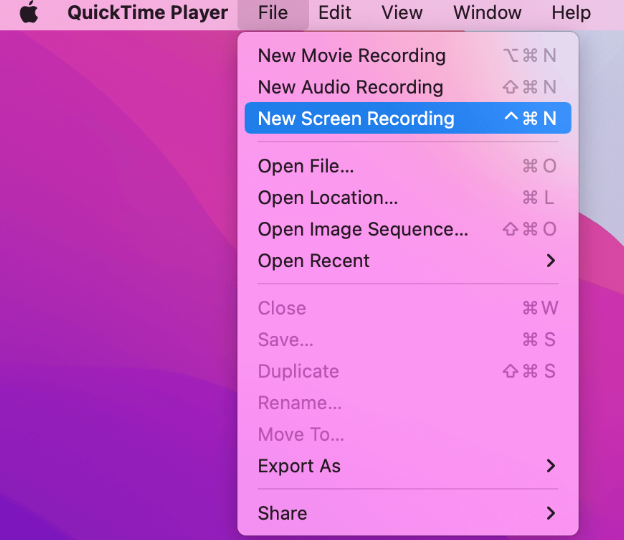
- Step 3: Open the QuickTime Player app and access the “Files” menu in the Menu bar. Then, choose “New Screen Recording.”
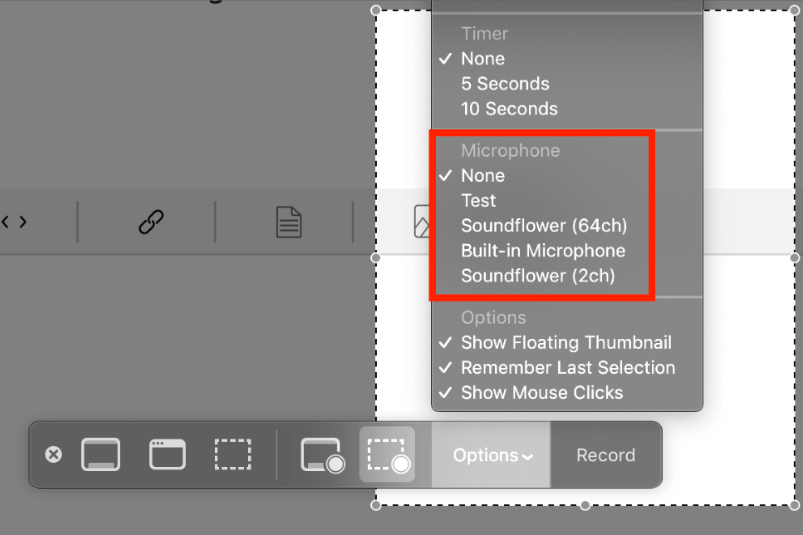
- Step 4: In the screen recording control bar, click “Options” and ensure that “Soundflower (2ch)” is checked in the “Microphone” option. This allows QuickTime Player to capture internal audio by rerouting the system audio output to the microphone input.
- Step 5: Select either “Record Entire Screen” or “Record Selected Portion.” If opting for the latter, adjust the recording area accordingly. Once prepared, click “Record” to commence recording.
- Step 6: To conclude the recording, click the Stop icon in the menu bar or use the shortcut Command + Control + Esc.

- Step 7: The preview of your recorded video will appear automatically. Remember to revert to your default sound output device in “System Preferences” to restore audio playback on your Mac.
Using Third-Party Options
Many third-party software offerings integrate seamlessly with MacOs devices, ensuring compatibility and ease of use across a wide range of environments. Here’s the list of a few third-party options to consider for recording screen with audio for mac
- ClickUp
- Camtasia
- OBS Studio
- ScreenRec
- Icecream Screen Recorder
- Snagit
- Screencastify
How to Screen Record with Audio on iOS Devices
To screen record on your iPhone with audio, follow these steps:
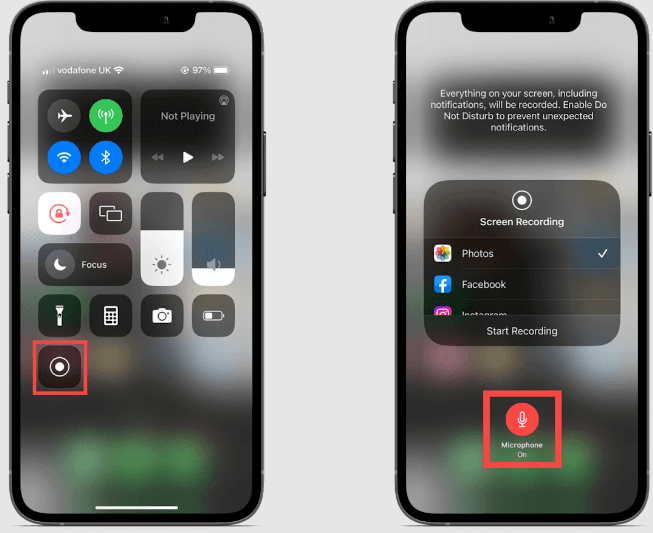
Step 1: Enable screen recording in the Control Center
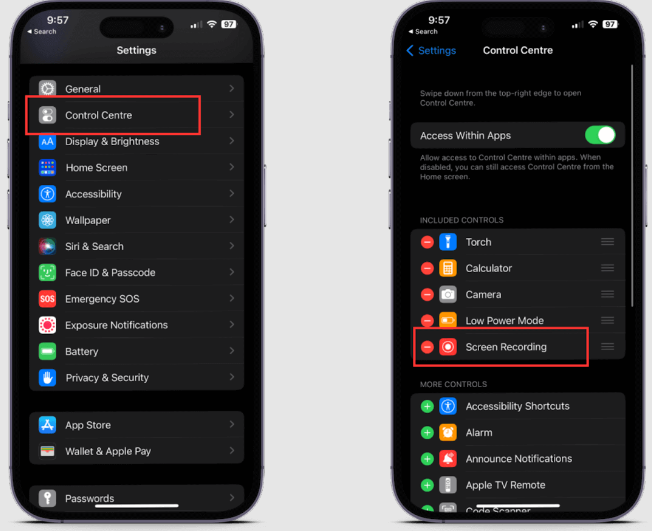
- Navigate to Settings and select Control Center.
- Locate the screen recording feature and drag it up into the Included Controls section.
Step 2: Open your Control Center
- Swipe down from the top middle of your iPhone screen to access the Control Center.
- Locate the screen recording button—a small circle icon.
Step 3: Turn on microphone access
- Long-press the screen recording button to initiate a new recording.
- A new tab will appear with recording options, including the ability to enable microphone access for recording system sound alongside your screen.
Step 4: Start and stop recording
- Once microphone access is enabled, start a new screen recording with audio. You’ll receive a three-second countdown before the recording begins.
- The clock on your device will display a red background to indicate that recording is in progress.
- Tap this area to stop recording. The video file will automatically save to your iPhone photo library.
Utilizing Third Party Options
Third-party apps options frequently provide greater control over recording settings, enabling you to optimize parameters such as resolution, frame rate, and audio quality to suit your specific requirements. Here’s the list of a few iPhone apps to screen record with audio:
- DU Recorder
- Screen Recorder Pro
- Screen Recorder+
- Screen Recorder: Video Capture
- Full Screen Video Recorder
- Display – Screen Recorder
- ApowerREC
How to Screen Record with Audio on Android Devices
There is no native method to simultaneously record your screen and microphone on Android devices. You can either record your Android screen and capture your voice using a separate device, or explore third-party apps for this functionality.
Android’s Screen Recorder
Procedure for Capturing Video with Android’s Screen Recorder:
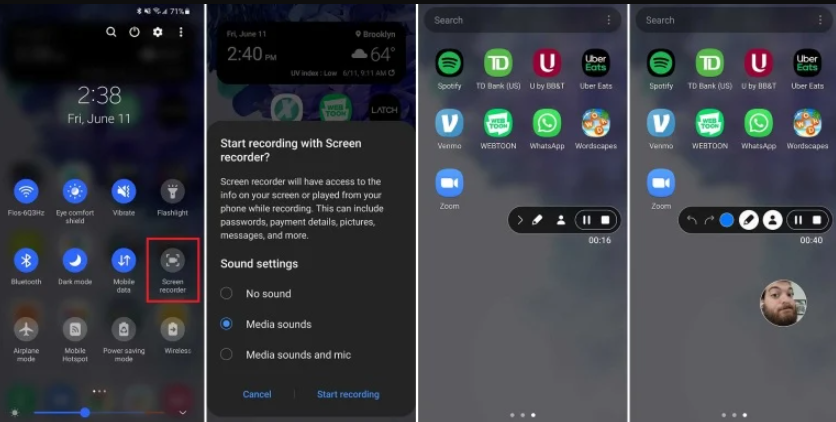
Step 1: Access the Screen Recorder
- Pull down the notification shade from the top of your Android device’s screen to reveal quick settings options.
- Locate and tap the Screen Recorder icon to initiate the screen recording process.
- Grant permission for the device to record the screen when prompted.
Step 2: Configure Recording Settings
Decide whether to include sounds and screen touches in the recording based on your preferences.
Step 3: Start Recording
- Tap the “Start recording” button to commence the recording process.
- A countdown will begin, indicating when the recording will start.
Step 4: Utilize Additional Features (For Samsung Devices)
- If you’re using a Samsung device, a toolbar will appear with extra functionalities.
- Options may include drawing on the screen, activating the front-facing camera, and pausing the recording.
Step 5: Stop Recording
- To stop the recording, tap the designated button on the toolbar or in the screen recording interface.
- Upon cessation, the recorded video will be automatically saved to your device’s media storage.
Google Play Games
Procedure for recording gameplay With Google Play Games:
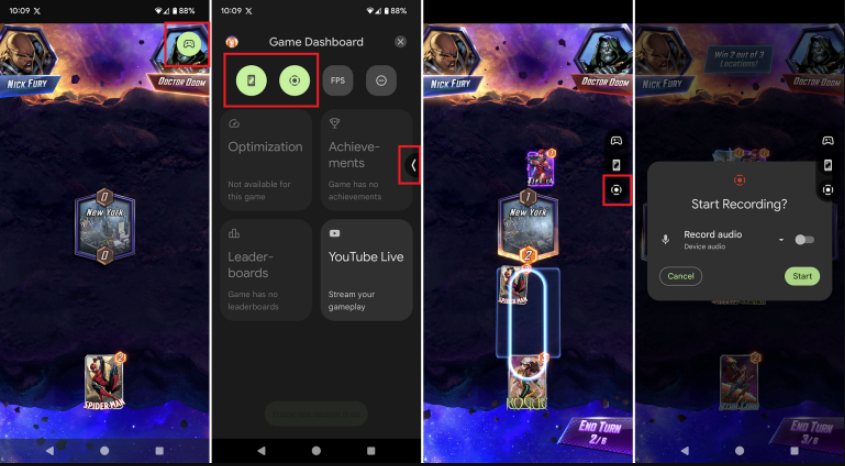
Step 1: Access Google Play Games
Open the Google Play Games app on your Android device.
Step 2: Select a Compatible Game
Choose a game from the available options on the Home tab or select a title you’ve previously downloaded.
Step 3: Verify Recording Capability
Swipe down from the top of the screen and look for a game controller button. If present, your device supports gameplay recording.
Step 4: Enable Recording Shortcuts
Tap the gamepad icon, then select the shortcut icons you wish to enable for recording.
Step 5: Initiate Recording
- To begin recording gameplay, tap the Recording shortcut to add the recording icon to the shortcut menu.
- Tap the arrow on the side of the screen and select the Recording option.
- Choose whether to record sound, then select “Start” and “Start now” to commence recording.
Step 6: Cease Recording
- When you’re finished recording, tap the Recording button again to stop the recording process.
- The recorded clip will automatically save to your device for future viewing and sharing.
Utilizing Third-Party Options
If you’re using an older version of Android or seeking enhanced functionalities beyond Google’s native options, numerous third-party apps available on the Play Store can meet your needs. Here are some popular choices:
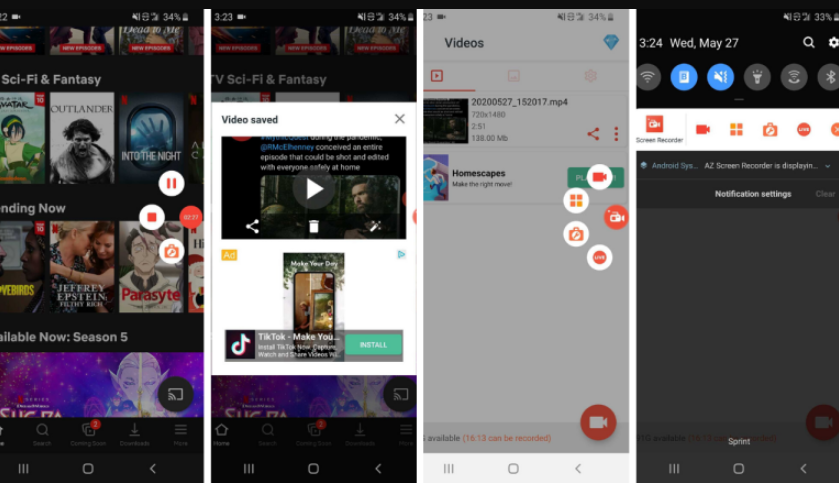
- ADV Screen Recorder: This free app offers comprehensive features, including screen recording with the ability to pause, front-facing camera view, screen touch display, and drawing capabilities. Additionally, it allows users to customize settings such as resolution, bit rate, frame rate, video orientation, and microphone settings.
- AZ Screen Recorder: AZ Screen Recorder is a free app with optional ad support and an ad-free upgrade priced at $2.99. It enables users to record and pause video, capture screenshots, and initiate live video sessions. The app provides convenient control options through the phone’s notification shade and overlay button. Users can also adjust settings like resolution, frame rate, bit rate, device orientation, time lapse, and audio preferences.
Editing and Sharing Your Recording
After completing your screen recording with audio, you might want to edit it before sharing. Most recording software offers basic editing tools like trimming and adding annotations.
Editing Your Recording
- Perform trimming or cutting actions according to your need.
- Refine your footage by removing errors and unnecessary sections.
- Add text overlays or highlights to emphasize key points.
- Do audio level adjustments and noise reduction if there is any.
Exporting Your Recording
- Export the edited recording in a suitable format.
- Consider compressing large files for easier sharing.
Sharing Your Recording
- Upload to platforms like YouTube, Vimeo, or Twitch.
- Share the direct link or embed it on your website for wider visibility.
Troubleshooting Common Issues
- Audio Not Recording or Low Quality: Check microphone settings and connections, adjust audio levels, and consider using external microphones for better quality. Ensure that the microphone is selected as the default recording device in the system settings and test the microphone before recording to identify any issues.
- Video Lagging or Poor Quality: Close unnecessary applications, reduce recording resolution or frame rate, and ensure sufficient system resources for smooth performance. Check system specifications and upgrade hardware if necessary to handle the demands of recording.
- File Size Too Large: Compress the video file using video editing software or choose a lower resolution/format for recording.
- Compatibility Issues with Playback Devices: Ensure that the video format is compatible with the intended playback devices and software.
Tips for Enhancing Screen Recording with Audio
- Place the microphone strategically and ensure a quiet recording environment.
- Minimize background noise to enhance the clarity of the audio.
- Consider the resolution and frame rate settings for optimal video quality.
- Ensure smooth performance by adjusting recording settings and minimizing system load.
- Respect copyright laws and adhere to fair use principles when recording audiovisual content.
- Be mindful of privacy issues and obtain consent when recording sensitive or private information.
Bonus Tip: Upgrade your screen recording setup with the Hollyland Lark C1 Microphone for crystal-clear wireless audio capture. Enjoy convenience, high-quality sound, and versatile compatibility for professional-grade recordings.
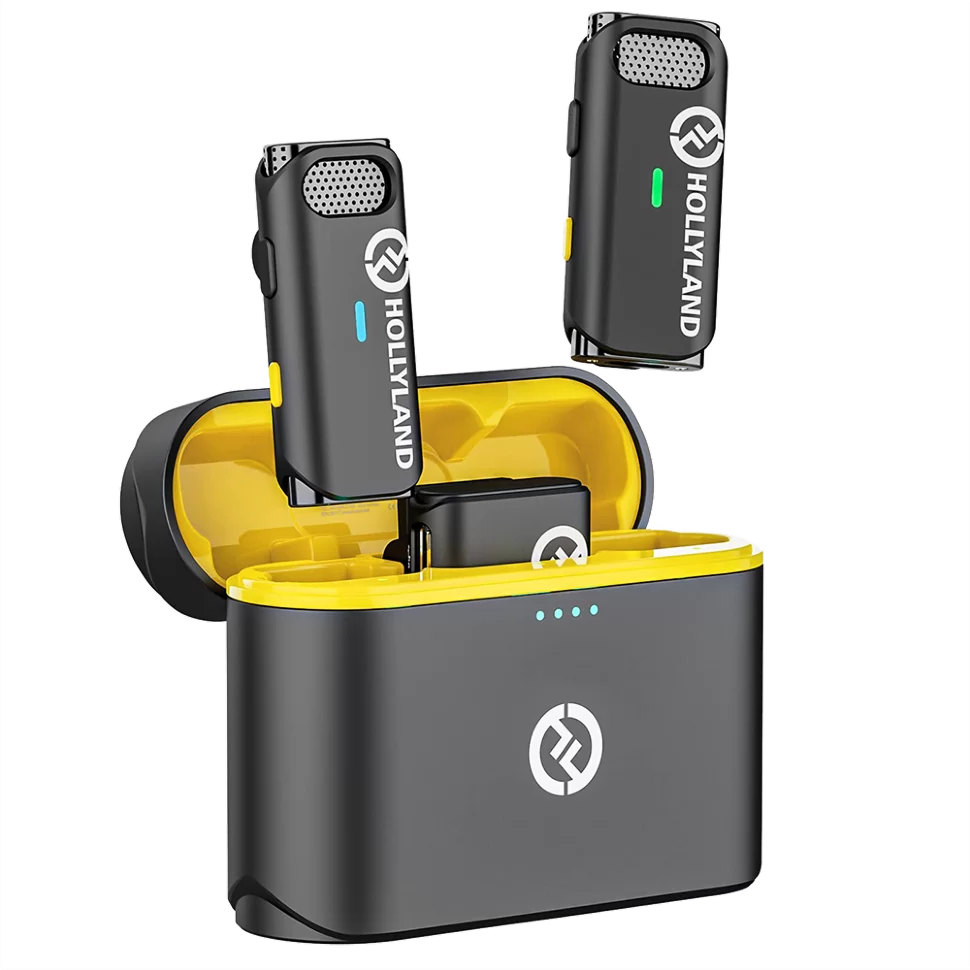
Hollyland Lark C1 - Wireless Microphone for Mobile
A plug-and-play wireless microphone system designed for mobile devices.
Key Features: MFi-certified | Hi-Fi Audio | 32 Hours Duration
Conclusion
In conclusion, mastering the art of screen recording with audio opens up a world of possibilities for content creators, educators, and professionals alike. By following the tips outlined in this guide, you can ensure clear audio quality, optimize video output, and navigate legal and ethical considerations with confidence. Whether you’re creating tutorials, capturing gameplay footage, or documenting software bugs, these insights will help you produce polished recordings that effectively convey your message to your audience.
We value your opinion! Share your thoughts on our screen recording guide. Did you find the tips helpful? Were there any areas you’d like to see expanded upon? Your feedback helps us improve and tailor our content to better serve your needs. Leave your comments below!
Frequently Asked Questions
Can I Record System Audio and Microphone Audio Simultaneously?
Yes, many screen recording software programs allow you to capture both system audio (such as computer sound) and microphone audio simultaneously. You can usually adjust these settings within the recording software itself.
Why Is My Screen Recording Without Sound?
If your screen recording doesn’t have sound, it could be due to several reasons, such as incorrect audio settings, muted microphone, or incompatible recording software. Check your recording software settings, ensure the microphone is enabled, and verify that your system audio settings are configured correctly.
How Do I Improve the Audio Quality in My Screen Recordings?
To improve audio quality in screen recordings, consider using an external microphone for better sound capture, adjusting microphone input levels to prevent distortion, and minimizing background noise. Additionally, selecting the appropriate recording software with audio enhancement features can help improve audio quality.
Are There Any Free Tools for Screen Recording with Audio?
Yes, there are several free screen recording tools available that allow you to capture both screen activity and audio. Some popular options include OBS Studio, ShareX, and QuickTime Player (for macOS). These tools offer basic and advanced features for screen recording without requiring a subscription or payment.


